Greetings friends of the Hive DIY community. Today I find myself engaged in a challenge that I imposed on myself, it turns out that last Mother's Day, my mom let me know that no matter how many ornaments I make for her, she will always have a place in the house for them. Faced with such news, I had no choice but to laugh, as I imagined my mom's house as a huge shelf at a craft fair. In the end, I accepted the challenge and today I bring you one of the pieces that is destined to decorate my mom's house.
In today's tutorial I will be showing you step by step how to make a wall ornament created with recycled cardboard and fomi. To make this ornament it will be necessary to cover a cardboard surface with small rectangles, and then apply a layer of kitchen paper smeared with flour-based glue. After drying, the whole piece will be painted white and the rectangular surfaces will be painted red, as if it were a small brick wall. Next, we will cut out the rest of the pieces in fomi and we will place and glue them on the mini brick wall.
As always, I ask you to leave any questions or suggestions in the comments section. I will be happy to read and answer them. And don't forget to follow me, remember that very soon I will be back here sharing with you another little piece of my creative world.
Spanish Version Here
Saludos amigos y amigas de la comunidad Hive DIY. El día de hoy me encuentro enfrascado en un reto que me impuse a mí mismo, resulta que el pasado Día de las Madres, mi mamá me hizo saber que no importa cuántos adornos le haga, siempre va a tener un lugar en la casa para ellos. Ante semejante noticia, no tuve más opción que reírme, pues me imaginé la casa de mi mamá como una enorme estantería de una feria de artesanía. Al final, acepté el reto y el día de hoy les traigo una de las piezas que tiene como destino adornar la casa de mi mamá.
En el tutorial de hoy les estaré mostrando paso a paso cómo confeccionar un adorno de pared creado con fomi y cartón reciclado. Para la fabricación de dicho adorno será necesario cubrir una superficie de cartón con pequeños rectángulos, para luego aplicarles una capa de papel de cocina untado de pegamento con base de harina. Luego de secarse, se pintará toda la pieza de blanco y las superficies rectangulares de rojo, como si fuera un pequeño muro de ladrillos. A continuación, recortaremos las demás piezas en fomi y las iremos colocando y pegando sobre el mini muro de ladrillos.
Como siempre, les pido que cualquier duda o sugerencia la dejen en la sección de comentarios. Estaré encantado de leerlos y responderles. Y no olviden seguirme, recuerden que muy pronto volveré a estar por aquí compartiendo con ustedes otro pedacito de mi mundo creativo.
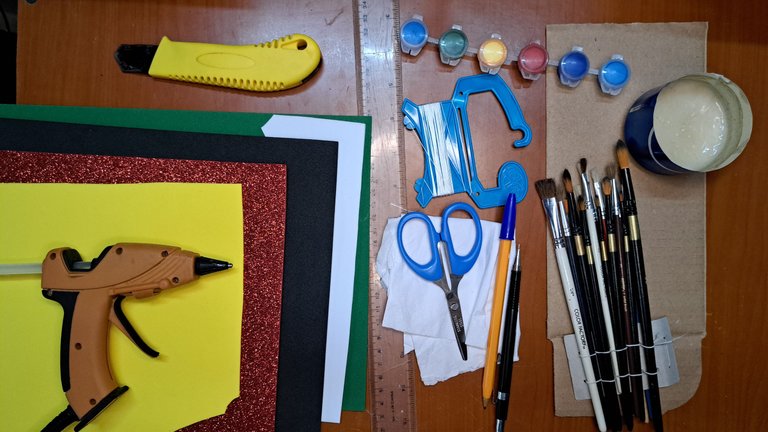
Materials // Materiales
| ✔️ Smooth foam in green, white, black, and yellow | ✔️ Fomi liso verde, blanco, negro y amarillo |
| ✔️ Red glittery foam | ✔️ Fomi escarchado rojo |
| ✔️ Recycled cardboard | ✔️ Cartón reciclado |
| ✔️ Red and white paint | ✔️ Pintura roja y blanca |
| ✔️ Brushes | ✔️ Pinceles |
| ✔️ Silicone gun | ✔️ Pistola de silicona |
| ✔️ Twine | ✔️ Cordel |
| ✔️ Scissors and cutter | ✔️ Tijeras y cortador |
| ✔️ Flour-based glue | ✔️ Pegamento con base de harina |
| ✔️ Kitchen paper | ✔️ Papel de cocina |
| ✔️ Ruler, pen, and marker | ✔️ Regla, bolígrafo y marcador |
⚜️ Finished Work // Trabajo Terminado ⚜️
 |
 |
 |
 |
 |

Thank you very much for reading my post. If you liked it, please leave a comment and consider following me so you don't miss my next posts. I'd love to know your opinion and your thoughts about the topic I discussed in this post, see you in the next one!
Credits and Resources // Créditos y Recursos
Cover page created in Canva Pro
Translated by DeepL
Video and images captured with my Samsung Galaxy A53 5G
Edited in Wondershare Filmora 13
Music by Mike Kripak from Pixabay


▶️ 3Speak
Saludos amigo, que bueno ese trabajo que nos compartes, donde es fascinante la manera como usas esos materiales y así poder conseguir una pieza única. Me gusto la manera como haces los ladrillos y le da un toque especial a esa gran manualidad. Ahora cuenta con un nuevo adorno.
La parte de hacer los ladrillos fue mi favorita. Este será uno de muchos que tienen como destino la pared de la casa de mi mamá. Gracias por comentar.
Creativity and order! giving good results! good job! Greetings!
Thank you very much, I thank God for always having some inspiration.
Hermosa decoración, muy creativo. Me encantó.
Muchísimas gracias. Tenía mis dudas sobre el contraste del rojo brillante sobre el rojo liso, pero quedó bastante bien.
Hermosa pieza, disfruté cada paso. Te felicito quedó muy bien. Gracias por compartir tu creatividad. Saludos 🌺🌷🌹💐🌻
Gracias a ti por pasar y dejar tan hermoso comentario.