
Buenas noches queridos creadores y amigos que hoy me visitan.
Bienvenidos sean todos.
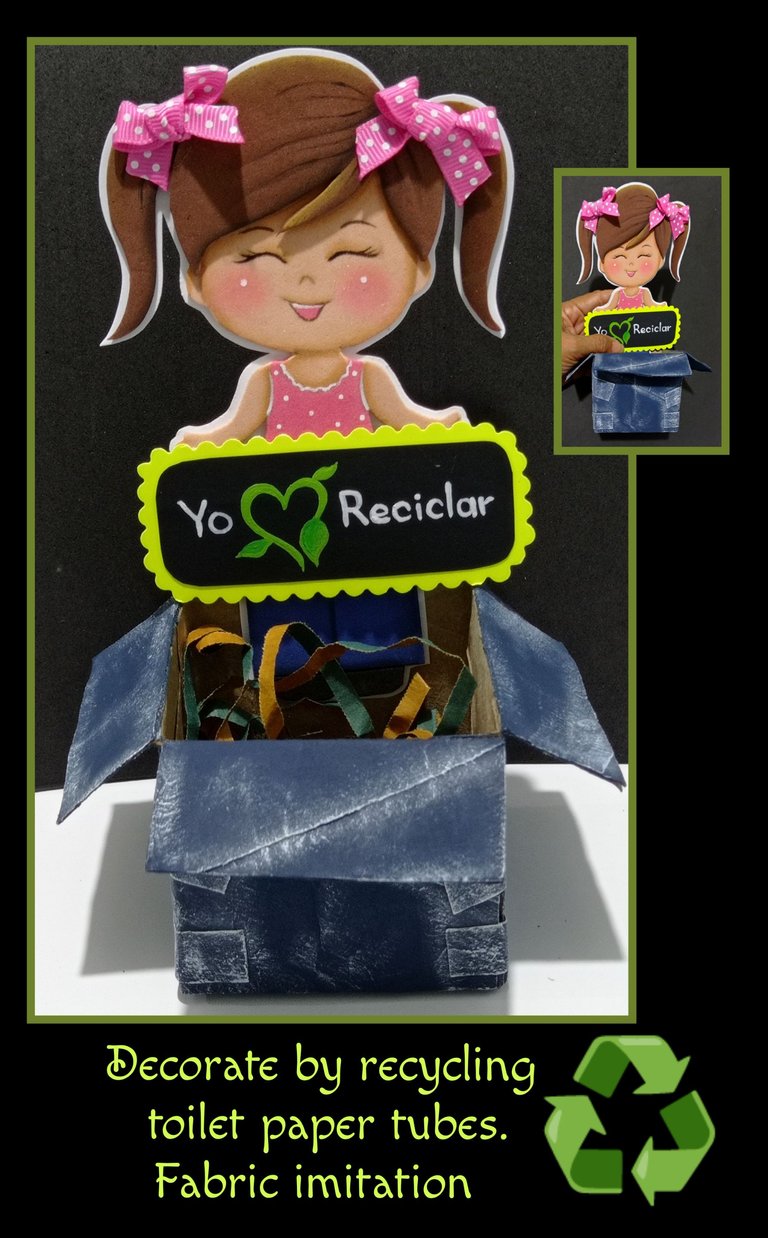
Y como hace días atrás, exactamente el 17 se celebró el día mundial del reciclaje, quise aprovechar para hacer este adorno al que le puedes dar cualquier uso y a la vez mostrarte como dar buen uso a algunos materiales que se desechan.
Entonces te invito a que me acompañes en el proceso.
Necesitarás:

| 4 Tubos de papel higiénico | Pinturas y pinceles |
|---|---|
| Retazos de foami y cartulina | Tijera |
| Lápiz, borrador | Tiza |
| Dibujo | Silicón |
| Cinta de tela | Palito de madera |
Comencemos:
Paso 1:

- Recorta los tubos por la mitad y recorta al tamaño que desees, luego estira pasando la mano o coloca sobre ellos un objeto pesado o trata de doblar un poco al lado contrario para quitar la curva, después marca una pestaña de 3cms de ancho en la parte superior y haz una línea en el centro y con la punta de la tijera pasa haciendo un poquito de presión para que sea fácil de doblar tratando que no se quiebre, te quedarán 2 lados de 7cms c/u, dobla como se vé en la foto 3, así harás 2 piezas para formar los cuatro (4)lados.
- Aparte, marca un cuadrado de 6,7cms y aumenta una pestaña de 1,5cm por cada lado, recorta en las esquinas, dobla y pega para formar la base, deja secar y pega los laterales para armar la caja.
- Recorta una tira de cartón de 1,5 cms y recorta pedacitos de 3cm y pega para unir los lados y por el lado de adentro pega tiras de cartón para reforzar (foto 7).
- Así quedará la caja.
Paso 2:

- Ahora comienza a pintar con azul intenso, deja secar y pasa otra mano de pintura.
- Luego moja en pintura blanca un pincel de cerdas duras, pasa sobre un cartón o tela (como barriendo) hasta que el pincel ya casi no suelte pintura y comienza a pasar por las orillas de la caja y en los cuadritos para que semejen parches, recuerda! dejar secar y repetir.
Y cada vez que mojes el pincel seca bien para aplicar sobre el cartón.
Paso 3:

- Remarca el dibujo con lápiz de mina blanda, luego transfiere sobre el foami y recorta todas las piezas.
- Ahora moja el pincel y pintura color piel y comienza a pintar la carita y piezas del cuerpo de la muñequita.
- Pinta ojos con marcador punta fina o pincel y pinta los demás rasgos.
- Deja secar, aplica silicón y comienza a armar, pega sobre cartulina y recorta dejando un pequeño borde.
Paso 4:

- Recorta un rectángulo en cartulina negra y haz la escritura con lápiz de mina.
- Aparte pinta con pintura blanca las palabras y el corazón, deja secar y pinta con verde el corazón.
(Nota: Cuando pintes sobre colores oscuros recuerda poner de base pintura blanca o colores claros para que el color dé su tono real.) - Si gustas puedes montar el texto sobre cartulina verde o amarilla y pega sobre la muñeca justo en las manitos.
Paso 5:

- Lista la muñequita, pinta lunares en la blusa, haz dos lacitos de tela y pega en los moños.
- Por último pega en uno de los laterales.
Ahora te muestro unas fotos con el resultado final.


Fuentes:
https://www.pinterest.es/pin/476255729361453291/
https://www.pinterest.es/pin/476255729361455424/
Etiquetas: HTML
Editor de fotos: GridArt
Teléfono: Redmi Note 9
Llegó la hora de despedirme no sin antes recordarles la importancia de Reciclar ya que así contribuimos a cuidar nuestro planeta.
Espero les guste y sirva de guía mi publicación.
Hasta mi próxima publicación.
Gracias por visitarme.
Good evening dear creators and friends who visit me today.
Welcome to all of you.
And since a few days ago, exactly on the 17th, the world recycling day was celebrated, I wanted to take the opportunity to make this ornament that you can give any use and at the same time show you how to make good use of some materials that are discarded.
So I invite you to join me in the process.
You will need:
| 4 toilet paper tubes | Paints and brushes |
|---|---|
| Pieces of foami and construction paper | Scissors |
| Pencil, eraser | Chalk |
| Drawing pencil | Silicone |
| Cloth tape | Wooden stick |
Let's get started:
Step 1:
- Cut the tubes in half and trim them to the size you want, then stretch them by hand or place a heavy object on them or try to bend them a little to the opposite side to remove the curve, then mark a 3 cm wide flange at the top and make a line in the center and with the tip of the scissors go through making a little pressure to make it easy to bend trying not to break, you will have 2 sides of 7 cm each, fold as seen in photo 3, so you will make 2 pieces to form the four (4) sides.
- Mark a 6.7 cm square and add a 1.5 cm flange on each side, cut out the corners, fold and glue to form the base, let dry and glue the sides to assemble the box.
- Cut a 1.5 cm strip of cardboard and cut 3 cm pieces and glue to join the sides and on the inside glue strips of cardboard to reinforce (photo 7).
- This is how the box will look like.
Step 2:
- Now start painting with deep blue paint, let it dry and apply another coat of paint.
- Then dip a stiff bristle brush in white paint, pass over a cardboard or cloth (as if sweeping) until the brush hardly releases any paint and begin to pass along the edges of the box and in the squares to resemble patches, remember! let dry and repeat.
And every time you wet the brush dry well to apply on the cardboard.
Step 3:
- Outline the drawing with a soft lead pencil, then transfer onto the foami and cut out all the pieces.
- Now wet the brush and skin-colored paint and start painting the doll's face and body parts.
- Paint eyes with a fine tip marker or brush and paint the rest of the features.
- Let dry, apply silicone and begin to assemble, paste on cardboard and cut leaving a small border.
Step 4:
- Cut out a rectangle in black cardboard and make the writing with lead pencil.
- Then paint the words and the heart with white paint, let dry and paint the heart with green.
(Note: When painting on dark colors remember to use white paint or light colors as a base so that the color gives its real tone). - If you like you can mount the text on green or yellow cardboard and glue it on the doll right on the little hands.
Step 5:
- Once the doll is ready, paint polka dots on the blouse, make two little fabric bows and glue them on the bows.
- Finally glue on one of the sides.
Now I show you some pictures with the final result!
Source:
https://www.pinterest.es/pin/476255729361453291/
https://www.pinterest.es/pin/476255729361455424/
Tags: HTML
Photo editor: GridArt
Phone: Redmi Note 9
It is time to say goodbye, but not before reminding you of the importance of Recycling, as this way we contribute to take care of our planet.
I hope you like it and that my publication will serve as a guide.
Until my next publication.
Thank you for visiting me.
!discovery 40
Gracias por el apoyo.
This post was shared and voted inside the discord by the curators team of discovery-it
Join our Community and follow our Curation Trail
Discovery-it is also a Witness, vote for us here
Delegate to us for passive income. Check our 80% fee-back Program
Spectacular recycling work, an excellent creative process from toilet paper rolls. Thank you for your good work
Muchas gracias @diyhub por el apoyo a mi publicación y por su comentario.
Saludos.
Agradecida @innerblocks por el apoyo a mi trabajo.
Gracias Yennys por el apoyo!
Jamás había visto lo de imitar tela con cartón, pero debo decir que me encantó la idea. Me gustó mucho la manualidad.
Hola amigo!
Te cuento, comencé armando la caja y a medida que iba aplicando la pintura, idee darle con pincel al seco y semejar como tela de jeans, jajajaja... pero bueno eso fué un invento y creo no me quedó tan mala la idea. Por lo menos a ti te gustó!
Muy bonito trabajo, lo mejor es que todo fue elaborado con los tubos de cartón y ni parece que fuera de ese material, la muñequita también está preciosa 😊
Hola Maria, muchas gracias por tu comentario, y si esos tubos de cartón podemos elaborar un sin fin de cosas.
Saludos y feliz dia.
Me fascino el efecto de tela en el cartón, parece real, todo tu trabajo quedo perfecto, con muy bellos acabados y colorido, y el motivo del mensaje siempre será de mucha importancia para cuidar el planeta.
Saludos Laura, muchas gracias por tu comentario y que bueno, me alegra mucho que te haya gustado mi publicación.
Claro amiga, debemos cuidarlo!