

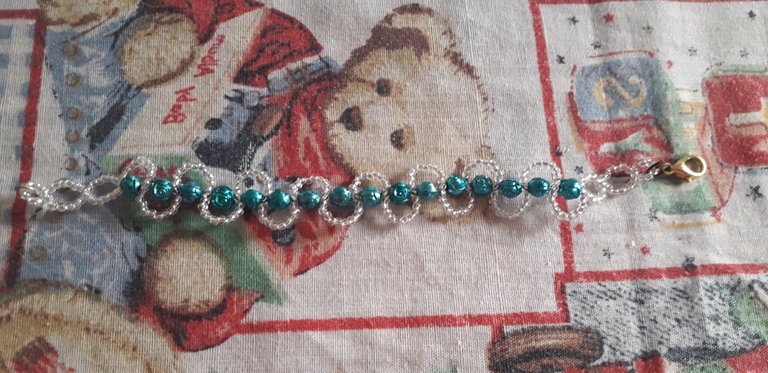
Buenas tardes queridos amigos de Hive y Jewelry, cómo están?, espero que estén muy bien y que hayan tenido y disfrutado de este bello día viernes. En esta preciosa tarde de les quiero compartir un sencillo tutorial para hacer esta bella pulsera de mostacillas y rosas de un color azul muy intenso que me gustó bastante cuando las compré. Esta pulsera es muy fácil de hacer y solo necesitaran estos dos materiales, mostacillas y rosas. A mi esta pulsera me encanta principalmente por el color de las rosas y que estás se ven reflejadas en las mostacillas trasparentes que completan este bello diseño, además son muy económicos y a mi me resultó fácil de conseguir. Espero les guste tanto como a mí.
Los Materiales que vamos a necesitar son:
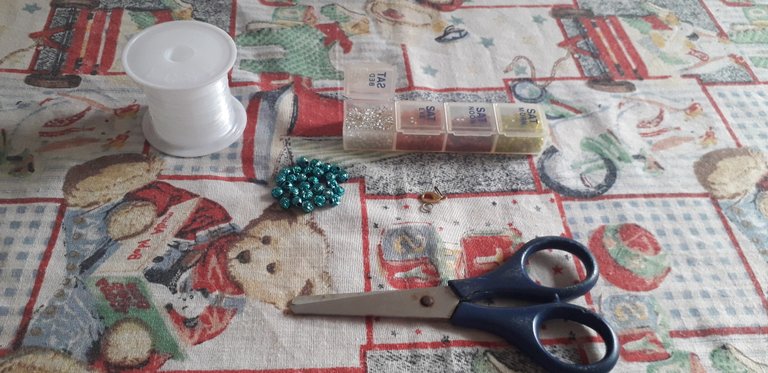
Mostacillas trasparentes
Broche y Argolla
1 mt de nylon 0,3
Procedimiento
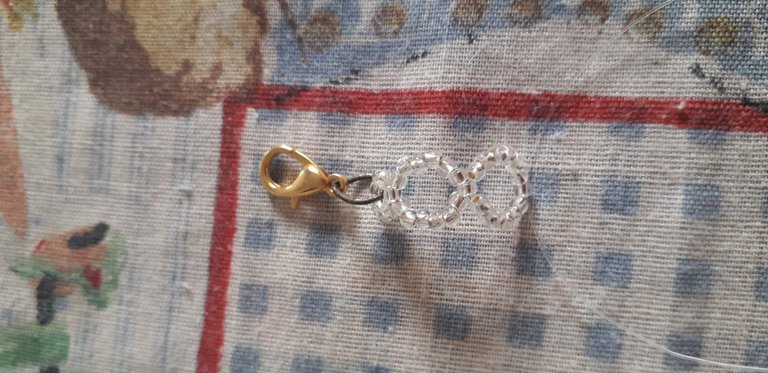
Para empezar vamos a insertar en el nylon 3 mostacillas trasparentes, el broche, 3 mostacillas trasparentes más y cruzamos por una nueva mostacilla trasparente, todo esto lo llevamos al centro del nylon para poder aprovechar todo el nylon que tenemos. Luego añadimos en cada nylon 6 mostacillas trasparentes y cruzamos por una nueva mostacilla, volvemos a añadir 6 mostacillas trasparentes en cada nylon y cruzamos por una nueva mostacilla trasparente.

Ahora comenzamos con la mejor parte del diseño, para lo cual añadimos en uno de los nylon 10 mostacillas trasparentes y en el otro nylon agregamos una rosa de color azul y cruzamos por una nueva mostacilla trasparente. Luego en el nylon opuesto a donde añadimos las mostacillas anteriormente insertamos nuevamente las 10 mostacillas trasparentes y en el otro nylon agregamos la rosa de color azul para volver a cruzar los nylon por una nueva mostacilla trasparente.
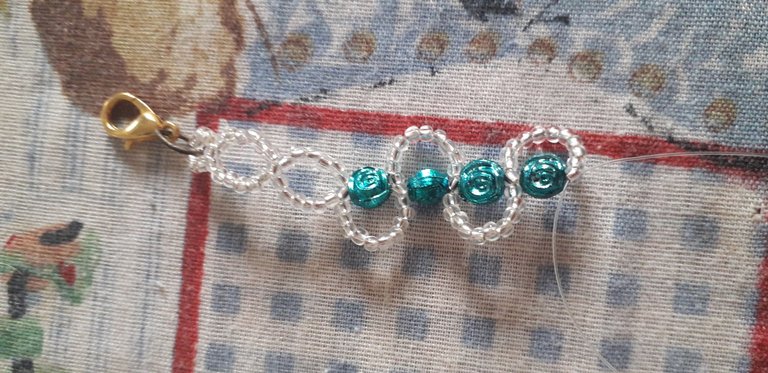
En el nylon opuesto a las mostacillas anteriores añadimos 10 mostacillas trasparentes más, en el otro nylon agregamos una rosa de color azul y cruzamos por una nueva mostacilla trasparente. Volvemos a insertar en el nylon opuesto a donde añadimos las mostacillas anteriormente las 10 mostacillas trasparentes y en el otro nylon agregamos la rosa de color azul para volver a cruzar los nylon por una nueva mostacilla trasparente.
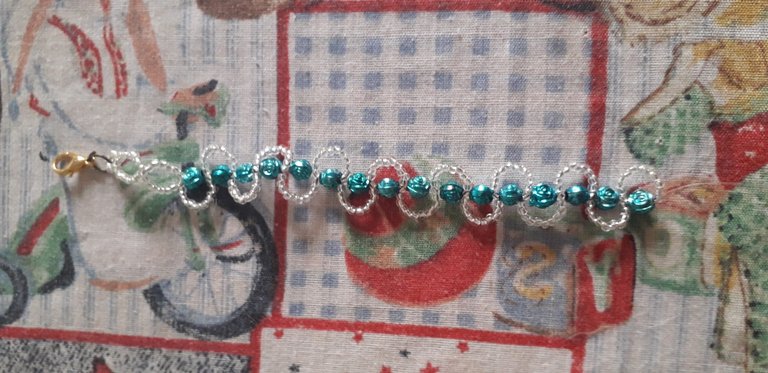
Repetimos el paso anterior 6 veces más o hasta que se tenga el largo de la pulsera deseado, es decir, según el nylon que tomemos tenemos que ver que se inserte en ese lado anteriormente para colocar una rosa o las 10 mostacillas trasparentes, si antes en ese lado están las 10 mostacillas en ese lado toca insertar una flor azul, igualmente si en ese lado anteriormente hay una rosa, esta vez tocará insertar las 10 mostacillas trasparentes y cruzamos por una nueva mostacilla trasparente. No se preocupen si al terminar un nylon queda más corto que el otro, es normal porque el largo del nylon usado en las mostacillas es más que el nylon en el que se insertan únicamente las rosas de color azul.
Ahora vamos a terminar nuestra pulsera, para esto añadimos 6 mostacillas trasparentes en cada nylon, cruzamos por una nueva mostacilla trasparente, añadimos nuevamente 6 mostacillas trasparentes en cada nylon y cruzamos por una nueva mostacilla trasparente, por último en cada nylon insertaremos 3 mostacillas trasparentes, en uno de los nylon agregamos la argolla y hacemos un nudo doble para asegurar bien que no se desarme la pulsera, cortamos el nylon sobrante y listo, terminamos.

Hasta la próxima 👋
Créditos
Traductor: App DeepL
Editores de fotos usados: editor de fotos Polish y Canva

Good afternoon dear friends of Hive and Jewelry, how are you, I hope you are very well and that you have had and enjoyed this beautiful Friday. In this beautiful afternoon I want to share with you a simple tutorial to make this beautiful bracelet of beads and roses of a very intense blue color that I liked when I bought them. This bracelet is very easy to make and you will only need these two materials, beads and roses. I love this bracelet mainly because of the color of the roses and that they are reflected in the transparent beads that complete this beautiful design, they are also very inexpensive and I found them easy to get. I hope you like them as much as I do.
Transparent beads
Brooch and ring
1 mt of nylon 0,3
Procedure
To start we are going to insert in the nylon 3 transparent beads, the clasp, 3 more transparent beads and we cross through a new transparent bead, all this we take it to the center of the nylon to be able to use all the nylon we have. Then we add in each nylon 6 transparent beads and cross through a new bead, we add again 6 transparent beads in each nylon and cross through a new transparent bead.
Now we start with the best part of the design, for which we add on one of the nylons 10 transparent beads and on the other nylon we add a blue rose and cross through a new transparent bead. Then in the nylon opposite to where we added the beads previously we insert again the 10 transparent beads and in the other nylon we add the blue rose to cross again the nylons by a new transparent bead.
In the nylon opposite to the previous beads we add 10 more transparent beads, in the other nylon we add a blue rose and cross through a new transparent bead. We insert again in the nylon opposite to where we added the previous beads the 10 transparent beads and in the other nylon we add the blue rose to cross again the nylons by a new transparent bead.
We repeat the previous step 6 more times or until you have the desired length of the bracelet, ie, depending on the nylon that we take we have to see that it is inserted on that side previously to place a rose or the 10 transparent beads, if before on that side are the 10 beads on that side touches insert a blue flower, likewise if on that side previously there is a rose, this time will touch insert the 10 transparent beads and cross by a new transparent bead. Do not worry if at the end one nylon is shorter than the other, it is normal because the length of the nylon used in the beads is longer than the nylon in which only the blue roses are inserted.
Now we are going to finish our bracelet, for this we add 6 transparent beads in each nylon, we cross by a new transparent bead, we add again 6 transparent beads in each nylon and cross by a new transparent bead, finally in each nylon we will insert 3 transparent beads, in one of the nylon we add the ring and we make a double knot to ensure that the bracelet is not disassembled, we cut the excess nylon and ready, we are done.
Until next time 👋
Credits
Translator: App DeepL
Photo editors used: Polish photo editor and Canva
Congratulations @dafne25! You have completed the following achievement on the Hive blockchain And have been rewarded with New badge(s)
Your next target is to reach 15000 upvotes.
You can view your badges on your board and compare yourself to others in the Ranking
If you no longer want to receive notifications, reply to this comment with the word
STOPCheck out our last posts:
Te quedo muy linda, pero lo que mas me gusta es el color de las rosas... me encanto... 😊