Español
Saludos comunidad🙋, quiero compartir con ustedes como comencé a la práctica del papel mache. Espero que sea motivo de inspiración para realizar este bello arte.
Muchas fueron las variantes que buscaron mis padres para que el ver tv no ocupara mi mayor tiempo en el día, pero le resultó difícil pues siempre de pequeña fue mi mayor entretenimiento.
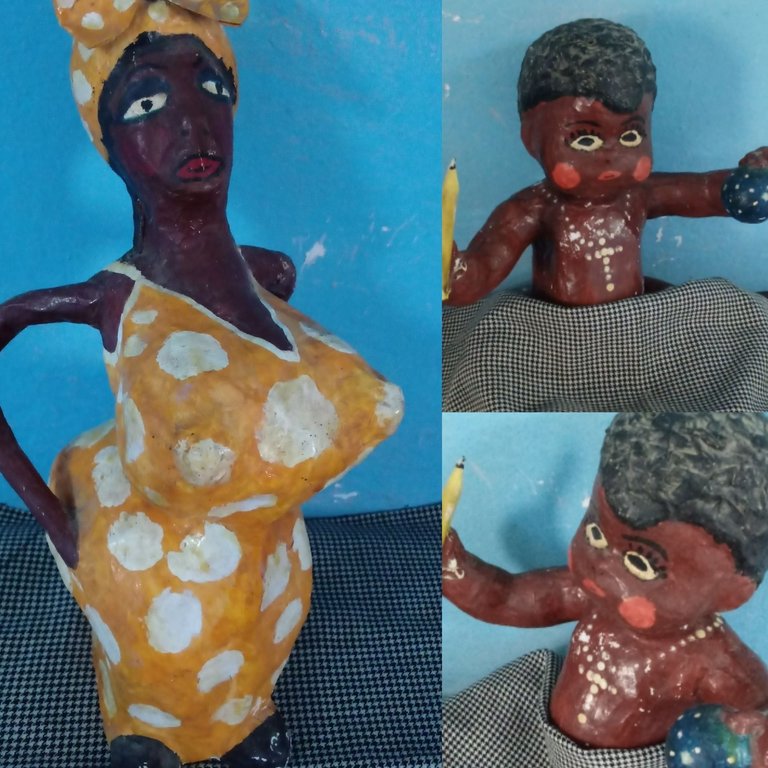
Teniendo 12 años voy de vacaciones a casa de una tía. Ella trabajaba en un taller de papel mache. Mientras estuve ahí los días me parecían cortos, se me iban mirándola ejerciendo su profesión, me fascinaba y más al ver el resultado. A partir de ese momento mis largas horas de tiempo giraron hacia esa dirección y comencé hacer pequeñas confecciones con su ayuda. Con gusto le comparto algunos de los primeros trabajos.
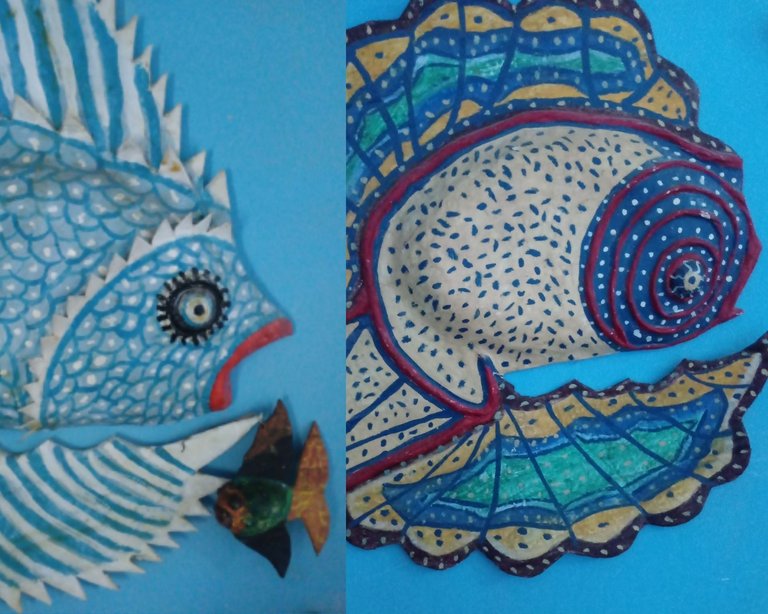
Aún habiendo pasado tiempo se mantienen bellos me trasmiten al verlos mucha buena vibra. El pecesito pequeño fue mi primera confección lo realicé de la siguiente forma hace más de 15 años .
Quería una forma ovalada asi que cogí un cascarón de huevo con apertura pequeñita y lo puse a secar al sol. Mientras lo secaba preparé diferentes tipos de tiras de papel y una vez seco comencé con pega elaborada con harina de consistencia media líquida a ir cubriendo el cascarón dándole tres vueltas de capas con las tiras. La última vuelta es de tiras blancas pues ahí sacaremos al pintor que llevamos dentro. Ya listo lo puse a secar. Mientras se secaba cogí un pedazo de cartón grueso y recorte lo que sería el cuerpo y la cola del pecesito.
Bueno innumerables formas de colitas podemos realizar grandes,pequeñas todo está en gustos😊. Ya teniendo estructurado como quería al pecesito tome el huevito seco, y le realize dos cortes uno arriba y otro abajo por la apertura, llegando a menos de la mitad, cuidando siempre su forma. Por la grieta indruje lo que sería su cuerpecito y su cola. Y nuevamente utilicé la técnica dándole firmeza a lo que sería su cuerpo.Depues de haber dado las tres capas lo puse a secar. Para hacer la boquita y ojos, realicé royitos de papel uno en forma circular y otro larguitos y los afirme con la técnica. Bueno ya secado solo seleccionar lo que seria los colores y a pintar con temperas acuarelas según nuestros gustos. Cuando terminamos para darle un acabado brilloso se usa barniz pero yo utilicé en aquel entonces poliespuma disuelto en gasolina que da un efecto similar.
Muchas son las confecciones que podemos hacer con la técnica desde máscaras, platicos, muñecos, piñatas además que sirve de forma decorativa lo considero muy relajantes, ayuda a crear también un espacio entre el adulto y los pequeños de la casa fomentando el aprendizaje.
Los exhorto a que la practiquen y disfruten, es muy grato ☺.
Bella e interesante comunidad gracias por sus post instructivos.✨
English
Greetings community🙋, I want to share with you how I started the practice of paper mache. I hope it will be a reason for inspiration to make this beautiful art.
There were many variants that my parents looked for so that watching TV would not occupy my most time during the day, but it was difficult for her because it was always my greatest entertainment as a child.
When I was 12, I went on vacation to an aunt's house. She worked in a paper mache workshop. While I was there the days seemed short, I was watching her practicing her profession, I was fascinated and more when I saw the result. From that moment my long hours of time turned towards that direction and I started making small garments with their help. I am glad to share with you some of the first works.
Even having spent time they remain beautiful they transmit to me when they see them a lot of good vibe. The small fish was my first confection I made it in the following way more than 15 years ago.
I wanted an oval shape so I took an eggshell with a tiny opening and put it to dry in the sun. While drying it I prepared different types of paper strips and once dry I started with glue made with flour of medium liquid consistency to go covering the shell giving it three turns of layers with the strips. The last lap is of white strips because there we will take out the painter that we have inside. I put it to dry. While it was drying I took a piece of thick cardboard and cut out what would be the body and tail of the little fish.
Well countless shapes of pigtails we can make big, small everything is in tastes😊. Already having structured the little fish as I wanted, take the dried egg, and make two cuts, one up and one down the opening, reaching less than half, always taking care of its shape. Through the crack I indrujo what would be his little body and his tail. And again I used the technique giving firmness to what would be her body.After having given the three coats I put it to dry. To make the mouth and eyes, I made paper royitos one in a circular shape and the other long and I affirmed them with the technique. Well already dried just select what the colors would be and paint with watercolor tempera according to our tastes. When we finish to give it a shiny finish varnish is used but I used at that time polyfoam dissolved in gasoline that gives a similar effect.
There are many confections that we can make with the technique from masks, talks, dolls, piñatas besides that it serves in a decorative way I consider it very relaxing, it also helps to create a space between the adult and the children of the house encouraging learning.
I urge you to practice it and enjoy it, it's very pleasant ☺.
Beautiful and interesting community thank you for your instructive posts.✨
Yeehaw! What an inspiring journey into the world of paper mache artistry! Keep creating and spreading those good vibes, partner! 🤠🎨
Thanks for your comment ✨ I will do my best effort
Keep on ridin', partner. Your positivity shines like a lone star on a clear night. Seize the day and wrangle those dreams with a spirit as wild as the wind.
!diy
!discovery 30
This post was shared and voted inside the discord by the curators team of discovery-it
Join our Community and follow our Curation Trail
Discovery-it is also a Witness, vote for us here
Delegate to us for passive income. Check our 80% fee-back Program
You can query your personal balance by
!DIYSTATSCongratulations @marydeluz! You have completed the following achievement on the Hive blockchain And have been rewarded with New badge(s)
Your next target is to reach 300 upvotes.
Your next target is to reach 50 replies.
You can view your badges on your board and compare yourself to others in the Ranking
If you no longer want to receive notifications, reply to this comment with the word
STOPCheck out our last posts: