The last time I told you a bit about what is Github and Git. Now, I'm going to explain how you can make a basic use of these tools. Even though we can create repositories in Github, upload files, edit these files, etc. the truly power of repositories and Git can be only achieved using them with a Terminal or a Command Prompt. Yes, a terminal, and it's very easy learning how to use it.
Source
Requirements
- A Github account
- Having Git installed; this is explained in the next section
Installing Git
Windows
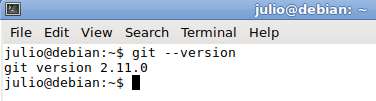
In order to use Git on Windows, we need to install it first. We can download the Git installer in the following link. We don't need to choose a specific setting during the installation, click on the Next button until the program is installed is enough. After Git is installed, we can check it was successfully installed with the following command in a Command Prompt window: git --version. You should see an output like this:

Linux
Most of the Linux distribution have Git installed by default. We can check we have it installed running the following command in a Terminal: git --version and you should see an output like this:
If by any chance you don't have Git installed, typing sudo apt-get install git in a terminal should be enough to install it.
All the commands I'm going to use in this guide can be used in both Linux and Windows system.
Creating a repository
Even though we are going to be using Git from our computers, our repositories will be stored in Github. So we need to create a New Repository in Github.
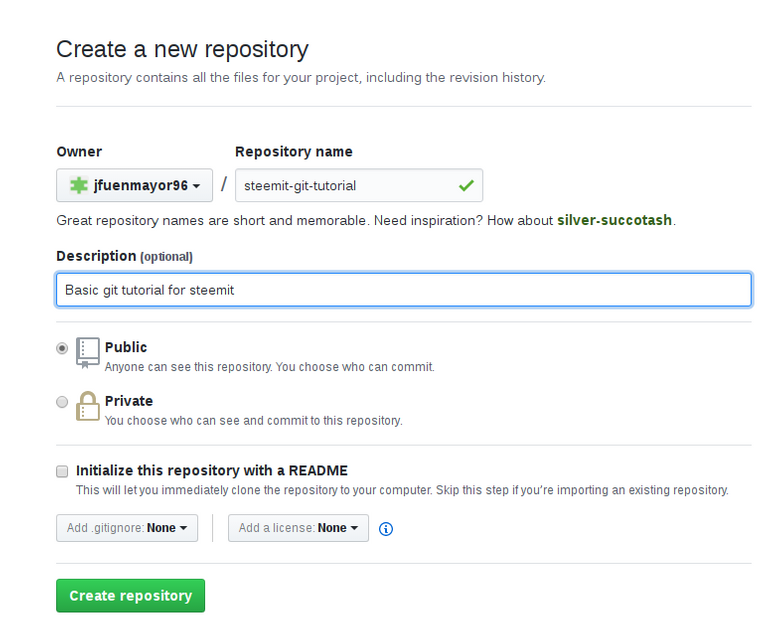
Once we have finished filling the basic information (repository name and description), we create the repository by clicking the green button that says Create repository, and we should see some instructions like these ones:
Cloning our repository
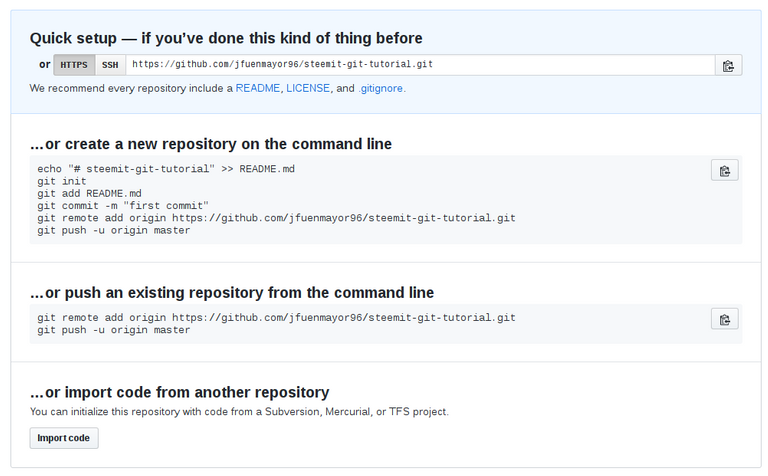
Of all the information that appears in the new screen, we only need the one in that says Quick setup. We copy this link and we open a Terminal (or a Windows' Command Prompt), and we execute the following command: git clone <link-we-just-copied>

The git clone command allows us, as its name suggests, clone a repository. This means we are going to download all the repository to our computer. By cloning a repository in our computer, a folder with the repository's name is created.
Everytime we open a Terminal or a Windows' Command Prompt, a default route or location is selected. In Linux this route is /home/<your-user>/ and in the case of Windows that location is C:\Users\<your-user>\. This means that inside these locations we can find the repository's folder we just cloned.
Once the repository is cloned, we need to move inside its folder by typing the command cd <our-repository-name>. In my case it'd be cd steemit-git-tutorial.
Adding files to our repository
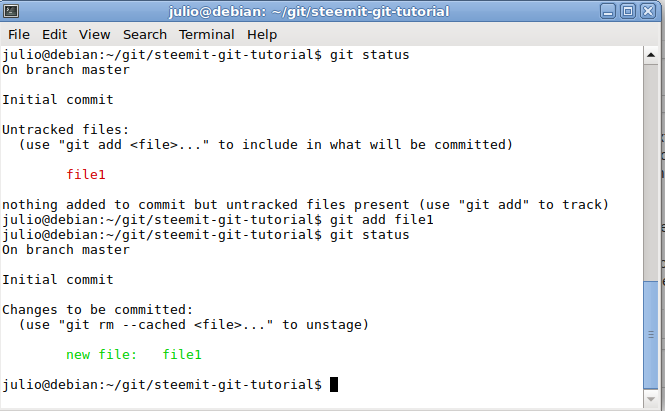
To get started, we are going to add a simple file to our repository. In this case, I'm going to create an empty text file and I'm going to save inside the folder that contains our repository, which in my case is steemit-git-tutorial. You can create a new file, or copy an already existing file, this is up to you. Once we have copied the file inside the folder, we can check that it's really in there by executing the command git status. This command shows every file that has been modified in the repository.
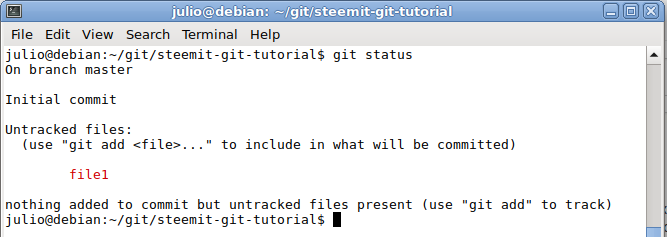
As you can see, we've received a message saying that this file is an untracked file, that means that the repository knows it's inside the folder but it doesn't know it should be tracking the changes of this file. So, in order of getting our repository to start tracking the changes in this file, we need to add the file to the repository by typing executing the command git add file1. After executing the command, we type git status again so we can see the difference.
Making our first commit
Once our repository is tracking all our files, everytime we execute the command git status it will tell us which files have been modified. As I told you before, we can use the commits to save all the changes we've made. We just added a new file, so it's time to make a commit and upload it to our repository.
In this case, we only have a single file, but we can add as many files as we need, separating the name and/or location of the files by spaces. Every time we want to make a commit, we need to indicate which files will be included in that commit, and we can do it with the command git add. We just added our new created file, so we don't need to do it again. Now, we execute the command git commit -m "introduce a brief description here". This command allows us to save all the changes we have made in our repository's files we have added with git add. As you can see, we can introduce a brief description within the quotation marks.

By executing this command, the terminal will tell us which files have been modified, and what kind of modification has been made: file deletion, file creation, adding lines or removing lines.
Uploading our changes to Github
Once we commit our changes, we can upload them to Github too. Having our changes in Github allows us to have a remote backup of our project on the server, so we can share them easily and download them in any computer we want. In order to upload our changes to Github, we execute the command: git push origin master. This command receives two arguments: origin is the name that Git gives to our repository, and master is the name of the main branch in our repository (and the only one created, by default). In another post we'll see more details about this.

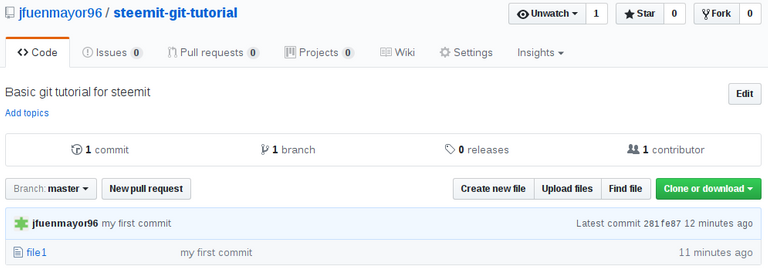
Now, if we check out Github repository, we can see that in fact our file was uploaded and it shows the description we entered.
Summary
This might seem like a lot of information to process, but we have only used 4 simple commands, the same ones will be using every time we work with Git. So far we've used:
git clone <repository>: allows us to clone (download) a repository to our computer. We only use this command when we want to download a new repository to our computer.git add <file1> <file2> <file3> ... <filen>: allows us to add new files to our repository, or to our commits. As you can see, we can add several files if we separate them with spaces, for example:git add file1 file2 /src/containers/file3.git commit -m "message": allows us to save the changes we've made to our files, also, we can (and we must, it's a good practice) add a descriptive but brief description to the changes we've made. Git won't let us commit our changes if we don't add a description.git push origin <branch>: allows us to upload our changes to Github. By default we use the branchmaster.
So far, we know how to add files to our repository and how to upload them to Github. In the next part, we are going to keep using these commands we've just learned, and we'll see what happens when we modify the files that are inside our repository and are modified.
Great breakdown! :) Stay stellar!
Haha thank you! :)
Great post! I am intetrsted in learning a programming language. Which is the best to learn if I want to help develop current and future blockchains?
Ethereum Developer Training = You will learn Geth, Web3, Truffle, TestRPC, MetaMask, Wallets, Solidity +++
Learn Javascript too so you should learn basic understanding of the Javascript/HTML DOM model
Ha, what a list man, not really encouraging :-) Do you know by any chance what everybody is using making all these steemtools? Are they written with javascript api, python?
I will have to interface soon with - hopefully - Ethereum as i have a financial app that will benefit a lot opening up to the smart contract blockchain. Do you have a starting point for learning this intensive list of yours?
Thank you! :) Well, I don't know much about cryptocurrencies and blockchains, but I know that people usually use C++ and something called Solidity. Also, a friend of mine told me the other day that he was trying some things with blockchains, and he uses Ruby. But I believe that you're good to go if you use C++ and/or Solidity.
Awesome, thanks.
You're welcome! Thanks for your comment.
I use Git quite a bit. (forgive the rhyme). And honestly, it's a lot easier to use on Linux! Good post!
Yes! Actually I prefer Linux over Windows for everything that's not related to playing games. Thank you for your comment!
Great post. Also, I believe, Source tree (https://www.sourcetreeapp.com/) is a provides a great set of tools and interface. But for anyone new to git I advise to use the terminal and learn the basic commands. Source tree allows you to create a clean Git flow by allowing you to 'Start New Feature', 'Finish Feature' and starting and finishing releases as well. If you are working on an advanced project or a project that involves multiple developers, Source tree makes things simpler.
Follow me @codero
Thanks @codero, I'm glad you liked it. I checked this tool you mention, Source Tree, and it looks amazing, but it's a shame it only works in Windows and Mac OS, anyway, thank you for the recommendation. I will check your profile for sure!
😂😂 thanks for your comment haha.
Thanks. This is something I will have to learn for sure.
Thanks for your comment! Learning Git is absolutely worth the effort
I have been using git for the last couple months, too. I'm just using the basic commands now, but it's helpful. I hope to continue to use git and get better at it.
Nice to hear that! I've using Git for 8 months, or so, and lately I've learned a lot of useful things I didn't even know existed. I hope to gather them all in this serie, so I can explain them to the people.
Thanks for your comment!
Good post. Please continue this series
Sure :) I want to cover several git commands, from basic to some advanced ones too. I'm following your Ionic post series too, I'm interested in it. Thank you for your comment!
For what exactly do you use Gib or Linux for?
Hello @suos.
Well, Linux is an operative system, just like Windows. With Linux you can do a lot of things: surf the web, edit documents, preview images, edit images, and of course, you can program with Linux. I prefer Linux over Windows because it has several tools installed per default that are useful for a programmer. Also, I find that doing some programming things in Linux are easier than doing them in Windows, it's lighter and it's more secure too. In this guide, everything that I do with Linux, can be exactly done with Windows as well, there are no differences, but it's not always like that.
Github is a web service that allows you to store and organize your code and keep track of all the changes that you made to your files. It's useful for medium-big projects and for sharing your code with a coworker or a partner who is using the same code that you are using. You can find more information in my previous post here.
Thanks for your comment, and welcome to Steemit!
Wow, congrats on getting discovered by Curie. You deserve the upvotes, great article again!
Thank you very much @pilcrow :')
Mmm... yeah, that's just what I wrote haha. Do you have a question about it? Or didn't I explained something right?
I just follow it, because it is the best and most useful sentence in my opinion @jfuenmayor96
do not forget to visit my blog. this is my new post, help you upvote and resteem thank friend > https://steemit.com/animal/@nasrud/belajar-bersabar-dari-seekor-laba-laba-or-or-learn-to-be-patient-from-a-spider
These are the type of things we need, good work
Thank you sir, I really appreciate your comment. Welcome to Steemit!
Thanks for the post. A Perl hacker for years but just starting to use git. Look forward to branching I up voted and shared.
Perl? Woah, my respects. You'll love Git for sure. Stay tuned, I will talk about branching ;) Thank your for your comment!
Congratulations @jfuenmayor96! You have completed some achievement on Steemit and have been rewarded with new badge(s) :
Click on any badge to view your own Board of Honor on SteemitBoard.
For more information about SteemitBoard, click here
If you no longer want to receive notifications, reply to this comment with the word
STOPThis post has received a 3.13 % upvote from @drotto thanks to: @banjo.