In the previous post we learned some basic Git commands such as add, commit, push, status and clone. In this second part, we are going to strengthen our knowledge about them.

Source
Cloning already existing repositories
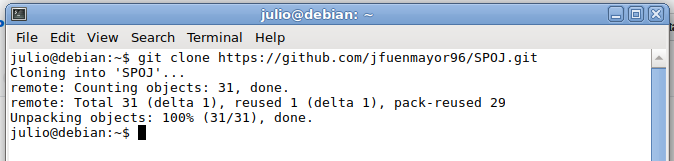
In the previous part we created our own repository, because that was our intent. However, we are not always going to start working with a repository we created, we might need to clone a repository from another person, or clone an existing repository of ours. In order to do this, we go to the repository we want to clone, and we click on the Clone or download green button and copy the link that appears in that section.

Once we've copied the link, we use the command git clone <repository>, and we'll have cloned the repository.
Modifying already existing files
Now, let's keep talking about what we've discussing... everytime a file inside our repository is modified, Git will detected these changes. By using the git status command we can see these changes. I'm going to create a couple of new files and also I will modify a little bit my main file, that was empty before. The structure of my repository looks like this:
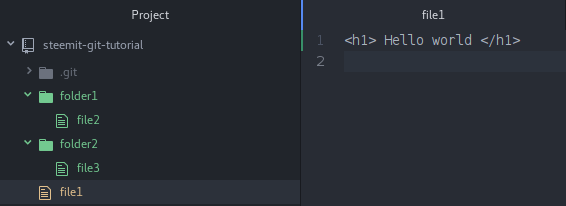
In Atom, the editor, we new files appear with a green color and the already existing files that have been modified appear in orange
As you can see, I created two new directories with a file inside them, also I modified the content of file1. Let's see these changes by typing git status.
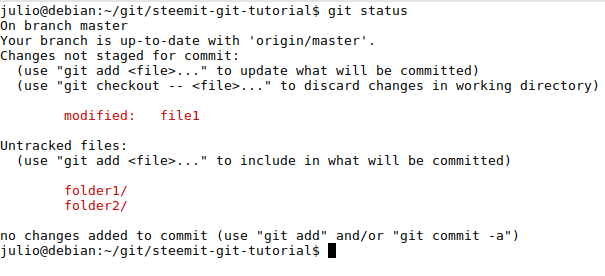
In fact, we see that the output tells us the same:
file1 has been modified, and there are two directories that are not being tracked, because they've just been created.
We've made enough changes, now, let's commit them.
git commit
First, we are going to commit the new folders we've created. Before we can make the commit, we need to add the folders first so Git can start tracking the changes in them by using git add.
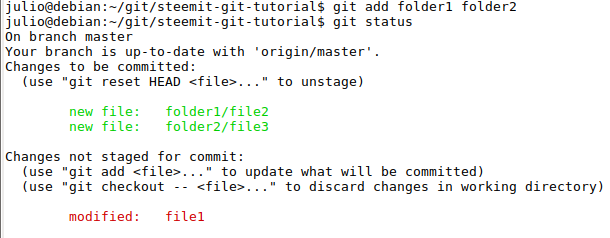
By adding a directory/folder, we are automatically including all of the files that are inside the folder
Once we finished adding the folders, we execute git status so we can see our repository's current state. As you can see, it tells us that there are a few changes to be committed. So, let's commit them.

Now, let's make the commit of file1.

git status now tells us that our working tree is clean, that means that we have nothing else to commit, nor modified files that we've not checked.

Note: it's a good practice to keep our commits as small as possible. That is, every time we make a significant change in one of our files, we should make a commit. This technique allows us to keep a record of all the changes we make in our files effectively. If all of the sudden something in our project stop working, we can track the error easily, since the commits are small enough to notice the error. On the other hand, is we modify 10 files at the same time and then we commit this big change and something stopped working, it would be harder to track the error among the 10 files.
git diff
Let's say I committed all the changes we made in my files, and then, I started modifying file1 but I forgot what its original content was. git diff will help us here, this command shows us all the changes that have been made to my file since the last commit I made. After modifying file1, I run git diff and I get the following output:
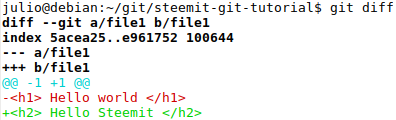
The output tells us that the line <h1> Hello world </h1>has been deleted (denoted by a red line with a - symbol) and the following line has been added (denoted by a green line and a + symbol) <h2> Hello Steemit </h2>. This command is very useful when we are working with several people that are editing the same files, since we can see all the changes they've made in the project files.
Once we've finished making changes in our files, it's time to upload them to Github.
git push origin master
This is the command we use to upload our changes from our local repository (our computers) to the remote repository (Github). We see it in every tutorial on the Internet, but none explains what mean the two argument it takes: origin and master.
git push
As we've said, git push is the command we use to upload (push) our changes to Github.
origin
Everytime we clone a repository, Git sets up some variables that we don't notice easily. One of them are the remotes or remote repositories. Our repository in Github is a remote repository. Everytime we clone a repo in our computer, the default name for that repository is origin. So, our computer knows where is located our repository in Github, and it calls the repo origin. We can add more remotes if we want, with the names we like. By using the command git remote -v, we can see a list of all the remotes that are configured in our local repository.
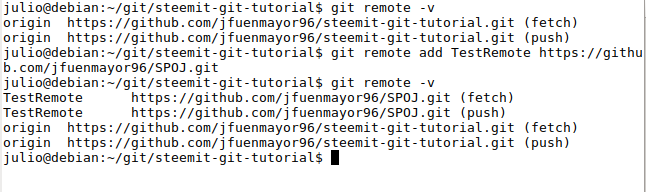
First, appear the name of the repository, and then, the link that it identifies. I added a new remote called TestRemote to my local repository using an old repository in my Github account, so you can understand the idea better. Now, when I execute git remote -v, the new remote will appear too.
master
In Git, we work with something called branches. They are copies of our repository at some point of the lifetime of our project, so we can modify the files, mainly because we want to add a new feature to our project, or fix a bug, without the need of modify the original files that other people might be using as well. Everytime we create a repository a main branch is created by default, and its name is master. If we type git branch, we can see all the branches that we have in our repository. In the next part, we'll be using branches.

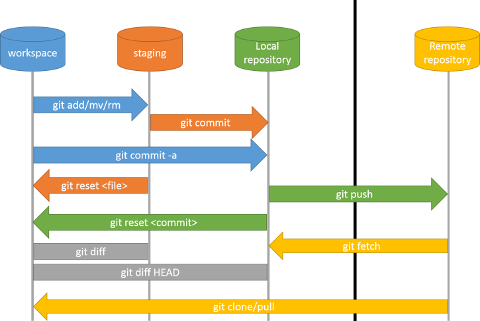
The following is a diagram that summarizes all the main actions in Git. As you can see, we've covered some of them, just like add, commit and push. I hope that by the end of this Github serie we have covered all of them. In the diagram, you can appreciate the flow of the actions, and how the information goes from one place to the other.
Source
Summary
This time we've strengthen a little more our knowledge about some very basic Git commands such as add, status, commit and push. We'll be using them every time we work with a repository. I support the idea of understanding the most basic concepts before going deep. Also, we've learned the importance of making small commits. Additionally, we've used some new commands:
git diff: allows us to see all the changes we've made to our files, taking the last commit we've made as the start point of the comparison.git remote -v: allows us to see all the remote repositories we have configured in our local repository.git remote add <nombre> <link>: allows us to add a new remote to our local repository.git branch: allows us to see all the branches of our repository.
Excellent tutorial! Thanks for sharing!
Thank you very much for your comment @jonrhythmic, I'm glad you liked it.
Congratulations @jfuenmayor96! You have completed some achievement on Steemit and have been rewarded with new badge(s) :
Click on any badge to view your own Board of Honor on SteemitBoard.
For more information about SteemitBoard, click here
If you no longer want to receive notifications, reply to this comment with the word
STOPThis is excellent Information I really love Git Hub
Thank you very much @phil-coding, I really appreciate your comment. I love Github too!
Congratulations @jfuenmayor96! You have completed some achievement on Steemit and have been rewarded with new badge(s) :
Click on any badge to view your own Board of Honor on SteemitBoard.
For more information about SteemitBoard, click here
If you no longer want to receive notifications, reply to this comment with the word
STOP