In the previous post we talked about making multiple changes in our repository, and then see these changes with git status and git diff, also we learned how to manage our remote repositories. In this part, we are going to learn how to use branched.

Source
As I've said a couple of times, the branches in Git allow us to have multiple copies of our repository without the need of modifying our main copy. With this feature we can make specific changes such as adding a new feature to our project, try new techniques and/or tools, fix a bug, etc. Once we finished working in that feature, we can proceed to merge the branch with new content with one of the previously existing branches.

Source
Visualizing branches: git branch
This command allows to see all the branches that exist in our repository. On the other hand, if we provide a parameter to this command: git branch <name>, we'll be creating a new branch with the name we provided. In order to continue with the tutorial, I'm going to create a very simple website. I'm going to modify my file1 file so now it will be called index.html.
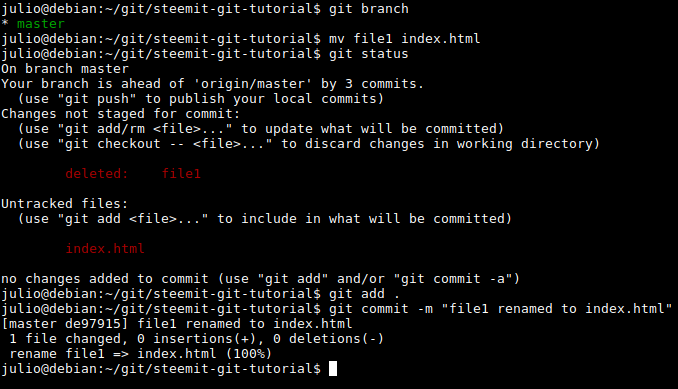
The
mv Linux command allow us to move files from one site to another, as well as changing their name. We can do this manually as wellIn the previous image, you can see I renamed file1 to index.html and I committed this change. This file currently contains one line of code: <h2> Hello Steemit </h2>. Right now, I don't want to modify this line until I've made all the changes I have in mind, so I will create a new branch so I can work in peace, knowing my original file won't be affected until I've finished editing it.
Creating a new branch: git branch <branch>
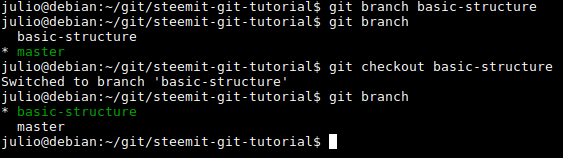
I've created a new branch called
basic-structure, which I'll be using to add the basic structure of my website. I created it using the command git branch basic-structure, and then I verified that it was created by typing git branch. However, I was still in the master branch (the current branch is denoted with a green color), so I used the following command: git checkout, that allows us to move from one branch to another. After using git checkout, I made sure I was in basic-structure branch.
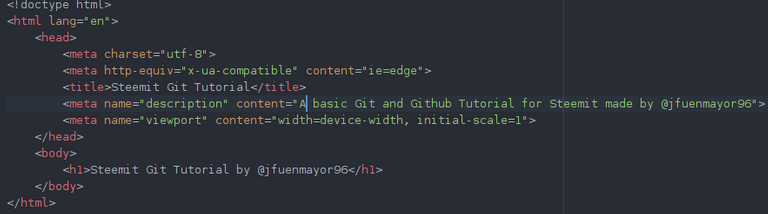
After editing a little bit my index.html file, this is how it looks:
After editing the file, I committed the changes:

However, these new changes only exist in the basic-structure branch, but I want them to be in my main branch master. Let's prove it: let's check the content of index.html in both master and basic-structure branches:
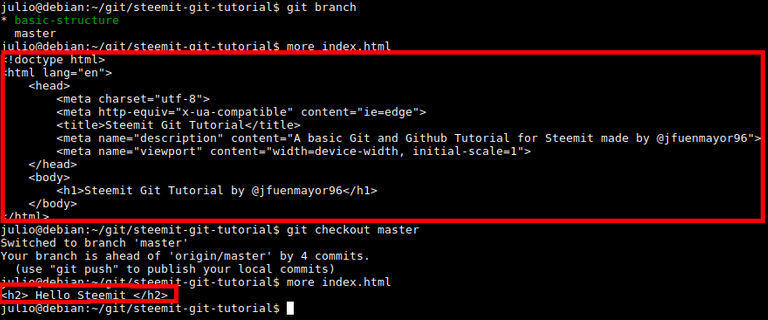
The
more Linux command allows us to preview the content of a file. This also can be achieved by opening the file manually with a text/code editorThe first output is the preview of index.html in the basic-structure branch and the second one in master branch.
Merging branches: git merge
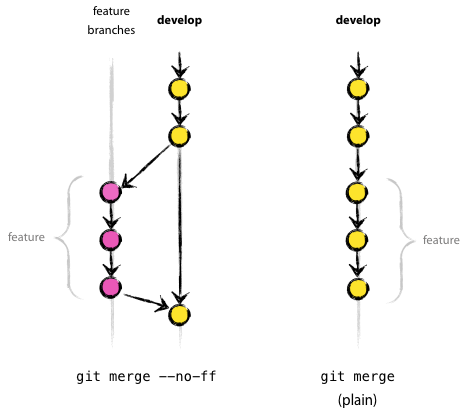
Source
I want to have all the changes I've made in basic-structure branch to also be in the master branch. In order to do this, we are going to merge the two branches. First, we need to be in the destiny branch, in our case it's master. Now, we execute the command: git merge basic-structure. This command will add all the changes I've made in basic-structure inside master.
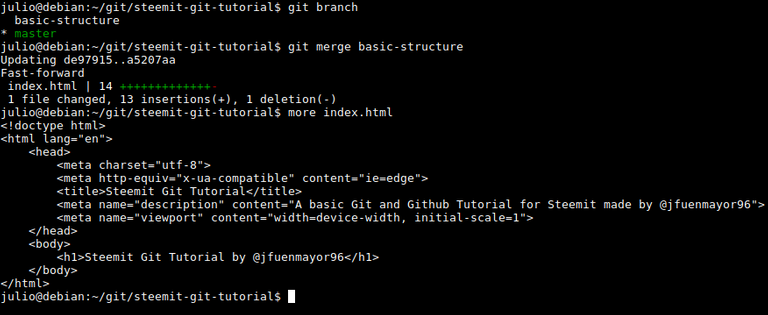
As we can see, when we executed git merge basic-structure, the output tells us which files have been modified. In fact, after executing more one more time, we can see all the changes I made in basic-structure exist in master too.
Note: keep in mind that the operation of merging two branches is not commutative. In this case, I wanted all the changes I made in basic-structure to be in master. But if I do this the other way around, that is, executed git merge master being in basic-structure branch, probably what I would had gotten would be index.html having the line <h2> Hello Steemit </h2> again, overwriting the changes I just made.
Pushing and pulling branches from Github

Source
Let's say that we want a branch that we created to appear in Github, because we want to have it in there, or because we want to share it with someone else. To do this, we only have to run the command: git push your-branch-name, in my case it'd be git push basic-structure. If such branch doesn't exist in Github, it will be automatically created when we push it. If it already exists, it will be updated.
On the other hand, if we want to download a branch that exists in Github but we don't have in our local repository, we should follow these steps:
- Create the branch locally, by typing
git branch branch-to-be-downloaded - Change our current working branch to the one we just created:
git checkout branch-to-be-downloaded - Update the local branch with the content it has in Github, by typing:
git pull branch-to-be-downloaded
And that's it.
Deleting branches: git branch -D <branch>
After a time working with our repositories, it's normal that we start accumulating branches that we don't need anymore. Once we've finished working on a branch, and we are sure we won't need it later, we can delete it in order to keep a clean repository. We can delete a branch with the command git branch -D <branch>.

Summary
This time we learned how to use one of the most important and useful features of Git: the branches. A good use of branches will allow us to advance in the development of our project in an organized and effective way, specially when working in a group. Everyone has it's own Git workflow, but everyone sooner or later will be using branches.
Here is the list of commands we used in this post:
git branch: allow us visualize all the branches that exist in our repository.git branch <branch>: allow us to create a new branch with the name that we indicate.git branch -D <branch>: allow us to delete a branch.git checkout <branch>: allow us to move between branches.git pull <branch>: allows us to update a currently existing local branch with the content this branch has in Github.git push <branch>: allows us to push a branch to Github, including all the changes/update we've made in it.
In the next post we'll learn what are merge conflicts: errors that occur when merging two branches
If you have any doubts or comments, leave them in the comments
Previous posts:
- What is Github? Why should you use it in your project?
- Learning how to use Git and Github - Part 1
- Learning how to use Git and Github - Part 2
Alot of great information. Always wondered about Github🙃
Thank you very much for your comment @paco, you can check my previous posts if you want to learn a bit more about Github. :)
Thanks. Seeing it from the cml really helps.