The Amazon Associates is one of the best ways to earn revenue from your blogs traffic because you suggest your readers to one of the best eCommerce site for purchasing products and in return earn a good commission from the same. In this article Iam going to tell you about the implementation of the Amazon Store on your blog without any coding or plugins.
To get started you need to visit the Amazon Associates website and then signup / login following which you would reach your account area. Next here in you need click on the ‘aStore’ which is a Quick Store you can be added to any web page directly. Click on the Add an aStore option to proceed with the same.
You would be asked to add a New Tracking ID which can help you in tracking the specific store or web page through which you received the sales. All these tracking ID’s can include alphanumeric characters, dashes, underscores and end with -20 to keep them unique. Next you would be asked to Create aStore Pages.
For each page, you have three options to select products from Amazon’s inventory:
Hand pick products for each page,
Display products from Amazon Listmania lists,
Display products that belong to selected Amazon categories or sub-categories. These pages will automatically show best selling products for the selected categories. In addition you can streamline the content of a category page to include products that contain a specific keyword.
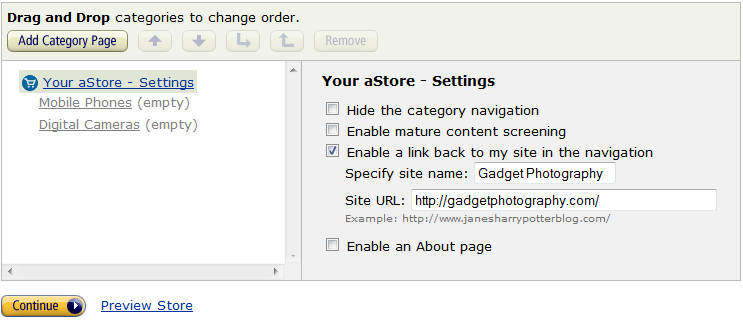
Next you can Customize & Edit the Color, Design of your store by applying the theme changes. If you have idea about CSS Editing you can also opt for Edit CSS option followed by naming your Store which should generally be given the name of your niche like Sports Store, Gadgets Store etc. You can also include a custom logo in the header instead of the text format name which should be a max of 200×75 px size.
Next comes the Sidebar Widgets which are the areas you can configure and add either to the left or the right. The advantage of these widgets are that you can show similar products in those which can increase the chances of the sales by offer your customers more options, along with the option to show Listmania and Your Amazon Wishlist. In case someone is your fan, he would buy products from your wish list too.
Following this in the last page you would finish the store publishing and would get a link which you can directly share with others like http://astore.amazon.com/gadgetphotography-20 or else you get different options to Embed the store using an inline frame.
Simple link to my store as a standalone site.
Embed my store using an inline frame.
Embed my store using a frameset.
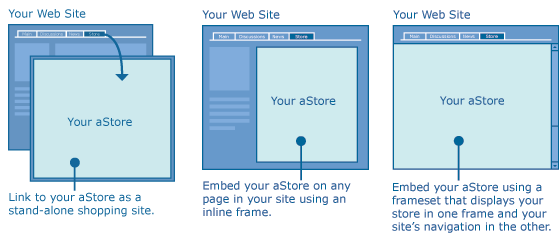
If you opt for the inline frame option you would get a iframe based code which you need to insert using the HTML option onto a seperate page of your WordPress based blog. Here is a demo of our Gadget Store which we created as a demo for all of you. Hope you liked this tutorial and we would be more than happy for reading your feedback under the comments section.
Give your suggestions about this blog.
Thanks
You have a minor misspelling in the following sentence:
It should be separate instead of seperate.