In this lesson, you will learn how to make an editable Mock-Up sticker with a glossy finish. During the lesson, you will use smart objects, transformations, filters and layer styles.
Step 1
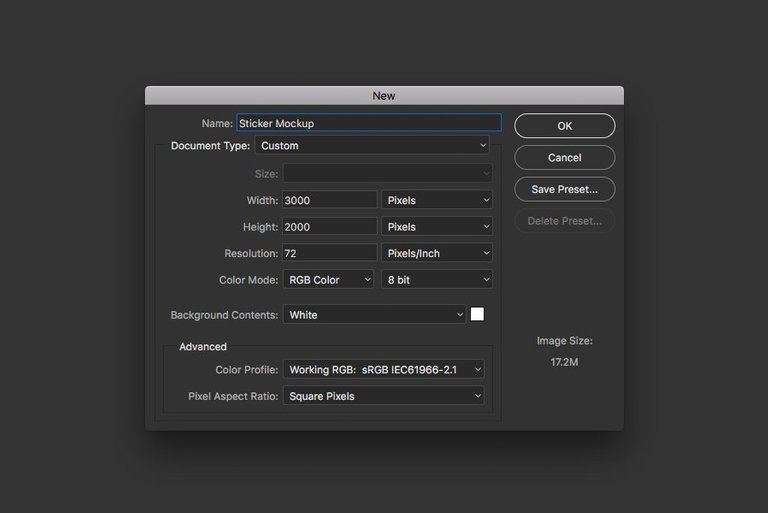
Open Photoshop and create a document size of 3000 x 2000 pixels, 72 pixels / inch, RGB.
Step 2
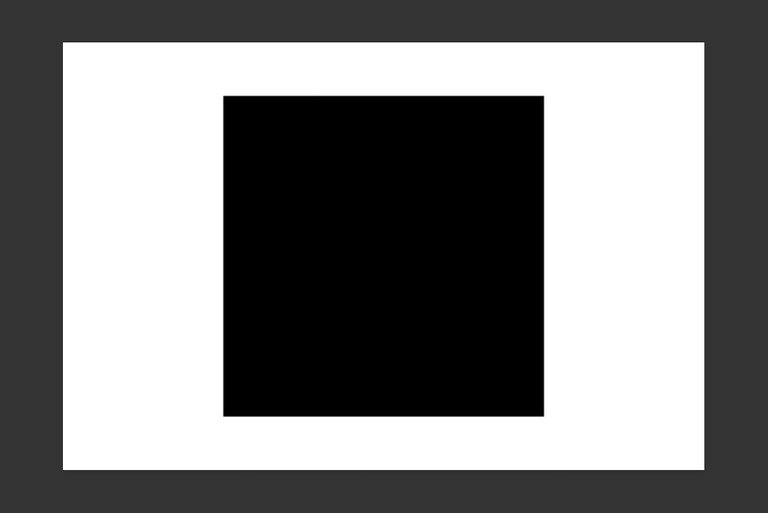
Using the Rectangle Tool (U) tool  in the Shape mode, draw a square in the center of the canvas in the size of 1500 x 1500 pixels. The fill color is not important as the layer will be used as a blank.
Step 3
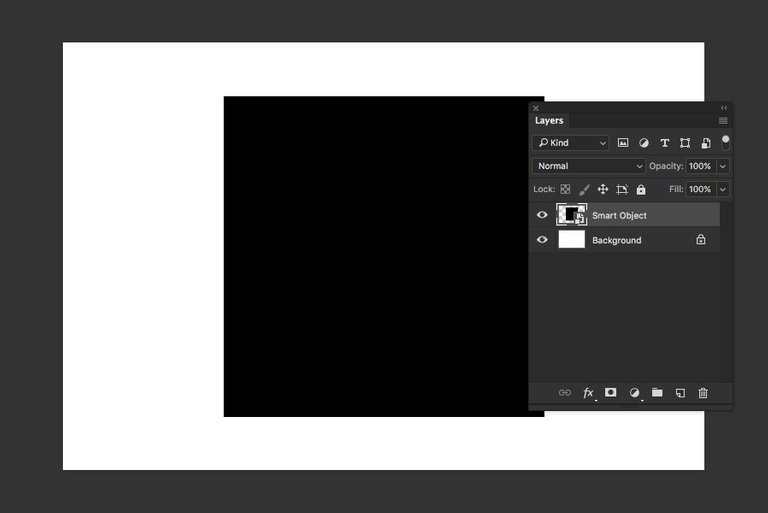
In the Layers panel, select a layer with a square, for convenience, rename it to the "Smart Object" or any other name, and then convert it to the Smart Object.
Translator's Note: Use Layers - Smart Object - Convert to Smart Object (Layer - Smart Object - or Convert to Smart Object), or right-click on the layers and in the context menu, select Convert to Smart Object.
Step 4
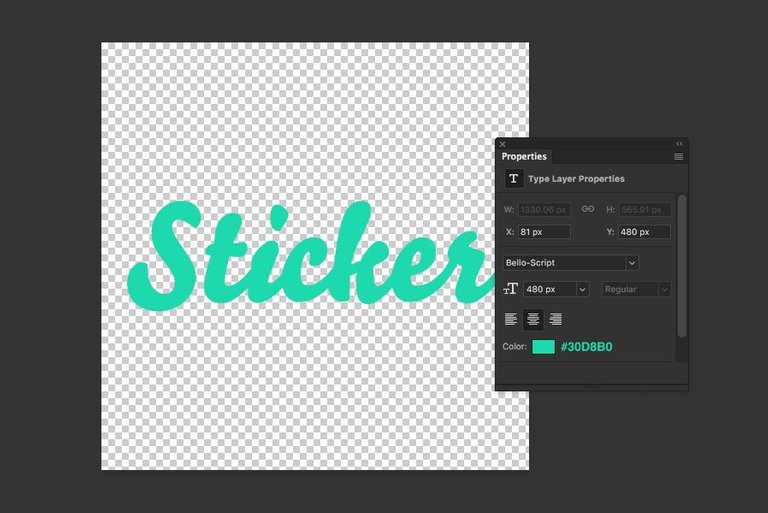
Double-click on the Smart Object icon to open the content in a new window. Disable the visibility of a square with a square. Using the Text Tool  (Horizontal Type Tool (T)), write the text that is automatically converted to the Text Layer. Settings for the text "Sticker": font Bello Script, 480 px, # 30D8B0.
Step 5
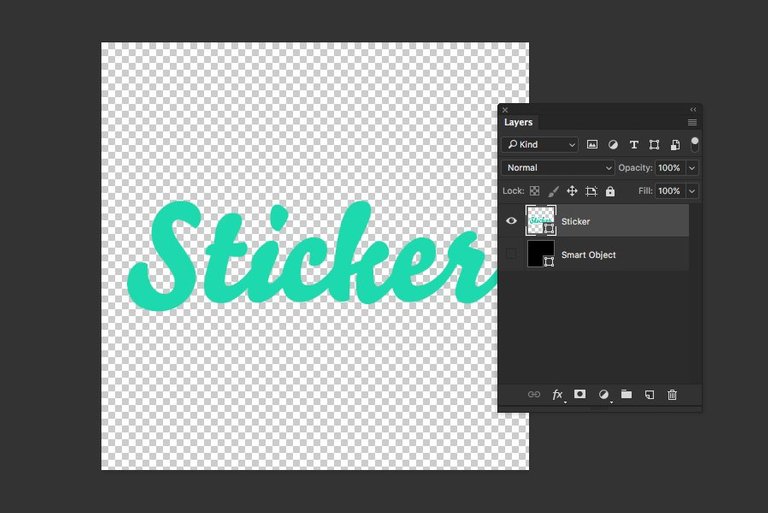
Make sure you are satisfied with the appearance of the text, transform it into a figure. To do this, right-click on the layer and select Convert to Shape from the context menu. In the next step, let's start by adding a white stroke that is typical of the stickers design.
Step 6
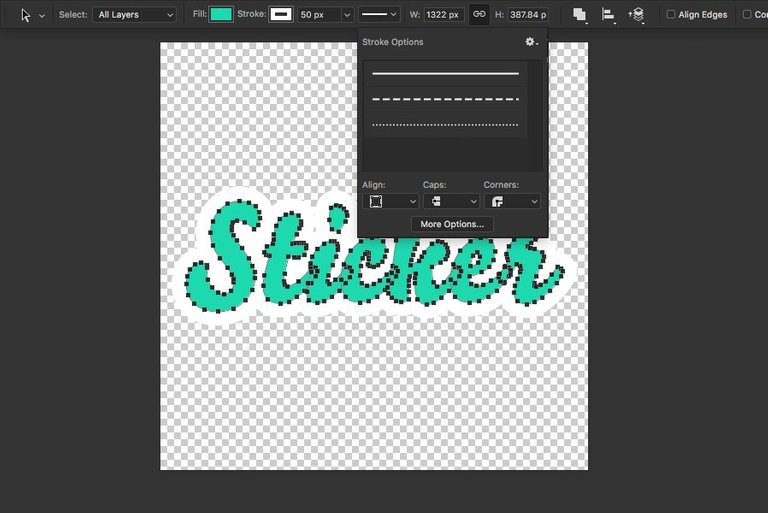
Select the Path Selection Tool (A)  and, using the tool options menu, make a rim of 50 pixels thick. Make sure that you select the Outside line alignment type, and the corners are rounded.
Step 7
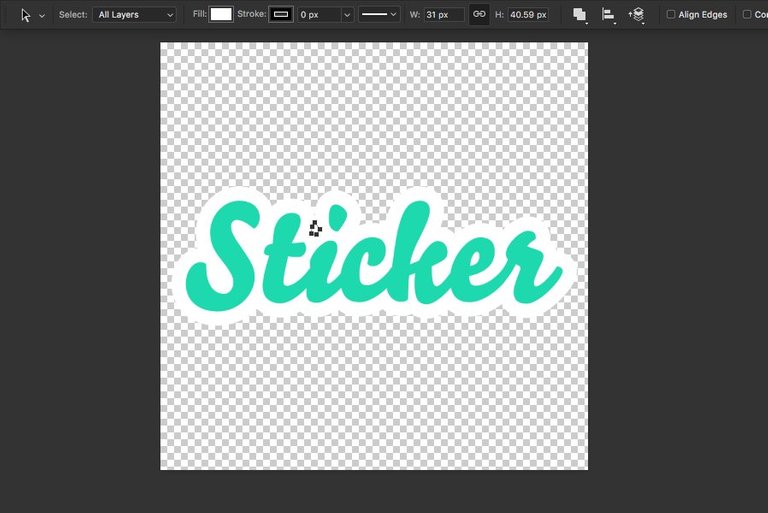
As you have noticed, there is a small empty space between the letters "t" and "i". To fill it with white, it's enough to paint a small patch with the Pen tool  .
.
Translator Note: Note that for the patch, the Inside stroke alignment type is used.
Step 8
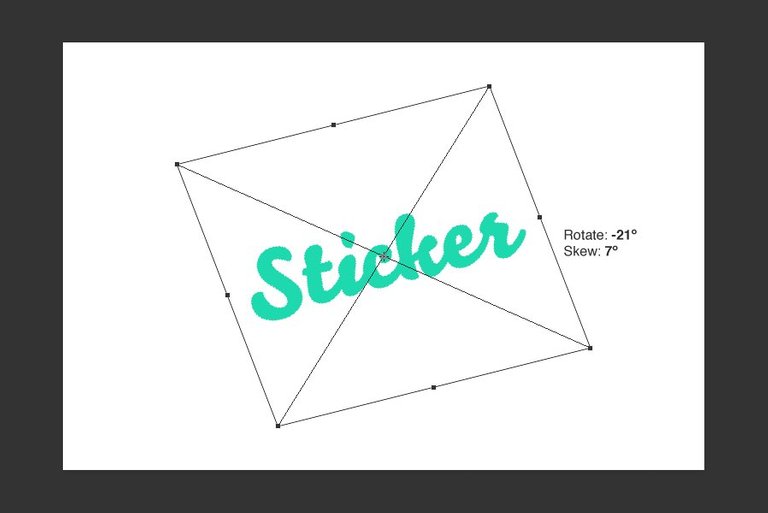
Save the changes and close the window (* .psb file) with the smart object. Returning to the main document, apply Transformation to the layer with the smart object.
Editing - Transform - Rotate (Edit - Transform - Rotate). Rotate the layer around the axis to -21º.
Editing - Transform - Tilt (Edit - Transform - Skew). Hold down the ALT key, pull the right upper corner and slide it to 7º.
Step 9
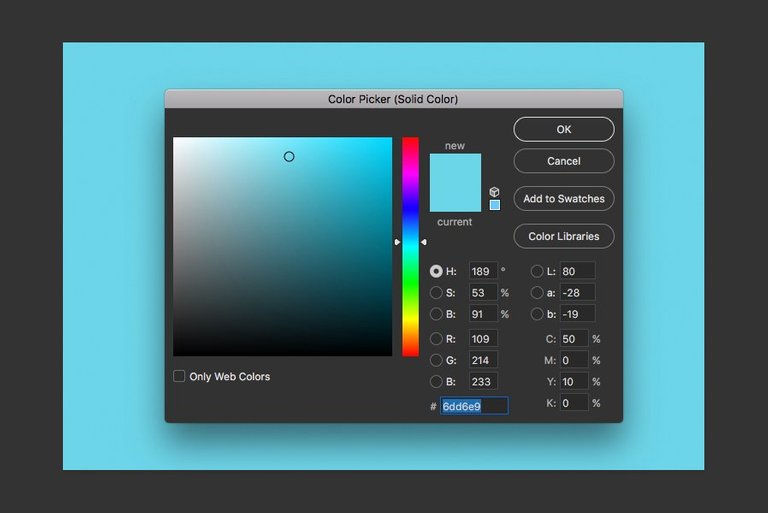
Now use Layer - New Laye r> Solid Color Fill and set the color to # 6dd6e9. Click OK.
Step 10
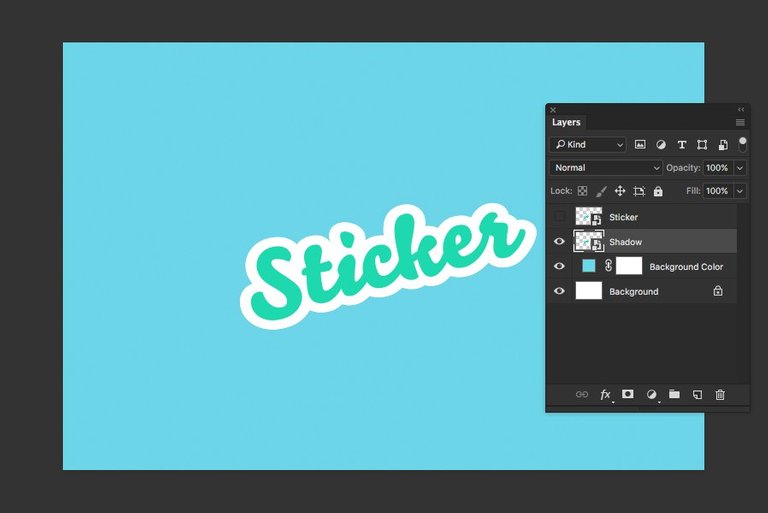
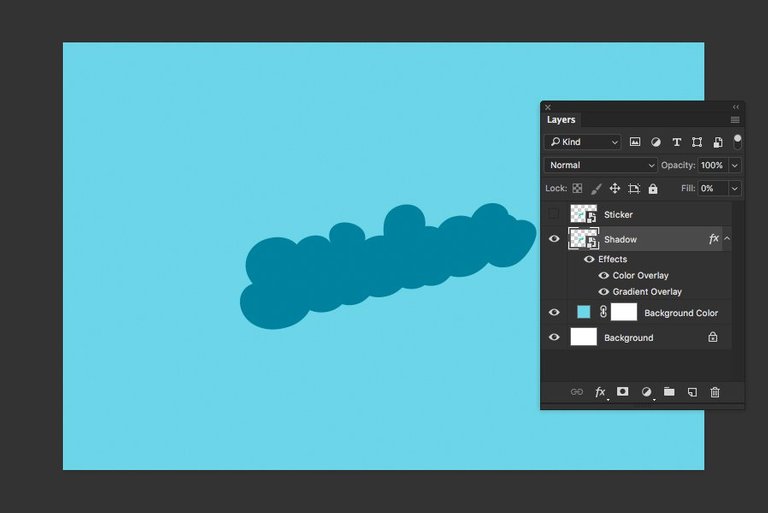
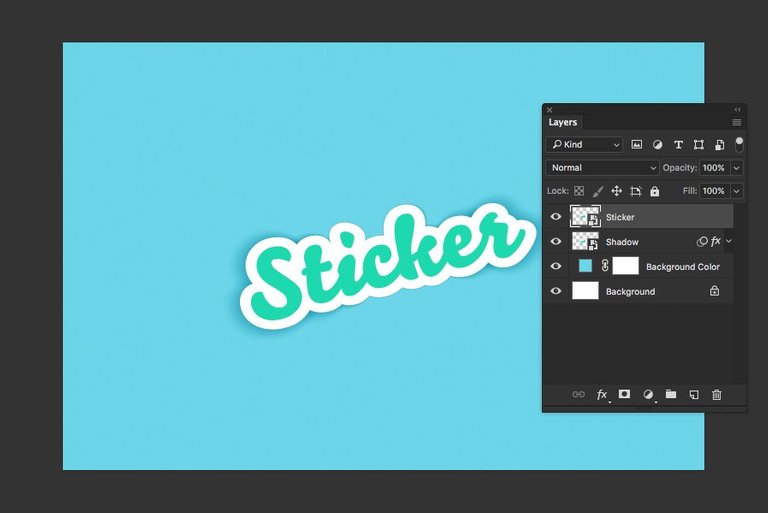
Give the name to the back-fill layer "Rear Background" and move it to the bottom of the layer palette. Duplicate the layer with a smart object. Rename a duplicate in Shadow, move it under the "Stiker" layer. Disable visibility for the Stiker layer. You can see the layers in the panel below.
Step 11
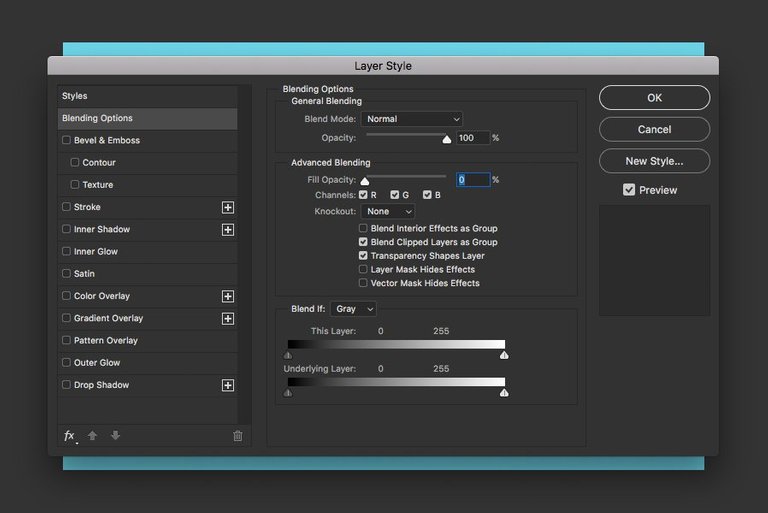
Double-click on the "Shadow" layer to invoke a layer with style sheets. In Blending options, reduce the opacity (Fill) to 0.
Step 12
Apply the Color Overlay layer style: Color - Black (# 000000), Opacity 25%.
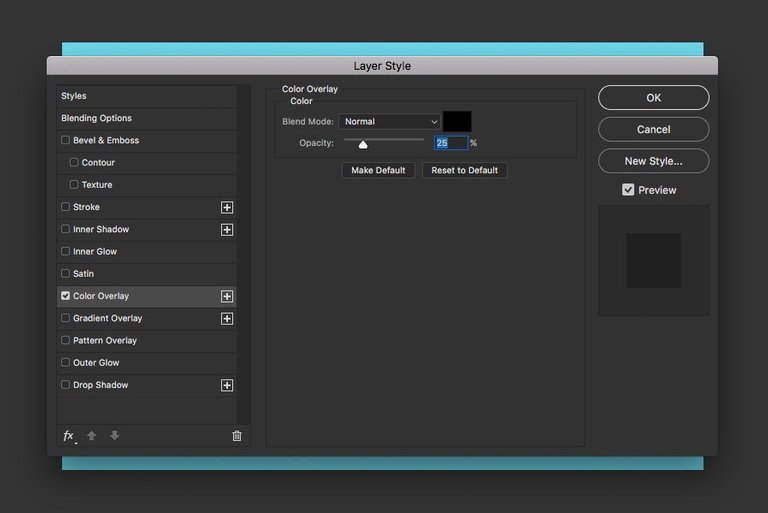
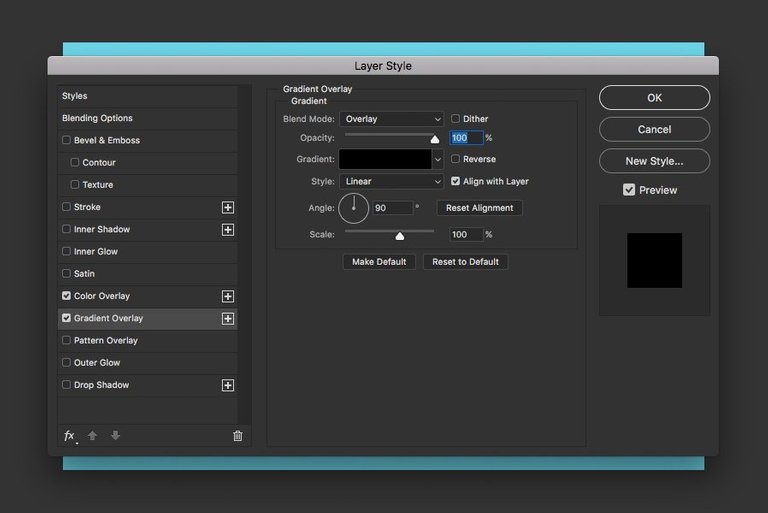
Step 13
Okay, now let's add a second time Color Overlay layer style. If you do not have the ability to reuse the same style on a single layer, then you can apply the Gradient Overlay layer style with the settings:
Gradient from black to black (black to black gradient);
Overlay Blend Mode;
Opacity is 100%.
Step 14
Below you can see the layout layout and the result of the applied layer styles.
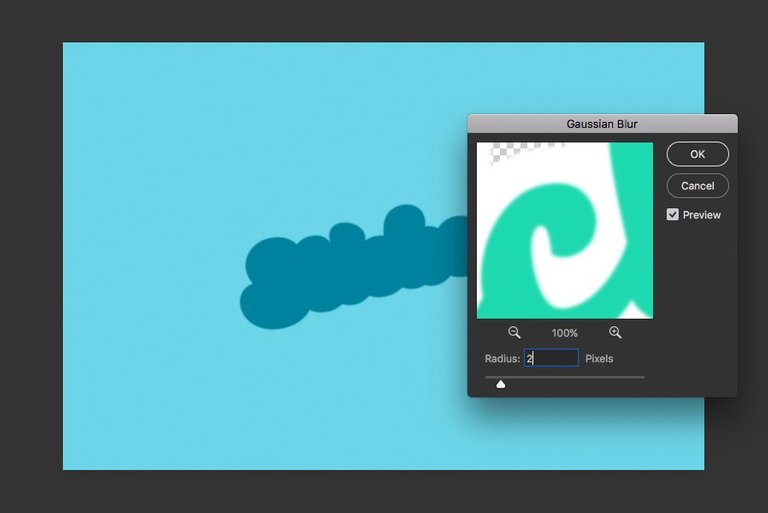
Step 15
Now apply for the shadow layer Filter - Blur - Gaussian Blur (Filter> Blur> Gaussian Blur) with a 2 pixel blur radius.
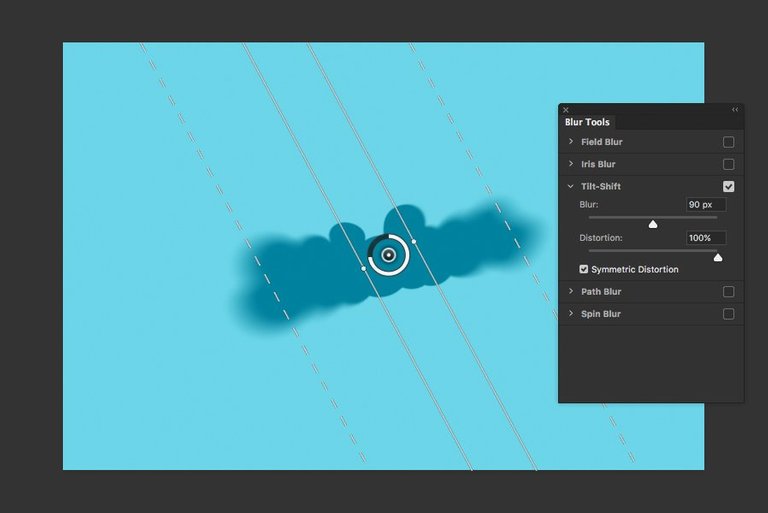
Step 16
Next, use the Filter - Blur Gallery - Tilt Shift (Filter> Blur Gallery> Tilt Shift) with settings: Blur 90 pixels, Distortion 100%.
Step 17
Click OK and return to the working document. In the Layers panel, select the "Stiker" layer now.
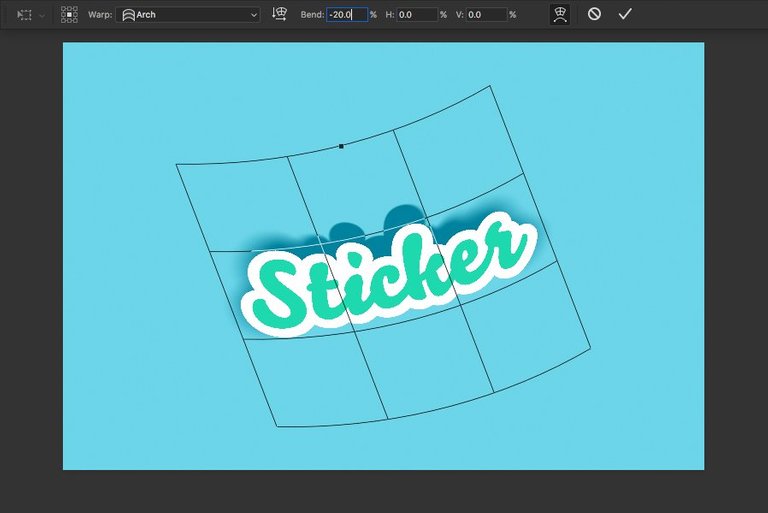
Step 18
Select Editing - Transform - Warp. In the Deformation settings, select Arch (Arch) and set Bend (Bend) to -20%. You can see the transformation demonstration and the result below.
Step 19
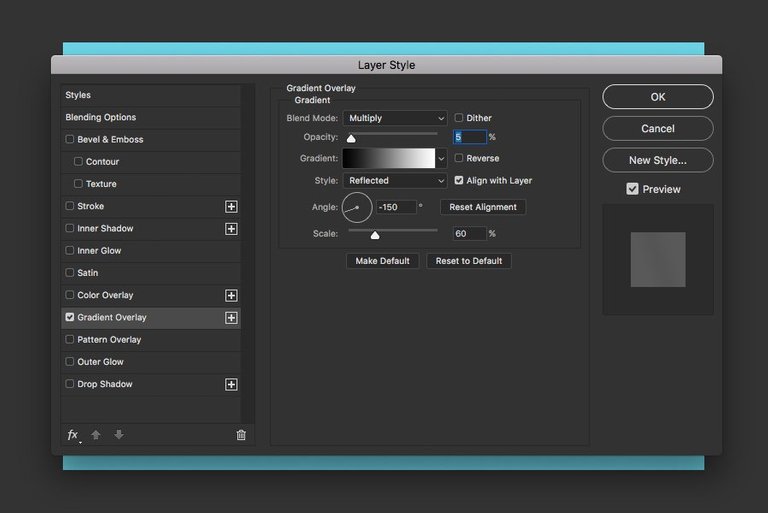
Double click on the "Stiker" layer to invoke layer styles. Apply Gradient Overlay:
Blend Mode: Multiply;
Opacity: 5%;
Gradient: From Black to White (Black to White (Default))
Style (Style): Mirrored (Reflected);
Angle: -150º;
Scale: 60%.
Step 20
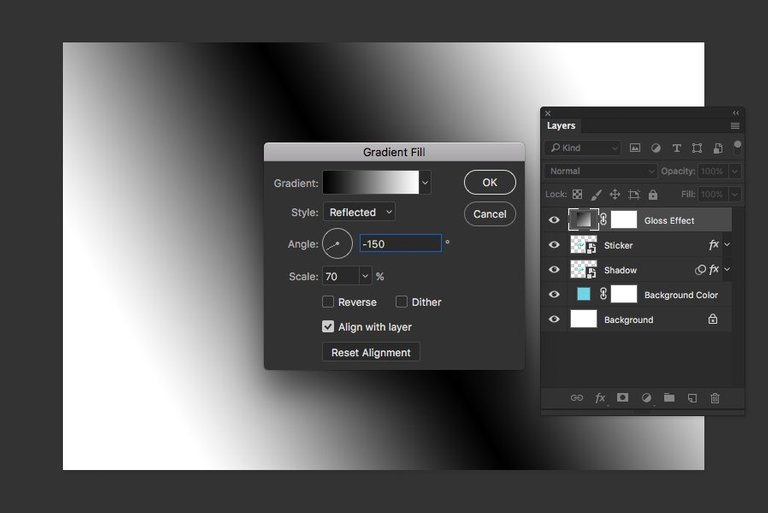
Next Layer - New Layer-Fill - Gradient. Use these settings:
Gradient: From Black to White (Black to White (Default))
Style (Style): Mirrored (Reflected);
Angle: -150º;
Scale: 70%.
Step 21
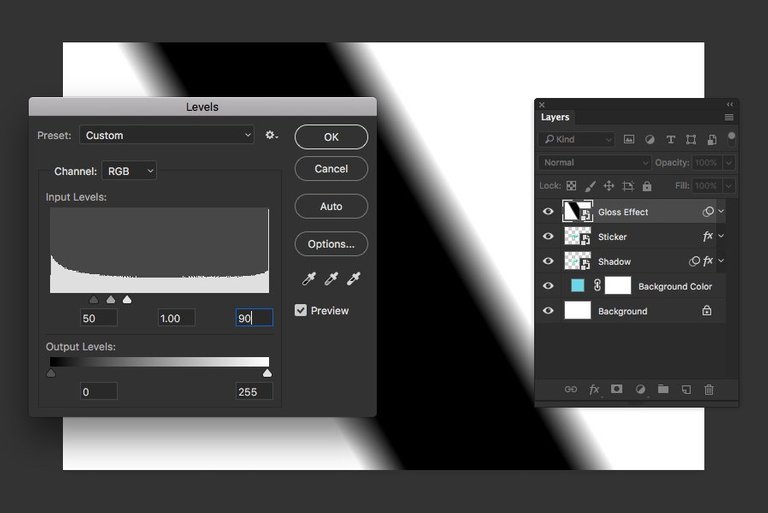
Name layer with Gradient "Gloss effect". Right-click on the layer and select Convert to Smart Object from the context menu. Go to Image - Adjustments - Levels ... Set values 50 - 1.00 - 90.
Translator Note: You can also use the correction layer as an overlay mask for the Layer Effect layer.
Step 22
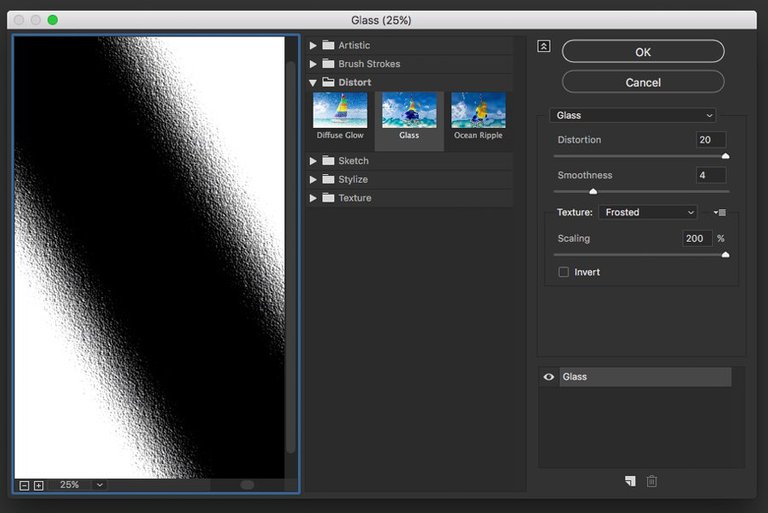
Go to Filter - Filter Gallery - Glass. Set Distortion to 20, and Smoothness to 4.
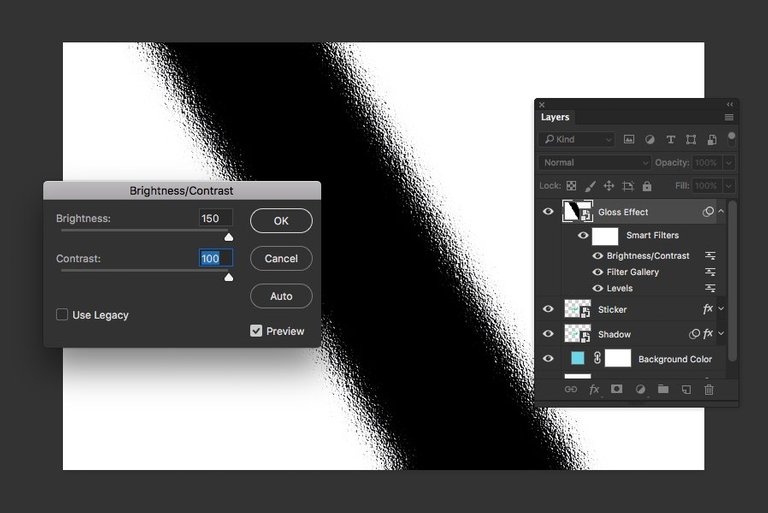
Step 23
Now, Image - Correction - Brightness / Contrast. Brightness 150, Contrast 100.
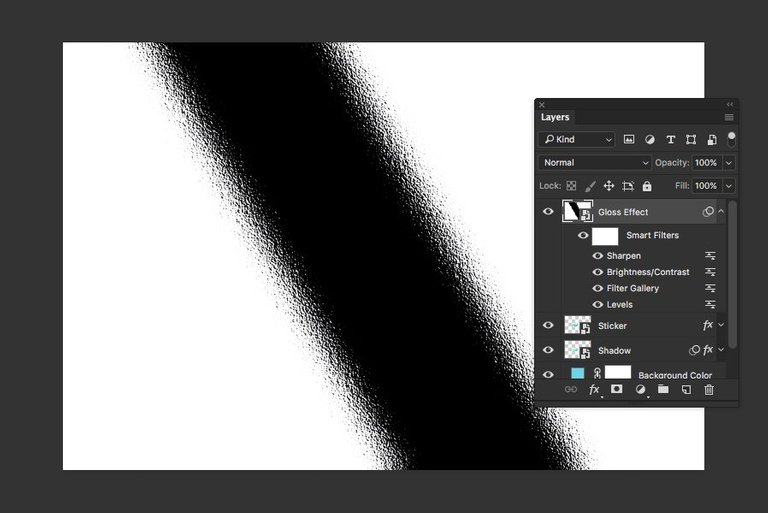
Step 24
Finally, add sharpness to the gloss. Go Filter - Sharpening Sharpness - Sharpness + (Filter> Sharpen> Sharpen).
Step 25
Make a copy of the Layer Effect layer and apply both glossy layers as a clipping mask for the Stiker layer. On the top copy, set the Soft Light and Opacity to 25%.
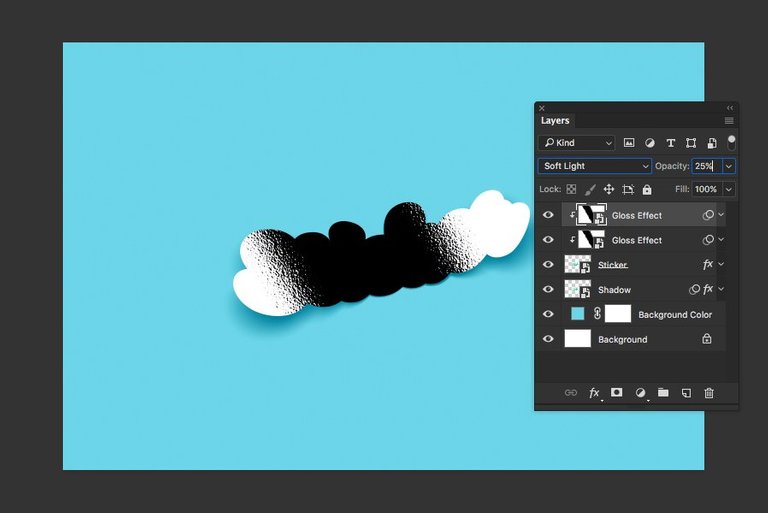
Step 26
In the Layer Effect Layer layer, set the Multiply mode, Opacity to 2%.
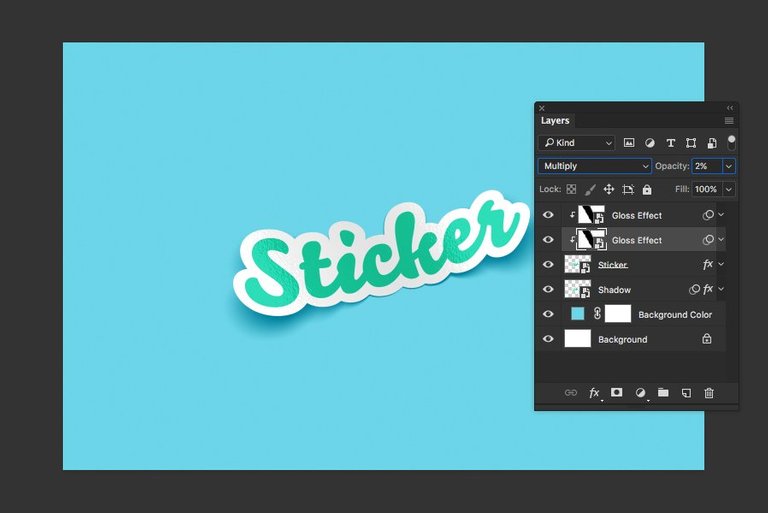
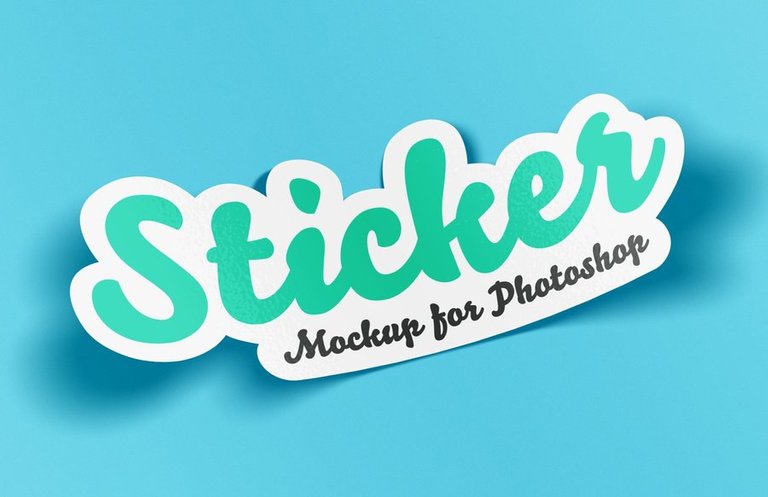
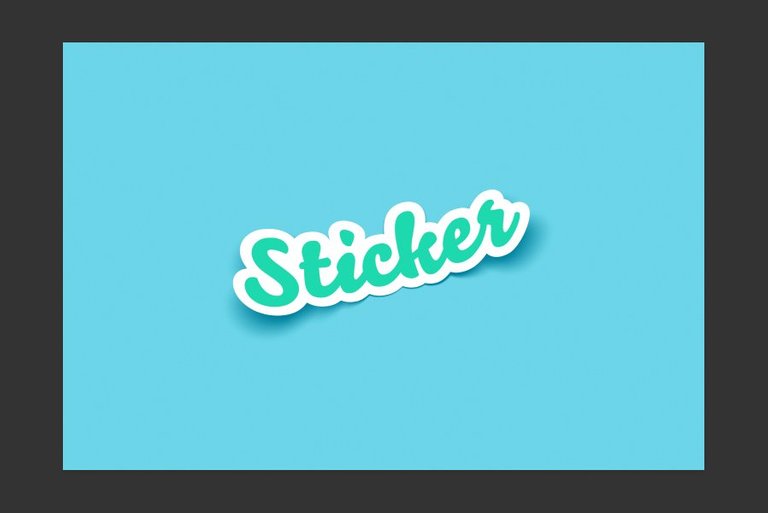
Conclusion
The final image of the sticker is in front of you. As you can see, simple techniques and effects can create a stunning result. And the most interesting, the layout of this sticker is easy to edit thanks to smart objects. By placing the text in them, you can immediately see the final image!
