Hi Steemians! Today we will learn how to use smart objects, smart effects and the most important - create Awesome Chrome Effect on text but You can use It on other objects too. I called that Most Legit Chrome Effect becouse when I surfed the Internet, I did not find a better effect. Let's do this!
Firstly, final result: 
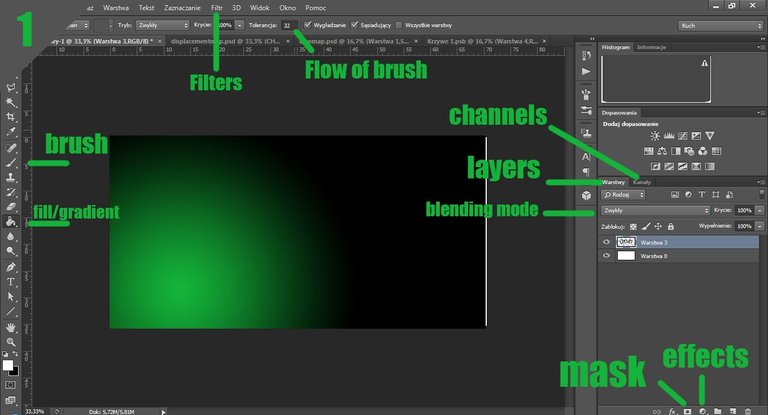
Step 0.5: Tools
Here you have everything we will use in this project
Step 1: Create text or somethig more.
Write some text / put some image or create somethig yours. I created something like that.

Remember the font, should be thick - "Impact" font is good enough.
Step 2: Creating a Displacement Map
Background layer should be white and your object black. First we have to deal with the displacement map, first right-click on the layer of your object (if it's text, right-click on the layer and "Rasterize the text") and choose "Convert to a smart object". Holding the left ctrl click on the layer thumbnail to select the object. Go to the "Channels" window and select "Create new channel". You should have created a new channel filled with black, when you have selected your object, press the left alt + backspace to fill the selection with white or use "Paint Bucket Tool". Copy the channel by dragging it to the "Create a new channel" icon or right-click on the channel and choose "duplicate channel".
Call this first channel "First", call the second channel "Blurred". Ctrl + D to deselect all.
You should have that situation 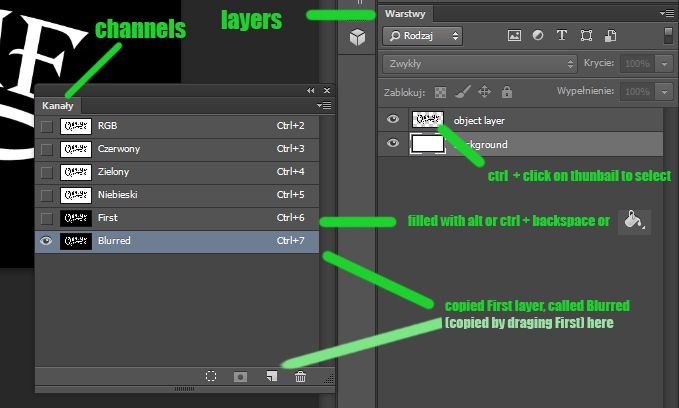
Tip: If you don't see Channels window go to "Window" - "Channels" in the top menu.
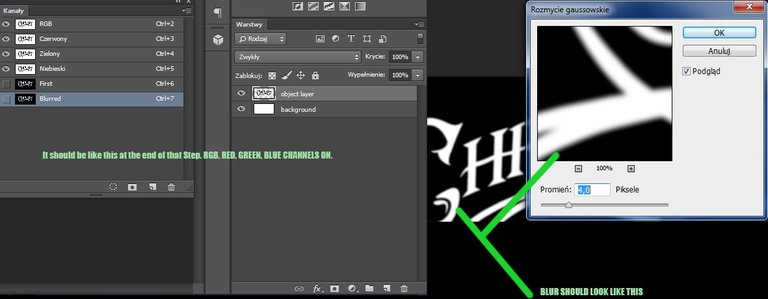
Step 3: Creating a Displacement Map - Part 2
Now when we are on the "Blurred" channel, we click Filter - Blur - Gaussian Blur and set (in my case 4px at the size of image 2000px / 1000px) blur so that it was only a little visible (I will show on the screenshot). Apply this. Now, while still on the "Blurred" channel, we click on the "First" channel thumbnail to select the outline of the object. In this section, we want to remove the blur outside the object, i.e. we have to invert the selection ctrl + shift + i and delete this unwanted content - Delete Key. Now (we are still all the time in "Blurred" channel) Ctrl + A to select all, Ctrl + C to copy this, Ctrl + N to create new document, Ctrl + V in new document to paste it there. In this moment In the new document you should have a white text on a black background. We save this new document as displacement.psd and close it. In our main document we enter the RGB channel (we unmark the "Blurred" channel - eye icon at channel). We should have only the RGB , Red, Green and Blue channels marked - eye icon. End of work with it, we can finally close this window.

Step 4: Background
To reflect something, you have to have something to reflect from, that's why we now add a background, preferably landscapes, clouds etc.
The most important thing is to adjust the size of the background to our workspace - Ctrl + T, it can not be bigger or smaller than the working area because then there will be complications with the location of the reflection. Convert background image to smart object - right-click on layer of background and "Convert as a smart object". I used clouds with sky, look source image at the top of post.
Step 5: Reflection
Being on the layer with the background (the layer with the object can be hidden by clicking the eye icon) click Filter - Filters Gallery - Glass. Should be in Distort folder. As texture you use displacementmap.psd file. Settings depends on your size of image and your taste. I used 15 distortion 8 smoothness and scale 100%. When you are fine with result click "Apply". Note that you can always change settings of Filter becouse we converted it to Smart Object. Now you should be still on that layer, go back to Channels and with left ctrl click on thunbail of "First" channel to select text. When selected click "Mask" icon under layers to trim image to the text contours and call that layer "Chrome". Ok, now seriously, we can close Channels window. It should be now somethig like this: 
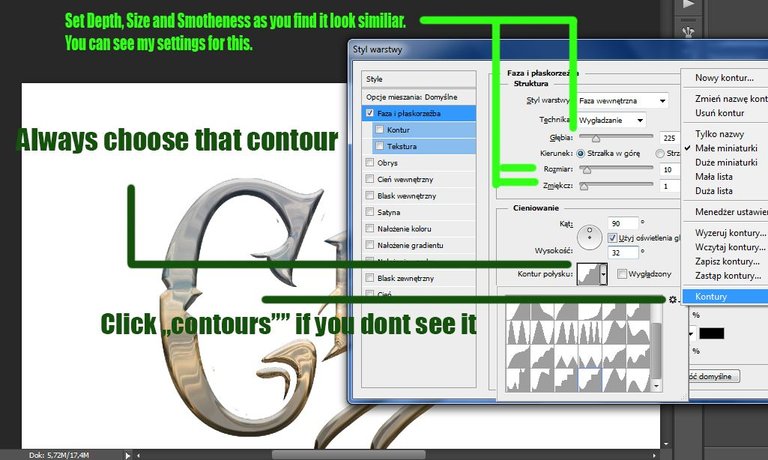
Step 6: Blending options
We will set only Bevel and Emboss + some grafient. Right click on our "Chrome" layer and choose "Blending Options". I will describe that part with screeonshots better.
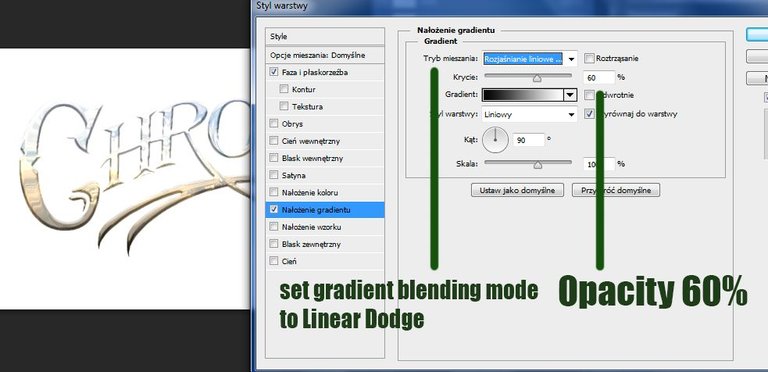
When finished it, let's copy that layer with Ctrl + J and clear that new layer style: Right-click - "Clear layer style". Change that layer blending mode to "Color Dodge", 40% opacity.
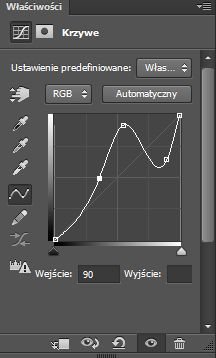
Step 7: Curves
Let's click "Effect" icon under layers, choose Curves and adjust them somethig like me or just experiment with it!
Select layer with curves, layer with object (text) and copy of that layer. When 3 selected, right-click on one of them and again choose "Convert to Smart Object". Theese 3 layers should be now 1 smart object. If you want to change somethig in them just click twice on smart object layer. On that smart object layer set Drop Shadow in Blending Options. You should get somethig like this:

Step 8: Setting up Background.
I use for my background the same image as I used for text. Just gradient it like before with green colour, gradient blending mode - hard light and with Ctrl + U you can set brightness.
Step 9: Add some lights.
Set Rounded Brush size around 35, Hardness 0% and Flow 25 then paint some light drops at contours of text with white colour. Mostly on top of the text, on bright parts.

And that's it! Hope you enjoyed and found it helpfull! If you got some questions, ask in comments, will answer soon!

I don't know that i should thank you or what? :D My english is still poor and I don't know meaning of flip. Anyways thank you for your time!