Hey guys, after finishing our life-sized Steemit Logo, here is our how-to guide.
We started the same way as we did with the small one - printed it on 88 DIN-A4 pages.

Next step was to remove all pure white sheets of paper. So at the end we only had the ones, that something printed was on it. Then we cut them with scissors and put them together with duct tape to get a template. The hitch was we needed to be 100% correct otherwise the hole logo would be wrong.

Meanwhile we worked on the styrofoam. We tried to get +2 meter high styrofoam plates, but couldn't find any. So we had to buy twelve smaller plates and glue (special styrofoam glue) them together to reach 2 meter height.

To see if our math was correct we put the template on the styrofoam. First the big one, because we had the presumption it would stick out left and right due the swings in the logo. But our presumptions haven’t confirmed luckily.


After that we pinned our template on the styrofoam so we could draw the outlines to cut it out with a styrofoam cutter. (Burning styrofoam smells disgusting) We needed to be very accurate to get the front and the back side being equal.


We did the same pattern six times. Two for the middle and four for the left and right pieces.

To get the whole logo really deep we put styrofoam pieces between the front and the back, so there is a total depth of 3x8cm. We placed the pieces a bit over the edge and honed them down to get a exact and accurate edge. After some time to dry we put some small wooden sticks in to support the glue and stability.


Next step was to cover the whole structure with paper and glue. This would also help to increase stability. We used lots of glue and covered it with three to four layers of paper.


This took us several days, because we needed to wait till it is dry enough so we could put on the next layers.

With the last paper layer it looked like this:

As we were about to print the newspaper we we realized that only newspaper doesn't look good and wasn't stable enough for the size of our logo.

We were in serious trouble. The whole project seemed to be a failure. So we had a brainstorm to fix the problem and how we could reinforce the outer layer. Our best solution was to support it with “WALLPAPER”! The wallpaper brings enough stability for this size and is also way better for the paint than newspaper. So we went yet again to the Baumarkt and bought some plain white newspaper. It turned out pretty good we’d say ;)


During drying process we had to face our biggest problem. How we would build the holder for the logo. The hardest part was to make clear that the hole logo was on the same height and accurate to each other. We had different ideas and many discussions and settled for a styrofoam construction on the back side of the logo.


We fixed the holder with glue and supported it with wooden sticks like before.
Luckily it was strong enough, so the paint job could start.

Again we had to wait till the glue dried. For our last step we needed a serious plan and some clutch execution to get the logo on the baseplate and at same distance to each other and on the same height. We calculated the middle of the plate and the needed distance to each other and sketched in where the logo needed to be. We fixed the pole with three screws in the pre drilled holes.

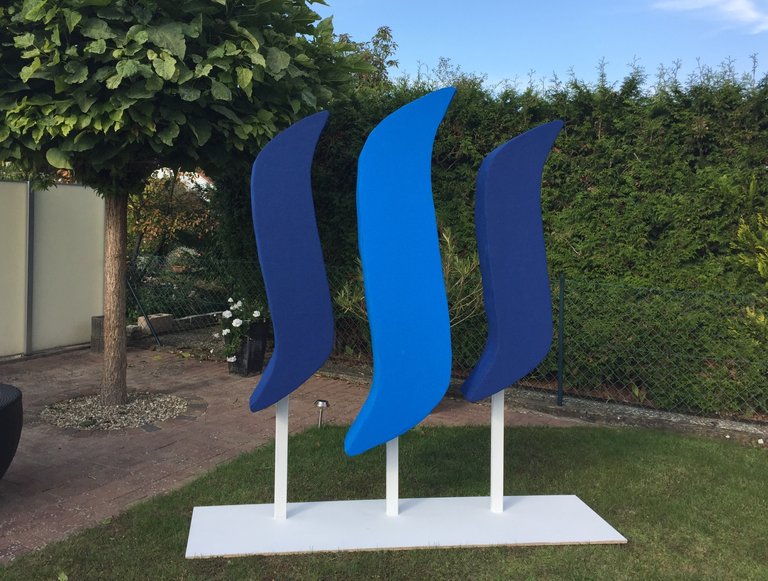
Now we just needed one final paint job to finish our journey to the life-sized Steemit logo and...
There we go!!

It is absolutely satisfying to see our finished logo. It’s awesome how far we came and what we could accomplish from just a plan in our minds to the finished logo, with teamwork, lot of time, sweat and some strong nerves.
Now everyone can build their own life-sized Steemit logo.
We really would like to see others following our instructions and show us the power of our community!
We thank all our supporters, which helped us to get this done. It’s awesome what we can accomplish when we help all together.
Kind regards!
@paa and friends!
PS: See you soon on Steemfest! :D
Wow, that took some serious time and effort. Definitely worth an upvote and a comment!
STEEM ON!!
Thank you!
Haha that is a fantastic idea! What a great living room decoration! I want one for the office too ;)
You can buy one from us ;)
I love it...Good work...worth an UPVOTE
Congratulations @paa! You have received a personal award!
Click on the badge to view your own Board of Honor on SteemitBoard.
For more information about this award, click here
Congratulations @paa! You received a personal award!
You can view your badges on your Steem Board and compare to others on the Steem Ranking
Vote for @Steemitboard as a witness to get one more award and increased upvotes!