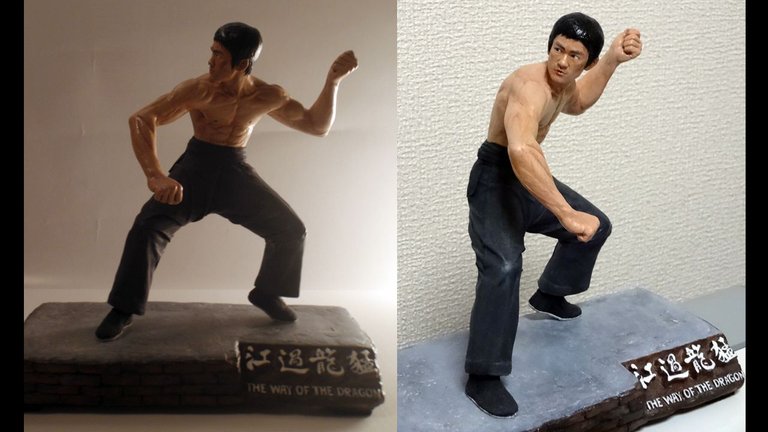
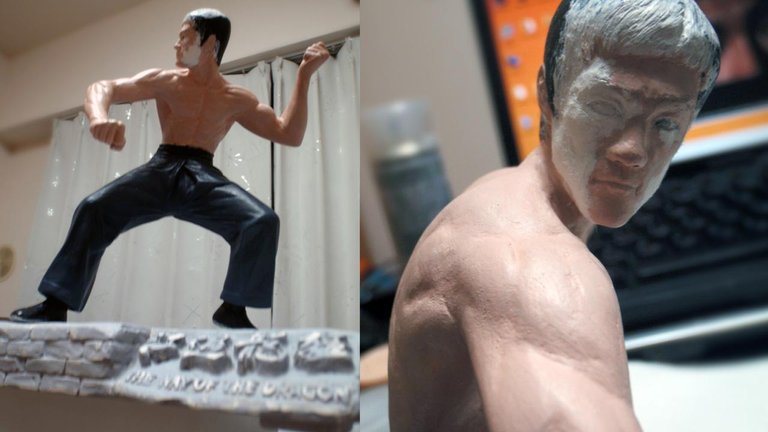
By the time the cat and mouse chase was over and the gladiators warmed up to do battle, the showdown would become the fight of the century. The level of choreography, fight psychology and drama set the bar so high that only a few? film fights have ever come close to reaching. What Tang Lung / Tong Loong and Colt succeeded in doing was taking its audience on a ride of transcendental quality--mesmerized by the contrasting styles, opposing colors and fluidity of motion. Add a psychedelic track with well timed camera zoom-ins and there my friend, you have a piece of inimitable film--virtually impossible to copy. We can bow down to the genius of Bruce Lee, who gave us this classic which was his very first motion picture he wrote, directed and produced besides starring and choreographing the action. Incomparable!


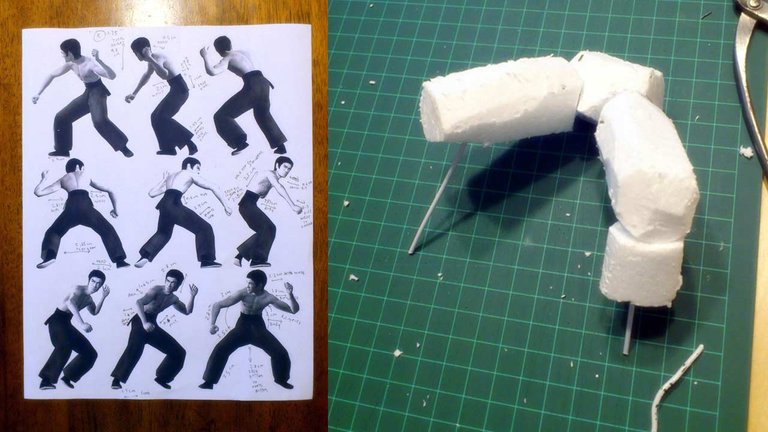
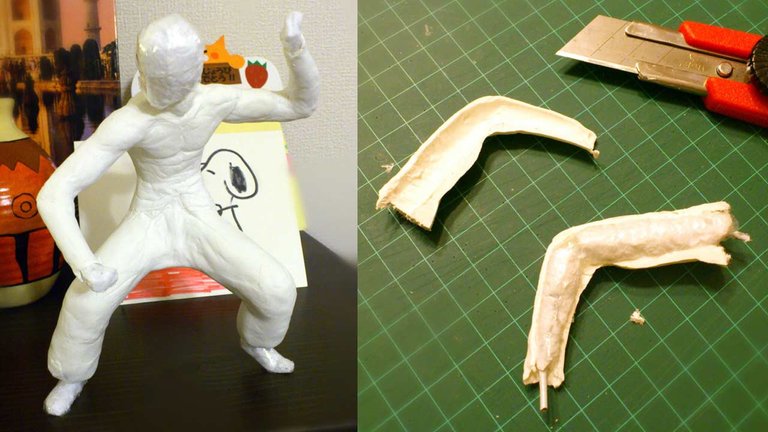
With my 3D Tang Lung model as reference, I began constructing the legs with aluminum wire coated with styrofoam blocks. The initial concept was to make the statue as a ball-jointed doll.
Establishing the legs with a strong foundation is vital in supporting the torso with splayed arms and tilting head. Balance is key. Once in the fixed position, the styrofoam blocks were glued down.
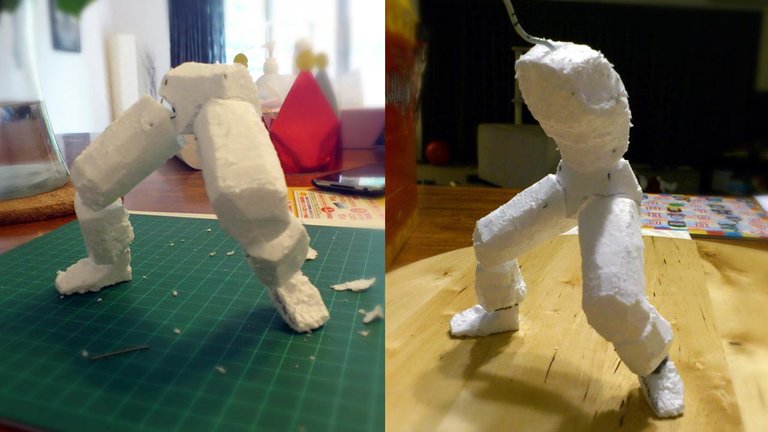
The styrofoam blocks were shaved down to get a general form. Modeling clay was used in the articulated areas to hold a temporary position while tweaking the pose.

With the entire body coated in styrofoam and shaved down. It was ready for the stone clay coating. Before that process, fine plastic was used to tightly wrap the two halves.

The first coat of Padico's Premier Stone Clay was applied to the body dusted with talcum powdered. I love this silky smooth clay and how it's ready to work right out of the package without much kneading.
I connectied the two halves by wetting down the ends and merging them together. The plastic wrapped inner styrofoam coating was easily removed due to the unsticking properties of the talcum powder.

Ball-jointed dolls are lightweight because they are hollow which became the goal even though I decided to make a statue instead. I continued to sculpt the torso and focus on the pants.
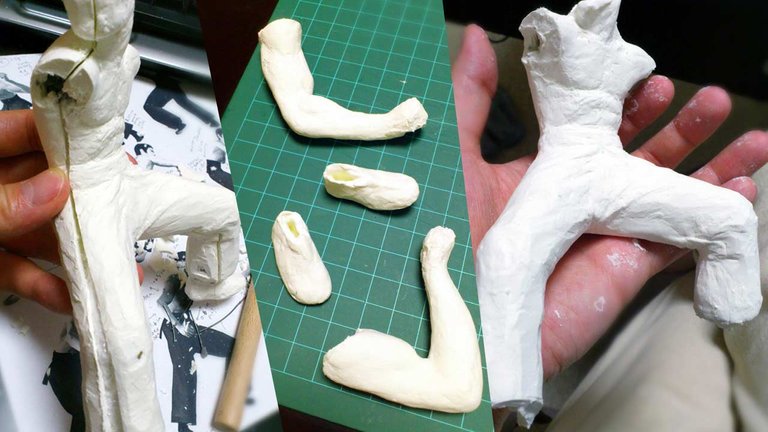
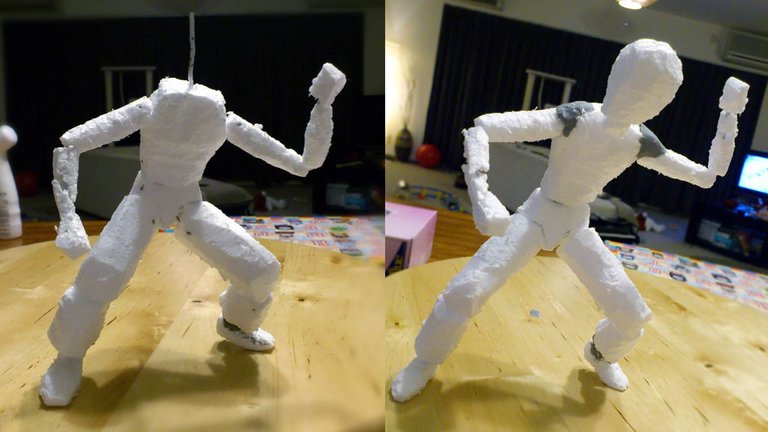
With the head in position, the body was split to extract the plastic wrapped styrofoam and aluminum coating. Hollowed out, the arms, feet and body were re-aligned and merged back together.
I had no plans to use fabric so continued to sculpt the drapery of the pants. All appendages were reattached.
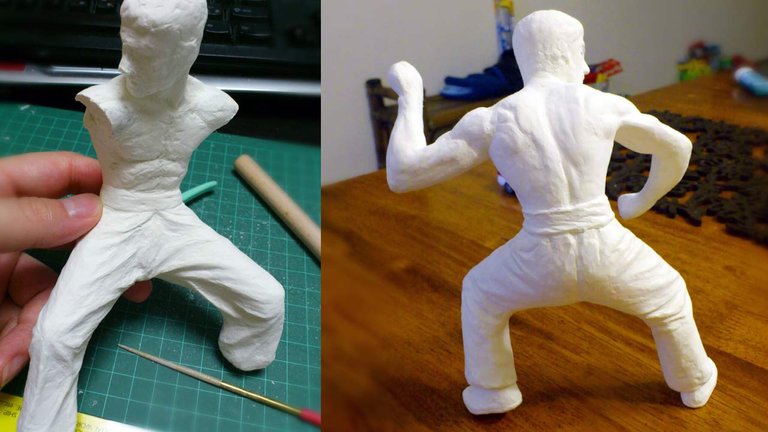
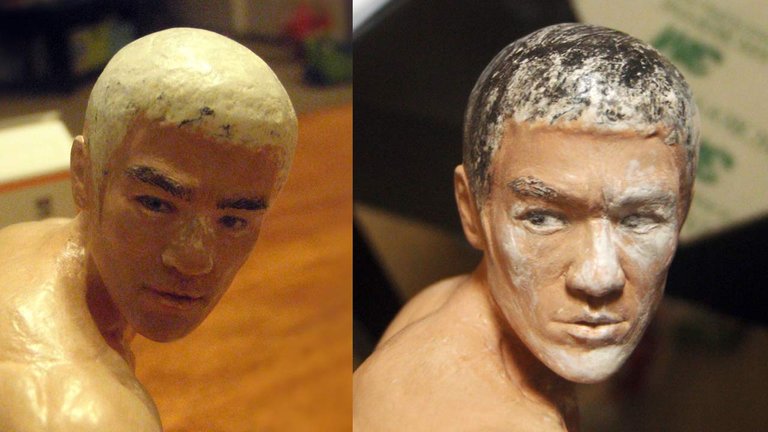
Detailing the face and refining the pose. Smoothing the stone clay by wiping the desired area with a damp paper towel.

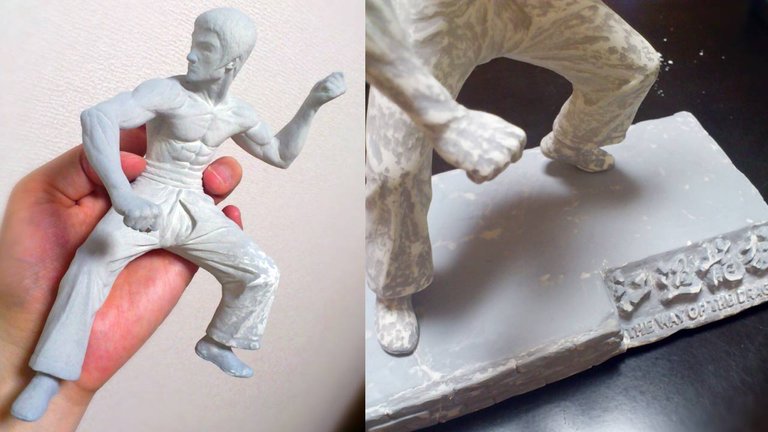
I can say this was my first ever sculpted statue. Little did I know, the head wasn't balanced with the body. My lack of sculpting experience would begin to haunt me. Sculpting the letters on the base was just the break I needed.
The base was constructed in light wood with a metal plate on the surface. Then it was coated in stone clay and bricks were sculpted all around the sides. The theme of the base is the Colosseum. The statue was ready for a first coat of primer.
Using Mr. Hobby's Mr. SURFACER 1200 spray, I primed the statue and base. A quick sanding gave them a silky smooth feel.
The skin base coat in acrylic paints went on and soon, the chatters in my head to redo the face and head started to grow persistently.

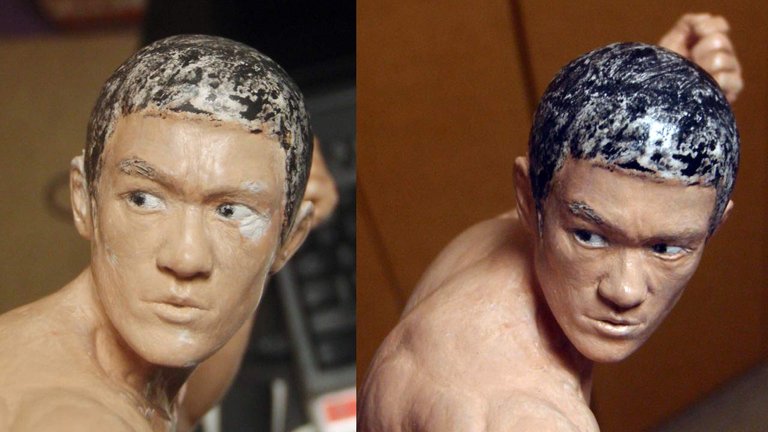
More coats of paint were applied. The notion and hope to fix the statue with paints all go out the window now.
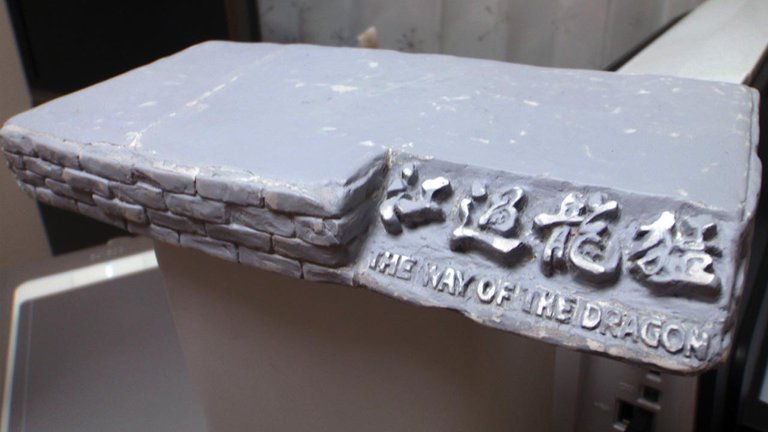
Returned to the base, sanding and refining each brick to give it the natural nonuniform appearance of aged bricks.
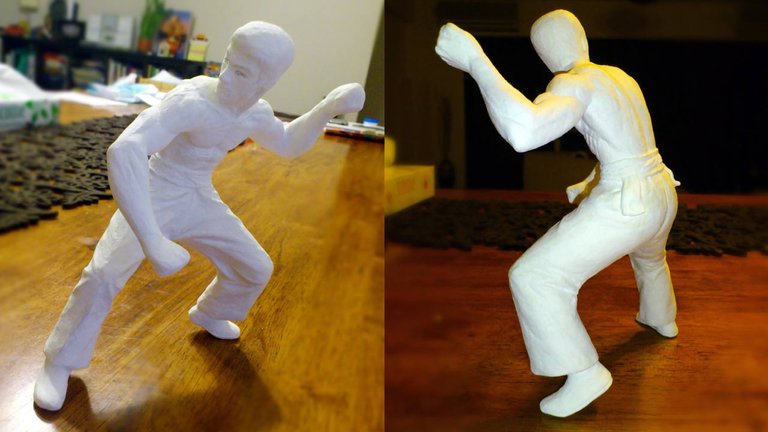
When Tang Lung stood on the base, there was no hesitation to start revising.
The balance between head, body and base were so off that it left me disappointed and disgusted.
When I thought it was good enough, it just meant, it could be better. My mother's wise words would run through my mind: "There's always a taller mountain".
It would eat at me, provoking a challenge--to push my limited sculpting abilities further than I ever imagined. To become the proverbial 'taller mountain' my mother had instilled in me.
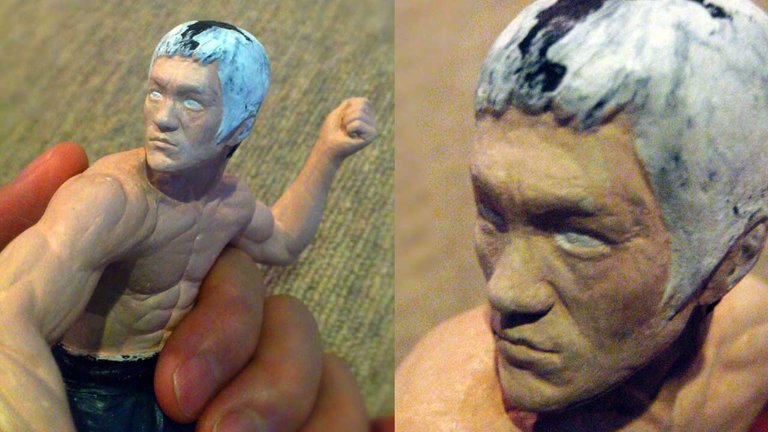
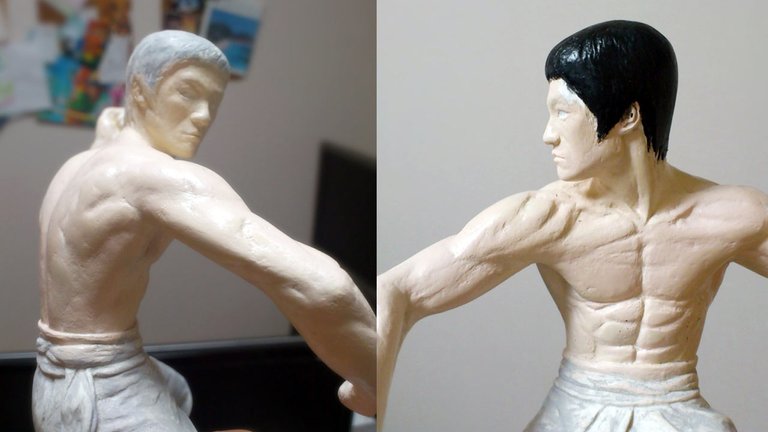
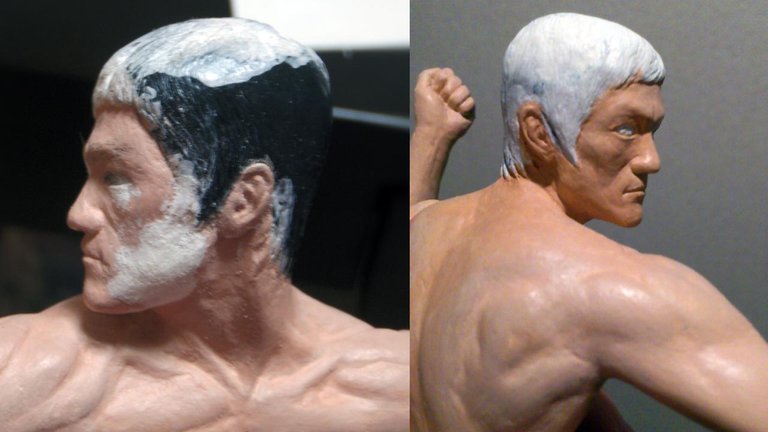
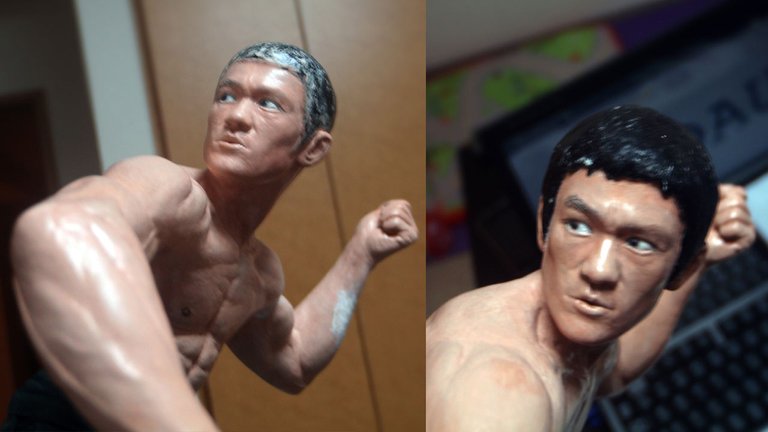
Bruce had that intense glare only he could do so how did I expect to pull it off.
It was a hypnotic glare that pierced into your soul by deconstructing your actions and sensing your thoughts.
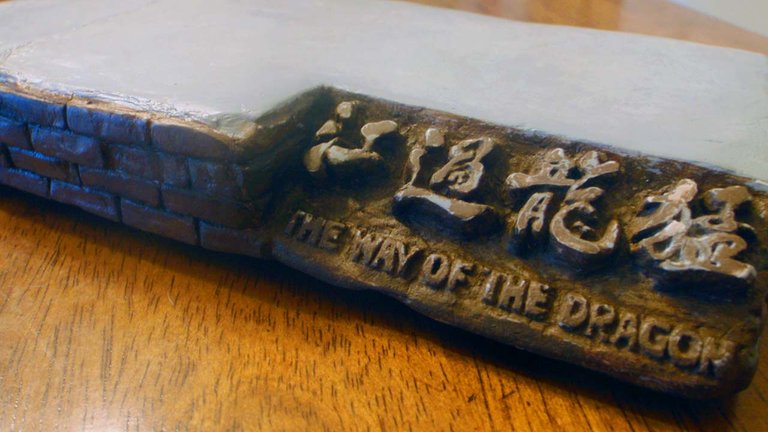
Sharpening the Chinese characters of the movie title pronounced "MAHNG LOONG GWO GONG" in Cantonese, read from right to left.
Another failed attempt at the eyes. I somehow managed to make him appear sleepy and bored. Definitely not ready for the fight of the century.

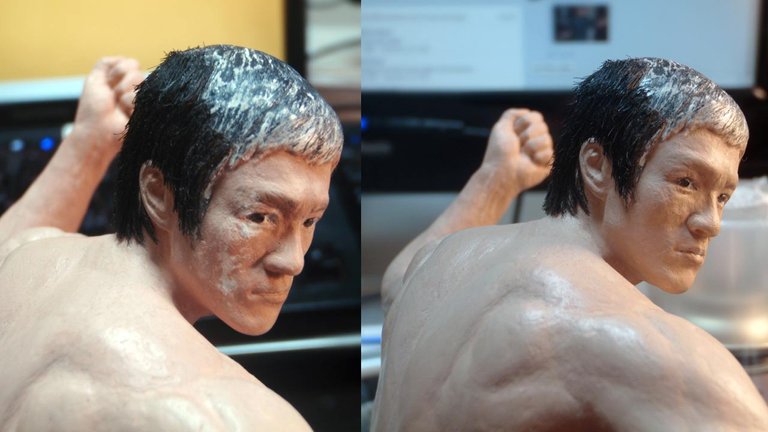
One more failed attempt before I tried a drastic approach on the eyes--using beads. Followed by doll hair.
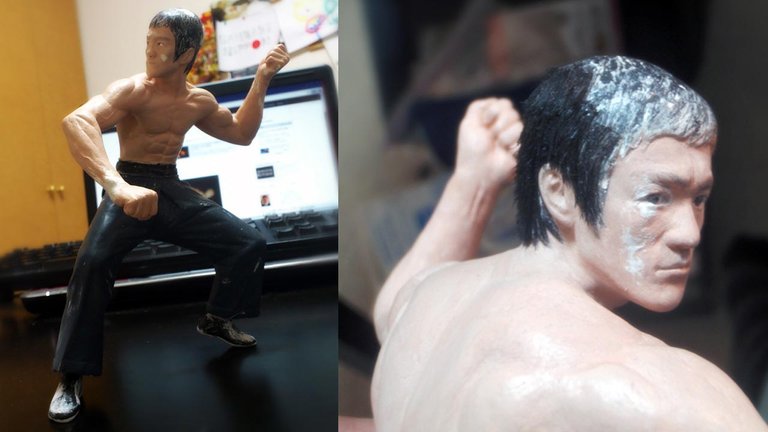
The results were actually pretty good. Both the eyes and hair gave it the lifelike quality I was after.
In retrospect, had I not given up on this version so soon, a more reserved yet calculated dragon could have made a wonderful piece as well.
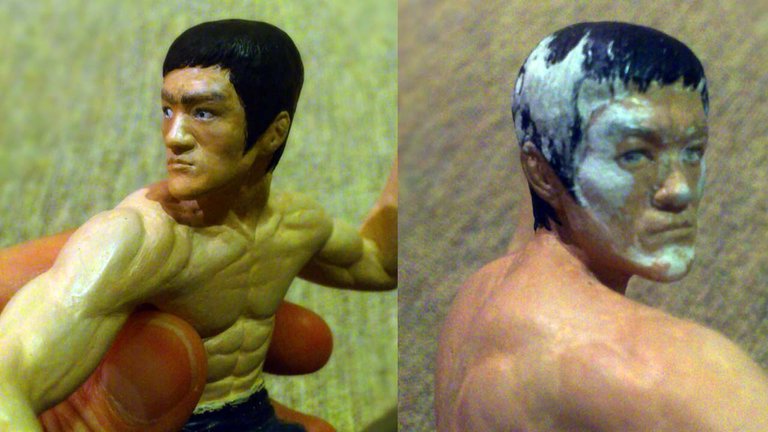
Once the hair was all in place, it was clear yet again... to start over. Yep, persist, persist, persist... but this time with a chip on my shoulder.
Farewell hair. It was fun while it lasted. During the application of doll hair, the decision to use fabric over the sculpted pants was supposed to be a test, but worked out better than I expected.
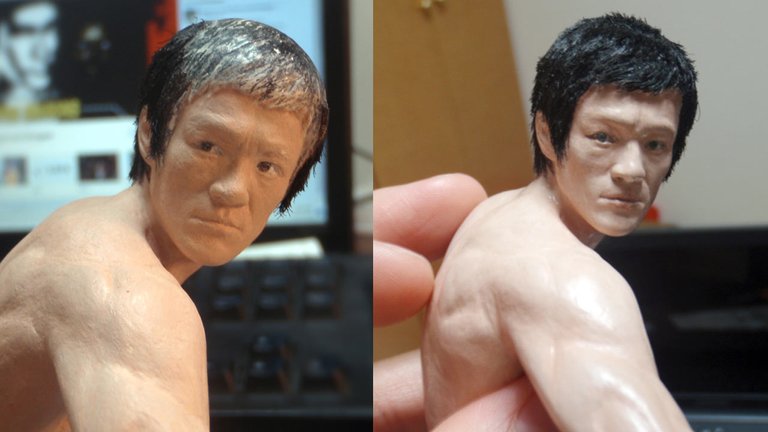
After much contemplation, the miniscule beads in the eyes were removed and the whole face was revised. I kept the hair on the eyebrows but that would also be shortlived.
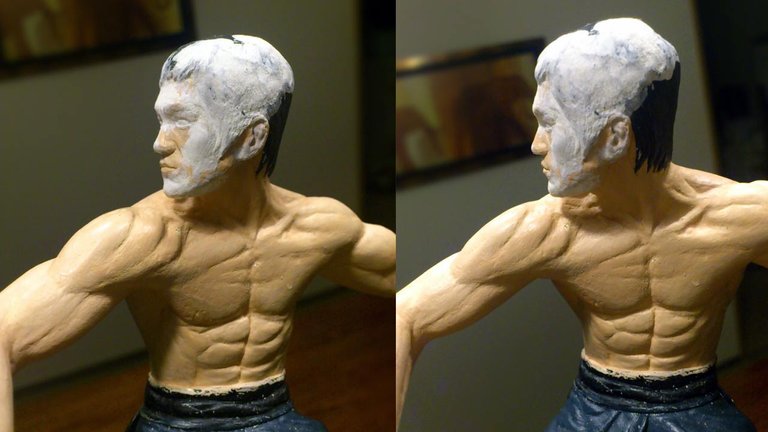
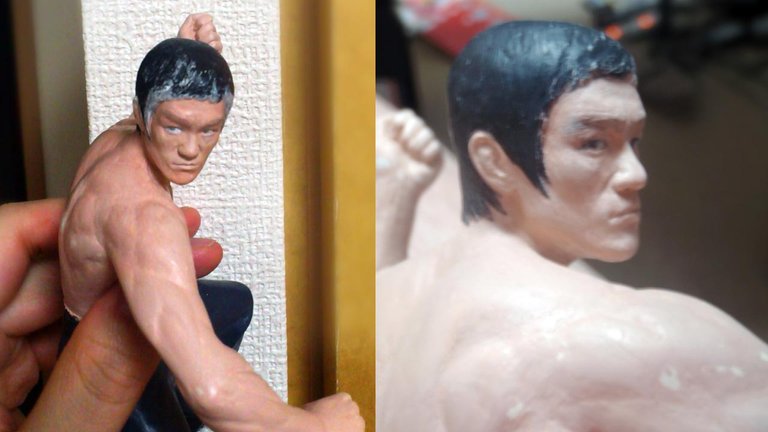
Finally, I can see light at the end of the tunnel. Number eight was a charm!
Using doll hair on the eyebrows worked so well, I stuck with it. One at a time by tweezers and glue.
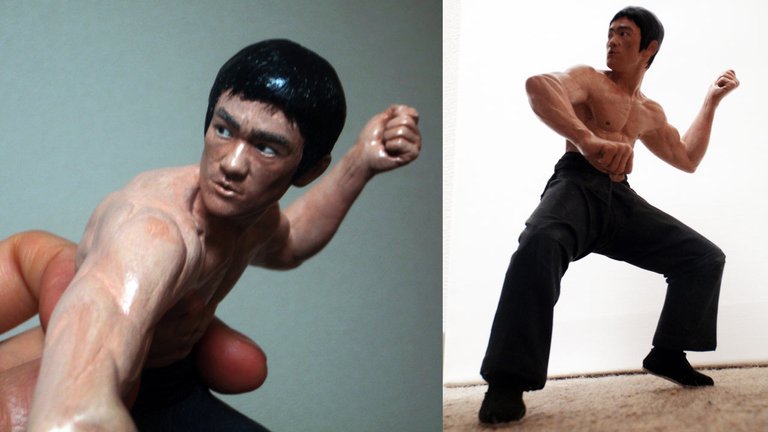
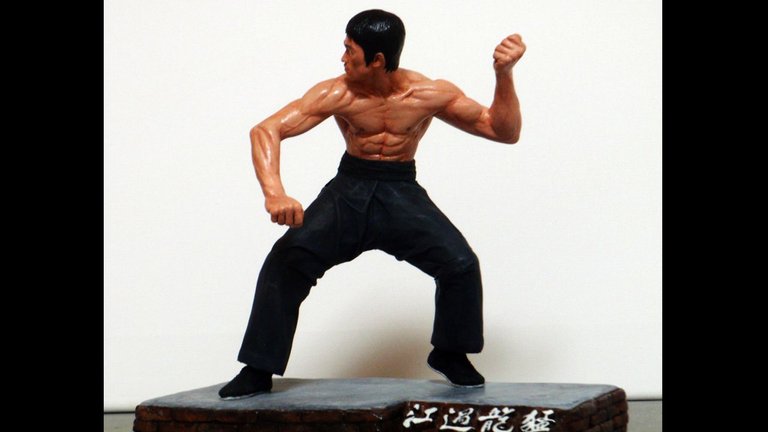
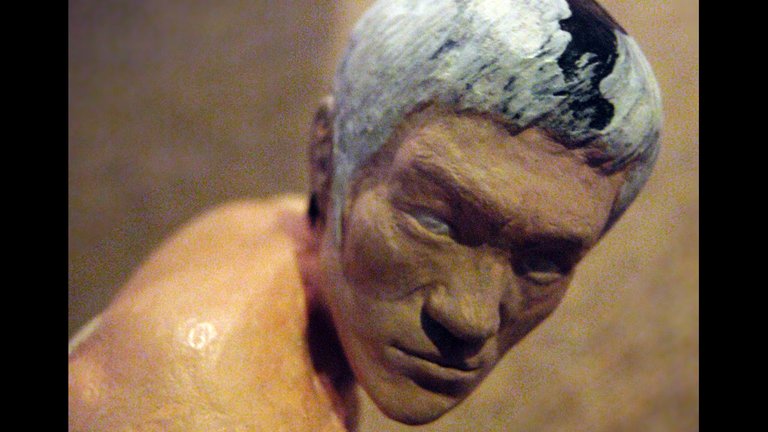
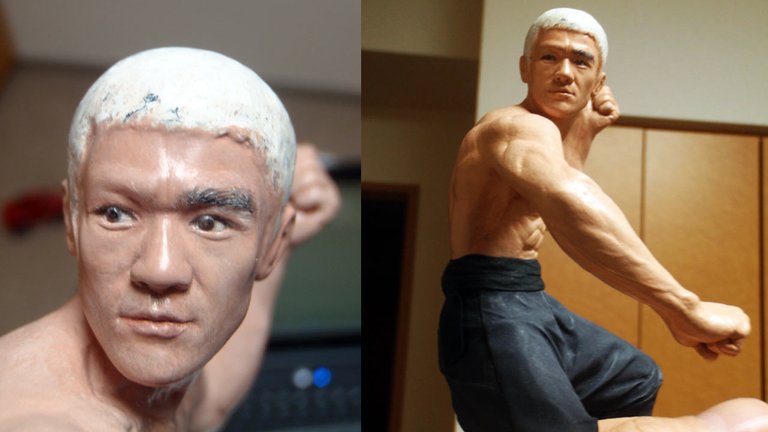
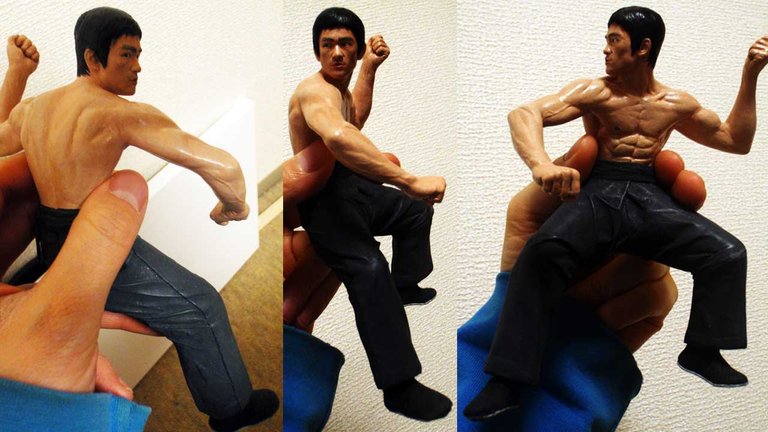
Chalk pastels added depth to the face. Balance in the statue piece was restored.

Bruising on the cheek and a bloody lip to finish off the painting portion of the statue.
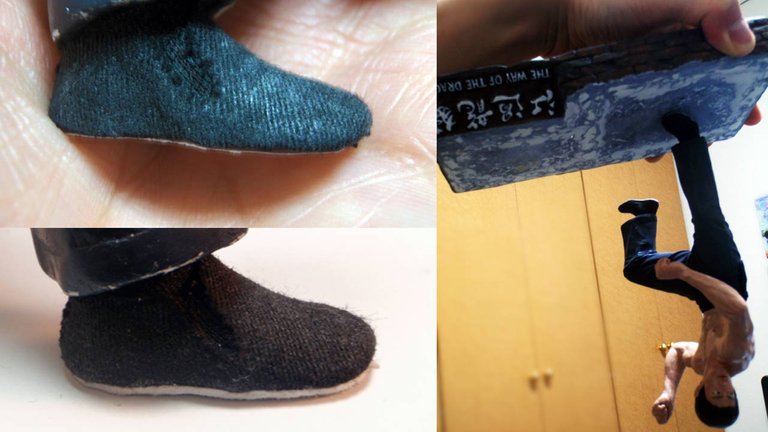
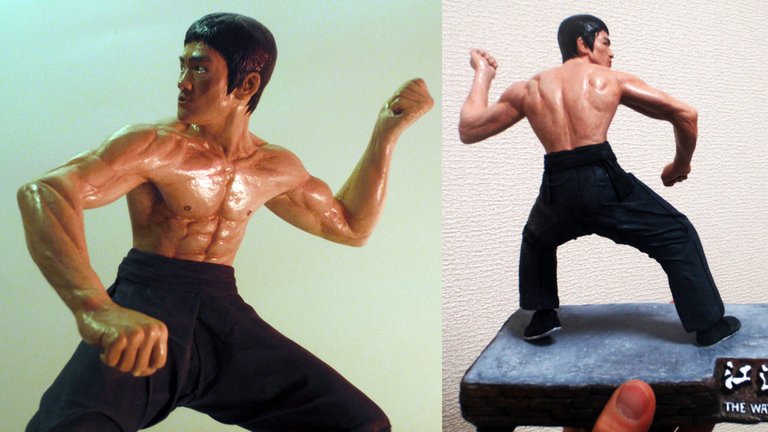
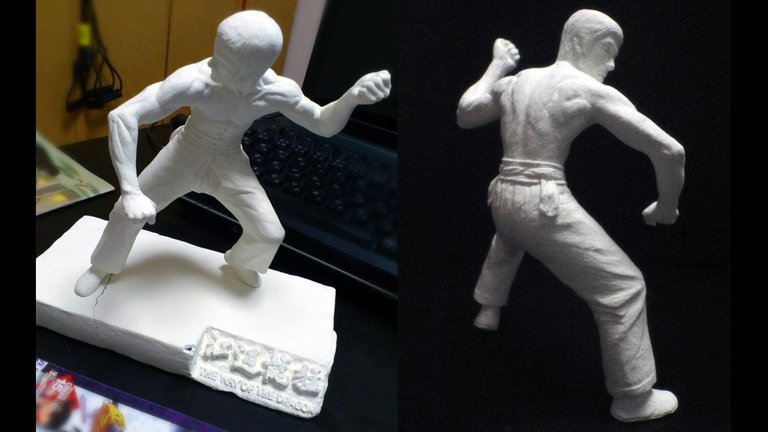
The kung fu slippers were made from a black baseball cap and the soles wrapped in vinyl. The embedded magnets would allow Tang Lung to stand securely on the metal surface of the base.

I couldn't accept my statue standing upright with a support post stuck in the middle of the base. The illusion of the realistic statue is lost when there is an obstruction at the waist or crotch propping it up.

I wanted Tang Lung to be positioned freely.

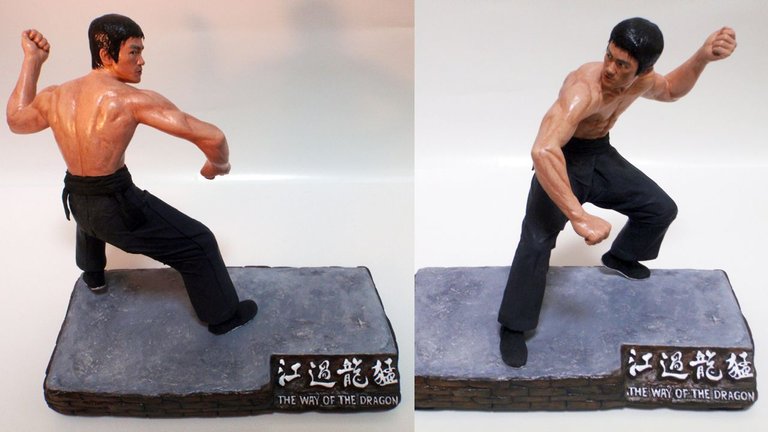
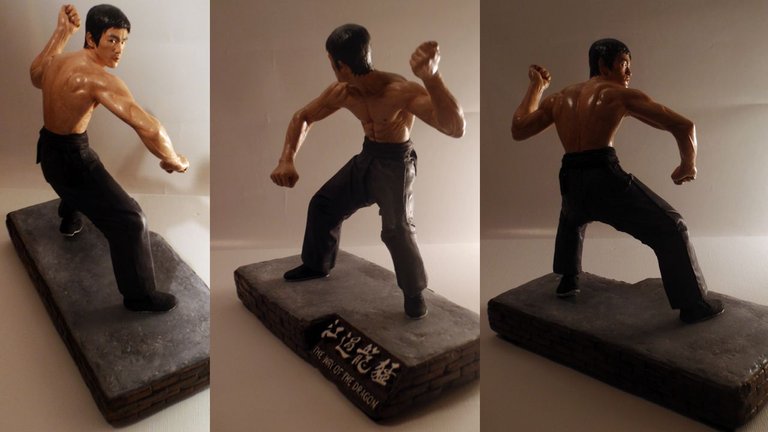
My first statue piece completed and it only took eight months!

Although it took eight months and eight tries to bring the visual in my mind to the real world, I didn't lose hope and kept trusting in my ability.
Looking back on these photos now, there are areas I would like to revise, but I don't think I will. Being a sentimental person, this Tang Lung statue will always be my first and the springboard into becoming a statuemaker.
- If you're interested to see my other step by step how-to handmake statue articles, please check out: OOAK Alabama Worley and OOAK Danny Torrance.
Have a good one!
This is dope man. And the patience it took...wow...very admirable.
I appreciate that a lot. Thanks.
Followed, and I'm going to RESTEEM this if I haven't already.
Thanks man. Followed back :)
You're welcome man. Hope to see more coming.
Thanks. Please take a look at my latest post :)
You should join the #COF Circle of Friends, good community to be in.
Thank you man! Love that shot of Bruce!
holy shit dude this is amazing, the doll hair actually looked pretty cool too but i love the way it turned out in the end, really neat stuff dude
Yeah when I look back at the doll hair version it's actually not that bad, but at that moment in time I was so zoned into another look and feel. No regrets though :) Thanks for your comment my man.
wow wow wow amazing art 0.0
Thank you thank you!
Definitely:
You love what you do .
I like your art.
Thx for this, you are one of all the diamonds on Steemit.
Wow! I appreciate your kind comment a lot. Thank you.
Epic!
Thank you!
What an artisan you are. That is truly magnificent - and in reading about all the revisions you went through, I can see you're not just dedicated to your craft.. but an "over-the-top" pro .
Thanks for this interesting journey; was a nice way to spend my morning. When you said you used doll hair for the eyebrows, I raised an eyebrow .
And the statue is certainly better by not being 'glued' to a support post on the base! Also, I thought the #Kung #Fu shoes came out well.
I know what Bruce Lee looked like - and this is very realistic. Out of the pictures, I enjoyed most the ones at beginning (styrofoam), and ones at the end (showing finished sculpture).
Also the ones showing his kung fu slippers, and the stages the hair went through
Thank you very much. I'm glad you enjoyed it. It was definitely a journey I'll never forget. Many times I thought to just pack it in having restarted on one too many face attempts. It was truly torturous lol, however, I would go through similar facial sculpting hells with other statues. Can't wait to show more of my pain haha.
Enjoyed is an understatement! This is amazing! Thank you for documenting the process. If u wanna do it again I'll buy one :) upvoted and resteemed!
You're welcome and thank you. Followed back. I would love to make another one but right now I've put statuemaking on hold. There's actually 11 unfinished Bruce Lee statues staring at me haha. When I moved from Japan to Canada, the one thing I left behind that I miss so badly is my art studio, the lighting and feel. Without it, I just don't feel it... I had made 9 statues there. After the completing the 10th one in Canada, I had to stop. It's been 6 months and I'm just waiting on the feeling to return. I'm sorry if that doesn't make any sense.
If I do return, absolutely, one will have your name on it. :)
Nice art with full of knowledge. I upvote you for your creation.
Thank you. I appreciate it.
Oh My God!
That's Bruce Lee. Unbelievable art. The minute details were incredibly made. I am fan of Lee and only they can feel what I feel.
@preserveddragons you really made a tribute to him.
Deep bow. Thank you for your great comment. It was an honor and privilege to make this statue of Bruce. Actually it was made for my Bruce Lee fans on Facebook. The fact that these fans (many super fans) know Bruce Lee's face and body so well that gave me motivation to deliver the most accurate portrait of Bruce Lee, no matter the cost or time or pain. I'm glad it worked out in the end :)
Especially the eyes... They are so catchy and lively.
I appreciate it. The look in his eyes was so difficult to capture. I learned so much about sculpting from his face alone :)
Wow nice post
Thank you.
salute to talent
grate job
Thank you!
Woww, this is amazing!! Make Conor McGregor next!
I would love to. Once I get my studio back to the way I want it with the proper lighting and feel, I'll return to statuemaking. There are 11 unfinished statues staring at me right now lol.
Nice ART! good hand with good angle... keep it up man!
Thank you. I appreciate it.
Wow...What breathtaking work! Bravo! definitely upvoted, resteemed and followed!
Thank you very much. Followed you back :)
Thank you so much!
Amazing man. You have great hands!
Thank you so much!
wow, you are so talented!
Thank you man I appreciate that.
Nice post, beautifully presented and explained. detail oriented with nice pics. thank you for sharing this with us, Upvoted
It's my pleasure. Thank you for checking out :)
I think you should do many samples, It will be more diverse
Good luck
Thank you. I will post more how-to's of my other statues. Stay tuned!
Fantastic work, well done & thanks for going to such lengths documenting the whole process and sharing it with us. You must be very proud of the final product, so much work, so much attention to detail, even the base with the brick work, and the lettering would have been time consuming and a little nerve wracking - one slip, all it takes, don't... make... one... F! I can fix, I can fix :')
For a laugh, here's what Google image search thought of your work.
Lol awesome comment. Yes the brick work more than anything else was truly a horror to do... Sculpting each one uniquely and then the painting and weathering effects... nightmares man haha. Letters also brought challenges due to scale mainly 🔬😎
It paid off, in droves.
Great work, you're an artisan and I look forward to seeing what you do next. Chance of disclosing identities of upcoming works?
I reckon you'd do a great Heeeeere's JOHNNY!!! wall plaque lol ;)
Ah, I shall show my Danny Torrance statue next :) Thanks for the inspiration.
I absolutely want to do the whole The Shining cast. Even Lloyd haha. I have plans in Oct. leading up to Halloween for a 'Shining' project.
I've actually put my statuemaking on hold to focus on 2D character art and tshirt designing. Here's some identities you might know which I've done:
Alabama Worley
King Conan
Thomas vs. Mondale's Henchman
Alex Wagner
Few more Bruce Lee's (The Big Boss, Game of Death and Enter the Dragon).
This is a not-to-miss channel, I am looking forward to so much.
Yes Lloyd is a marvelous & enigmatic character and there's an opportunity to pose he and Danny in such a way that if put opposite appear to be 'shining'.
BTW: 'that' carpet has turned up in a few places around the globe, I've seen it myself a few times here and there, I think some designers have a twisted sense of pop-reference-humour, others probably just think it's retro-chic.
You've given me a lot to look forward to, I better everyone feels the same way about your Halloween efforts each year.
I love that carpet. I've seen the pattern on a guy's Instagram page made into everything from bowties to bedsheets haha. I can understand his artistic sense to do that because the shining world that Stanley Kubrick has given visual life to has seeped into his soul just as it has mine. There were days when I was putting together my theory that Jack Torrance wasn't actually the caretaker, that all I did was eat, sleep and then analyze the film and theorize. I was stuck in that world for days lol.
Anyhow, October can't come soon enough. I'm dying to get started hehe :)
pfff... I order figures on amazon and it takes a day to arrive...
kidding! ;)
Really cool!
You really wanted to have his face a special look, hm?!
Haha you know that Bruce look, that murderous dead eye look? I had to have it one way or the other lol ✌
I know that feel
total awesomeness! great job and post here. thanks putting all the time in to get it right and produce such quality. i really appreciat it. :) im following u now and upvoted. thanks,
I appreciate that a lot. Followed you back 🙇
So awesome!! Bruce Lee was my true role model growing up 💪🏼🙌🏼💯
meep
meep :)
meep
Thank you. I know all about it 💪 I still look to him for self improvement and insight.
nice and good
Thank you!
Wow this is incredible! So inspiring <3 Hope to keep seeing your awesome creations.
Thank you very much. Working on a new statuemaking post atm. Can't wait to post it :)
very cool.. crazy cool.. @preserveddragons
salute!
Thanks man!
Amazingly creative, I love this! Good job man! :). Greeting @york1
Thank you for your nice comment. I appreciate it a lot.
Wonderfull . Thanks for sharing
My pleasure. Thanks for checking it out :)
Great art.
Thank you ✌
amazing!!! i love bruce lee :)
Thank you. Bruce is always in our hearts 💪😉
good job keep it up
Thank you!
wow
great work
Thank you very much 🙏
Very Cool....he looks like the real deal! what a ninja!
Thanks, I appreciate it ;)
Par Excellence...!!!
Thanks for sharing.
Appreciate it a lot.
This deserves my 100% upvote, because I'm a huge Bruce Lee fan.
Appreciate that alot, my man. Bruce Lee fans are like family to me 😉🙇
He's the only true movie martial artist, all the others are peasants.
Couldn't agree with you more. The man embodied martial arts and to bring that spirit and prowess on the big screen, man, what a genius!
wow great art man. you work like a 3D printer.
Haha that's cool. Appreciate it.
Hello. Excellent post of Bruce Lee, I like art. Greeting
Follow me
Thank you. Followed :)
omg!!! I can see why it took 8 months. This is freakin awesome!!!!
Haha you know it. Thank you :)
That is incredible dude. He even got that look in his eyes just like Bruce Lee would look, the entire expression of his face and his body tension are very alike. Brilliant job man. Wow.
Thank you for your insightful comment. That tension is what makes Bruce Lee such a difficult subject to draw or sculpt.
I can easily imaging that it is a difficult task overall, but you rocked it man. Respect.
Appreciate it my man.
Oh man, amazing work! Congratulations, you made it perfect!
Thank you very much. Glad you enjoyed it.
This is amazing haha. I love it. Bruce Lee is buried close to where I grew up in Seattle. @preserveddragons great job keeping with it until you finished.
Thank you. I appreciate it. Have you visited his grave? It is the one thing top on my list to do when I visit the States again.
You are extremely creative and talented! It seems to be made in a toy factory
Wow. I appreciate that a lot. If a toy company would make one of my prototype statues, that would be epic!
But you are already a toy factory. You have to do more
Nice sculpture @preserveddragons So detailed. "Be like water"
I appreciate it my man.
Interesting post and interested my heart when he saw his greetings know my friends may we become friends.
Thank you. Yes definitely we can become friends.
Nice figurine
Thank you.
WOW!!!! You even captured the tension in his face....the whole body...WOW. You really got some talent! Bravo!
I appreciate it a lot thank you for your comment. I'm glad you mentioned the tension in his face. That was the single thing I couldn't capture until the 7 and a half month mark lol. Looking back I don't know how I stayed sane haha.
OMGosh!!!! 7,5 month!!! And you didn't throw mini Bruce against the wall?!?!? ayay...much respect! I would have gone coockoo after 2 weeks :p hihi
LOL. Trust me when I say everyone who knew I was making this statue said, "Just finish it already, it looks good enough!" and when I heard that, it made me want to redo it again haha...
Oooh lordy wuhahahahah!!! But I really respect your enthusiasm, energy and your patience!!! But from my part it was really worth it. And...what will your next project be?? :D
Have you seen 'The Shining?' The next statue I plan to show is Danny Torrance :)
Yessss I have seen this movie. OMGosh I was so scared!!! Well I was 14 years hahaha. Can't wait to see your work! For now...relax a little bit before you start giong nuts again :p
You did an amazing job! I love Bruce Lee! He's a phenomenal human being. His was a life well lived even though it was cut short. "Be like water" is one of the powerful quotes I will remember him by. Thanks for taking us through the process of your craft. It's awesome!
You're welcome and thank you very much. I appreciate your wonderful comment and I absolutely can't wait to show more Bruce Lee related artwork :)
This is amazing
Thank you!
the art is very good, I'm amazed at you
Appreciate it. Thank you very much.
Great !! I Love your picture by picture explanation !! i am searching this training since long time because i always think to do more with clay now i got something interesting to do lot more in hobby !! thanks !
You're very welcome and thank you. I hope you create something wonderful and then share with us your experiences using clay :) Happy sculpting!