Hello friends!
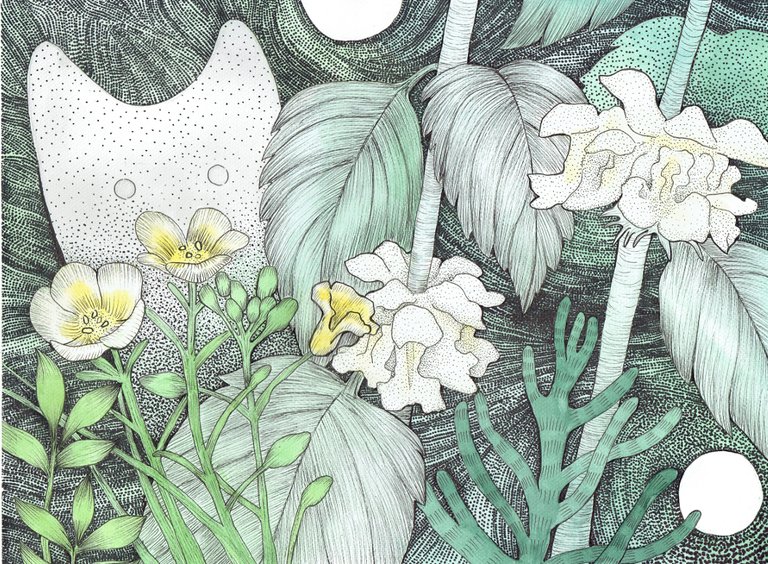
Today I have something bizarre for you :) A postcard from Shiny Forest with a close-up of a ghost hidden in some flowers.
Hard to say if this ghost is shy... Lurking curiously in the back, he can't decide if he wants to come out and play or not. Well, I say we give the ghost some more time and who knows, maybe we'll be even visiting that secret garden of his soon :)
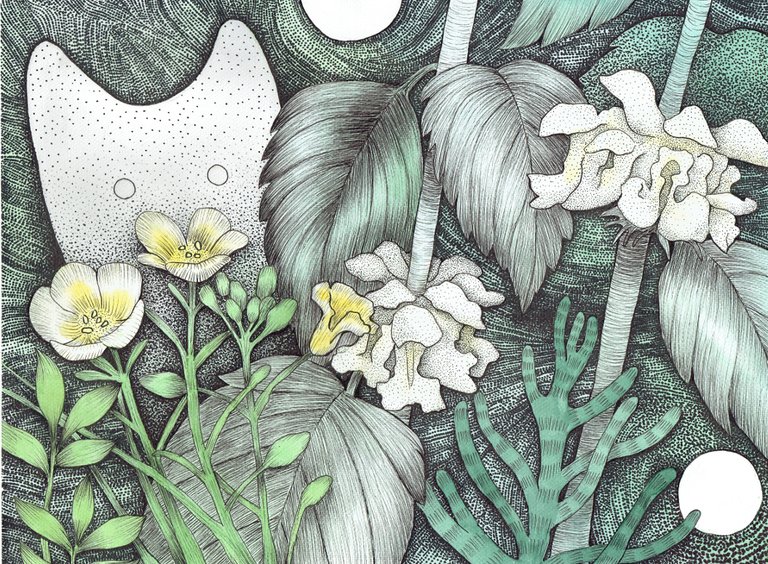
Watercolor, pen and ink on paper, 30 x 40 cm
I have to admit that I really enjoy mixing watercolor with pen! But it's not an easy marriage. My progression is slow and careful, I watch out for my every move, trying not to ruin the whole piece... I got used to modifying a blank space to my liking with my black and white works . But with colorful ones it's harder to decide what texture to choose, and very often the outcomes of my decisions are very unexpected. Basically I don't know what I'm doing ;) Hopefully you won't notice and greet my effort with a smile hah :)
Below I will be explaining myself how did this piece even happen 👌
TOOLS AND MATERIALS THAT I USED FOR THIS ART
- Cold press, 300 g/m2 watercolor paper- unfortunately I cannot give you any more specific info about it, because I lost the block cover;
- Sharp pencil;
- White Nights watercolours;
- Masking fluid;
- A 241 pure squirrel Restaurohouse brush - big and flat;
- A 24 Pure Squirrel Kolibri brush- medium size;
- Pen;
- 0.1 and 0.3 markers.
STAGES OF ARTWORK
A delicate but thorough pencil sketch;
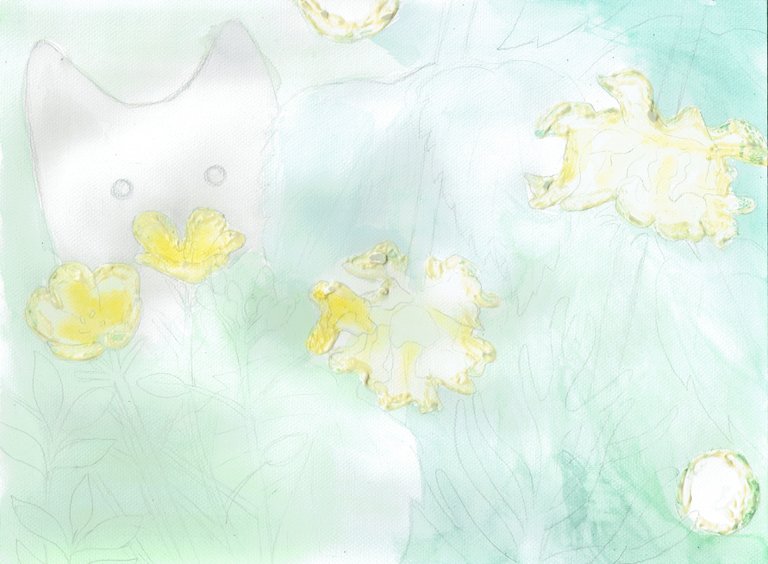
Wet-on-wet painting;
Wet-on-dry painting (adding more layers);
Outlining and getting rid of pencil marks;
Stippling and texturing;
Digital processing (resizing, cutting out the scan etc.).
PROGRESS STEP BY STEP
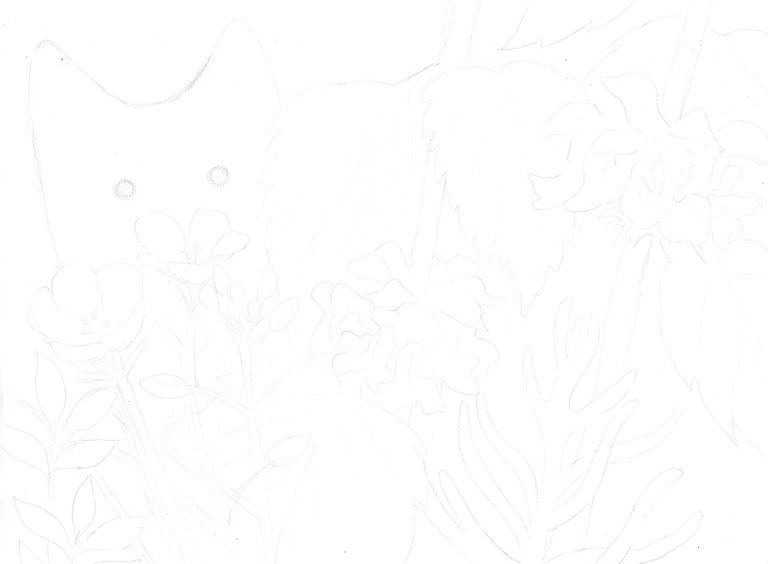
To begin with... First thing in my case is always a sketch ✎, and a quite accurate one, so I won't have any doubts as to where to put what colour when it comes to painting.
TIP 1: I use a sharp pencil and sketch delicately, so that the lines won't be very visible after I put some watercolor on. I've drawn with soft and dark pencils before, and they didn't go well with watercolor in my case. Besides, I wanted to give my art some distinct pen outlines, which was another reason to keep it clean.
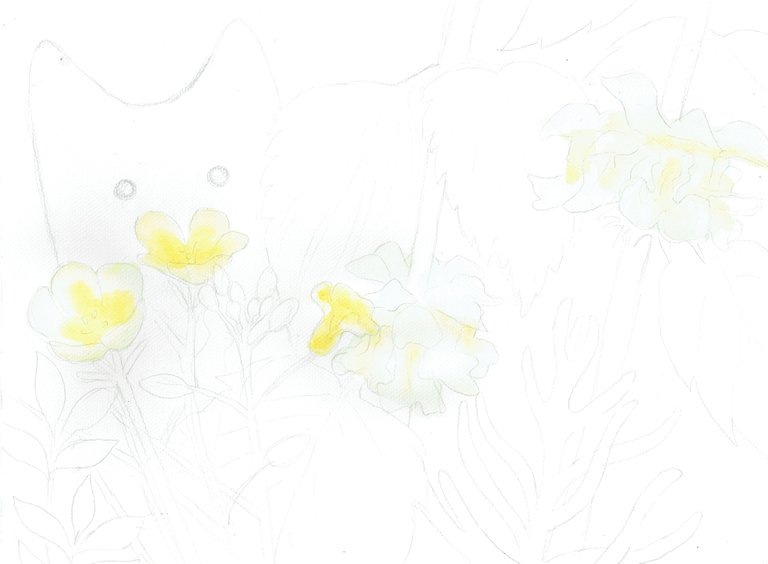
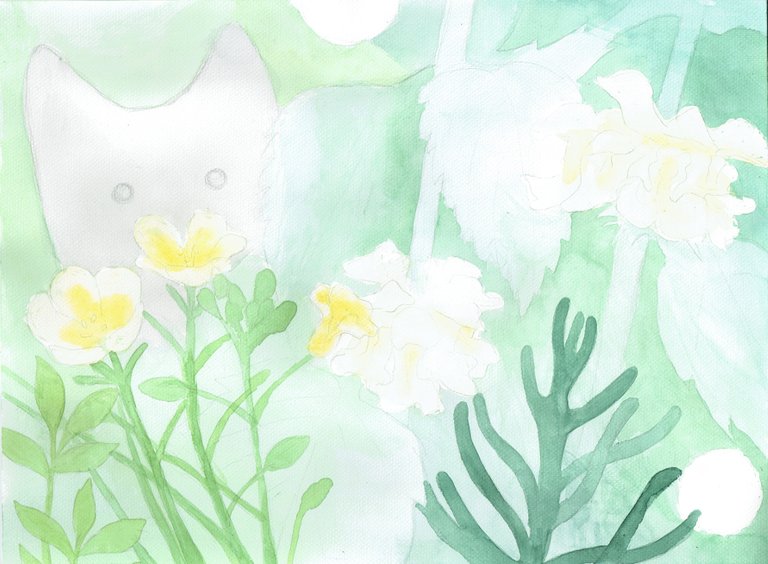
I knew I wanted to have big light-coloured spaces in my painting, which would contrast with the darker background. Some of them (balls of light) I left completely white, and some of them I painted with light yellow hues (flower blossoms). I waited for them to dry out (by using a hairdryer, hehe), before I moved on to the next step.
TIP 2: you can mask not only the white, but also the light colored parts of the drawing using masking fluid. In fact, you can mask even vividly colored parts of the drawing if you need them untouched by other colors :)
After the balls of light and flowers dried completely, I masked them with a masking fluid. As you can see above, it was a struggle. My masking fluid got really dense and formed some huge clots on the paper. I waited for the masking fluid to dry out and sprayed the paper with water ( I have a small cosmetic dispenser that I use for this purpose) and I put first layer of color with a big flat brush. I made several big global strokes with my brush. The colors are green, green mixed with yellow, emerald green and a a little bit of indigo mixed in. This stage is called wet-in wet watercolor (wet paint on wet background), and it results in diffused, diluted colors.
The very second that the painting has dried, I took off all of the masking fluid (fortunately this time it didn't cause me any troubles, like tearing of the paper etc.) and I put paint on the frontal plants (green on the left, and indigo mixed with emerald green on the right). This is called wet-on-dry painting. It gives sharp edges to your brush strokes and more vivid colors.
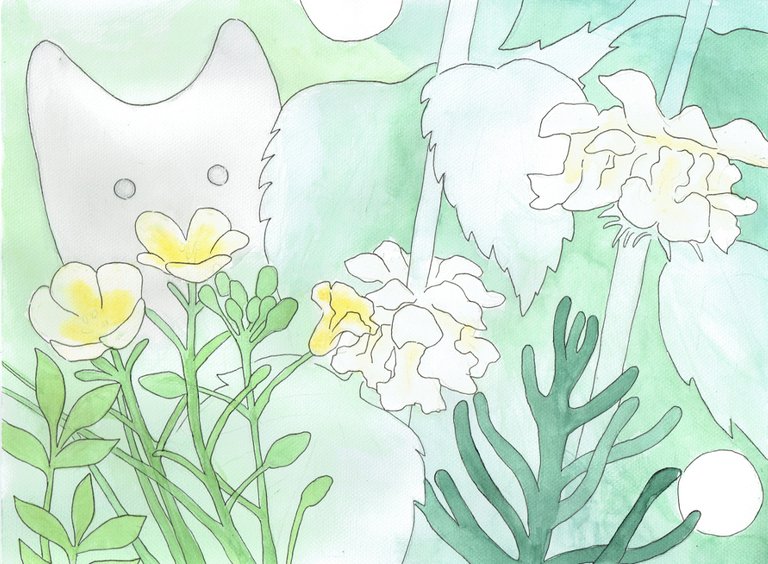
Once again I had to wait for the painting to dry :) And then I proceeded with a loose pen outline. This stage always shows me where I stand, meaning some general impression and hints where to start best.
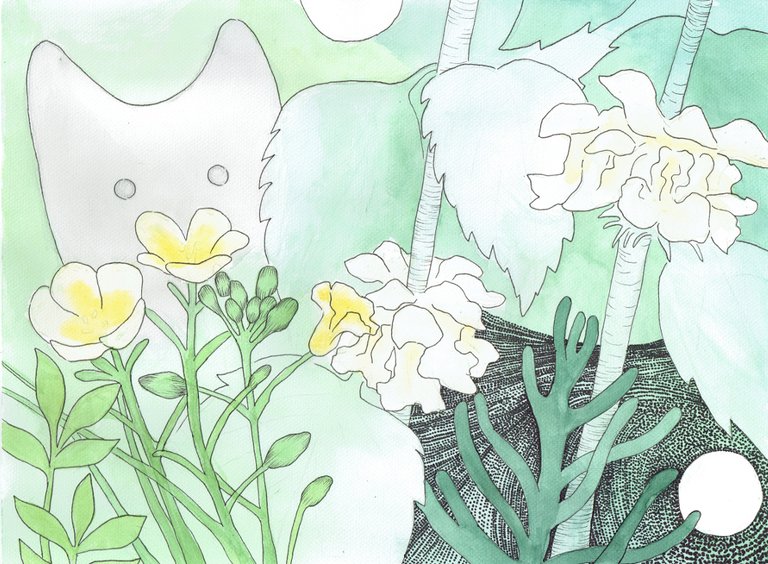
Usually I start with the background, to create depth and leave the frontal parts for the end. Apparently I'm going through my whirling stippling phase now, guys :) I really like how it looks.
When I was sort of finished with the background, I went for the plants and the ghost. I wanted to try some new textures, so I gave the plant in the bottom these small lines. I think the impression is that it's flickering. I felt the urge to experiment more while working on this painting-drawing :)
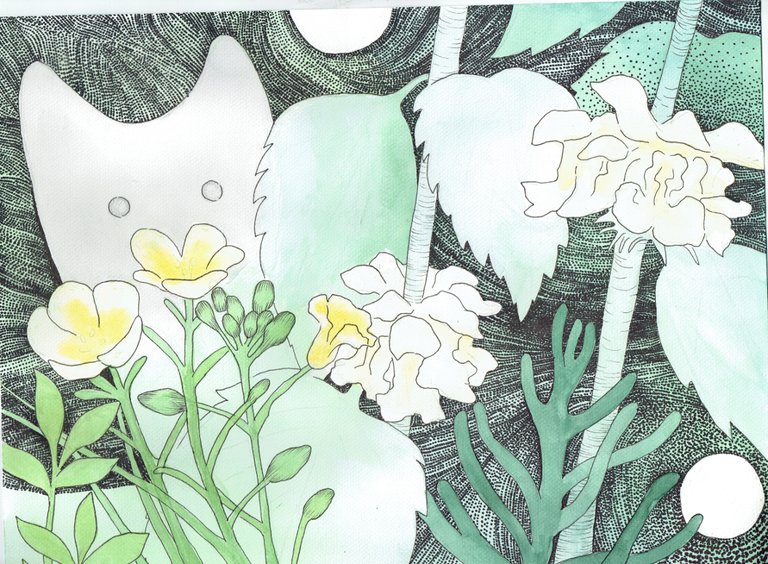
Yeah, so stippling (and inking in general) is in my case a very gradual, scrupulous and time-consuming process. But I never measure time I spend on an artwork, as I really like to work on the piece until I feel it's ready. And checking on time could stress me out , which could in turn make me rush with it... And I wouldn't like that to happen. So I was taking my time and adding more and more details, shading and textures, neverminding the time ;)
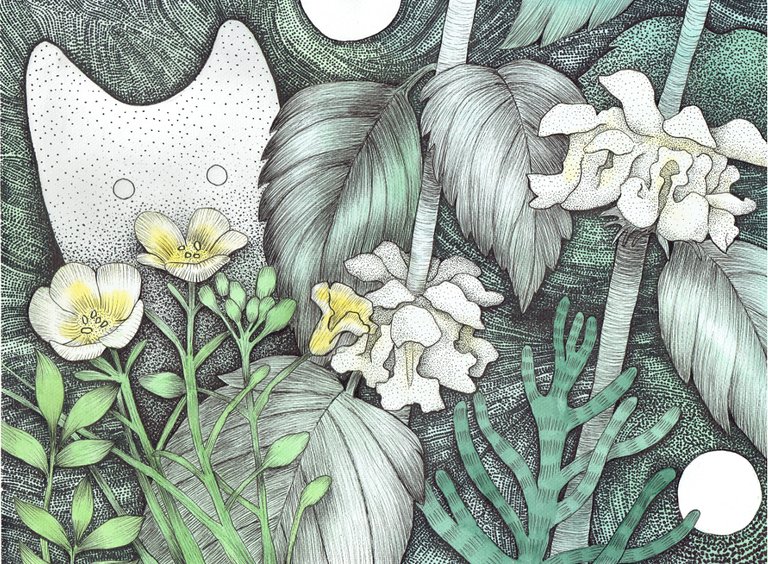
Now, when I got to this stage, I thought at first that I was finished. But after I saw the scan on my monitor I noticed one thing that could look better.
And so I revisited the leaf nearest to the ghost's head and added some more shading. This might've been a small change, but it made a huge difference for me. And then I was finished. The ghost says hi, guys! :)
TIP 3: If you want to better assess your art, you can try to photograph or scan it, and check it out on the computer monitor (works on smartphone ,too). This change of perspective helped me many times to spot problems or unfinished elements in my works.
THE PROGRESS OF ARTWORK IN A GIF

I wanted to show you the development of my artwork, so I've made a detailed GIF. Do you like this combination of painting and drawing? I'd love to know what you think!
If you'd like to see more of my forest ghosts, you can check out my other Steemit posts! :)
MY OTHER RECENT ARTWORK TUTORIALS:
- Shiny garden - a step by step artwork
- Entry for Sketch Off Contest -Lady Loki- Edition 2: The Club of Antiheroes
- A mighty black rooster- original artwork - a step by step progress
- Contest Entry for ART EXPLOSION WEEK 24: Theme LIGHT
❤ ❋ ✯ I hope you liked my tutorial, guys! ✯ ❋❤
I'm very happy you stepped by and took a look at my tutorial. How do you like this new experimental trend of mine, guys? I have some more new ideas and projects, which makes me very happy. Steemit is simply wonderful at giving me a boost of motivation to try new things and develop new skills. I hope that you can feel this way too :) And as always...
This is amazing.... Hardly have I seen an artwork with so many details not just done with watercolour alone but also with Markers. If I had a museum, I would place this Masterpiece in it for the World to behold its beauty.
It is Truly an ORIGINAL CONTENT. I love your story behind it also. Keep Up the Good Work.
Thank you for this encouragement and support, @ufxpression! Means a lot ;)
All the best,
Klaudia
Another great piece Shiny :D
Loved to see the process of it and it came out absolutely stunning!
Great job... as always!
Thank you @spiritualmax, I'm sooo glad you like it! I look up to you when it comes to captivating content so getting your support feels cool. Do you hang out somewhere on Discord? Would be great to chat with you.
Love,
Klaudia
Hello Klaudia.
Of course, I have my community Crypto Empire... we even have a Slothicorn Embassy.
Check my signature in any of my posts.
Will see you there :D
Wow i admire your patience and detailing. Awesome art!
Thank you @jacinta.sevilla, that's very sweet of you, I appeciate your support a lot!
Hi and youre welcome! youre a great artist :D
Very delicate watercolor. Did you stretch paper on board or just used a tape? I always have problem of warping paper with my watercolor because I do not use tape at all. One day I will use masking fluid. I have a bottle of it for few year but was afraid to use it :) I LOVE cold press paper. It is do not take vividness out of the color compare to hot press paper.
Ah, thanks @marinaart, I wrote nothing about it in the process description. The truth is I didn't use anything, because I'm scared of tape haha! I can never get a straight line with it, it's almost always a catastrophe when I use it. But I should probably try until I succeed. My painting isn't very much warped, but compared to one created with tape it looks worse. Yeah, I prefer cold pressed too. Are you somewhere on Discord chat, @marinaart?
Love,
Klaudia
I am on few Discord chats but can't go there much , way to many scrolling and searching for me and I never know where people show up there. It is always choice for me to search on discord or on Steemit and mostly I choose Steemit. At what Discord channel are you mingling ?
I'm in Steem Artists and Slothicorn. I've only just started chatting. Would be lovely to see you there :)
I would love to. Only need to get out of my daily routine and I will be there :))) I also would love to meet you in real life :)
I really really really like your style * ___ * You have such a unique colour palette also and and and I love how cute your pieces are * ___ * The dotted parts are so well considered * ___ * there are parts that are densely dotted and parts that are sparsely dotted and these considerations really pull the picture together very well <3
waw~
upvotes and resteems
<3
Soooo cool you like it, dear! You know the feeling is mutual!
Love,
Klaudia
Oh, this little shy ghost is so sweet!
I love the combination with the water colours ^_^
Keep on "not knowing what you're doing"! :D
Looking good! Wish I had a bit more talent or time to practice in the art department. I didn't even notice the green in the background until you showed the earlier photo.
Thank you @chr7is for your support, I'm glad you liked it :)
All the best,
Klaudia
This is surprising, congratulations, beautiful strokes.
Me encanta :)
It's amazing~~ Great...
Your pieces are becoming more and more colorful over time! I like it a lot :)
Wow! So many details.. This is really nice..
I liked this, Enjoyed your process and hope to see more.
Thank you @aaalfonz, hope to see more from you, too.
Shiny... Your stuff is SO good! Keep it up. You're gonna blow up.
Thank you so much @chrismccron for your kind words! :) The feeling is mutual ;)
I love your whirling stipple phase! this again is a great share on watercolor and ink combo. I love combining ink with my pastels or watercolors, you've got me inspired!
You do art in similar style? Cooool I'd love to see it, @coyoteom! :)
This is both a wonderful piece of work, and a great post. You have gone into so much detail and been very generous with the way you have walked us through the stages. You have a great talent, thank you for sharing this.
What beautiful work! Thank you for sharing.
Beautifully done! You keep on crafting your own way and always remember to have fun!
Thank you for sharing!
Thank you @spellmaker, do you happen by any chance to be a fan of Mr Robot? :) Thank you for your nice words, you made me smile!
All the best,
Klaudia
You guessed it right. It's a great show!
Aww this is so cute! ^_^
Wow i totally love this artwork process. Keep 'em coming - looking forward towards the other series ;) @shinyforest
Thank you @deborism, I feel very encouraged! I appreciate your kind words! ;)
This is such a great piece and quite stunning too. ^^ would love to see more. ^^
Thank you @dawnsheree! Your words made it like a dawn was here ;) I'm very happy to hear that, I will create more for sure. See you around friend :)
Aww, I want one! I love your little ghosties :D
beautiful painting
Thanks @yadi22!
okay friend
I see you're new to Steemit @yadi22. When I was new to Steemit I didn't know many things. Here are some useful information for you:
My experience is, that:
I should have read the FAQ earlier- lots of crucial & basic info there for you! Trust me, it’s worth reading!
I also wish I joined PAL- a minnow support group on Discord from the beginning (Discord is to Steemit like Messenger is to Facebook). Here’s an invite for you and here’s the registration manual- you can get a lot of support for your blog there!
I would also strongly suggest following @mikepm74 as well as @inquringtimes. These two prominent users post lots of useful and instructive posts- you may learn a lot from them to your benefit!
I also should read some comprehensive guide about how to success here on Steemit :) I can recommend: A Simple Guide to getting Started on Steem(it) and A minnow’s guide to Steemit- lots of info about money, etiquette, formatting, good strategies, bad strategies, content creation :)
The Steem Community rewards perseverance, quality original content, and social engagement! I had to be patient, write creative and elaborate posts, listen to other’s advice and leave a lot of thoughtful comments! It worked great!
GOOD LUCK @yadi22!
Klaudia
What a good artwork and lesson!
Very inspiring..
Great piece and a great tutorial!