---

Accounts and Permissions
Accounts within EOS are not talked about enough, in my opinion, they are a big part of what gives EOS the nomenclature of a global operating system, albeit a very basic one by today's standards. Just like any new operating system, understanding how to create accounts and manage permissions can be daunting, EOS is no different. Right now, the only way to manage your account(s) and the associated permissions hierarchy are via the CLI using cleos or the cut-down and tidier version, eosc created by @eoscanada.
Let's take a quick detour on why the tool from eosc a great option rather than using the cleos command line tool from Block One. As I mentioned in my cleos basics post, to get the cleos and keosd command line tools, you need to download and compile the complete EOSIO package. Doing so, although not difficult, is a waste if you do not intend on running a full EOS node. Eos Canada's tool requires you to download one 11M package which is much efficient, and you still get all the options an average user would need. On the @eoscanada Github, they also give a good summary:
cleos is hard to compile, being in C++, as it requires a huge toolchain. eosc works on Windows where cleos doesn't. eosc contains a wallet inside and is able to use it to sign some transactions, cleos interfaces with yet another program (keosd) in order to sign transactions, making it more complex to use. eosc brings keosd and cleos together in a swiss-knife package.
As of this writing, you will not be able to use the eosc tool to 'set' values on accounts currently, you can only 'get' account details.
Creating Permissions & Setting Actions
Before we start, I agree that we desperately need a GUI for account management as you are about to see. If you want to link a specific action to specific permissions, you need to pass a JSON string as an argument, which on the command line looks very messy and is difficult to read, at least for my old eyes, making it easy to miss an important comma or curly/square bracket. I am sure one of the leading EOS wallet developers (@eosrio or @greymass) are working on account management integration as I believe this will be a heavily used feature within EOS. Both teams have been slammed with requests in the Telegram channels lately, so I assume this is on their todo list.
Account creation & Permission Allocation
The command to create an account could not be more straightforward, here is the syntax for both cleos and eosc, bear in mind that I do not run a full node, so I have to use the -u option that points to an active system running nodeos.
cleos -u https://api.eosnewyork.io:443 create account <creator-account> <account-name> <owner-key> <active-key>
everywhere you see <> brackets is a template for a value you will need to fill in.
Template Definitions
- <creator-account> - Which account is sponsoring the new account, i.ie paying for the RAM.
- < account-name> - This will be the name of the new account, remember that is must be 12 characters long
- <owner-key> This is the first and highest privileged permission, so this key will be able to perform all actions against this account.*
- <active-key> - This is the second native permission that you should use for daily signing of transactions by default.
As shown above, when you create an account you must specify keys for two permissions (known as native permissions); these are the 'owner' and 'active' permissions as seen below:
cleos -u https://api.eosnewyork.io:443 get account testaccount
permissions:

 owner     1:    1 EOS6Yh5u2FtTwblahblahblahu1tBjMNyBgJEV3srrpgeKF
    active     1:    1 EOS6Yh5u2FtblahblahblahJEV3srrpgeKF
Notice that the active key is indented, this indicates that the owner is the parent permission, i.e., the owner permission can do everything the 'active' can but not the other way around. For optimal security, well-managed accounts will also use multiple keys when using EOS accounts, one key pair for each of the permissions but you do not have to. So why do we need permissions? Great question and one I will answer with an example to help drive the explanation home.
A Permissions Usage Example
When EOS was a lot cheaper (at the rate the price is dropping we may get there again soon), I bought 50 EOS tokens for both my children. Now that the mainnet is live, I created two new accounts, one each for them. Now, here is my dilemma, do I trust the private keys associated with these accounts to young children, even if I have a copy of them written down? My answer is, absolutely not.
They are both at the age where they are asking more intelligent questions, getting into computers (unfortunately, they are Windows machine users) and blockchain technology, which does make me happy by the way. On the flip side, they also know the price of EOS, monitor it on a regular basis and understand how to trade tokens thanks to youtube, time for EOS permissions to step in.
You can assign custom permissions to various 'actions' that are stored within EOS smart contracts. One of the common actions is called 'transfer,' stored within the system eosio contract. As the name suggests, this action permits the transfer of funds out of an account, not something I want to happen until they truly understand the meaning of money, regardless of whether it is physical or digital. There are, of course, many other actions that you might also like to block, such as the buying and selling of RAM on the RAM trading market (which would be covered by the transfer action in the case above) and you can do so. EOS only gives the ability to allow and not deny actions; this is not an issue as listing actions to block would be massive compared to the list of actions I would like to permit. Therefore, I have gone for the blanket approach of letting the key pair I assign them to have permission to vote for block producers only, easy heh. Below are the action and the command to list all actions within the eosio account contract that can be called, be prepared for a significant amount of JSON to be returned to screen, if you have any scripting skills, I recommend dusting them off.
cleos -u https://api.eosnewyork.io:443 get abi eosio

{
  "name": "voteproducer",
  "base": "",
  "fields": [{
      "name": "voter",
      "type": "account_name"
    },{
      "name": "proxy",
      "type": "account_name"
    },{
      "name": "producers",
      "type": "account_name[]"
    }
  ]
For both accounts, I will hold the key for the both the 'active' and 'owner' permissions; I will give different keys to both my children that will only allow them to vote and view their account balance from within a wallet of their choice. They will both still be able to receive funds, which means they can convert their allowance from chores each week into EOS if they so wish, or spend it on nonsense as per usual. At least I can comfortably hand over a separate account to them so they feel a little more in control of the EOS they own and can monitor the dollar value within their wallet. I will of course also send them any aridrops they are due, I am not a monster after all.
Creating and linking permissions to actions is a two-step process, first create the permission, then assign actions to it.
Here is the command to create an action.
cleos -u https://api.eosnewyork.io:443 set account permission <account-name> <permission-name> ‘{“threshold": 1,”keys”: [ {“key” "<public-key-assigned”, “weight”:1}] }’ "<parent-permission>" -p accountname@active
As you can see, typing this into a command line is not the best experience, but as mentioned that will be addressed soon (I hope). I will talk about the threshold and weight values lower down, but the rest should be self-explanatory, if not feel free to post questions.
The command to link an action to this new permission is as follows:
cleos -u https://api.eosnewyork.io:443 set action permission accountname eosio voteproducer
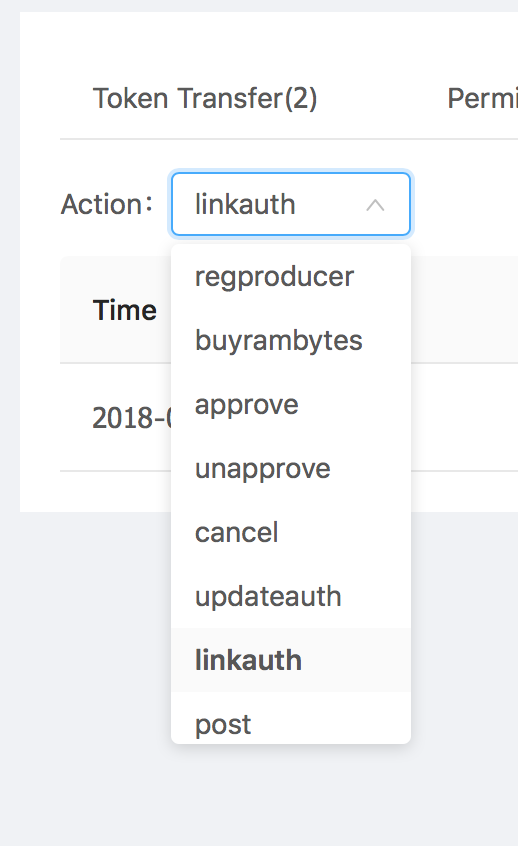
Currently, the get account command on the cleos tool is not functioning as expected. To see what actions are linked to what permissions, you will need to go to a block explorer. www.eospark.com has an excellent break down of the types of actions listed and allows you to filter them. In our case, we want to be able to filter on the 'linkauth' type to check our permissions to action mappings. To do so, first go to www.eospark.com, enter in the account name, then click on the tab titled 'Other action'. From there, click on the drop-down and select link auth
If any mappings are found, they will be listed in the table, click the magnifying glass under parameters column for more information and you should be presented with some JSON text similar to the following.
{
"account": "testaccount",
"code": "eosio",
"type": "voteproducer",
"requirement": "claimer"
}
Other Options (A Two-Faced show Of Trust)
We all want to think our children are angels and would never do any wrong, but the reality is that kids will be kids. So, there are other options available to us that will make both my children feel like I trust them, while still maintaining full control with fail-safes provided by EOSIO. Lets take a look at two other options, the threhold feature and the
EOS account permissions have a feature that forces a timer to expire on actions, so I could give my older children full access, but allocate a time wait to the transfer action of at any time periods I like. That means he will be able to initiate a transfer, but it will not complete until the 5 day waiting period has ended. During that time, I could cancel the transaction at any point before execution, thereby returning the funds to the account. This would be a good option if anything happened to me and the funds would need to be transferred in my absence.
Alternatively, I could set up the permissions using the weight and threshold feature You can assign a weight to keys and the aggregate value of the keys used to sign a transaction must equal or exceed the threshold. For example, If I want to allow my kids to execute the transfer action but not let it go through (as a test of their honesty), I can set a threshold of 2, assigning a weight of 1 to their key and a weight of 1 to mine, meaning that both keys must sign a transaction for it to be valid.
Awesome piece of research, @aclark UK ! Changing keys and permissions is really important. Looks like I need to try out eos eventually.
You got a 5.78% upvote from @upmewhale courtesy of @aclarkuk82!
Earn 100% earning payout by delegating SP to @upmewhale. Visit http://www.upmewhale.com for details!