
I want a coffee and I want to pay in crypto-currency!
One of the earliest use cases cited for crypto-currencies was their ability to replace mainstream payment networks like Visa and Mastercard. Illustrating this vision was the use of crypto-currency to pay for a cup of coffee, a simple requirement yet one that has turned out to be deceptively hard to satisfy.
To be able to buy or sell a cup of coffee in a timely manner a payment network needs to be at least:
Fast: The transaction has to be approved quickly (confirmed in crypto-currency terminology). Visa and Mastercard typically take seconds or less to approve a transaction.
Cheap: The cost to the merchant or the customer to undertake the transaction must be minuscule. A cup of coffee is a low value, high volume commodity. Profit is made on the numbers sold, but each cup is usually a different transaction (a different person queuing for their fix) so high processing fees can seriously impact already tight profit margins.
Predictable: The purchasing power of the transaction needs to be predictable. A US Dollar in a Visa or Mastercard account should be - as far as the merchant and customer are concerned - equivalent in value to a physical US Dollar bill and it should retain its value no matter how long it is held.
In the context of crypto-currencies Fast, Cheap and Predictable are best described by the following features:
High transactional throughput: The crypto-currency's network can process a large number of transactions (E.g. lots of people buying coffee at the same time), quickly.
Low cost per transaction: The cost to make a transaction (send or receive funds) on the crypto-currency network is cheap enough to facilitate low value transactions. If a cup of coffee costs 1 US Dollar and if the fees to send 1 US Dollar's worth of the crypto-currency are 0.5 US Dollar's (50 cents), this represents a 50% cost. By comparison, Visa and Mastercard generally offer percentage based fees in the 1-3% range (0.03 US Dollar (3 cents) fee for every 1 US Dollar transaction).
Low volatility: The crypto-currency does not suffer from high price volatility relative to its fiat counterparts. In simple English, this means that a unit of crypto-currency (for example 1 Bitcoin) isn't worth 1 US Dollar one minute, 1.50 US Dollars the next or worse, 0.50 US Dollars the minute after that.
The problem with most existing crypto-currencies in the market is that they meet none or only some of these requirements. In order for a high volume, low margin business like a coffee shop to operate, all three of the above requirements must be met.

So, is there a crypto-currency that I can use to buy or sell a cup of coffee?
The simple answer is yes and its name is Bitshares. Bitshares offers a unique feature-set that is not - at time of writing - shared by any other crypto-currency currently on the market.
To meet the requirements of a Fast, Cheap and Predictable payment network, Bitshares offers the following:
Fast: A transactional network capacity that dwarfs its competitors. In the real world, Bitshares has been able to demonstrate throughput of over 3300 tx/sec and theoretical throughput of over 100,000 tx/sec. By comparison, Bitcoin offers a transactional capacity of around 5 tx/sec and Ethereum can handle around 15 tx/sec.
Cheap: Bitshares uses a different mechanism to a majority of its competitors to confirm (approve) transactions called dPoS or delegated Proof of Stake. Bitcoin and Ethereum use a system called PoW or Proof of Work. One essential difference between the two is that dPoS has no Miners but rather an small number of users who confirm (approve) transactions on the network. This group of users (called Witnesses) is elected by other users of the Bitshares system. Like a company stock, the more Bitshares tokens (BTS) a user holds, the greater their voting power in voting in or voting out users who want to be Witnesses. The advantage to this system over Proof of Work implementations is that fee's to send and receive on the network can be adjusted - in the same way shareholders may set the pay of members of the company board - to reflect the price sensitivities of the network and its users. This technology, coupled with the high network capacity leads to extremely low transactional costs relative to other crypto-currency networks. For example; to make a transaction on the Bitshares network currently costs 0.07 US Dollars (7 cents), regardless of the value of the transaction. Comparatively, to send a transaction on the Bitcoin or Ethereum networks is heavily contingent on how busy the network is, the size of the transaction and the relative-to-fiat value of the crypto-currency (how much it costs in US Dollars, Euro's etc to buy 1 unit of the crypto-currency). High fees relative to the transaction value are not unheard of.
Predictable: Probably the most important achievement of the Bitshares platform is SmartCoins, or price pegged assets. In essence, these are representations of real-world instruments like the US DOLLAR, the CHINESE YUAN or the EURO that are backed by Bitshares tokens but rather than having a free floating value their value is set by the Bitshares platform (specifically by Witnesses via Price feeds). A Witness performs a similar role to a Miner in Bitcoin or Ethereum networks and a Price feed is a value that each Witness publishes to the Bitshares network saying how much a SmartCoin should be worth in Bitshares tokens (BTS). This clever mechanism allows a SmartCoin to have a price pegged to a real-world instrument (for example the US DOLLAR, EURO or CHINESE YUAN), but valued in Bitshares (BTS). The SmartCoins are backed by BTS (so if BTS is worth nothing, then they'll be valueless), but - if the assumption is that BTS is always worth something - then by exchanging BTS for a SmartCoin (E.g. BitUSD, BitEUR or BitCNY), a user of Bitshares can effectively transact in a crypto-currency that is as stable as the asset it is following. In the context of the coffee shop, by accepting payment in BitUSD the merchant can undertake transactions and know that when they want to convert their BitUSD to US Dollars at any point in the future, the value of their BitUSD when converted to US Dollars should (minus any intermediary conversion fees) more or less match what they get in their bank account. As participants become reassured that this mechanism works, it opens up the possibilities of a whole parallel money system where customers, merchants and suppliers may choose to transact with each other entirely using SmartCoins (in the same way as some already do using PayPal) and only cashing out back to real USD, EURO or CHINESE YUAN when required. The stability of fiat melded with the incredible benefits of crypto-currencies.
OK, this all sounds great but how do I actually go about using Bitshares to make this magic happen?
A product is only as useful as the practical examples demonstrating how to use it and Bitshares - like most crypto-currencies - can appear daunting at first glance. But looks can be deceiving...
The following section assumes no prior knowledge and will aim to demonstrate the features outlined in the previous sections in a simple and easy to follow walk-through. We'll be setting up two Bitshares accounts, one on your desktop and one on a mobile device. Ideally the mobile device will be on a different network, e.g. mobile phone 3G/4G network and your desktop will be on a broadband/fixed line connection. The intention is to show how to;
- Get funds into and out of the Bitshares eco-system; and
- How to transfer between two accounts; and
- The stability of SmartCoins like BitUSD; and
- How fast the Bitshares network is
We'll be using a simple Android wallet (see below for iOS/Other OS users) and a desktop wallet to mimic a rough approximation of how a simple merchant<->customer transaction aka the coffee shop experience, may look like. It's very very rough approximation, but it should showcase the features and give you a feel for the possibilities.
A few pre-requisites and caveats before we get started;
An Android device: With the latest SmartCoins wallet installed (Ideally a smartphone). This guide was created with version 1.5.14 - future versions may differ in layout so some of the screen shots may not match but the functionality should still be the same. Grab and install the wallet from the Google Play store. Version 1.5.14 isn't currently available on iPhone, so if you are using one or a phone with another OS, you can register for a Bitshares account via the web site at http://openledger.io/ or http://bitshares.org/wallet/ in your phone browser. Choose Wallet model when registering and use a very long, very secure password. Account model will let you login from anywhere, but it's only got your password to keep your account safe. Wallet model will only let you login from the device and browser you register on (unless you backup and export your account data at a later date). It is not as flexible as the Account model, but is a lot more secure. When you have registered using Wallet model, go to Settings->Backup->Choose Create Brainkey Backup->Show Brainkey. Make a very careful note of this phrase and store it in secure place, since it will allow you to recover your wallet in any eventuality (See Part 2 - Steps 8 onwards below for an explanation on how to restore your account with your Brainkey). Alternatively, follow all the steps in Part 2 on your iPhone or other OS mobile device.
Bitshares Light desktop wallet: The Bitshares light desktop wallet is is available here. This guide is prepared with version 170522 (March 28th, 2016 / GUI May 22nd, 2017). More recent versions may differ in layout so some screen shots may not match but the functionality should still be the same.
A Coinbase account to obtain some Bitcoin or some Bitcoin from another source: Although Bitshares is a rapidly growing eco-system, it doesn't yet have the same number of fiat (US Dollar, EURO etc) to Bitshares (BTS, BITUSD etc) conversion ramps that Bitcoin has. To make this guide easy to replicate, the whole process of converting from your fiat->Bitshares and converting back will be covered and to ensure maximum accessibility we'll be using Bitcoin as an interim currency simply because you can buy it and sell it in pretty much every country on the planet. Coinbase provides a straightforward site for obtaining Bitcoin. If Coinbase is not available, you can use LocalBitcoins.com or any other Bitcoin provider to get some initial Bitcoins. You will be obtaining the Bitcoins and immediately converting them to Bitshares BitUSD to reduce your exposure to Bitcoin's volatility and demonstrate the benefits of SmartCoins like BitUSD. If you prefer to obtain BitUSD directly, you can find a list of the deposit and withdrawal options for Bitshares listed here: https://bitshares.org/deposit/. You can also use alternative intermediary crypto-currencies like Ethereum (FIAT->ETH->BITUSD), but these options are not covered in this guide.
So, lets get too it.
Part 1. Configuring the SmartCoins wallet
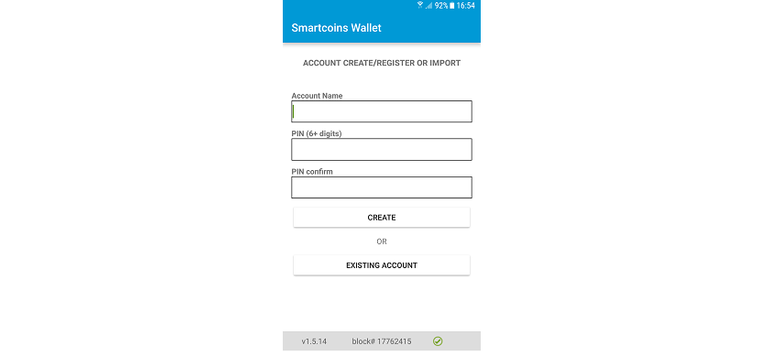
- 1: Install the SmartCoins wallet from the Google Play store on your Android device and open the application. Enter a unique account name and security PIN number and click Create.
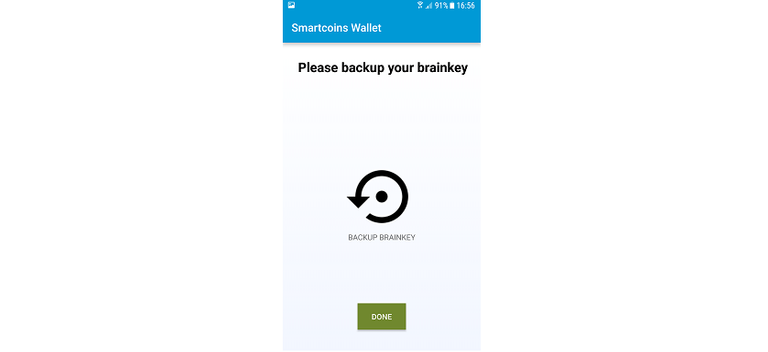
- 2: When prompted to backup your Brainkey, click Backup Brainkey and write down the words. It is very important you store this information securely since it will allow you to recover access to your account in the event of problems. This information should not be shared with anyone else as it would also allow them to recover access to your account, so store the words securely and triple check you have recorded them correctly!
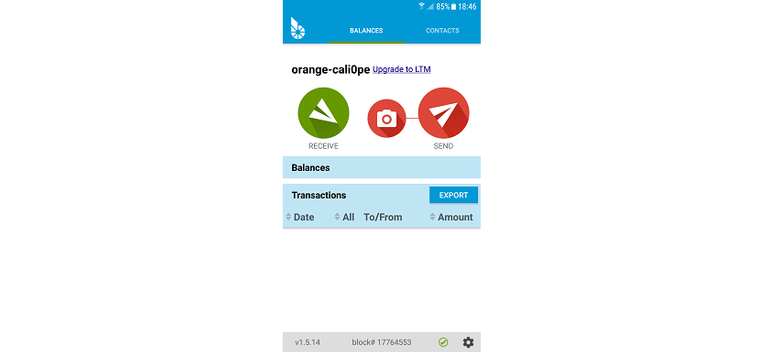
- 3: Once you have completed this stage you will be presented with the main wallet interface. You can exit the application at this point, we'll be coming back later.
| OPTIONAL STEPS: To confirm the Brainkey you wrote down earlier and stored securely is correct, you can uninstall the SmartCoins wallet, delete the application folder and restore access with the Brainkey. |
|---|
4: Uninstall the SmartCoins wallet application.
5: Navigate to your devices SDCard storage partition and locate the SmartcoinsWallet folder. You will require a file explorer such as ES File Explorer or equivalent application. The path you are looking for is typically /device/sdcard/SmartcoinsWallet
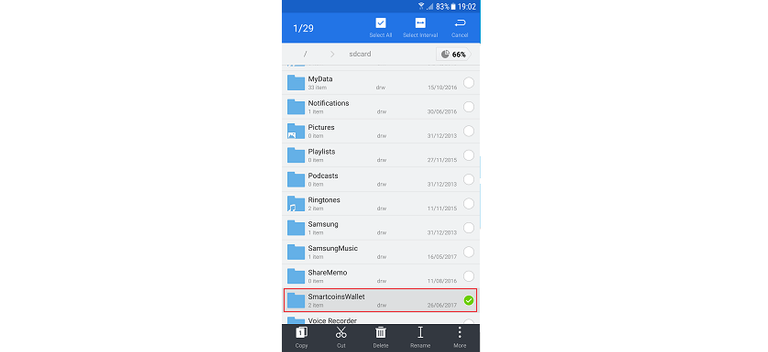
6: Delete the folder SmartcoinsWallet from your sdcard.
7: Return to the Google Play store and reinstall the SmartCoins wallet application and open it once installed.
8: Choose Existing Account at the main menu followed by Import from Brainkey.
9: Choose a new PIN (it can be anything you like) and carefully enter the Brainkey words you wrote down in Step 2. Click Create Wallet and if its correct, the wallet should show the same account screen as Step 3. You can now be reassured that your Brainkey is correct and that you have a way to recover access to your account.
Part 2. Configuring the Bitshares light desktop wallet
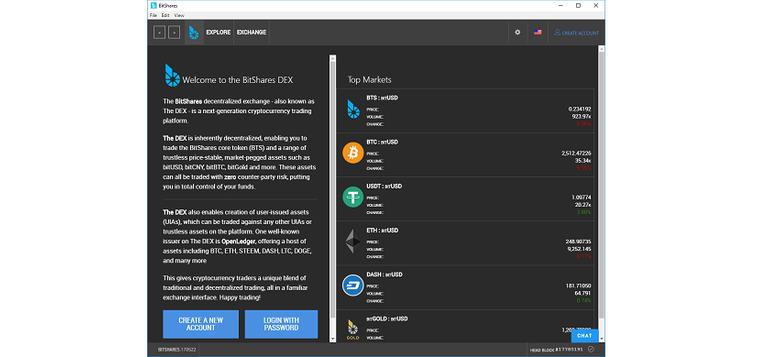
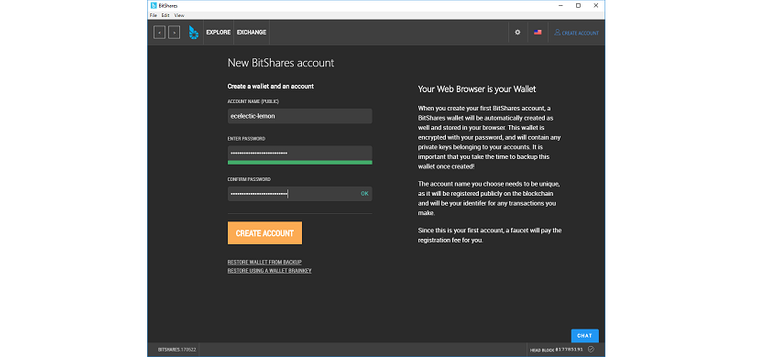
- 1: Install the Bitshares light desktop wallet from the website on your computer and once installed, open it and choose Create a New Account
- 2: Choose Use the Wallet Model for the login type which offers better security for protecting your account by storing important information only on your desktop.

- 3: Select an account name and enter a secure, long password. You can generate a secure password using passwordsgenerator.net or a tool of your choice and you should ensure its at least 16 characters long. The bar beneath the Enter Password box should be fully green to indicate you've chosen a sufficiently secure password. Make a note of your password somewhere safe! Click Create Account and your account will be created.
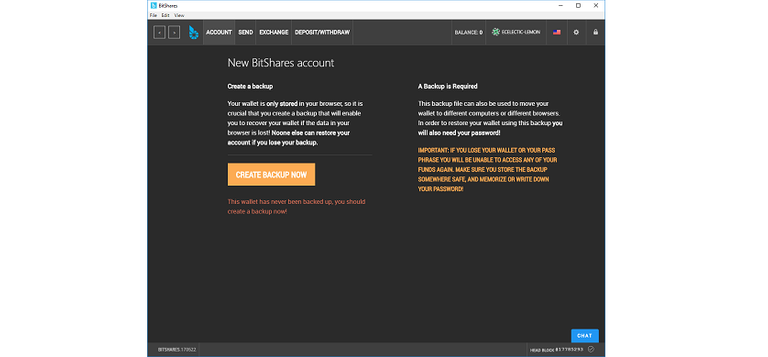
- 4: You will now be prompted to take a backup of your account. If you choose to take a backup at this point (it's entirely optional), the backup .bin file that is created will be encrypted with your current password. If you change your account password at any point in the future, you should remember that any older backups will still use the old password and only new backups will use the new password.
The alternative way to restore an account is with the Brainkey. The Brainkey is a set of words (which must be kept secure and secret) that will restore full access to your account even if you have forgotten your password and we will be backing up the Brainkey in the following steps. Click the Cog in the top right hand corner and select Settings.
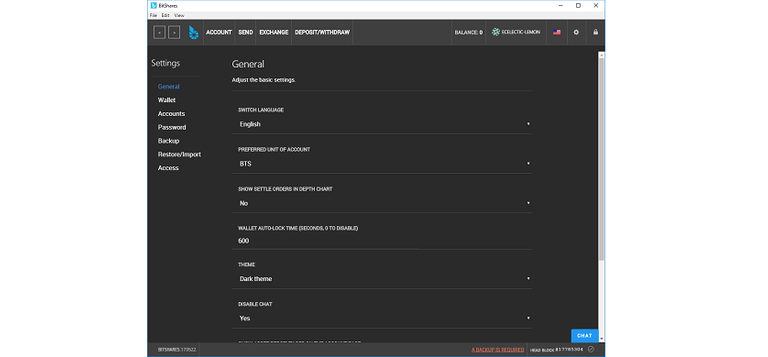
- 5: From the Settings menu on the left hand side, choose Backup
| [!] The Settings menu allows you to adjust settings for your wallet. One particularly useful option is Preferred Unit of Account which will work out the value of all the assets in your account (E.g. BitUSD, BitShares etc) and provide the total in the Balance box at the top of the wallet in the currency you've chosen. Really useful for getting an idea of the total value of your holdings. |
|---|
- 6: From the Backup screen, select Create brainkey backup from the drop-down and enter the password you chose when you created your account. Click Show Brainkey.
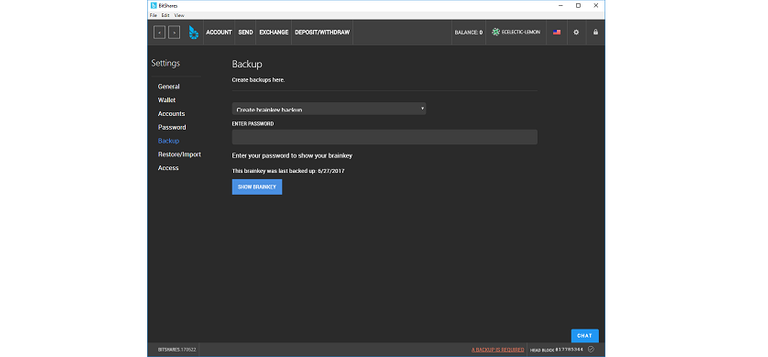
- 7: Write down the Brainkey words. It is very important you store this information securely since it will allow you to recover access to your account in the event of problems even without your password. This information should not be shared with anyone else as it would also allow them to recover access to your account, so store the words securely and triple check you have recorded them correctly!
| OPTIONAL STEPS: The next few steps will cover restoring your account with your Brainkey. They are optional, so if you wish to skip them you can. To confirm the Brainkey you wrote down earlier and stored securely is correct, we will be deleting all the account data from the Bitshares light desktop wallet and restoring access with the Brainkey. If you don't wish to follow these steps, you can just click Account at the top of the wallet to go to the overview screen or close the wallet and move on to the next part; Part 3: Buying some Bitcoins with Coinbase. |
|---|
- 8: Close the Bitshares Light wallet on your desktop and open a file explorer tool. Navigate to one of the following locations depending on which operating system you are using:
| [!] {YOURUSERNAME} is the user name you use to log in to your computer, not your Bitshares account name. The locations may also be slightly different on some computers. If you can't find the location, search your system for the folder BitShares2-light |
|---|
| OS | Location |
|---|---|
| MAC | /Users/{YOURUSERNAME}/Library/Application Support/BitShares2-light/ |
| WINDOWS | %APPDATA%/Bitshares2-light |
| LINUX | /home/{YOURUSERNAME}/.config/BitShares2-light/ |
9: Once you have located the Bitshares2-light folder, delete the contents inside it.
10: Restart the Bitshares light wallet application and it should open to the Welcome to the BitShares DEX screen, having completely forgotten your previous account details. Any settings changes you made will also have been forgotten. Click the Cog in the top right hand corner and select Settings.
- 11: From the left side of the Settings screen choose Restore/Import and when the Restore/Import screen displays, choose Restore using wallet brainkey from the drop-down.
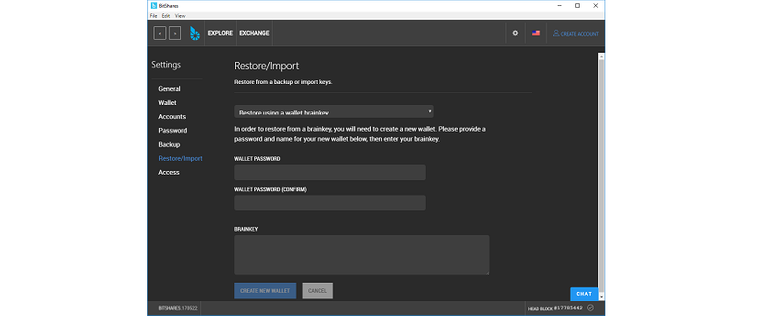
12: Enter a new password to protect your wallet. You can use the password you created in Step 3 or generate a new secure one using passwordsgenerator.net or a tool of your choice. You should ensure its at least 16 characters long and a mix of characters.
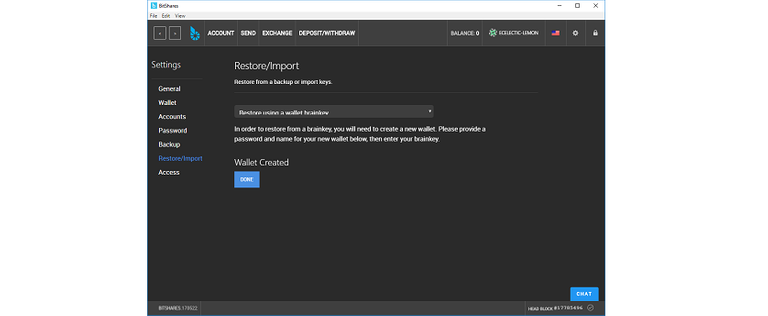
13: In the Brainkey box, enter the Brainkey phrase you wrote down in Step 7 and click Create New Wallet when done. If the phrase was correct, your account - through the magic of mathematics - will be restored back to its former glory and you should see the message Wallet Created appear.
| [!] You can use the Brainkey restoration process to restore access to your account on any other Bitshares wallet on any other device, useful if you wanted multiple places to access your account or if you just wanted to move your account to another wallet or device. The password you choose each time you restore your account using your Brainkey will be specific to that wallet, so if you had restored your account to two different wallets on two different devices and chosen a different password for each wallet, only the password you chose on each wallet would work - you couldn't use the password from one wallet on the other one. |
|---|
Part 3. Buying some Bitcoins with Coinbase
If you have already obtained, know how to obtain Bitcoins or your preferred crypto-currency or want to use a Bitshares conversion ramp instead, you can skip this section for Part 4.
The number of fiat to Bitshares conversion ramps are constantly increasing so you may not need to use Bitcoin as an intermediate currency, however it does help to illustrate how much faster Bitshares can be and so you may still find this a useful exercise.
You can find a current list of the available deposit and withdrawal options by visiting the Bitshares.org website here: http://bitshares.org/deposit/
| [!] You will require identification documents to sign up for a Coinbase account and a Visa Verified by Visa or Mastercard 3D Secure enabled credit or debit card to be able to buy or sell Bitcoins instantly. Alternative deposit and withdrawal options such as bank transfer are available, but may take several days to process. |
|---|
1: Visit the Coinbase signup page to begin the process of registering: https://www.coinbase.com/signup
2: Once registered, complete the identity verification stage to enable full access to the platform.
3: From the dashboard, click the Buy/Sell link at the top. Ensure the Buy tab is selected and Bitcoin is your chosen currency.
4: Select a valid payment method and enter the amount if Bitcoin you wish to purchase. For the purposes of this tutorial, a small amount in the 10-15 US Dollar range is sufficient. Once you are happy with the amount, click Buy Bitcoin Instantly and complete any additional payment verification steps.
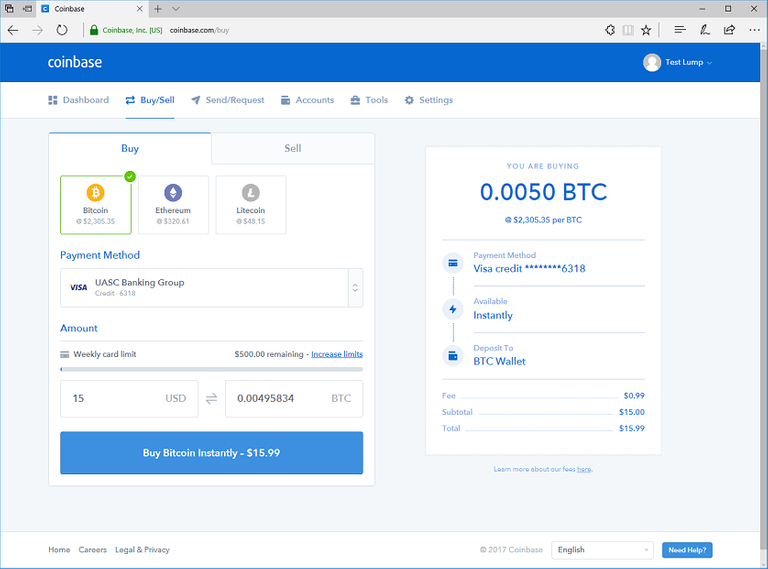
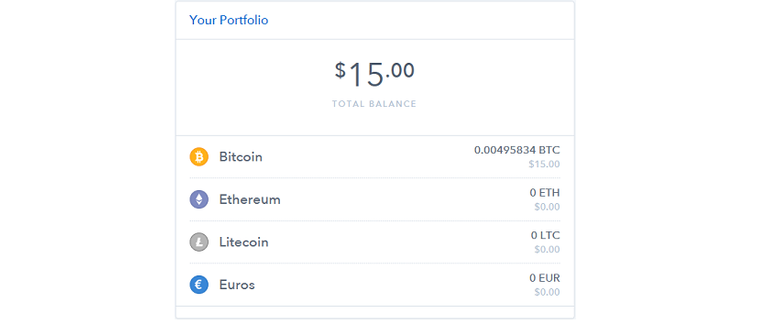
- 5: If all went well, you've just bought your first crypto-currency! Clicking the Dashboard link will return you to an account overview screen and under Your Portfolio you should see a balance value in Bitcoin equivalent to the amount you just purchased.
Part 4. Converting your Bitcoin (or preferred crypto-currency) to Bitshares BitUSD Smartcoin
In this section we are going to walk through the process of converting Bitcoin (or your preferred crypto-currency) to the Bitshares Smartcoin; BitUSD. Before we begin, a brief overview of the deposit and withdrawal options is provided below. You can skip it if you just want to continue the tutorial.
There are three main ways of depositing and withdrawing crypto-currencies or fiat from the Bitshares ecosystem;
- Gateways
- Bridges
- Exchanges
Gateways
A Gateway is a private company that issues virtual assets (called UIA's or User Issued Assets in Bitshares terminology) that can be traded on the Bitshares Distributed EXchange (DEX) and are backed by the asset which they represent.
A simple English analogy would be a Casino that issues poker chips to the value of cash that a customer deposits. A customer cannot play games in the Casino using cash, but must have the Casino's poker chips. Those poker chips are equivalent to cash within the Casino and are guaranteed by the Casino to be exchangeable for their face value in cash at any time, e.g. one 10 US Dollar Poker chip can be exchanged to 10 US Dollars. If the Casino suddenly burnt down, the poker chips would be valueless.
In the context of a Gateway, this means the Gateway company accepts a variety of crypto-currencies (or fiat) and will issue an equivalent token that can be traded on the Bitshares DEX (Distributed EXchange). If you wanted to convert that token back at any time, you can withdraw it via the Gateway and the Gateway will send the equivalent real asset to whatever destination you requested (E.g. A Bitcoin wallet, a bank account etc). Since Gateway's are private companies, there is trust on your part that the tokens the Gateway issues are backed at all times by the asset they represent.
For example; depositing 1 Bitcoin through the openledger.io gateway, will send 1 OPEN.BTC token to your Bitshares account. This 1 OPEN.BTC represents 1 REAL BTC (Bitcoin) provided openledger.io remains in existence. If the gateway failed or was robbed of the backing assets, the 1 OPEN.BTC issued would be valueless since it would no longer be backed by 1 REAL Bitcoin.
Smartcoins (like BitUSD or BitCNY) are not issued through gateways. Smartcoins are instead created inside the Bitshares platform and backed by Bitshares tokens (BTS) and so always exchangeable for their current value in Bitshares tokens (BTS).
Bridges
A Bridge is a simple conversion service operated by a private company that will exchange one crypto-currency for another for a small fee and deposit the converted currency to the destination of your choice. Examples of Bridges are Shapeshift.io and Blocktrades.us.
A Bridge can be thought of as the crypto-currency equivalent of a foreign exchange service (somewhere you might go to get your holiday money for example). They hold lots of different types of currencies, and charge a small fee for allowing you to convert between them.
In this tutorial, we will be using the Bridge provided by Blocktrades.us to quickly convert from Bitcoin to Bitshares BitUSD.
Exchanges
Exchanges are central websites operated by private companies that provides users the ability to trade a number of crypto-currency and fiat currency pairs. They are equivalent to stock exchanges like the New York Stock Exchange or the London Stock Exchange, typically offering a huge number of trading pairs and advanced trading features for power users.
Exchanges generally offer the cheapest way to buy or sell crypto-currencies and will often also have facilities to allow users to deposit or withdraw fiat (E.g. USD, EURO, CHINESE YUAN) to bank accounts or credit/debit cards.
For example; you could trade User Issued Assets or SmartCoins on the Bitshares DEX into Bitshares tokens (BTS), send those BTS from you Bitshares wallet to an exchange like Bitrrex and exchange them into Bitcoin (BTC) which you could then send to a Bitcoin ATM somewhere in the world and withdraw as cash.
As with Gateways, Exchanges carry a requirement that you trust that they hold all the crypto-currencies or fiat assets that their users are trading on their website. So called fractional reserves (where an exchange does not actually have all the assets that its users are trading) have existed in the past with catastrophic effects. It is therefore best not to use them as long term stores for your crypto-currencies or fiat, as there can be nasty consequences for doing so.
Some examples of major exchanges include Bitrrex, Poloniex, Bitfinex, GDAX - from Coinbase, Kraken and Bitstamp. Not all of these exchanges offer Bitshares tokens (BTS) as a trading pair.
Summary
Hopefully you now have a better understanding of the available options for moving crypto-currencies into and out of the Bitshares eco-system. Helpfully, the Bitshares light wallet includes access to a number of reliable Bridges and Gateways through the Deposit/Withdraw tab, and that's where we are heading next...
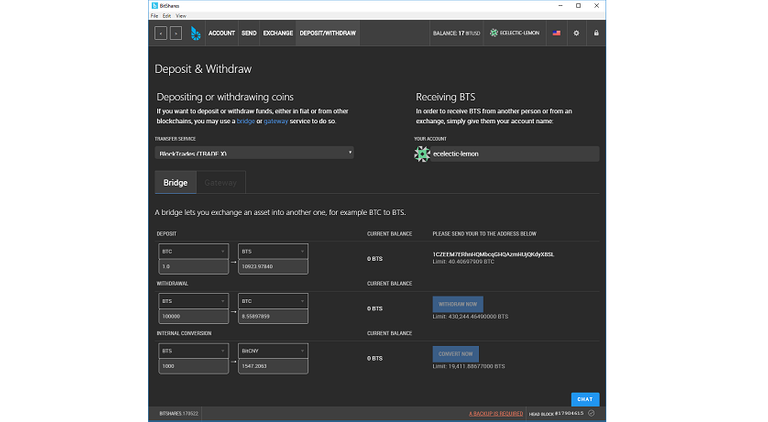
1: Open the Bitshares light wallet application from your desktop
2: Click the Deposit/Withdraw link along the top of the wallet to show the Deposit & Withdraw screen.
3: From the drop-down labelled Transfer Service choose BlockTrades (TRADE.X). Click the button labelled Bridge to choose the BlockTrades Bridge.

- 4: Under the label Deposit, select BTC and in the box beside it choose USD. The Current Balance column should update to read 0 BITUSD and next to it you should see a Bitcoin Address (Starting with the number 1 - E.g. 1CLbU569[...lots of other characters]). This address is unique to your Bitshares account and will mean that any Bitcoin you send to it will be converted to BitUSD and credited to you.
| [!] You will notice that you can change the numbers in the drop-downs under the Deposit, Withdrawal and Internal Conversion labels. These are just handy calculators to give you an estimate of the amount of the converted SmartCoin or asset you will receive. They have no other effect, so you can put any values you want in them. |
|---|
5: If you are using your own source for Bitcoins other than Coinbase, at this point you can deposit Bitcoin to the Bitcoin address that is listed and skip to Step 11. If you are using an alternative crypto-currency like Ethereum, change the drop-down under Deposit to generate the appropriate deposit address. You can deposit as much as you feel comfortable with, but for the purposes of this tutorial it is suggested you try 10-15 US Dollars worth. If you are using Coinbase as your source of Bitcoins, we will now send the Bitcoins you purchased earlier from your Coinbase account to the BlockTrades bridge address.
6: Keeping your Bitshares light wallet application open, open your browser and sign in to your Coinbase account.
7: From the link at the top, select Send/Request and click the Send link (it should default to this)
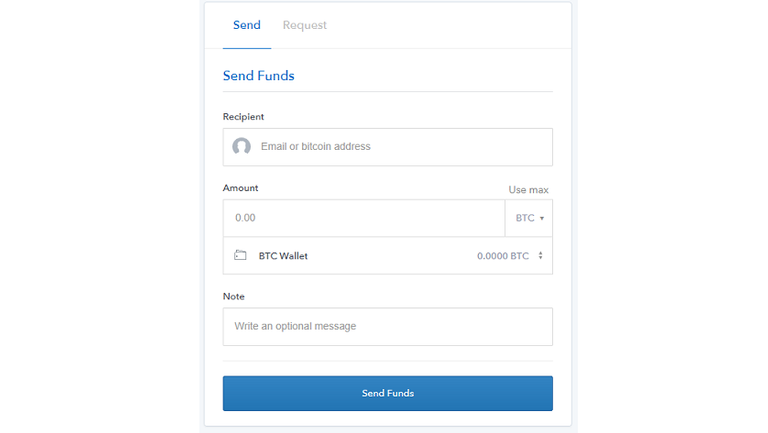
8: Carefully copy the Bitcoin Address shown in Step 4 (The one starting with the number 1 - E.g. 1CLbU569[...lots of other characters]) from the Bitshares light wallet and enter it into the Recipient field on the Coinbase website.
9: Click Use max to send all the Bitcoin in your wallet or enter the number of Bitcoin that you want to convert to BitUSD if you don't want to convert all of it.
10: Once you are happy, click the blue Send Funds button to make the transfer. Coinbase will now initiate the transfer of your Bitcoin to Blocktrades. This process may take upwards of an hour during busy times, so be patient.
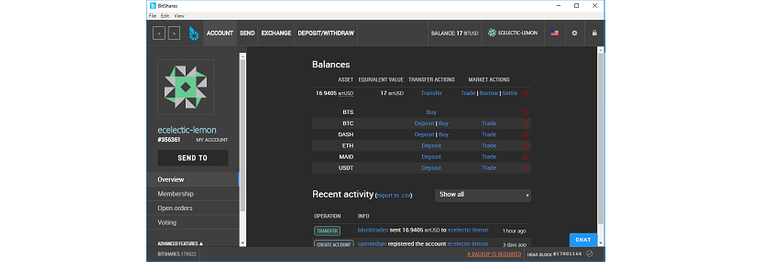
11: If you keep an eye on your Bitshares light wallet, you should suddenly see the Balance field along the top changes from 0 to a positive value, indicating your transfer has gone through. You can also click on the Account link and under Balances you should see BitUSD listed with a positive value once the conversion has taken place and your account has been credited. Hurray! you now have BitUSD!
| [!] If your BitUSD don't turn up in a timely manner, you can contact Blocktrades support at [email protected] giving them your Bitshares account name, and Coinbase support at https://support.coinbase.com/ |
|---|
Part 5. Sending your BitUSD to your Mobile SmartCoins wallet and back again
In this section we will be transferring some of your BitUSD from your Bitshares light wallet to your mobile SmartCoins wallet and back again.
As you may have noticed when you deposited Bitcoin to convert it to BitUSD, typical crypto-currency deposit addresses are not very easy to remember. Bitshares allows you to use easy-to-remember account names to send funds between accounts. This is much nicer than trying to remember a complicated string of upper and lower case characters.
One slight disadvantage to this approach is the existence of scam accounts that may be similarly named so as to catch misspellings. For example, the exchange Poloniex has a Bitshares account named poloniexwallet, however similarly named scam accounts such as poloniex-wallet exist to try and catch the unwary.
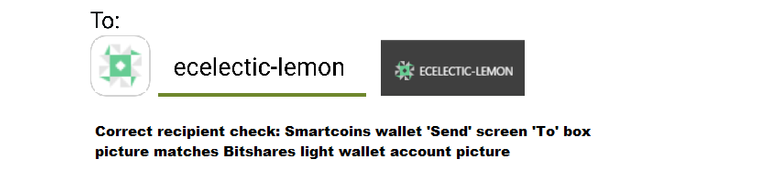
To help reduce the risk of funds sent to the wrong address, you will notice a little picture adjacent to your account name in the Bitshares light wallet, Smartcoins wallet or web-wallet, depending on which you are using.

This picture is unique to your account and similarly named accounts will have completely different pictures. If you are in any doubt, it is always worth double checking that the picture of the account that you are sending to matches that of the intended recipient.
| [!] Remember; crypto-currency transactions are irreversible, so mistakes can be very costly! |
|---|
It is handy to have your mobile device with the SmartCoins wallet next to your desktop and ideally on a separate network (E.g your mobile phones 3G or 4G network), so you can see how fast the Bitshares network is and how the experience would be if you were buying or selling (a coffee) or just transferring funds to another person in the real world.
| [!] If you are using an iPhone or other OS and have registered your mobile account with a web-wallet, you can sign into your account on your mobile device now. Opening up your mobile browser and navigating to the web-wallet you registered on should display your mobile account. The screenshots below are for the Smartcoins wallet, but the steps are the same when sending between any account on the Bitshares platform. |
|---|
5.1 From your Bitshares light desktop wallet to your Mobile wallet
- 1: Open the Bitshares light wallet on your desktop and click the Send link at the top to switch to the funds transfer screen.
- 2: The From box will already be pre-populated with your account name. In the To box, enter the name of the account you added to your Smartcoins wallet. Notice that the picture adjacent to the account name changes based on the name you type in.
| [!] To check that the account you are sending to is your mobile account (and not someone else's), on your mobile Smartcoins wallet click the Send button. You will notice the From box is populated with your mobile account name and the little picture should match the picture adjacent to the name in the To box on your Bitshares light wallet. Return to the main menu in your SmartCoins wallet once you have verified you're sending to the right account. |
|---|

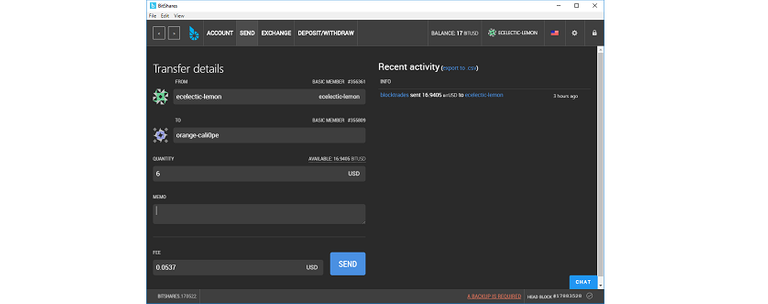
- 3: On your Bitshares light wallet in the Quantity box, put 6. We'll send 6 BitUSD (6 US Dollars) worth of funds, enough for our mobile wallet to buy that cup of coffee. On the right hand side of the Quantity box is shown the asset you are sending. This will default to USD (BitUSD) if that is the only asset in your account, but if you had other assets (like Bitshares tokens (BTS)), this would be a drop-down that allows you to pick the asset you want to send. It is important to check the asset you are sending so you don't accidentally send the wrong one.

- 4: The Memo field is where you can enter additional information about the transaction to help identify it. Its purpose is identical to a reference field you might find when sending a bank transfer from your bank. If you are sending funds to an account belonging to a business (E.g. depositing funds on an exchange or buying an item), this value will normally be a unique reference they give you like an order number or account identifier. If you are sending funds to your own accounts or to a friend's account, you could use this field to enter a friendly description of the transaction or leave it blank if you prefer. The Memo value is encrypted so only your account and the recipient account can see its contents. Enter Coffee money (or whatever you like) in this box.
5: The last box is the Fee for sending the transaction on the network. This box will be pre-populated for you and the text on the right will show you what asset you are going to use to pay the network fee. If you have multiple assets in your account that could be used to pay the fee, you will get a drop-down allowing you to choose which asset you want to use. If you only have BitUSD in your account, this box will default to USD (BitUSD).
6: Check all the details one last time and when you are happy, click the Send button. You will be prompted to unlock your wallet, so enter the password you chose for your Bitshares light wallet account and click Log In (Unlock the wallet).
| [!] Now is a good time to ensure your mobile Smartcoins wallet (or web-wallet if you are using an iPhone or other OS) is open on your mobile device. This way you can see how fast the funds reach your mobile account. |
|---|
- 7: A final confirmation box will be displayed. If you are happy with it, click the Confirm button and your funds will be sent!
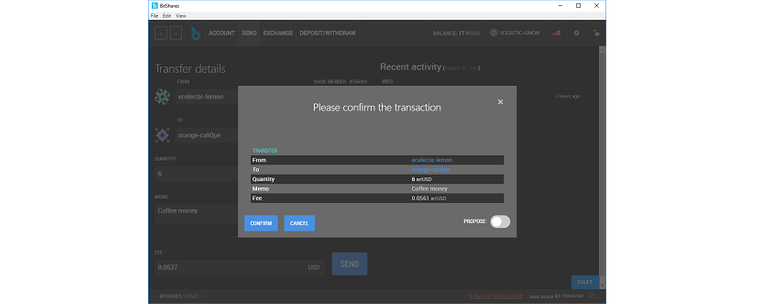
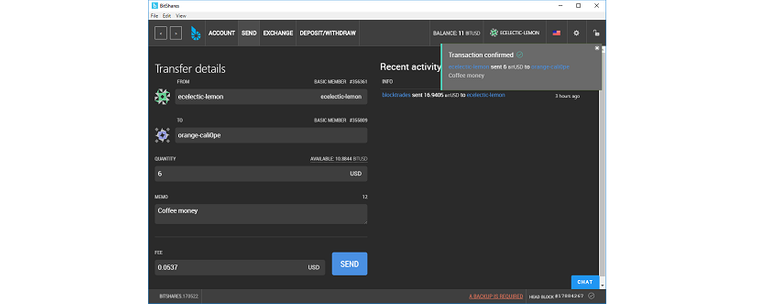
- 8: Once the network has confirmed the transaction (which should be instant thanks to the magic of Bitshares), a final Transaction confirmed message will be displayed on your Bitshares light wallet and your Recent activity will be updated.
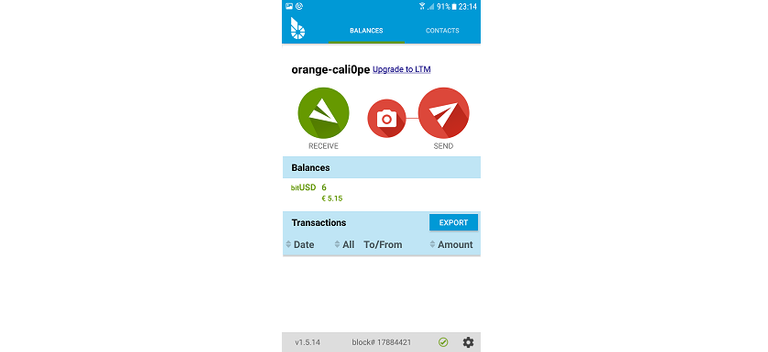
- 9: On your mobile device Smartcoins wallet you should see the balance has updated with the funds you have received. Note: there is a slight bug on some Android OS versions where the transaction list doesn't get updated in the Smartcoins wallet. This is a known issue and should be resolved in future updates of the application.
| [!] A note about network fees; All the wallets estimate the fee. It can be very slightly more or slightly less than the amount shown. Normally this isn't an issue, but if you wanted to empty your account entirely of an asset you may get an insufficient fee error when you try to send the transaction. If you have subtracted the fee from the total asset in your account and the network says the fee isn't enough, you may need to adjust the fee manually to get the transaction to go through. The network will tell you how much the minimum fee is. |
|---|
Now that we have successfully sent the funds to our mobile account, we're going to send them back to our main account. This will demonstrate a rough approximation of the scenario of a customer paying a business from a mobile device.
5.2 From your Mobile wallet to your Bitshares light desktop wallet
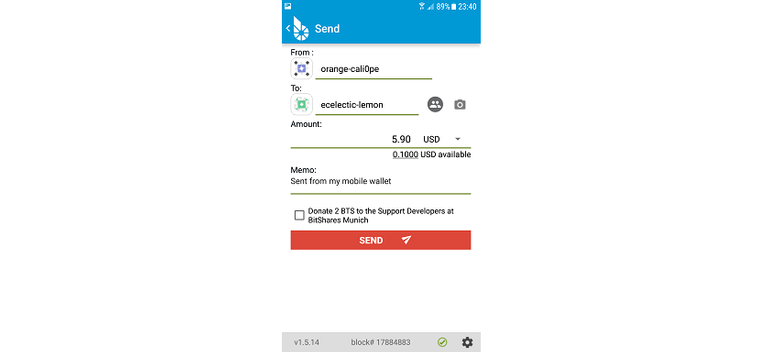
- 10: On the Smartcoins wallet on your mobile device, click the Send button to show the Send screen.
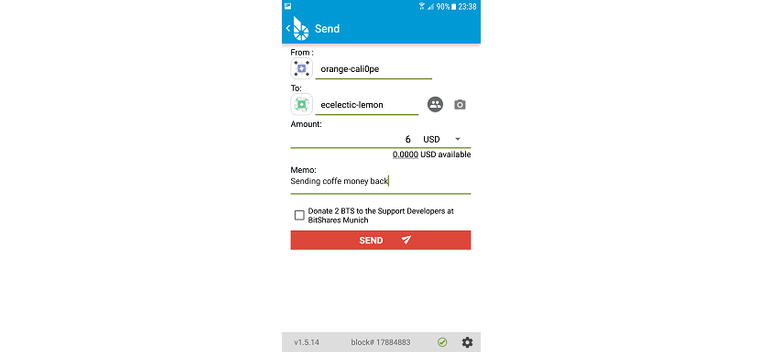
- 11: The From box will already be pre-populated with your account name. In the To box, enter the name of the account you added to your Bitshares light wallet. Notice that the picture adjacent to the account name changes based on the name you type in.
| [!] To check that the account you are sending to is your desktop account (and not someone else's), on your desktop Bitshares light wallet check the picture next to your account name (along the top) matches the picture adjacent to the name you entered in the To box on your Smartcoins wallet. |
|---|
12: On your Smartcoins wallet in the Amount box, put 5.90. We'll send 5.90 BitUSD (5.90 US Dollars) worth of funds back to our main desktop wallet. We will reserve 0.10 BitUSD to cover the network fee. On the right hand side of the Quantity box is shown the asset you are sending. This will default to USD (BitUSD) if that is the only asset in your account, but if you had other assets (like Bitshares tokens (BTS)), this would be a drop-down that allows you to pick the asset you want to send. It is important to check the asset you are sending so you don't accidentally send the wrong one. Unlike the Bitshares light wallet, the transaction fee is taken from any spare balance you leave on the mobile Smartcoins wallet, that is the reason we are sending 5.90 BitUSD and not 6 BitUSD. Future versions of the Smartcoins wallet may change this behaviour.
13: In the Memo field, enter a friendly identifier for this transaction for example; Sent from my mobile wallet (or anything descriptive you like). See Part 5.1 - Step 4 above for more information on the Memo field.
14: Since we have no Bitshares tokens (BTS) in our account, you can uncheck the Donate 2 BTS to the Support Developers at Bitshares Munich. It's completely optional to donate, but if you make regular use of the Smartcoins wallet, it's worth considering donating occasionally to support continued updates and enhancements to the software.
15: Carefully check all the fields one last time and once you are happy, click the Send button.
- 16: The transfer will be made and if you switch to your Bitshares light wallet on your desktop and click the Account tab, you should see Recent activity update with the new deposit and your Balance (along the top) will also increase.

That concludes this section on sending funds between accounts on the Bitshares network. Easy wasn't it?
| [!] The Smartcoins wallet is created and maintained by http://bitshares-munich.de/ - be sure to donate if you find it useful. If you find any bugs in it or can think of improvements, you can report them via the Github website here: https://github.com/kenCode-de/smartcoins-wallet/issues (you will need to create an account). Be sure to include screen-shots if possible! |
|---|
Part 6. Converting your Bitshares BitUSD Smartcoin back into Bitcoin (or preferred crypto-currency)
In this final section we'll be looking at how to withdraw funds from the Bitshares eco-system and convert them back to another crypto-currency that you can then sell for fiat (USD, EUR, CHINESE YUAN etc).
Because we are going to use Bitcoin as an intermediary, we can convert the Bitcoin back into fiat (USD, EUR, CHINESE YUAN etc) wherever there are Bitcoin->fiat conversion ramps. You can choose any withdrawal destination you like (E.g. an exchange like Kraken or a conversion site like Localbitcoins.com), however for the sake of consistency as we used Coinbase in Part 3 we will be converting our BitUSD to Bitcoin via the Blocktrades.us bridge and sending the Bitcoins back to our Coinbase wallet. From there you can liquidate the Bitcoins to fiat and transfer the balance to your bank account, credit or debit card.
Using this technique, you can take advantage of the Bitshares network for your day-to-day wealth storage and trading needs, converting back to crypto-currencies like Bitcoin only when you need to cash out or want to buy something only sold in Bitcoin (or another crypto-currency). This way, you avoid exposing yourself to huge volatility of crypto-currency while also benefiting from the vast number of conversion ramps that Bitcoin offers, at the cost of a fee for using Bitcoin (or your preferred intermediate crypto-currency) as an intermediary.
| [!] Bitcoin network fees can be quite high making them prohibitively expensive for low value transactions. Fees of 2-5 US Dollars or more are not uncommon. In future you may wish to use Ethereum (ETH) or Litecoin (LTC) as your intermediate currency, both of which are supported by Coinbase and will typically be a lot cheaper than using Bitcoin. At the time of writing, the Blocktrades.us bridge only supports BitUSD->BTC and does not support BitUSD->ETH or BitUSD->LTC, so you would need to convert your BitUSD to Bitshares tokens (BTS) first if you wanted to withdraw BTS->ETH or BTS->LTC. That's a task for the Distributed Exchange (DEX) which we'll be covering in the next article. |
|---|
The number of fiat to Bitshares conversion ramps are constantly increasing so you may not need to use Bitcoin (or any other crypto-currency) as an intermediary. You can find a list of deposit and withdrawal options at https://bitshares.org/deposit.
1: Open the Bitshares light wallet application from your desktop
2: Click the Deposit/Withdraw link along the top of the wallet to show the Deposit & Withdraw screen.
3: From the drop-down labelled Transfer Service choose BlockTrades (TRADE.X). Click the button labelled Bridge to choose the BlockTrades Bridge.
4: Under the label Withdrawal, select USD and in the box beside it choose BTC. The Current Balance column should update to read the balance of BitUSD in your account
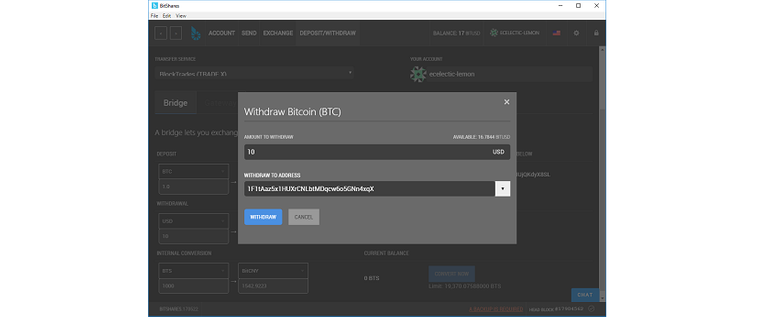
5: In the USD box, enter the number of BitUSD that you want to convert to Bitcoin (BTC), for example; 10. The number needs to be equal too or less than the value in the Current Balance column for the Withdraw Now button to become enabled.
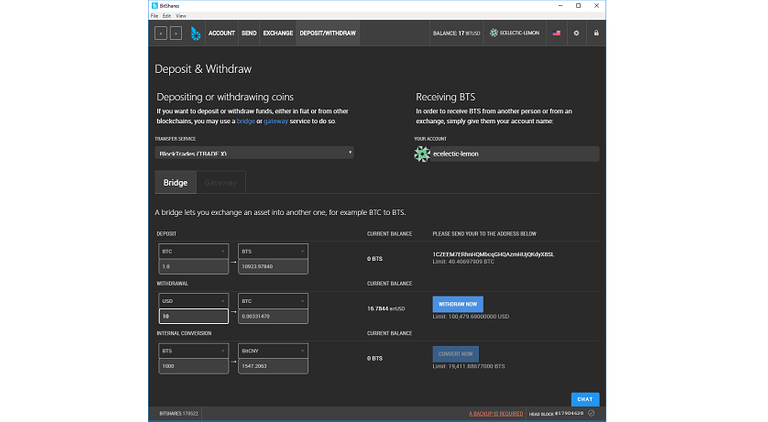
- 6: Check you are happy with the estimated BTC (or selected crypto-currency) you will receive and click the Withdraw Now button.
| [!] The Bitcoin network fee is separate from the Bitshares network fee and is included in the estimated number of BTC you will receive. You can use Google for an approximate conversion, using the search term XXX BTC in USD where XXX is the number of Bitcoin shown. E.g. 0.003 BTC in USD. |
|---|
7: You will now be prompted to enter the destination address for your Bitcoin to be sent to. At this point, open a new Browser session and log in to your Coinbase account.
8: From the main Dashboard, click the Accounts link and adjacent to the row labelled BTC Wallet under the Actions column, click Get bitcoin address.
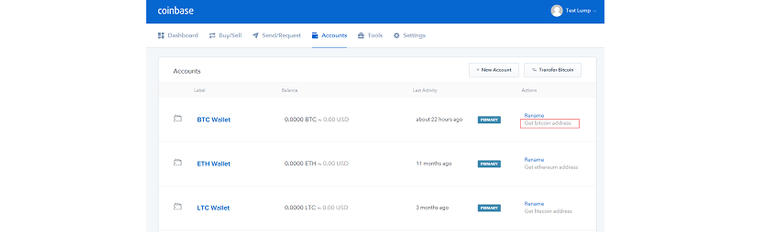
- 9:A popup will be displayed that coins a Bitcoin address (A long string starting with the number 1 - E.g. 1CLbU569[...lots of other characters]). Carefully copy this address down and switch to your Bitshares light wallet and in the Withdraw Bitcoin (BTC) box enter the address Coinbase gave you. Click the Withdraw button.
- 10: You will be prompted to unlock your wallet, so enter your Bitshares light wallet password and click OK. A final confirmation screen will be displayed, check the details one last time and click the Confirm button to complete the withdrawal.
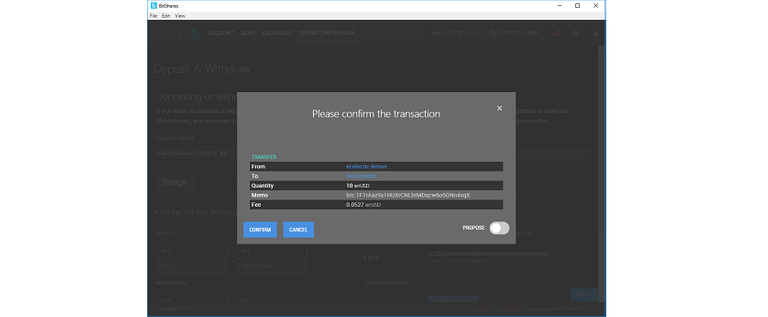
- 11: Switch back to your Coinbase browser and click the Dashboard link. Under Recent Activity you should see your incoming Bitcoin deposit. You may need to refresh the page a few times if the Bitcoin network is busy, so be patient (only Bitshares is the fast crypto-currency!).
And, that's it! You can now use Coinbase to sell your Bitcoin and credit the balance to your bank account, credit or debit card.
Part 7: Final Summary
Hopefully you now have the confidence to send vast fortunes through the Bitshares network with the click of a few buttons and have gained some insight into the possibilities of the Bitshares platform.
A further exercise you can undertake is to deposit some SmartCoins (BitUSD), wait a week or two and then widthdraw them to see how well the value has held compared to what you deposited. Don't forget to account for intermediate currency network fees (if you use one).
In the next article, we'll cover the Bitshares Decentralized EXchange or DEX for short. If you are feeling adventurous, you can start trying it out by clicking on the Exchange tab from within your wallet, just try experimenting with a small amount of capital.
Bitshares web wallets
The following Bitshares web-wallets are hosted by private companies but connect directly to the Bitshares network. They offer a customised user interface and/or localisation for certain geographic regions.
If you register a Bitshares account using the Account model, you can log in to your Bitshares account from any of these websites or the Bitshares light wallet*.
If you have registered your account using the Wallet model, you would need to use your Brainkey if you wanted to access your account from a different wallet or web-wallet than the one you registered on.
| Wallet Website |
|---|
| wallet.bitshares.eu |
| openledger.io |
| market.rudex.org |
| secure.freedomledger.com |
| bit.btsabc.org |
Point of Sale integration
If you are looking for a Point of Sale solution, check out the Blockpay "S" Android application from Blockpay and Bitshares Munich to accept a variety of crypto-currencies including the awesome Bitshares Smartcoins like BitUSD.
In additional to standard support channels, you can find active support for BlockPay solutions by visiting the BlockPay channel on Telegram.
Communication Channels
If you are in need of support , want to suggest new features or just want to keep up to date on the latest Bitshares developments, you may find the following active channels helpful:
Acknowledgements
Coffee cup image via Pexels
Feel free to copy / disseminate with or without attribution any whole or part of this guide and help show the world how game-changing Bitshares and crypto-currencies can be.
You clearly spent a lot of time on this. This article showcases just how far we have to go in order to bring bitUSD to the masses. Still much progress to be made on our UI.
THIS is a fantastic post chock full of information. By far the most comprehensive post I have seen on the subject, thank you in advance for all of the new folks that see this and use it to get ahead.
Glad you all like it. Be sure to spread the word to all those who may want to get involved but not sure where to start :)
very informative post!
This is a really comprehensive guide to using bitshares. Nice to have something to refer to while I'm learning.
nice tutorial of bitshares. It can be kind of confusing when you first start. This is a good guide.
Complete, organized, thoughtful. Excellent!
awesome! thanks for posting :)
Excellent writeup! Having guides of this quality is absolutely essential for easing the initial learning curve for new users.
Thats fantastic! 💪
Great Work !!!
This is a very thorough guide.
I know it was mentioned mid-article, but I recommend getting Litecoin first instead of Bitcoin and using Shapeshift.io to convert to Bitshares instead of using an exchange.
Longest tutorial for buying a coffee I've ever seen - but I like it a lot ;-)
Very detailed and well written how-to. I would just add that EOS is/will be the new bitshares. Also, if you are interested in a DEX such as bitshares, check out Ardor as well.
Thank you for the clear and articulately explained article @testlump. I have resteemed and promoted this fantastic work. You have got yourself an avid follower once again, thank you.
Congratulations @testlump! You have completed some achievement on Steemit and have been rewarded with new badge(s) :
Click on any badge to view your own Board of Honor on SteemitBoard.
For more information about SteemitBoard, click here
If you no longer want to receive notifications, reply to this comment with the word
STOPlol, that was intense.
i feel like I need a drink or something.
thanks.
cash inbound.
bitshares.eu is down and has been for a while now.. please fix that or put a replacement
Seems to be working ok here?
Congratulations @testlump! You have completed some achievement on Steemit and have been rewarded with new badge(s) :
Click on any badge to view your own Board of Honor on SteemitBoard.
For more information about SteemitBoard, click here
If you no longer want to receive notifications, reply to this comment with the word
STOPThanks for sharing! A link to your post was included in the Steem.center wiki page about Bitshares. Thanks and good luck again!
Post which is very interesting and useful for beginners like me
Congratulations @testlump! You have received a personal award!
Click on the badge to view your Board of Honor.
Do not miss the last post from @steemitboard!
Participate in the SteemitBoard World Cup Contest!
Collect World Cup badges and win free SBD
Support the Gold Sponsors of the contest: @good-karma and @lukestokes
Congratulations @testlump! You received a personal award!
You can view your badges on your Steem Board and compare to others on the Steem Ranking
Do not miss the last post from @steemitboard:
Vote for @Steemitboard as a witness to get one more award and increased upvotes!