Introduction
Arduino is an open source computer hardware and software company, project, and user community that designs and manufactures single-board microcontrollers and microcontroller kits for building digital devices and interactive objects that can sense and control objects in the physical and digital world. Source
Since it is open source, many compatible boards are in the market nowadays and some of the clones require a different setup in order to be able to upload sketches to them, using the official Arduino IDE software and thus be able to later interact with Blinkit.
What will I learn ?
In this Tutorial (for Windows OS) we will be guiding you on:
- how to look for the COM port where your board is connected
- how to look for/change the baudrate of your connected board
- how to install the driver of Arduino Compatible boards
- how to burn the bootloader for not working Arduino UNO boards
By following these steps you will be able to easily setup your Arduino board and upload the sketch to it and be able to interact with Blinkit and receive notifications about Steem activity with the blink of an LED.
Following this tutorial you will be able to let any Official or Clone Arduino Board interact with Blinkit and thus be able to receive the notifications from Steemit.
What is Blinkit?
Blinkit is a notification software that can be used to give to regular and widely available devices a Steem purpose.
Supported devices:
- USB Sticks (with read/write status light)
- Philips hue lamps
- Sonoff smart Wifi switches
- Arduino Boards or compatible (Genuino, etc...)
Blinkit can look for new Steem account Upvotes and Followers, and it can notify on new Posts made by a user.
Blinkit is free and open source, and can be downloaded from the Blinkit Github page:
https://github.com/techtek/Blinkit
For more information about the new version of Blinkit please visit the following link
For more information about the Arduino integration to Blinkit please visit this link

Requirements
For Genuine Arduino boards:
- Your Windows PC or Laptop
- Arduino IDE software
- Arduino Board
For Compatible boards:
- Your Windows PC or Laptop
- Arduino IDE software
- CH341SER.EXE driver for compatible boards (direct download link)
- Arduino Clone board
Difficulty
- Basic Windows OS knowledge
Tutorial Contents
Step 1: Install the right Driver
In order to be able to let Arduino interact with Blinkit the proper driver should be installed for the board. If Arduino IDE software is installed and the owned board is a Genuine/Official Arduino board there should be no problem with the driver setup as the software itself should recognize the board and install its respective driver automatically. If this is your case then click the next hyperlink to jump to the next step called Getting COM port and Baudrate.
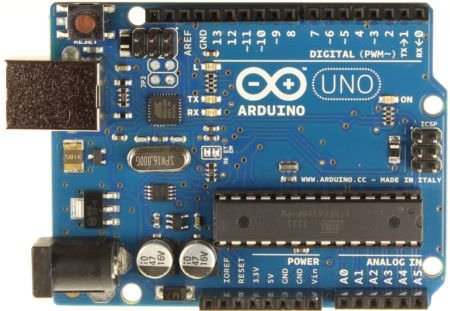
Image of a Genuine/Official Arduino Uno board
However many compatible/clone boards found in the market for few bucks will not directly be recognized by your PC/Laptop. Hence, you will not be able to upload the sketch to them to be able to interact with Blinkit.
The problem is that the clone does not use the standard serial to usb chip but a chip marked CH340. Your computer will not recognize these CH340 chips as a COM device but will recognize them as a normal 2.0 usb device.
If by plugging the Arduino board to your PC/Laptop no device is detected at all, start by checking the USB data/power cable which could be broken. If you are sure that the cable is fine then you can continue with this tutorial to fix the other technical issues.
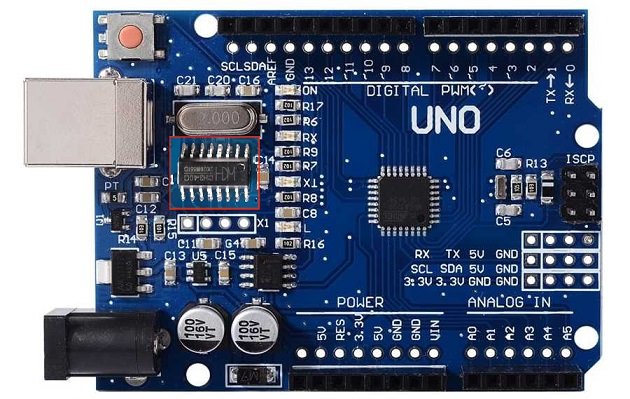
Image of an Arduino Uno Clone
Hereafter is the solution to the software problem.
Download the manufacturer software CH341SER.EXE (redirects directly to download link) and install it on your computer. This software will work for all versions of Windows.

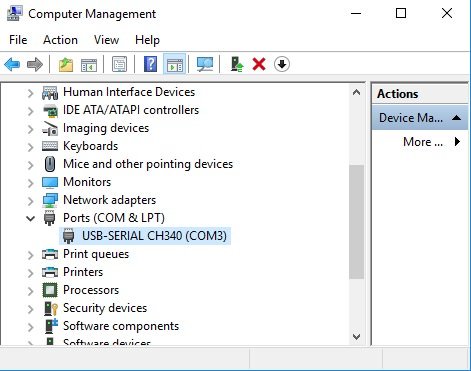
Once done installing the software you can then plug in your Arduino Clone which should now be visible to Arduino IDE and thus ready to receive the sketch. The device will be visible on the com port as USB-Serial CH340 as per below image.
In some cases the board might still not work. In this case the problem could be:
- The Arduino clone board had been plugged to the pc before the CH340 driver installation thus the PC/laptop already recognized it as another type of device and is not updating the driver.
- The bootloader is not installed on the Atmel microcontroller chip.
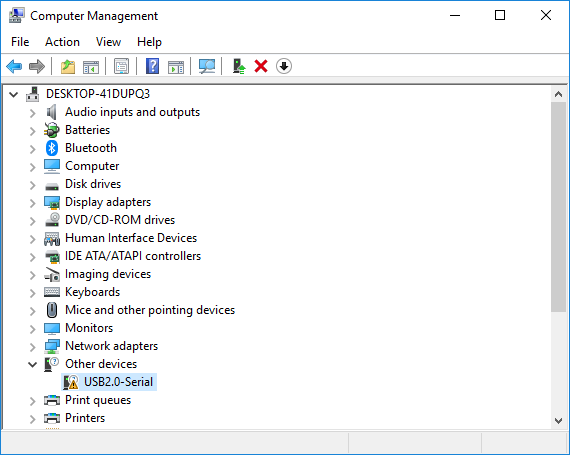
To solve the first problem (wrong driver) please open your Device Manager. (click on the link to be redirected to the section where it shows how to open device manager or scroll down to get to it) and uninstall the driver that has been associated with your board (most of the times you will find it on the top as USB2.0-Serial as per image below)
Step 2: Burn the bootloader (Not needed if Step 1 solved the problem)
If the driver is well installed and thus the problem is not related to a wrong driver associated to your board then the problem could be that the bootloader is not installed on your Atmel microcontroller chip. To solve this problem we need a working Arduino board (could be a working clone board) and the clone Arduino we want to fix.
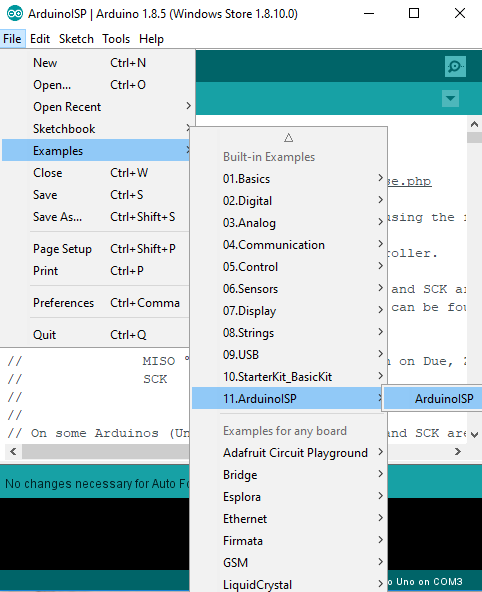
First of all we need to create an ISP Programmer using the working Arduino board. To do this open Arduino IDE and go to File -> Examples -> ArduinoISP and upload this to the working Arduino. Ones uploaded disconnect the Arduino from the PC/Laptop.
After having uploaded the sketch to the working Arduino board and after having disconnected the board from the PC/Laptop, it is time to wire up as shown below the 2 Arduinos.
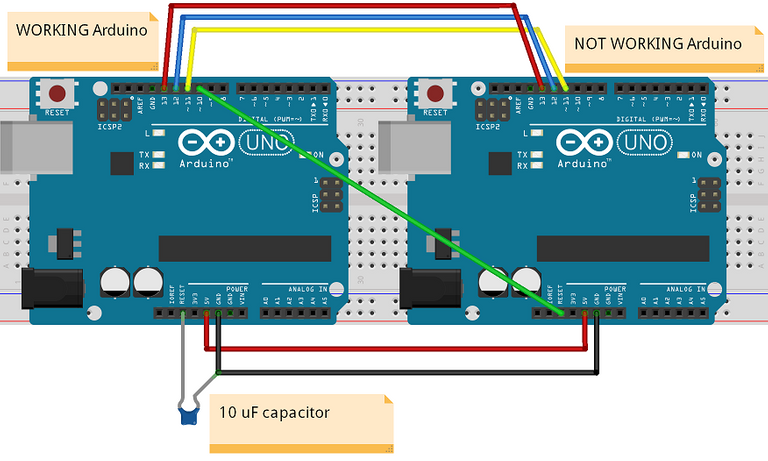
Connections will be as follow (From working Arduino to not working Arduino):
Pin 10 goes to reset
pin 11 goes to pin 11,
pin 12 to pin 12,
pin 13 to pin 13.
5v to 5v,
ground to ground,
Connect a 10 uF capacitor between reset and ground on the working Arduino.
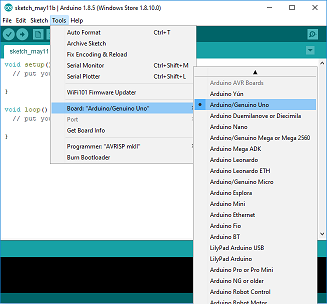
After having acomplished the wireup it is time to burn the bootloader. In order to do that, connect the working Arduino to your PC/Laptop using its data/power USB cable and open the Arduino IDE then
go to Tools -> Board and chose the type of board you are using. In my case i taking as example Arduino/ Genuino UNO but it is the same procedure for other boards having the same issue.
Then go again to Tools -> Programmer and select Arduino as ISP.
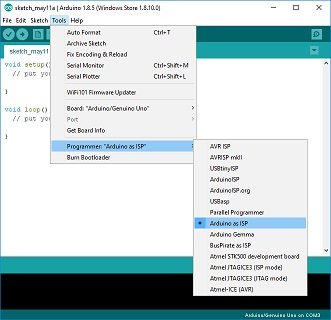
Now go to Tools again and select Burn Bootloadr !!
Once done you can put back ArduinoISP in Tools -> Programmer
Now your Arduino Clone board should work fine and thus we are ready to go to the next step.
Step 3: Getting COM port and Baudrate
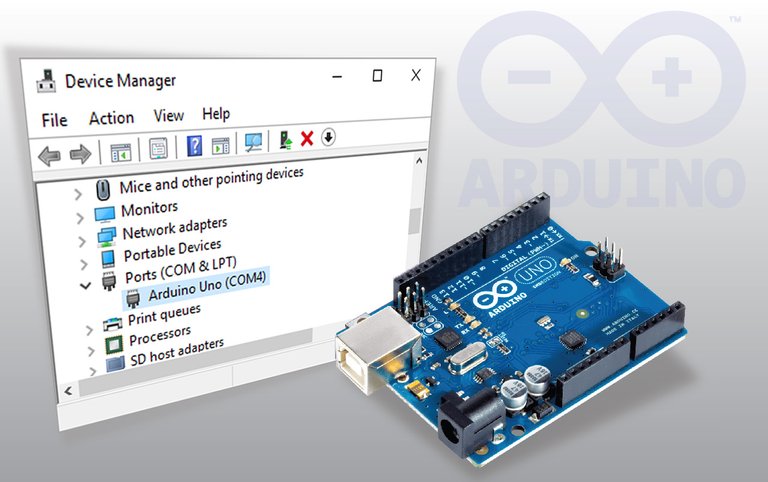
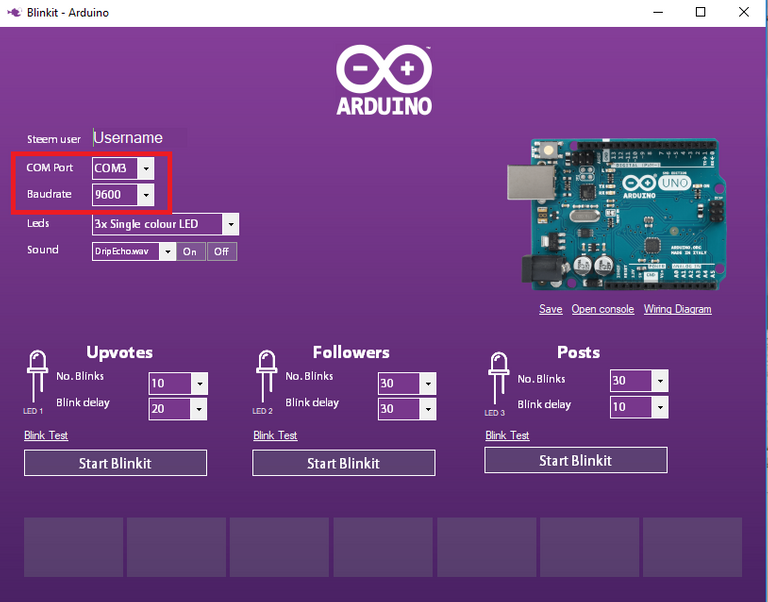
Once the driver is set up, and once the Arduino is recognized by Arduino IDE we are ready to upload the sketch for Blinkit interaction. One last thing is required in order to be able to interact with Blinkit: save the COM port and Baudrate Value in the Blinkit interface as shown in the image below.
.
In order to get the value of COM port and Baudrate for the connected board, Go to the Device Manager:
right click on This PC (known as My computer also) and click on Manage -> Computer Management gets opened.
In the left sidebar click on Device Manager and then in the main screen look for "Ports (COM & LPT)". There you will find all the devices connected to a COM port (and if everything went well, it should also show your Arduino clone board).
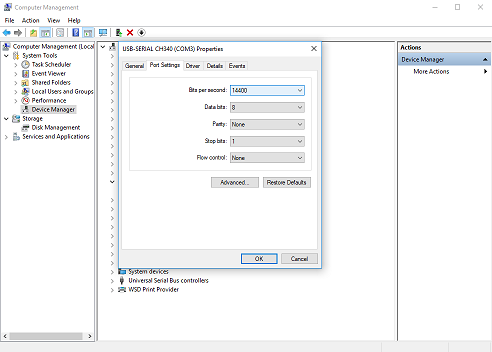
Next to your device name you will find in brackets the current COM port on which it is connected (in my case it is COM3, image below)
Once noted the COM port double click on your device. A pop out screen should appear...click on the tab named Port Settings and you will find all the port related settings of your device ( Baudrate is the first value mentioned). You can note the baudrate of your device to be used later in Blinkit. Baudrate can be changed if needed but then the baudrate must be changed also on the sketch of Arduino and in Blinkit interface.
Now any Arduino board (Genuine or Clone) should be supported and should be able to interact with BLinkit !!
Once all this is done you are ready to go and can open Blinkit interface and put all your settings in it with the newly noted COM port and Baudrate and start receiving your notifications over serial on Arduino.
Now chose the action required to look for in Blinkit interface (upvote, follower or post) and start receiving notifications by clicking the relative "Start Blinkit" button.
Technical Support
Technical support is available, if you may encounter a problem please leave a comment below or contact me through Discord (eliaraysalem#0829)
Hello @electronicsworld,
Your post "Blinkit | Electronicsworld - TUTORIAL 2: How to set up Arduino for Blinkit interaction" hast just been Resteemed !!! 🙃😝🙃
I've done this for following me..
😻🙃😻 If you want's to stop me, Please Unfollow @tow-heed😉😉😉
thanks !!
Congratulations @electronicsworld! You have completed some achievement on Steemit and have been rewarded with new badge(s) :
Click on any badge to view your own Board of Honor on SteemitBoard.
For more information about SteemitBoard, click here
If you no longer want to receive notifications, reply to this comment with the word
STOPAwesome write up on how to setup your Arduino (clone) to use with Blinkit !
Join our Discord Channel to connect with us and nominate your own or somebody else's posts in our review channel.
Help us to reward you for making it ! Join our voting trail or delegate steem power to the community account.
Your post is also presented on the community website www.steemmakers.com where you can find other selected content.
If you like our work, please consider upvoting this comment to support the growth of our community. Thank you.
Thank you @steemmakers !!

Congratulations @electronicsworld! You have completed some achievement on Steemit and have been rewarded with new badge(s) :
Click on any badge to view your own Board of Honor on SteemitBoard.
To support your work, I also upvoted your post!
For more information about SteemitBoard, click here
If you no longer want to receive notifications, reply to this comment with the word
STOPCongratulations @electronicsworld! You have completed some achievement on Steemit and have been rewarded with new badge(s) :
Click on any badge to view your own Board of Honor on SteemitBoard.
For more information about SteemitBoard, click here
If you no longer want to receive notifications, reply to this comment with the word
STOPشكرا للمشاركة الجميلة.
حصلت على تصويت من
@arabsteem curation trail !
و تم اختيار مقالتك ضمن مقالات يومية مختارة للنشر في مقالنا اليومي
يمكنك الحصول على تصويت اضافي عبر ارسال مبلغ اقله
0.05
ستيم او اسبيدي الى حساب التصويت الالي
@arabpromo
مع رابط المقال في حقل المذكرة (memo)
مما يتيح لك الحصول على تصويت مربح بحوالي 2.5 اضعاف :)
Thank you @arabsteem !! شكرا !!