
On May 25, public Gravity testnet was launched. Many thanks to all the participants!
For those, who has not yet decided to join in, we issue a set of instructions on the testnet participation. The Gravity Team takes a serious view on information support of the project. If you have any questions which are not presented in the instructions, please leave them in the comments.
Join our Telegram dev chat
More information here
Instructions in the Set
- Creating an Issue on Github
- Wallet Registration Tutorial
- Install Gravity Node for Public Testnet
- Install Gravity Node for Public Testnet with Docker
- Turn a node into a witness node
- Comittee Memember Registration Tutorial
- How to update Gravity Protocol node
- How to resync Gravity Protocol node
Attention! Resync your node please!
Last Friday our testnet had its first emission. Due to sync problems it is not displayed either in the wallet or in the explorer, and it can't be spent. To fix it, all the nodes should be resynced, and first of all - all the witness nodes. You'll need to recync your node in 24 hours, otherwise your node will fork in relation to the main testnet. Please notify us in the telegram chat after you'll resync your node.
See the manual below or here
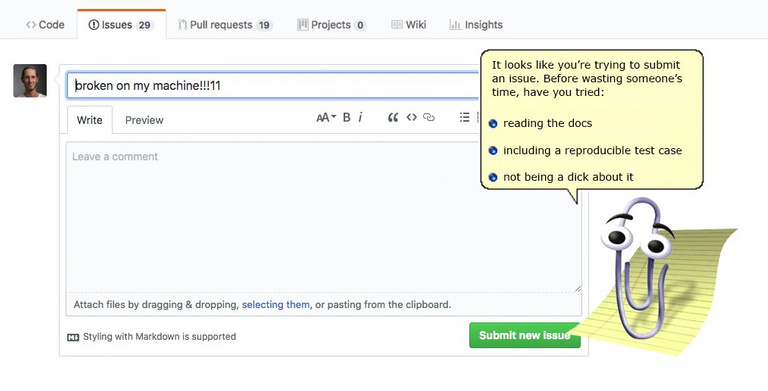
📢 Creating an Issue on Github
To participate our testnet, you need to follow instructions.
All the work with the code, along with suggestions should be presented on the Gravity testnet GitHub in the form of issues. Today we will be teaching you how to create and submit an issue on Github.
- In order to do that, we first need to find an account for the products where we have special offers.
- Next, we need to select a specific repository.
- Now, moving to the issue tab, we’ll select “New Issue”.
- In the title of this issue we will briefly describe the idea of our proposal or the mistake we’d like to report to the team.
- Next, In the space below, we will talk about our proposal in greater detail.
- If you wish to do so, you may use the formatting tools provided. For example, you can make the text size larger.
- We can also click on the “Preview” button- to see how it will be displayed.
- When you’re finished, select “Submit new issue”.
- If you’d like to edit the title, press “Edit” button provided.
- And if you need to edit the text, press the “Pencil” button.
- If you make a mistake and send your issue to the wrong repository, do not worry! You are able to close your issue at any time.
- To do so, press the “Close Issue” button.
- Likewise, if you accidentally close your issue, you can reopen it as well.
- Do do that, just select the “Reopen issue” button.
Wallet Registration Tutorial
We’re going to review the registration process for the Gravity Protocol Blockchain.
In order to do so, open the link https://wallet.gravityprotocol.org on your computer.
Next, select the button “Create wallet”.
Now you’ll need to create a password for your wallet, and select the “Submit” button.
In the next step, the site asks us to move our mouse, in order to generate a unique brainkey.
Once you have that unique brainkey please save it.
Now, double check that you definitely saved your brainkey.
Then, among the words listed, find words 2, 4, 8 and 12 (in order) in our brainkey.
Select “Confirm”.
Next you will see three tick marks.
Select the first mark. Then, we need to confirm that we understand the fact that our wallet, as well as, private keys and tokens that are stored in our wallet, are only saved on our machine and that there are no other copies saved to the servers.
By selecting the second mark, we give our agreement to send anonymous data to improve the platform.
The third mark prompts you to make a backup copy.
As you can see, it’s not required to make a backup copy but it is better to do so just in case.
All that’s left to do is select the button “Get started”.
As you can see, the backup copy is downloaded immediately.
Now you’re able to use any of the available wallet functions.
Install Gravity Node for Public Testnet
We’re going to show you how to assemble your own Gravity protocol node. Choose a server with Ubuntu 16.04 for the correct node installation. You need to install: git, docker, docker-compose. If you need use the command: docker login.
- Please note, that you must have git, docker and docker compose installed on your machine.
- First we’ll clone the repository by using git clone.
git clone --depth 1 https://graphenelab.unfuddle.com/git/graphenelab_gravitypublic -b testnet
- Right now, our repository is still private so in this video I’ll need credentials to log in.
- After the clone is complete, you need to double check the that the new folder has been created.
ls
- Then switch to that folder.
cd graphenelab_gravitypublic
- Now we need to give the command to compile the node.
- Please note that you may need to use sudo depending on the type of user account credentials that you have.
sudo docker-compose build
- Now you'll have to wait for approximately 20 minutes for the node to compile.
- There will be some warnings in red, but you can safely ignore them.
- Now, that the node is compiled, you need to boot up the node. We'll use the 'docker compose up' command for that.
sudo docker-compose up
- After a while, you'll see blocks being created every few seconds.
- To terminate the node press Ctrl+C.
Install Gravity Node for Public Testnet with Docker
We'll learn how to install a gravity-protocol node using another method. It is also suitable if you have a version of the operating system differs from Ubutnu 16.04. You need to install: git, docker, docker-compose. If you need use the command: docker login.
- First of all we need to clone the repository, we do this using git clone.
git clone https://github.com/GravityProtocol/gravity-testnet-docker.git
- Next, we’ll check the newly created directory. As you can see, the directory is there, so let’s cd to it.
ls
cd gravity-testnet-docker
- Now we need to download an image with the node. We'll use docker-compose pull, to do that.
sudo docker-compose pull
- After the image has downloaded, we need to boot up our node.
- Let’s use docker-compose up, to do that.
sudo docker-compose up
- Soon you'll see blocks being created.
- To terminate the node you’ll need to press Ctrl+C.
Turn a node into a witness node
We’re going to turn a node into a witness node.
- First, open node’s directory.
cd gravity-testnet-docker
- Then, run the node in daemon mode, and run the cli-wallet with advanced settings.
sudo docker-compose up -d
sudo docker-compose exec gravity_node cli_wallet -w /var/lib/gravity/wallet.json
- Next, Set a password for the wallet and unblock the wallet.
set_password password
unlock password
- Import your account in the wallet.
import_key "your-account" "your-active-private-key"
- Here’s where you’ll get a lifetime membership, and then create a witness.
upgrade_account "account" true
create_witness "account" "url" true
- Now you’ll need to get your witness-ID.
get_witness "account"
- As you can see, the witness-ID for this specific account is "1.6.*" You’re going to want to memorize it or write it down. There is also a public key for signing blocks which also needs to be saved.
- Now you can derive a private key using the public key, save the private key as well.
get_private_key [public signing key] (without quote)
- Now close the cli-wallet using Ctrl+C.
- After that, you’ll need to edit the config.ini file.
sudo nano ./data/config.ini
Add your witness-ID, and replace the keys.
Don’t forget to delete the sharp symbol (#) in front of witness-id to turn the comment line into a code line.
After you’ve added your witness-ID and replaced the keys, press Ctrl+X.
Then press Y to save the changes.
Now you’ll need to restart the node. For that, use the docker-compose down and docker-compose up commands.
sudo docker-compose down
sudo docker-compose up -d
- And there you have it, a running witness node!
- Now, all you have to do is convince people to vote for you.
Comittee Memember Registration Tutorial
We’ll be learning how to create a member of the committee from an account.
- To begin, we need to open the file with the program node.
cd gravity-testnet-docker
- Now, let’s start our node with demonization.
sudo docker-compose up -d
- Next, run the cli-wallet with extra parameters.
sudo docker-compose exec gravity_node cli_wallet -w /var/lib/gravity/wallet.json
- At this time, we’ll create a password for the wallet.
set_password password
- Unblock the wallet and we’ll be sent into our account.
unlock password
- Here, we’ll import our account.
import_key "your-account" "your-active-private-key"
- Now that we’ve done this, we have a lifetime membership for this account,
upgrade_account "account" true
- From this account we’ll be creating a member of the committee.
create_committee_member "account" "url" true
- Execute the following command, an example is in the video description.
- Now close the cli-wallet using the keyboard shortcut Ctrl+C.
- Now your account is a candidate to be a member of the committee.
- All that is left to do is convince people to vote for you.
If you’ve already created a witness node, you can skip the password setting steps for the wallet, import the account and purchase a lifetime membership.
How to make proposals and to edit a blockchain configuration
We’re going to learn how to make proposals and to edit a blockchain configuration.
- First we’ll open cli-wallet when the node is launched.
sudo docker-compose exec gravity_node cli_wallet -w /var/lib/gravity/wallet.json
- Then we’ll unlock the wallet.
unlock 1234567
And now we’ll get to work.
- We’ll get current configuration values:
get_global_properties
- We’ll make a proposal to change the interval between the blocks using the template:
propose_parameter_change [from account] [time, the value must be greater than CURRENTTIME + committee_proposal_review_period and lower than CURRENTTIME + maximum_proposal_lifetime] {json with the new values} true
For example:
propose_parameter_change "g2090i8190e9280o7900" "2018-06-13T17:28:00" {"block_interval": 3} true
- Now we’ll get the number of proposal id.
get_account_history "g2090i8190e9280o7900" 1
2018-06-13T17:00:20 proposal_create_operation g2090i8190e9280o7900 fee: 20.00007 ZGV result: 1.10.1
- And we’ll vote.
approve_proposal g2090i8190e9280o7900 1.10.1 {"active_approvals_to_add" : ["g2090i8190e9280o7900"]} true
- Now we’ll close the cli-wallet using Ctrl+C
And we’ll change the fees:
- First we’ll get current values of the configuration
get_global_properties
- Then we’ll make a proposal to change the fees.
propose_fee_change "g2090i8190e9280o7900" "2018-06-13T04:32:00" {0 : {"fee": 1, "price_per_kbyte": 0,1}, 34 : {"fee": 10000000}} true
- Now we’ll get the number of proposal id.
get_account_history "g2090i8190e9280o7900" 1
2018-06-13T17:00:20 proposal_create_operation g2090i8190e9280o7900 fee: 20.00007 ZGV result: 1.10.1
- And vote:
approve_proposal g2090i8190e9280o7900 1.10.1 {"active_approvals_to_add" : ["g2090i8190e9280o7900"]} true
How to update Gravity Protocol node
We’re going to learn how to update Gravity Protocol node.
- First, we’ll go to the node’s directory.
cd gravity-testnet-docker
- Here we’ll stop our node.
sudo docker-compose down
- Then we’ll receive the update from github.
git pull origin
- And new versions of packages from Dockerhub.
sudo docker-compose pull
- Now we’ll run the node in daemon mode.
sudo docker-compose up -d
- If you prefer, you can display current sync status on the screen.
sudo docker-compose logs --tail 10 -f
- To hide the logs, press *Ctrl+Z.
How to resync Gravity Protocol node
We’re going to learn how to resync Gravity Protocol node.
- First we’ll go to the node’s directory.
cd gravity-testnet-docker
- Here we’ll stop our node .
sudo docker-compose down
- And run it again.
sudo docker-compose up -d
- If you prefer, you can display current sync status on the screen.
sudo docker-compose logs --tail 10 -f
- To hide the logs, press Ctrl+Z.
📢 Gravity Launches Public Testnet
Come to our testnet and break our toys!
Want to join our team?
See the previous articles
Gravity Protocol Intro
Gravity Protocol Roadmap
A Deeper Look Into Dan Larimer’s radio
Gravity Protocol initial distribution
Adaptive Emission: Making Blockchain Economy Real
Gravity IPFS: Off-chain Data Storage
Gravity: Ecosystem Participants
Gravity: Stablecoin Solutions
Follow Us
Website: http://gravity.io
BitsharesTalk: https://bitsharestalk.org/index.php?board=122.0
Bitcointalk: https://bitcointalk.org/index.php?topic=4189531.0
Telegram channel: https://t.me/gravityprotocol
Telegram dev chat: https://t.me/gravity_protocol
Blog: https://steemit.com/@gravity-protocol
Blog: https://medium.com/@gravityprotocol
Twitter: https://twitter.com/protocolgravity
Discord: https://discord.gg/bcavmUg
Linkedin: https://www.linkedin.com/company/gravity-foundation/
Amazing. This steps will definitely get me started asap. Thanks, sir
Good. If you have more questions, ask them in our Telegram dev chat.
https://t.me/gravity_protocol
What's the criteria for becoming a witness?
Your desire is the main criterion in the testnet.
Really.
So after having the desire, what next?
Server or your laptop with Ubuntu 16.04, 4+ Gb RAM.
good work mercy
Thanks for your support and helping post
hello there!!!
thanks for sharing all this information, you all are doing a great job, keep working hard and nothing it will stop you.
also this a great project, i wish you good luck!!!
have a wonderful day!!!
Thank you!
Your work is extraordinary whether it is realed to cryptocurrency updates or blockchain projects and other technologies,, these tyes of updates all very useful for the steemitians or the people who are new to the community..
It is actually an honour for me to serve your post by wonderful comments..
Thank you!
You got a 68.50% upvote from @postpromoter courtesy of @gravity-protocol!
Want to promote your posts too? Check out the Steem Bot Tracker website for more info. If you would like to support the development of @postpromoter and the bot tracker please vote for @yabapmatt for witness!
hi//
i follow you..
Amazing post....
Excelente.
GOOD^^
Read it haven't heard anything before liked the way you've put on to everything.
buena publicación....
Wow... So much to take in at once... Off to sign up first.. baby steps :)

This looks like exciting tech..
Tremendously attractive, interesting project, I congratulate you, successes!
My foto

Muy bien explicado, buen post.
I really like your post, so I resteem your post. and this will be a new passion for me. I hope you can support me to continue developing in the world of steemit
I will try to do it step by step, be patient.
You use GitHub? :D :D
Good new. Thank for sharingg
I dont understand this system benefit my profile ? Please someone explain clearly for me
Congratulations @gravity-protocol! You have completed some achievement on Steemit and have been rewarded with new badge(s) :
Click on the badge to view your Board of Honor.
If you no longer want to receive notifications, reply to this comment with the word
STOPTo support your work, I also upvoted your post!
Congratulations @gravity-protocol!
Your post was mentioned in the Steemit Hit Parade in the following category:
Most detailed post ever. Thanks for good Information.
Excellent post all those steps will serve me to start as soon as possible thanks
Excellent! post.
Great tutorial
Dear users of Steemit, I want to recommend you MassCoinApp - the best application for real traders.
It will help you to check the rate of cryptocurrency in desktop mode with real comfort.
Link to read full info and download: masscoinapp.com
@dionesarit you're on the @abusereports naughty list!
Bad Steemian! Bad!