
Byteball logo
1. Introduction
You have probably all heard about Byteball already. The last airdrop closed in November at full moon and a next airdrop is tentatively scheduled for March 2018. Assuming this new Airdrop will go ahead: make sure that you prepare in time for a next drop of bytes and black bytes. See a tutorial to set up a wallet and link it to your Bitcoin wallet address (with balance) here.
Byteball developer Tony is steadily adding new features to the software. Lately it was 'textcoins' (read here for more). Now, Tony has released a new feature that is all about verifying your ID and tying it to the Byteball ecosystem.
Given that ID versus cryptocurrency is a hot item and will increase in importance in 2018 and beyond, cryptocurrency projects that can bridge the unregulated and anonymous nature of cryptocurrency to the world in which KYC and AML rules play a vital role, have an edge when it comes to capturing a large part of the payment markets.
For this feature, Byteball partnered up with Jumio. Jumio is a start up firm that's in the business of automated (digital) ID verification. The grand idea is that the user pays Jumio a small amount of Byteball (worth about $8) to verify his ID. Jumio verifies the ID information provided by the user and - if successful, records the user's ID information as a hash in the Byteball DAG 'blockchain'. The user stores his ID information in his Byteball wallet. As an incentive, Byteball pays the user $20 worth of Byteball for the ID verification so the user nets $12 from all of this.
From now on, the user can share these ID details to other Byteball parties. The user has full control over which elements of the ID information to share with a third party. The recipient of that ID information can verify the authenticity thereof himself (he can verify that Jumio attested the ID info).
A 'digital ID' is born.
In this tutorial, I show the steps of creating this digital ID. This will be done via the Byteball wallet and - further down the process - via the Jumio website. Be sure to keep your ID ready and use a device with a camera/webcam because you need to make a photo of your ID and your face. All relevant fields/actions have been marked with green boxes or arrows. Those have been added by me to the figures for explanation purposes.
Caution, this is a long tutorial due to the many screenshots. Because cryptocurrency is very cryptic (pun intended), I preferred the long article instead of short cuts that could prove difficult to understand.
2. Creating a 'single-address' wallet and funding it
First step is to create a 'single-address' wallet. This is important because the bot that will be used to set up the payment to Jumio only accepts payments from so-called 'single-address' wallets. By default, Byteball wallets are multi-address wallet. This means that upon each payment made, the change in the wallet is moved to a new address. This is hidden to the user (the user still sees his main wallet address and the remaining change in his wallet) but the change has actually been moved to a new address in the wallet.
To avoid this from happening, you will set up a 'single-address' wallet where any change upon a payment out remains in the main wallet.

Figure 1: create new wallet
Click the 'hamburger' on the left top side and a menu will appear.
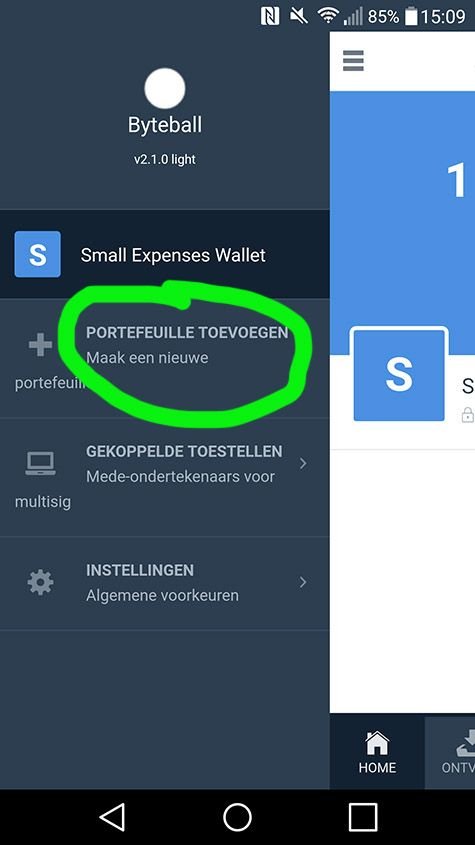
Figure 2: create new wallet
Choose to create a new wallet.
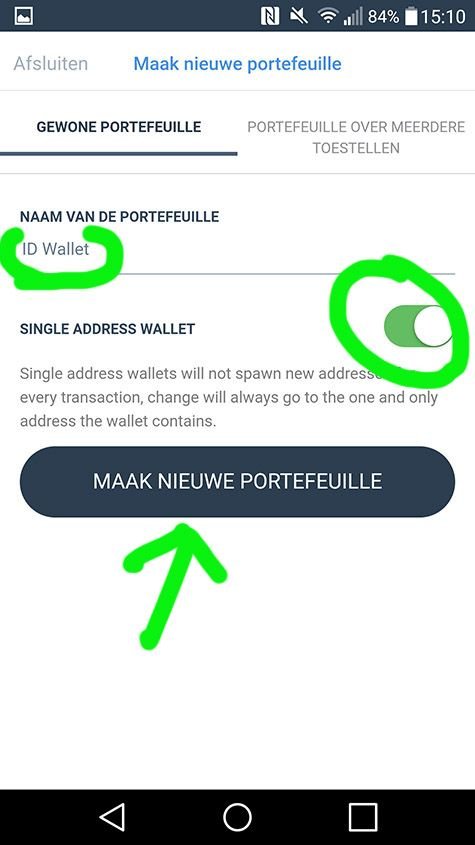
Figure 3: new wallet options
Give your wallet an appropriate name (I chose 'ID Wallet' and will use this name to refer to this wallet in the rest of this tutorial) and make sure that the 'single-address wallet' option is checked. Create the new wallet.

Figure 4: new wallet created
When the new wallet is created, it is visible when tapping the 'hamburger' menu button.
IMPORTANT: the payment to Jumio must come from the ID Wallet; otherwise the ID attestation will fail. If you do not have funds in the ID Wallet yet, you need to fund this wallet with the funds needed to pay for the ID attestation. Funding the ID Wallet from one of your other wallets in the same wallet app is described below. If not applicable for you (ID Wallet already funded), you can skip this and move to paragraph 3.
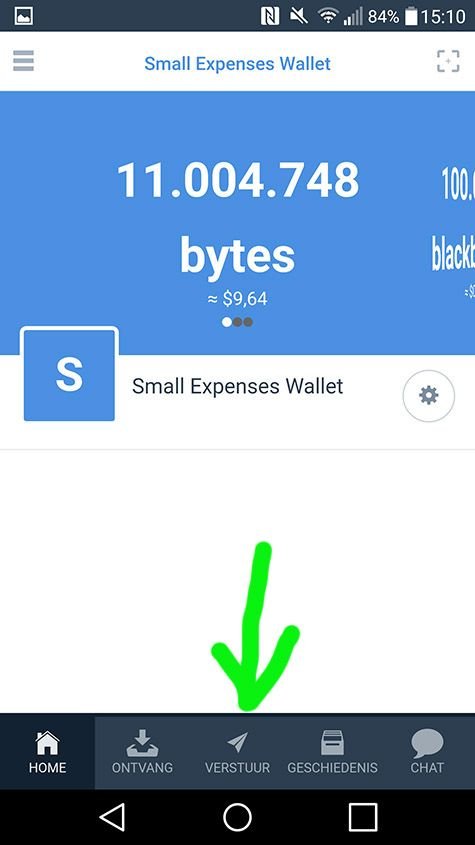
Figure 5: wallet with funds
In the wallet that has funds, go to the tab to make a payment.
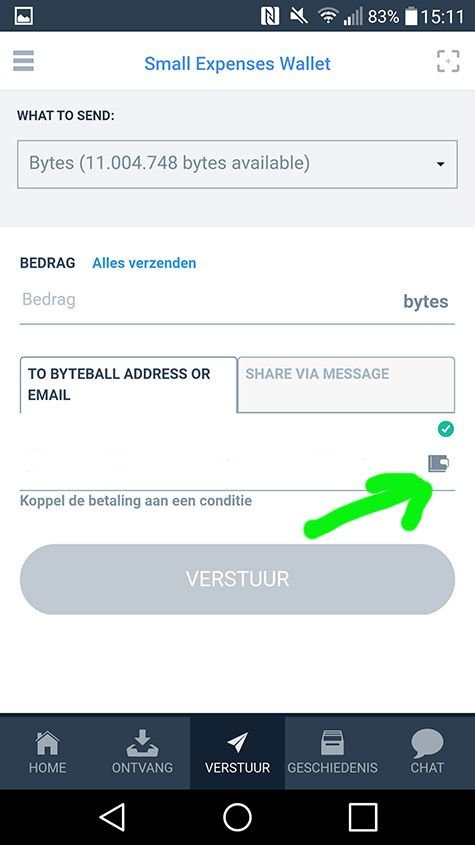
Figure 6: making a payment
In the payment menu, select the address book where you will immediately find the newly created ID Wallet (see Figure 7 below).
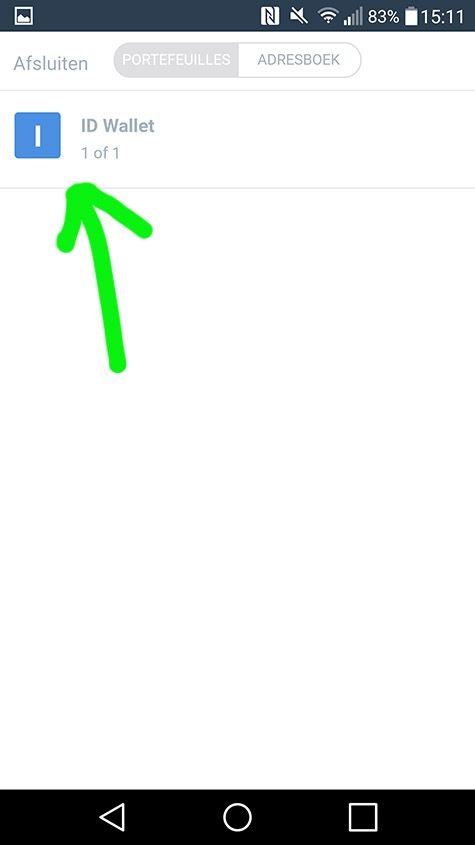
Figure 7: ID Wallet bookmarked
Select the ID Wallet as receiver of the payment.
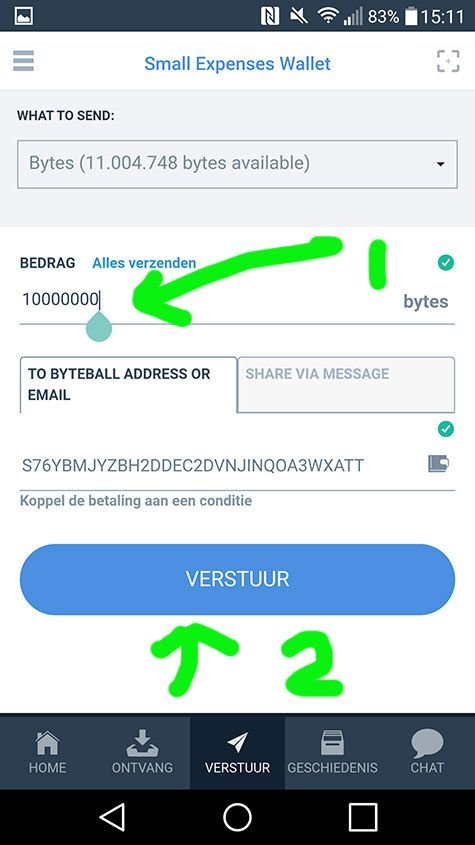
Figure 8: final payment details ready
Check whether the final payment details are correct:
- Receiver (should be the ID Wallet)
- Sufficient funds (the payment should at least be about $8 worth of Byteball)
Make the payment by clicking the payment button.
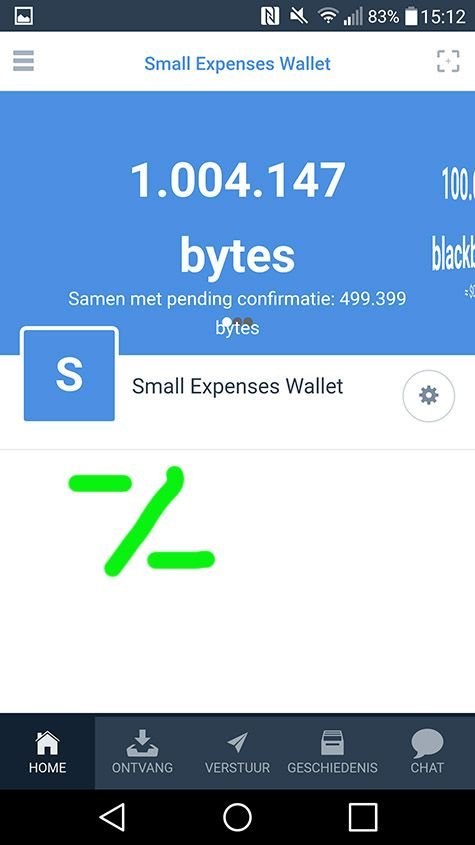
Figure 9: payment subtracted from sending address
The payment has been subtracted from the sending address.
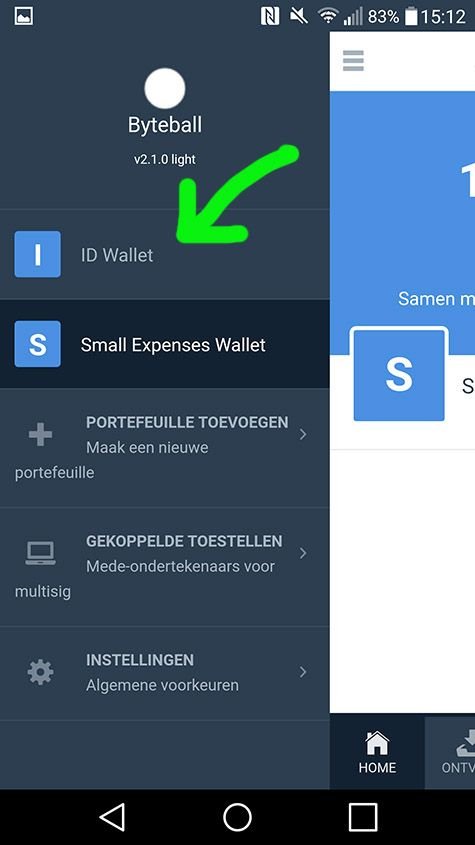
Figure 10: switch to the ID wallet
Switch to the ID Wallet to track the incoming payment.
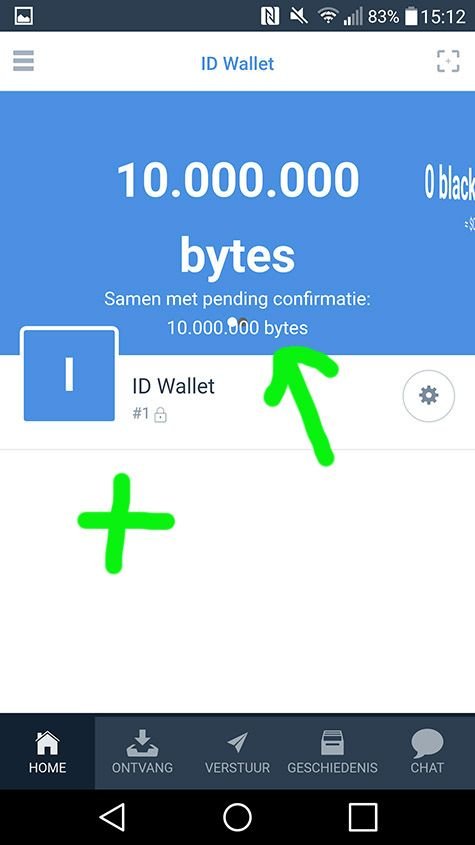
Figure 11: payment added to receiving address as 'pending'
The ID Wallet shows the payment as pending. After a short while, the pending message will dissappear.
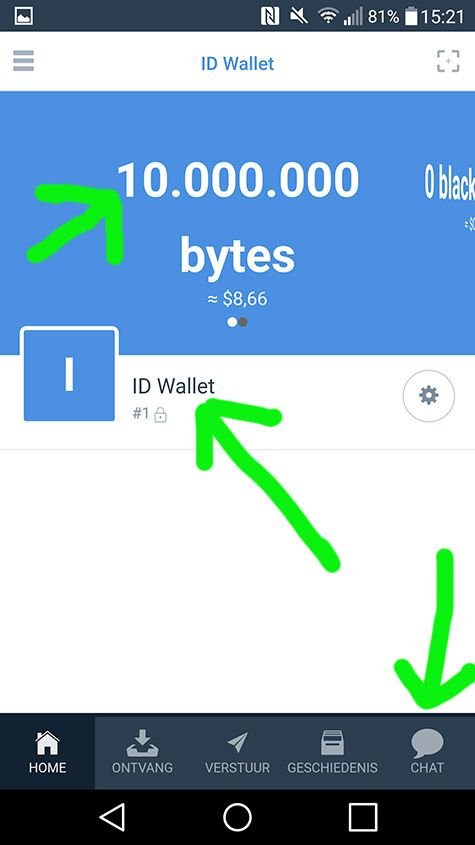
Figure 12: payment added to receiving address (final)
Once the payment is final, press the 'chat' button.
We are done with part 2 now.
3. Adding the attestation bot and setting things up
Next step is adding the attestation bot and setting things up for the ID verification.
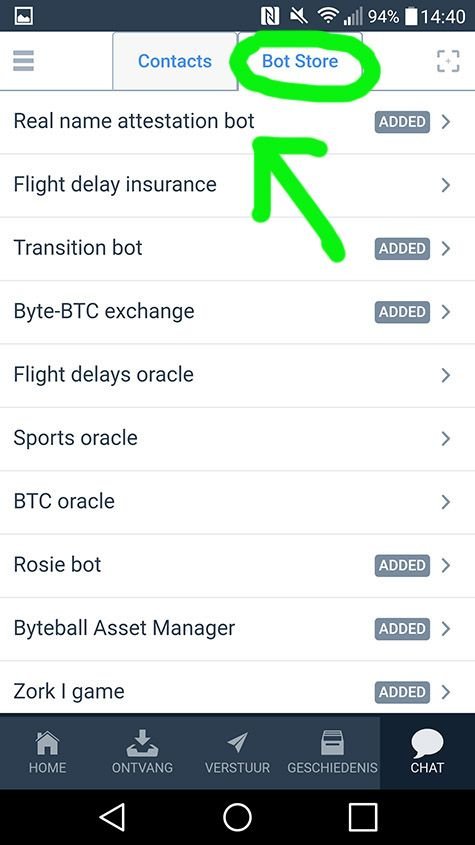
Figure 13: adding the 'real name attestation bot'
In the chat menu, go to the bot store and add the 'real name attestation bot'.
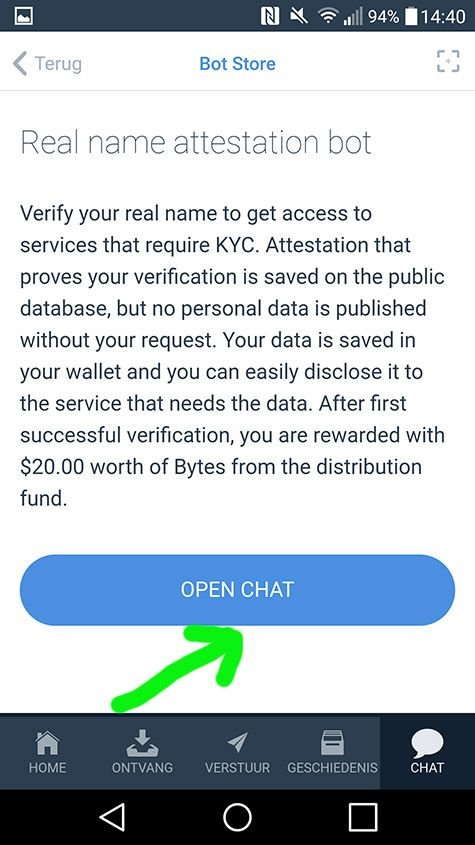
Figure 14: add the 'real name attestation bot'
Add the bot.
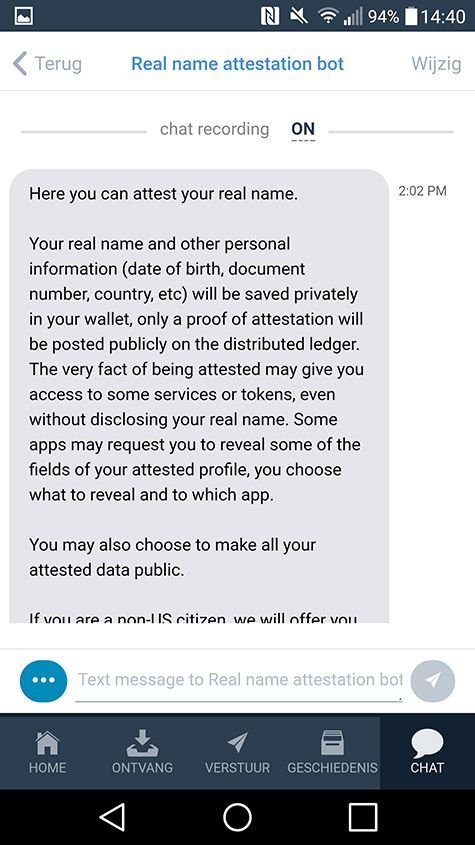
Figure 15: welcome message with instructions
Read the welcome message of the bot (if necessary, just type 'help' in the chat channel) carefully.
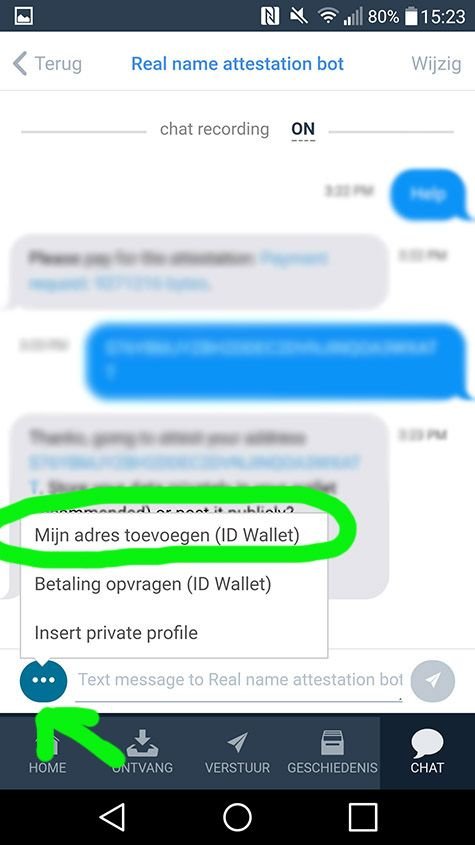
Figure 16: insert the wallet address of the ID Wallet
What you need to do is provide the address of your ID Wallet. This can be done by clicking the button at the bottom left side and choosing the 'insert my address (ID Wallet)' option. The wallet address will be inserted and you can send that address to the bot as a response.
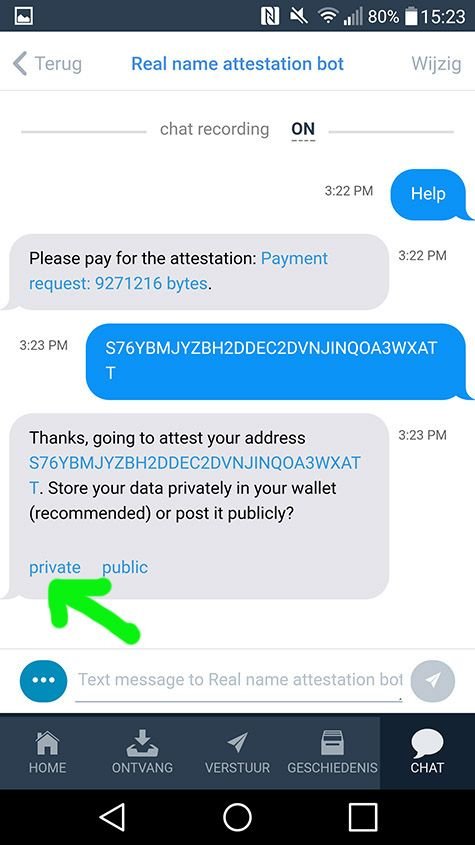
Figure 17: choose the 'private' option for storing your data
The bot will respond and ask you whether to store the data private or public. Choose 'private'.
.jpg)
Figure 18a: make the payment to the bot (for Jumio)
The bot will ask to make the payment. Again, it is vital that the payment comes from the 'single-address' wallet and not another (multi-signature) wallet. Doing otherwise will result in losing $8 worth of Byteball (the bot won't refund).
Making the payment starts with tapping the payment request.
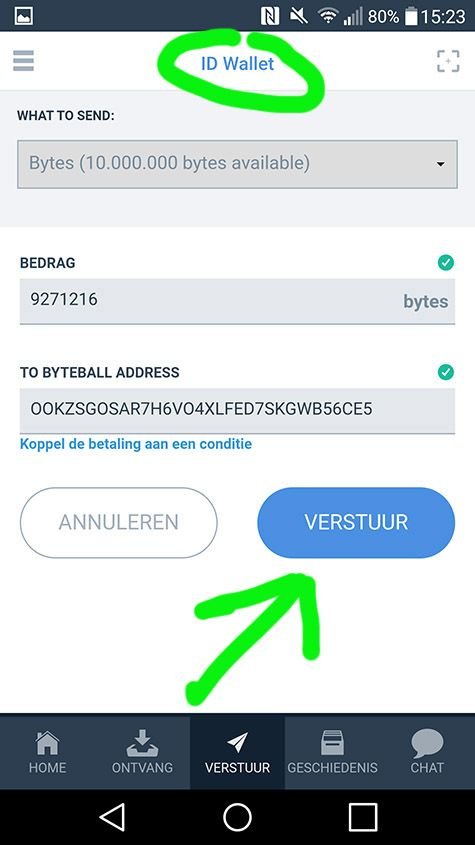
Figure 18b: payment screen
In the payment screen, we see that the ID Wallet is chosen (because you were working from the ID Wallet already). The payment details are filled out automatically. Make the payment.
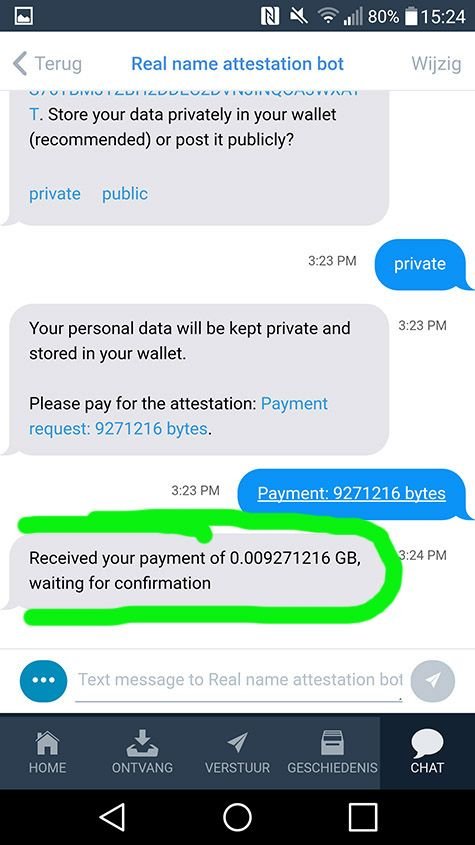
Figure 19: bot confirming receipt of payment
The bot will confirm receipt of the payment and that it needs to wait until the payment has been confirmed by the network. This could take a couple of minutes.
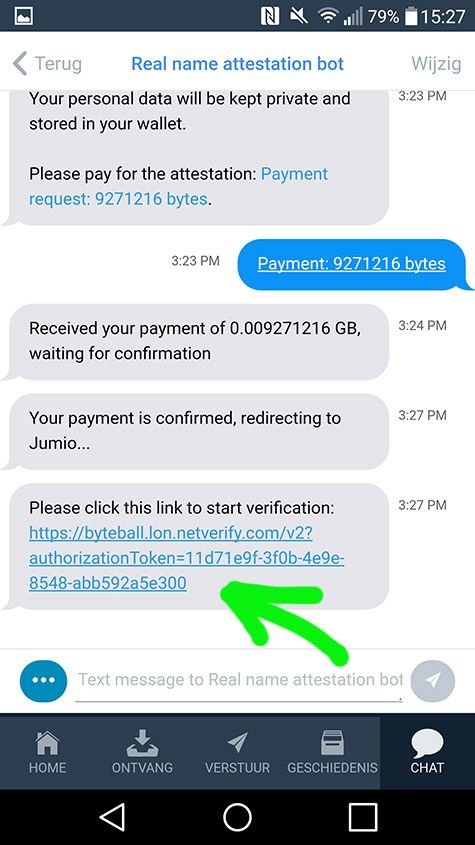
Figure 20: link to Jumio verification process
Once the payment has been confirmed by the network, the bot will confirm so and ask you to proceed with the verification process at the Jumio website. Tapping the link will take you to an external site via your default browser.
4. The Jumio verification process
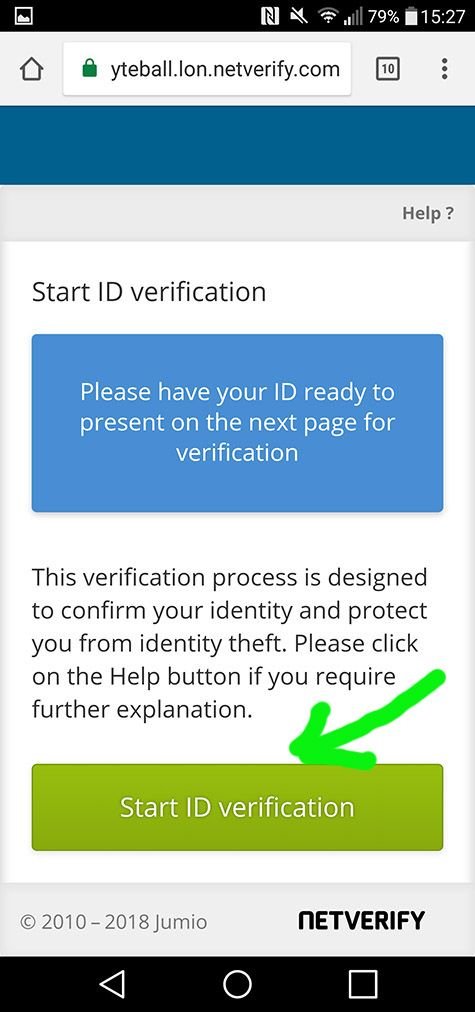
Figure 21: start of verification process
The Jumio website opens and will ask you to prepare your ID. Proceed to the next step by starting the ID verification.
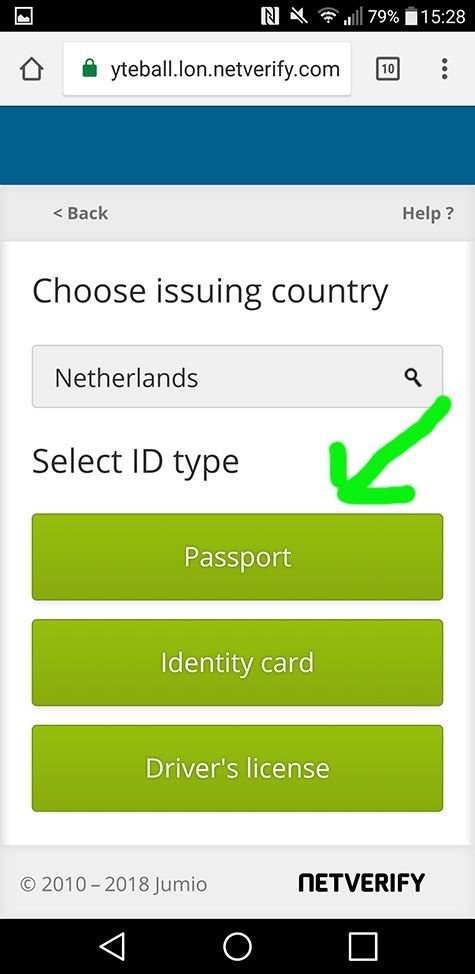
Figure 22: choose the type of ID document
Choose the type of ID document. I used my passport. The browser already filled out my country of residence automatically.
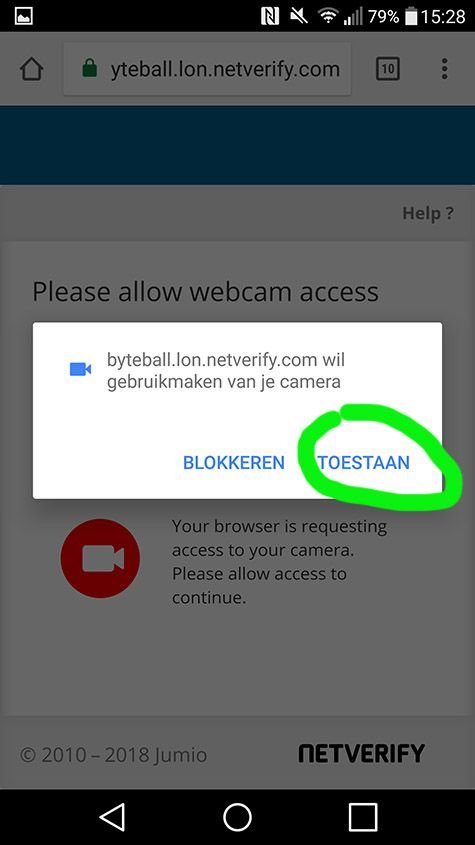
Figure 23: granting access to camera
The browser will request access to your camera. This is needed to make a photo of the ID chosen and your face. Choose the option to allow this.
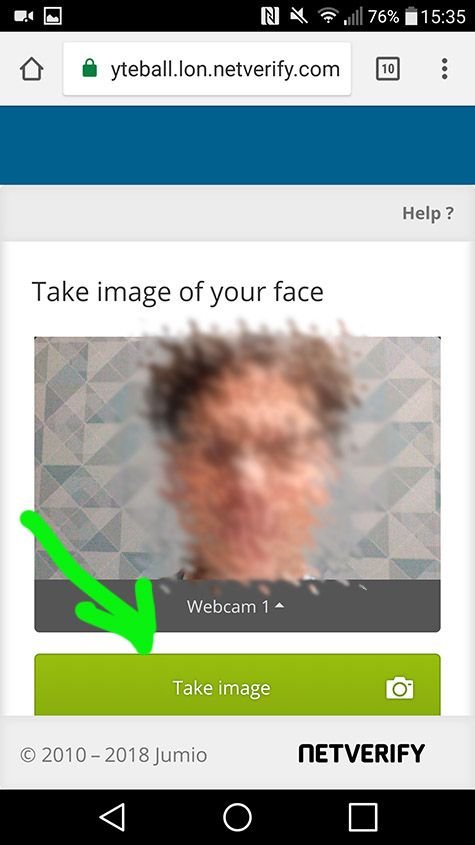
Figure 24: take a photo of your ID and face
The browser opens a page with a box showing the output of your camera. By tapping the button, you can make a photo of your ID and on the next page, your face (ID shot not shown in the Figures).
In my case the front camera of my phone was automatically chosen (Webcam 1). Choosing Webcam 2 resulted in a Google Chrome crash so I reloaded the link and just went with the front camera.
Make sure that the photos are good quality and that the copy ID is legible and has no shiny reflections etc. This will increase the chance that Jumio will accept the images. If the images are not good enough, the attestation can fail and the whole process needs to be redone (including payment).
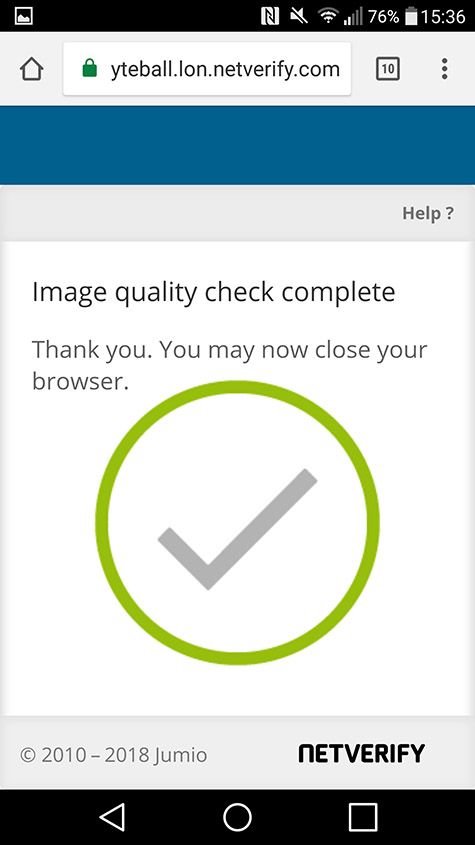
Figure 25: Jumio procedure complete
The Jumio process is complete now. You may return to your Byteball wallet.
5. Wrapping things up
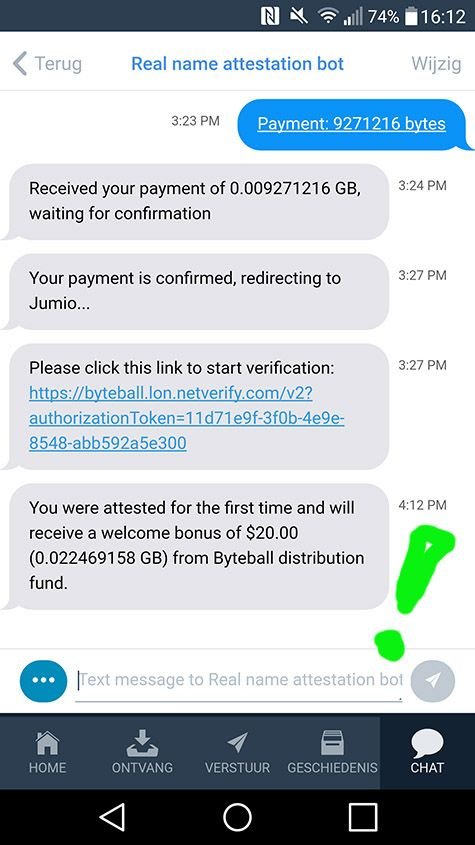
Figure 26: the bot confirms completion of the attestion
In the Byteball wallet the bot confirms the completion of the attestation process. As a result, you will receive a payment of $20 worth of Byteball.
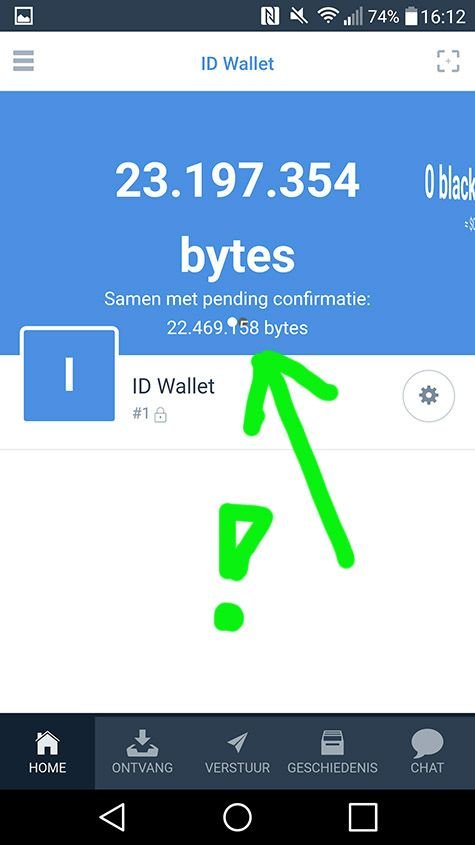
Figure 27: $20 worth of Byteball received after completing the attestation
Byteball has paid $20 worth of Byteball for completing the ID attestation. This payment will only be done once so doing the ID attestation multiple times will not lead to renewed incentive payments by Byteball.
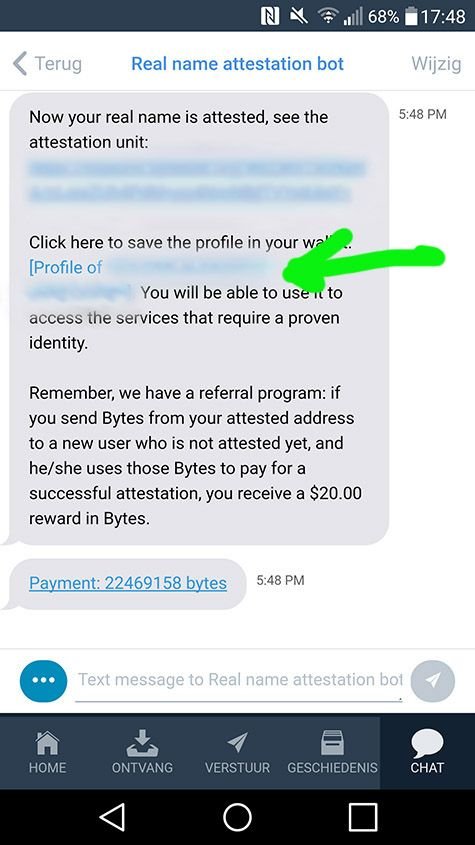
Figure 28: saving the ID profile in the wallet
After a while, the bot let's you know that the attestation unit has arrived. This package is stored in the wallet by clicking the profile link and saving it in the wallet. Now, this information can be provided by anyone with a click of a button in cases where proof of ID is needed. Byteball innovation at work.
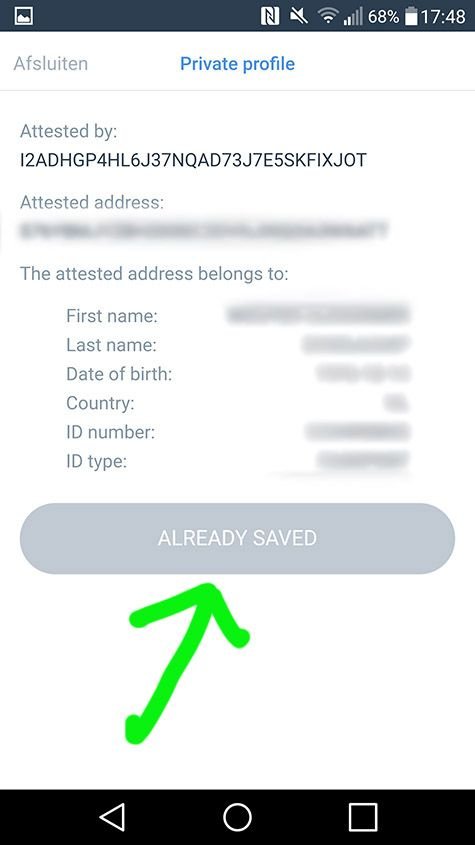
Figure 29: card with personal details
The personal details are shown (blurred of course). The first time the button to save is still active (I already saved the profile in my wallet when making the screenshot).
You can send this information (or any part thereof while keeping the rest hidden) to a Byteball recipient now. See Figure 16 for the option 'Insert private profile' which will bring up a dialog with options for this.
6. Referral program
Byteball offers a referral program for creating digital IDs. If I send you some funds from the wallet that I used to set up my ID, and you will use those funds to create your own ID, I will receive $20 worth of Byteball. The same applies if you subsequently have someone else create an ID, paying for it with funds from your ID wallet address. This creates an incentive to induce people to install the Byteball wallet and create a safe private digital ID.
Happy to pay the first person Byteballs to create an ID. If I get the bounty back, I can redo this more times for other people. Just leave your Byteball address in the comments and let's get this Byteball rolling!
Please also check out my tutorial on creating private tokens on the Byteball network: https://steemit.com/cryptocurrency/@wekkel/byteball-create-your-own-tokens
byteball:TEXYDWOIDB67AZ3J3SIAHRJAPUGBYP3H
I sent you Byteball. Please finalise the ID attestation procedure. Only then I will receive funds to use for funding the wallet of the person in the next comment as well.
Lets keep the Byteball rolling.
Hi, I finalysed ID already, before your transaction. I think I got initial $ from @edmundspriede https://busy.org/@edmundspriede u Wana your money back? 😃 Put address and amount still not confused with all those transactiona
Thanks for the heads up.
It would be great if you could send it back so I can fund someone else.
S76YBMJYZBH2DDEC2DVNJINQOA3WXATT
Still waiting for return of the funds.
My byteball:ZHOKOV3J64ED2YFEY5APVGJKTOLMOXYT
byteball:IIMFP44R4MEWIPH5QTRHTEEEBOUPTZC3
i also funded my self ...
After looking at all that and needing id not even gonna bother. 👎
How to get to level 30