¡Hola, Mundo!
Hablemos de carvar. Y no cavar, ni excavar, ¡ni tan siquiera cargar! Es que la palabra "carvar" no existe en realidad en nuestra lengua española, es otro anglicismo (viene de "carve", que significa tallar) que hemos tomado para referirnos al tallado de un sello. Algo tan común en el mundo del scrapbooking y en el de las manualidades en general, como es tomar palabras del inglés (claro, es que el scrap es genuino de Estados Unidos, y bueno, así nos sentimos más auténticas nosotras también). Qué nos gusta un "palabro" nuevo: llamamos a los broches, brads; a los ojales, eyelets; al tablero aglomerado, chipboard; al repujado, embossing; a las etiquetas, tags;...y así, para casi todo. Es que suena más cuqui, la verdad, decir "voy a una crop esta tarde", que "voy a una reunión con otras chicas para hacer scrapbooking con nuestras herramientas y materiales mientras charlamos, reímos y nos tomamos un cafelito". Que sí, que tenemos una palabra referirnos a esta técnica, pero qué vamos a hacerle, parece que carvar un sello es más profesional que tallarlo (jejejeje).
Puestos así, yo me hubiera ido seis mil años atrás, cuando tallaban en piedras dibujos muy esquemáticos, hasta la Grecia Clásica, que se hacía sobre piedras preciosas. Esta técnica era la glíptica, y no me digáis que este "palabro" no hubiese sido más atractivo.
Hi, World!
Let's talk about carving. And not digging, not digging, not even carrying! The word "carvar" doesn't really exist in our Spanish language, it's another anglicism that we have taken to refer to the carving of a stamp. Something so common in the world of scrapbooking and in the world of crafts in general, as it is to take words from English (of course, it is that scrapbooking is genuinely from the United States, and well, this way we feel more authentic ourselves too). We love a new "word": we call "broches", brads; "ojales", eyelets; "tablero aglomerado", chipboard; "repujado", embossing; "etiquetas", tags;... and so on, for almost everything.
It sounds cuter, really, to say "I'm going to a crop this afternoon", than "I'm going to a meeting with other girls to do scrapbooking with our tools and materials while we chat, laugh and have a cup of coffee". Yes, we have a word to refer to this technique, but what can we do, it seems that carving a stamp ("carvar") is more professional than carving it ("tallarlo")(hehehehehe).
I would have gone back six thousand years, when very schematic drawings were carved on stones, to Classical Greece, which was done on precious stones. This technique was glyptic, and don't tell me that this "word" would not have been more attractive.
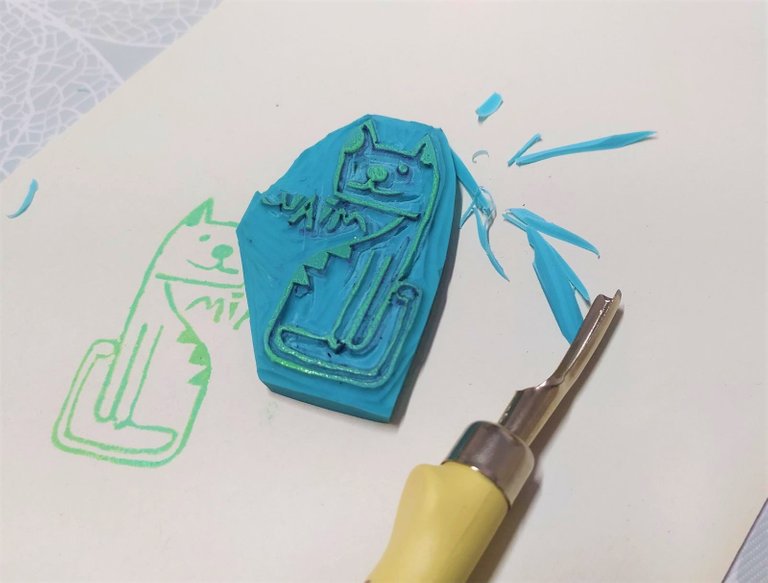

En fin, que el sello de miAu! que incluyo hasta la saciedad en mis publicaciones, imágenes, pies de fotos,... y que estampo en todos mis trabajos, lo tallé yo misma. Es un diseño muy sencillo con una técnica muy rudimentaria, pero lo hice yo, en toda su totalidad, y por eso tiene un gran valor (para mí, obviamente).
Para iniciarte en el carvado de sellos necesitas muy poco, por eso somos muchos los "iniciados" (y pocos los que dominan realmente esta técnica). Los materiales fundamentales son:
Una plancha de goma, que venden expresamente para esta tarea. Las hay de diferentes grosores y consistencias, dependiendo del tipo de proyecto (del detalle del diseño) que desees realizar, el tipo de tinta que vayas a utilizar (acrílica, de base aceitosa,...) y la durabilidad que esperes de tu sello.
Una gubia. Al menos una, claro, aunque lo ideal es tener varias puntas diferentes, para las distintas necesidades: surcos más o menos anchos o profundos, líneas curvas,... En el mercado existen juegos de herramientas que incluyen un mango con diferentes plumillas intercambiables.
Anyway, the miAu! stamp that I include ad nauseam in my publications, images, captions,... and that I stamp on all my work, I carved it myself. It's a very simple design with a very rudimentary technique, but I did it myself, in its entirety, and that's why it has a great value (for me, obviously).
To get started in stamp carving you need very little, that's why there are many "initiates" (and few who really master this technique). The basic materials are:
- A rubber plate, which is sold specifically for this task. They are available in different thicknesses and consistencies, depending on the type of project (the detail of the design) you want to do, the type of ink you are going to use (acrylic, oil-based,...) and the durability you expect from your stamp.
- A gouge. At least one, of course, although the ideal is to have several different tips, for different needs: more or less wide or deep grooves, curved lines,... There are sets of tools on the market that include a handle with different interchangeable nibs.

Además necesitarás para dibujar tu sello:
- Un lápiz de grafito
- Papel vegetal: aunque puedes dibujar directamente en la plancha de goma, siempre es más cómodo dibujar en el papel, donde puedes borrar con facilidad y rectificar, y una vez obtenido el diseño definitivo, calcarlo a la plancha. Recuerda cuando vayas a realizar el dibujo, que al calcarlo en el papel te saldrá la imagen en "espejo", por lo que si tienes letras (sobre todo) o tu dibujo sigue un sentido, tienes que dibujar su reflejo.
Y por último, para estampar el sello:
- Tampón de tinta para sellos. Es lo más cómodo para aplicar la tinta sobre nuestro sello. Según la tinta que elijamos, podremos estampar en cristal o cerámica, tejido, papel, plástico,...
Podemos hacer algún día un humilde "paso a paso" para que veáis el sencillo proceso de esta técnica. No os quedéis con la imagen de mi gato (jajaja), hay maravillas de sellos creados y carvados por diseñadores y artesanos, que trabajan fantásticamente con la gubia. Os invito a cotillear por internet y disfrutad de esas habilidosas manos.
You will also need to draw your stamp:
- A graphite pencil
- Vegetable paper: although you can draw directly on the rubber plate, it is always more comfortable to draw on paper, where you can easily erase and rectify, and once you have obtained the final design, trace it onto the plate. Remember when you are going to make the drawing, that when you trace it on the paper you will get a "mirror" image, so if you have letters (especially) or your drawing follows a direction, you have to draw its reflection.And finally, to stamp the stamp:
- Stamp ink pad. It is the most comfortable to apply the ink on our stamp. Depending on the ink we choose, we will be able to stamp on glass or ceramic, fabric, paper, plastic,...
One day we can make a humble "step by step" so that you can see the simple process of this technique. Don't just take the image of my cat (hahaha), there are wonderful stamps created and engraved by designers and artisans, who work fantastically with the gouge. I invite you to browse the internet and enjoy those skilled hands.

Gracias por leerme. Encantada de tenerte por aquí 💛
Te doy la bienvenida a miAu!
Traducido gracias a la versión gratuita de www.DeepL.com/Translator
Thank you for reading me. Nice to have you around.
I welcome you to miAu!Translated with www.DeepL.com/Translator (free version)
¡Qué alegría que te haya gustado mi publicación, @fridakahlo! Gracias por valorar mi post