In [Part 1] we went over the very basics of Craft CMS, what it is, pricing, sections, assets, globals, entry-types, fields, and field-groups. In Part 2 we're going to continue (and complete) our introduction into Craft CMS so that in forthcoming articles we can dive right in fully aware of how all the basics work, and start building an amazing website in Craft!
Templates & Twig
Unlike platforms like Wordpress, Joomla, and some other popular (for god only knows why) content management systems, you can not simply install a Theme in Craft. But wait. THIS IS A GOOD THING!
You see, many of these other platforms make assumptions about your content, that often times (unless you are building the most basic of sites with no creativity or pre-set specifications) means that the output is NOT what you wanted: bloat, unnecessary hacks to output the most basic of configurations, etc.
Craft makes no assumptions about your content. You build exactly what you need/want, and output it exactly how you want to. You do this by using the robust templating system and the Twig template engine.
DRY (Don't Repeat Yourself)
Using Twig in your templates allows you to use and re-use code wherever necessary, need to change something that appears all over a site? If you coded it properly, you only have to update it once, not 500+ times. Website maintenance developers rejoice!
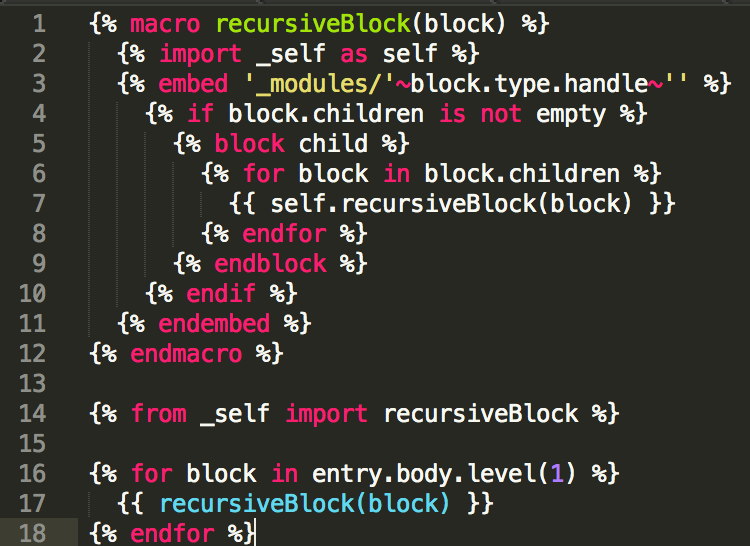
Remember that picture at the top of this page? That has a lot to do with DRY. You see, I wrote that code a good while back (in Twig for a Craft website) and that 18 line piece of code (which really could be condensed even more if I were to sacrifice readability), saved us from having to write over 3000 lines of code! Yes, you read that correctly, that tiny little bit of code outputs thousands of lines of code for our project, but we only had to write 18 because we thought smart and did not repeat ourselves!
I used that particular code block because it's sitting in a picture frame on my desk in my home-office. Why would I have a block of code framed and on my desk you may ask? Well it's quite simple really, I was having a hell of a time trying to solve a particular problem in a website I was building. Then I wrote that. It solved a TON of problems for me instantly and I did a bit of a dance at my self-proclaimed genius, A habit other developers are very familiar with I'm sure.
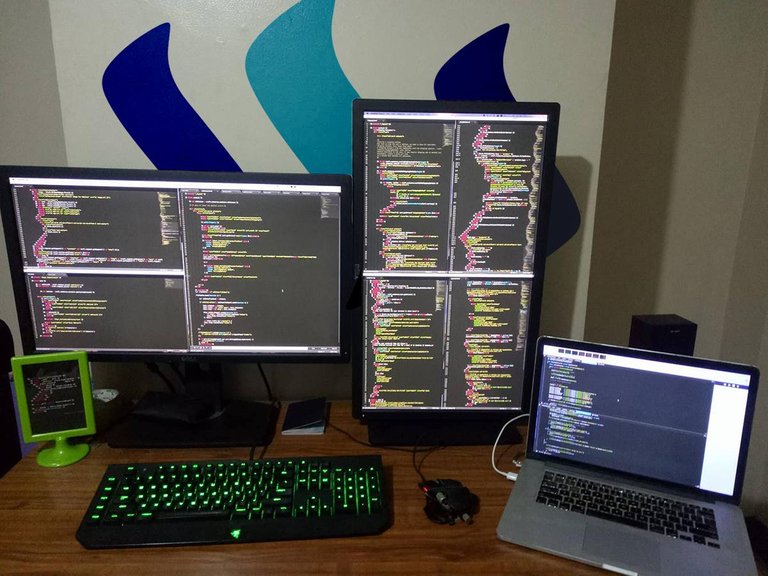
I shared the code snippet with my good friend @descterity and explained it all to him and the reason for my excitement with myself; the amazing guy that he is, printed it out, framed it, and gave it to me as a gift! WHAT A GUY RIGHT!?!?!? So now I keep it on my desk, as a reminder to follow the DRY Principle, and an appreciation that my great friend appreciates my passion for what I do. Here's a quick snap of my home-office desk, it's nothing fancy but It's mine; you can see the framed code from above on the left side of my desk in the cute little green picture frame.
Back to the overview though!
You are able to define templates that extend others, include others, or even embed others. We'll get into the differences and benefits of using one over the other for particular use cases in a future article but for now lets take a look at some basics.
     {% block body %}
          {# Content that is shown that overrides the '_layouts/_master'
          template within the block named 'body' #}
     {% endblock %}
What the above code block does, as it states in the comment, is to use Twig in the template to extend the _layouts/_master template at the block body. An example of what the _layouts/_master template may look like is like so:
<!DOCTYPE html>
<html>
     <head>
          <-- All of your meta data, title, css, etc. -->
     </head>
     <body>
          Some text, possibly a logo, etc. etc. basic html
          or other blocks/includes/embeds
          {% block body %}
               The content that will be overridden by the template
               that extends it and includes the block body tags.
          {% endblock %}
          Some additional content/text etc. that is not editable on the
          template(s) that extend this one.
     </body>
</html>
If you read [Part 1] you'll remember how we talked about Channels and how they are the ideal section-type for things such as News, a Blog, etc.. A very basic example for how you may output all articles in a blog would look a bit like this:
     {% for entry in craft.entries.section('blog') %}
          <h1> {{ entry.title }} </h1>
          <h2>{{ entry.subTitle }}</h2>
          {{ entry.body }}
     {% endfor %}
The above example assumes you have a Title field which is set by default even if you did not set it, a subTitle field which would you have had to set and in this example would have been a simple plain text field, and a body field, which in this example could have been a rich-text field, a plain text field, or really anything that stores data as a STRING and not an array.
If the body field were an Assets, Matrix, Entry, or several others we have not yet covered field-type, then the output above would throw an error that it could not convert the array into a string.
If it were any of the above mentioned fields then it would have had to have been included in another for loop instance:
     {% for item in entry.body %}
          {{ item.text }}
     {% endfor %}
The above code example would output a field called text within a matrix field-type. As matrix allows multiple iterations it must be run through a for loop.
You could also get away with adding .first() to the end of the call of {{ entry.body }} and add .text after body for instance {{ entry.body.text.first() }} which would output the same as the multi-line code above IF AND ONLY IF there was only one item to loop through. If there were multiples, this 2nd example would only output the very first instance of text within the matrix field named body, which in some cases may be exactly what you're looking to achieve!
Just like PHP the Twig Template Engine allows us to set variables, whether they be arrays or strings. This can help us to follow the DRY principle and keep our code as clean as possible. An example of how to set a simple variable is like so:
{% set foo = "bar" %}
Having set that, now anytime we call {{ foo }} it will output bar. Simple right!? But it gets even better! You can set advanced arrays to a variable as well. Remember how we looped through the blog section above but we had to type a bunch of text around it? We can simplify that even further by setting a variable with that array. This is an example of what that would look like:
{% set blog = craft.entries.section('blog') %}
Having set that, we could then write that original code in a much simpler format like so:
     {% for entry in blog %}
          <h1> {{ entry.title }} </h1>
          <h2>{{ entry.subTitle }}</h2>
          {{ entry.body }}
     {% endfor %}
That's much easier to read and understand, plus if we needed to reference craft.entries.section('blog') anywhere else in our code, instead of typing out all that code, we could simply call it by stating {{ blog }}, or as seen above, if it is within twig tags already, simply blog without the {{ }}wrapper.
As this series progresses we will go a LOT more in depth with using twig in craft and even cover some clever little hacks that you're sure to store in your developer toolbox. For now though, lets keep it simple and move on to Routes!
Routes
Typically the way that URL's in Craft work is that they will go to http://yoursite.com/template_folder/template_file etc. Of course you may have more folders before you reach your final file, but that's the typical default if you haven't changed routes or strayed too far from the standard configurations inside of your entry-types.
But I wanted to have a unique URL that doesn't follow that structure!
You're in luck. Let's say you wanted to have mysite.com/clowns-are-scary/cheese-is-delicious that loads a unique template that is located at /pages/clowns/cheese.twig EASY!!
You can override the default behavior and tell Craft to look for specific url's or patterns and if they match, to load specific templates. You can specify any type of template to load, the example screenshot demonstrates routes that are calling both twig and html template files. You can of course also call RSS, JSON, or anything else.
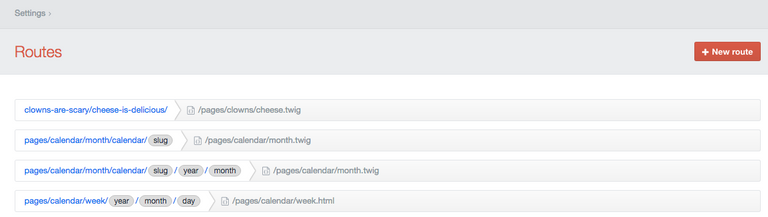
One note to be aware of, the rules in Routes are order specific. If you have rules that conflict with each other and the incorrect template is being loaded for your particular URL, you may want to re-order your customizations by dragging and dropping the rules to be checked in a different order. We'll go even further into Routes in a future article but that covers the basics, lets talk about my clients absolutely favorite part of Craft shall we? That's right, it's Live Preview baby!
Live Preview
If everything we've discussed thus far hasn't sold you or your clients on using Craft you're crazy, but this little bit really puts it over the top! My clients are so in love with this feature they want to send it flowers.
Live Preview allows you, or the site owner, to see exactly how a page will look as they select fields to use and enter their text, IN REAL TIME, before saving or submitting it to the next step in the workflow for review!
This is particularly useful for making sure your text and images look exactly how you want them to appear, or if you're offering an extremely complex setup, how many columns, push, pull, offset, etc. It displays and how they react at different breakpoints.
Here is just a glimpse of a live-preview screen on a site I've built:
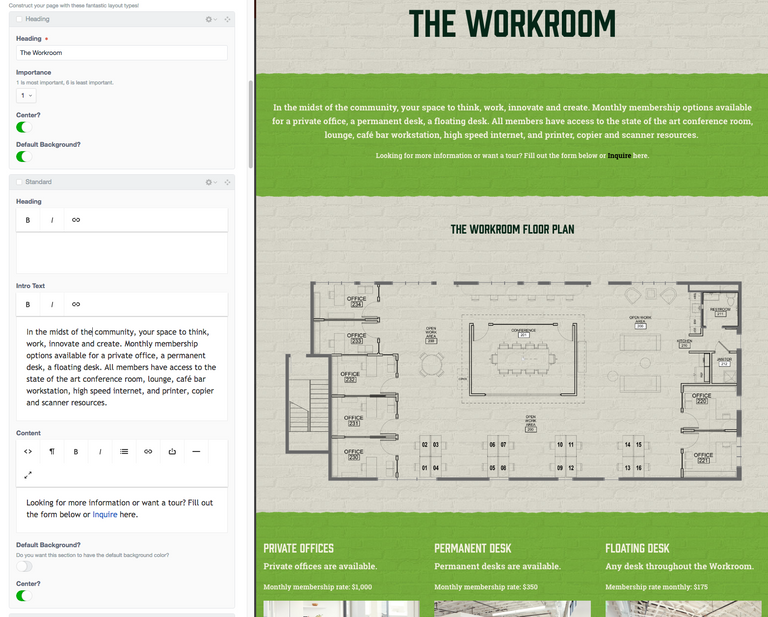
Changing the text, instantly is reflected, no refresh necessary. Turn off the default background switch? The colors for that section change before your eyes. Your clients feel they are extremely in control of exactly how their content is displayed, and it's all because of how expertly YOU set it up. Congratulations, I think i smell some repeat work in your future!
I HOPE YOU ENJOYED & LEARNED SOMETHING!
As always If you've reached it to the end of the article, given it's not particularly short, I'm going to assume that you enjoyed reading it. Please go ahead and UPVOTE the post, RESTEEM if you think your followers would also find value in it, and make sure to @FOLLOW ME to make sure you don't miss the upcoming articles in this series where we'll get much more in depth and even build a site together from the ground up! EXCITING TIMES!
Thanks to all of my followers both new and old, I hope to continue to bring you quality content that interest you, feel free to comment any requests for any particular topic you'd like to read or learn about if you believe I may be able to answer it for you. Cheers!
Really great work, as I said on the chat.
You we're the final inspiration for me to share some developers knowledge and sight of life. As I described I wanted to this kind of thing, too.
I'm looking forward to you're future posts, really good job! I'll give you a hint when I drop some web dev knowledge.
Greetings from Germany
Glad to hear it, I look forward to reading some of your upcoming content on the topic!!
hey @Sasha.Shade, not only have you shared on a particular topic on how to use Craft CMS, you have also gave us a glimpse into what your work environment looks like plus the type of language/code you are immersed into. Such an amazing line of work you do!
Congratulations! This post has been upvoted from the communal account, @minnowsupport, by sasha.shade from the Minnow Support Project. It's a witness project run by aggroed, ausbitbank, teamsteem, theprophet0, and someguy123. The goal is to help Steemit grow by supporting Minnows and creating a social network. Please find us in the Peace, Abundance, and Liberty Network (PALnet) Discord Channel. It's a completely public and open space to all members of the Steemit community who voluntarily choose to be there.
If you like what we're doing please upvote this comment so we can continue to build the community account that's supporting all members.
This post received a 1.9% upvote from @randowhale thanks to @sasha.shade! For more information, click here!
This is looking very cool. I need to play around with this and follow along.
I absolutely encourage you to! Please also feel welcomed to ask questions along the way as well!
Congratulations! This post has been upvoted & resteemed by @philippinetrail. We thank you for any support that you can give (upvote, resteem, donate, delegate, or even comment). Join our Facebook Group.
Please upvote this comment so we can continue to build this account if you like this initiative.
I'm not gonna pretend I know anything about any of this but it was good chatting to you yesterday X-D
Nice
wow! nice post shade. look at u, all smart and teacher.. :P c u, and thanks for sharing..