In part1 i installed the Skyminer software on a Raspberry Pi 1B. It works great and fast. I don't think it is a fast node for the network but for now it is only in test mode.
You can upgrade you're Skyminer easy just with extra hardware and install the software on it.
So i grabbed a Raspberry Pi Zero (the old Stratis staking wallet) and installed a fresh Raspbian Stretch Lite. The Raspberry Pi Zero only has WiFi and 1 micro USB port.
So i made the installation headless.
This is how:
- use etcher or win32 image to copy the image on the SD card (Raspbian Stretch Lite)
- make a file on the boot partition: ssh (no extension)

- when you use Windows: enable "File name extension"
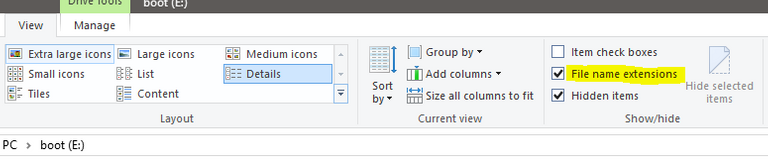
I just made a Text Document, i named it ssh and after that you can rename it and delete .txt
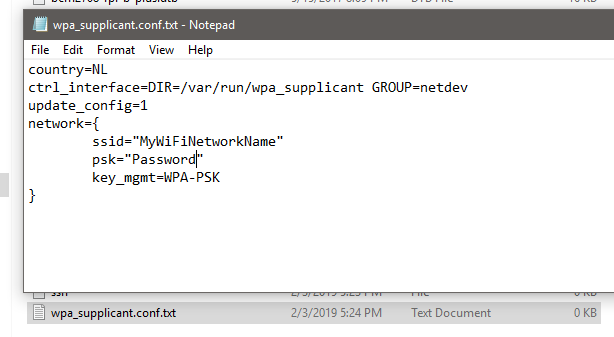
- create a Text Document and name it : wpa_supplicant.conf (delete the .txt)
- fill the conf file:
country=NL
ctrl_interface=DIR=/var/run/wpa_supplicant GROUP=netdev
update_config=1
network={
ssid="MyWiFiNetworkName"
psk="Password"
key_mgmt=WPA-PSK
}
Above is an example config you can edit. the Country, ssid and password with you're own settings.
Now you have this 2 files on the boot partition:

This works for all the Raspberry Pi devices with WiFi, my Zero don't has WiFi but i use a micro USB to USB cable with a USB WiFi adapter.
After that i powered up the Pi and after a minute waiting to let it boot i use Advanced IP Scanner to search for the IP address.

I know its the TP-LINK because the WiFi adapter is from this brand.
So know it is time to SSH to the Pi!
To install the software i am still using this great tutorial:
https://skywug.net/forum/Thread-Raspberry-Pi-Sky-Miner-Setup-for-noobs-TESTNET-READY
I don't gonna copy the commands because the credits belong to adhaelon!
You need a little bit less commands to install it.
I made a startup text file for my main node and secondary node:
Skywire primary node:
cd $GOPATH/bin
nohup ./manager -web-dir ${GOPATH}/src/github.com/skycoin/skywire/static/skywire-manager > /dev/null 2>&1 & echo $! > manager.pid &
nohup ./node -connect-manager -manager-address "IP ADDRESS":5998 -manager-web "IP ADDRESS":8000 -discovery-address discovery.skycoin.net:5999-034b1cd4ebad163e457fb805b3ba43779958bba49f2c5e1e8b062482904bacdb68 -address :5000 -web-port :6001 > /dev/null 2>&1 &cd /
Skywire secondairy node:
cd $GOPATH/bin
nohup ./node -connect-manager -manager-address "IP ADDRESS":5998 -manager-web "IP ADDRESS":8000 -discovery-address discovery.skycoin.net:5999-034b1cd4ebad163e457fb805b3ba43779958bba49f2c5e1e8b062482904bacdb68 -address :5000 -web-port :6001 > /dev/null 2>&1 &cd /
I keep this on my Window machine so i can copy it into putty when i need to start a node.
"IP ADDRESS" = the IP address of you're primary node! The secondary node connects to the manager of you're primary node.
When i check the web manager i got 2 nodes :).
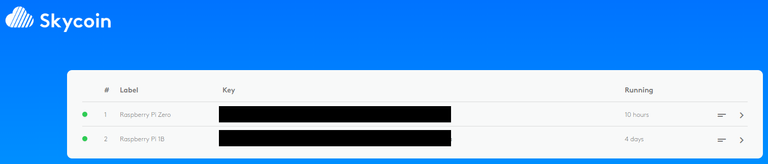
I renamed the nodes to easy see which one is the Pi or Pi Zero.
You need to whitelist you're second also so it that right after i installed it and its already whitelisted!
So i hope to run February with this cheap test node to require some Skycoin and the join the Skywire network!
The story continues!