This is a guide to show you how to setup a remote masternode for Social SEND on a linux based VPS (Virtual Private Server).
Prerequisites:
- A linux based VPS with at least 512 MB of RAM, 5 GB of free space. For this guide we will use a cheap Vultr VPS with Ubuntu Linux 14.04 preinstalled. (Will also work with Ubuntu 16.04, 18.04 hasn't been tested yet).
- A ssh client to log into your VPS (I'm using PuTTY).
- A fully synced, local Social SEND wallet with at least 12.500 spendable coins in it.

Step 1. - Prepare your local Wallet
---
Step 1.1 - Open your local SEND wallet and go to: "Tools > Debug console" and enter the following command: "masternode genkey".
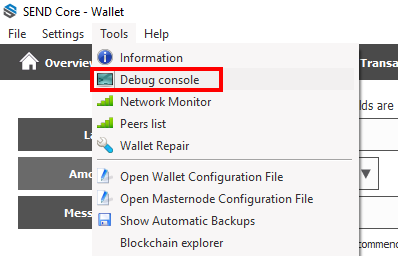
The output should look something like this:
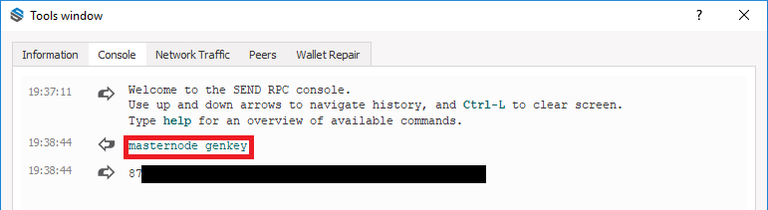
Save this information into a seperate File called "SEND-MN-Setup-Info.txt".
---
Step 1.2 - Within you local SEND wallet create a new receiving address for your masternode.
To do so go to: "Receive", enter a name for your MN-addres into the inputbox called "Label", e.g. "Masternode1" (without the ") and click on "Request payment".
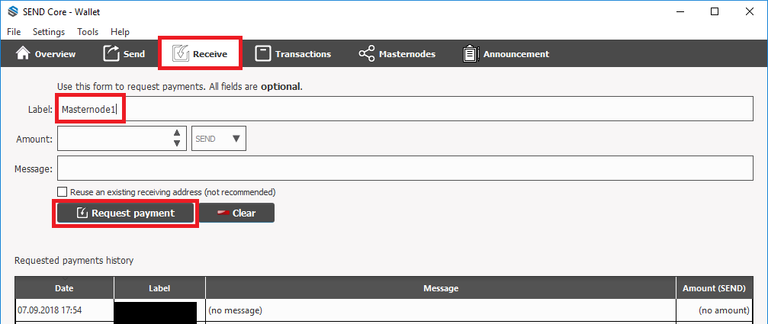
Your new receiving address should now be visible within the "Requested payments history" box. Double click on your new address and copy it.
---
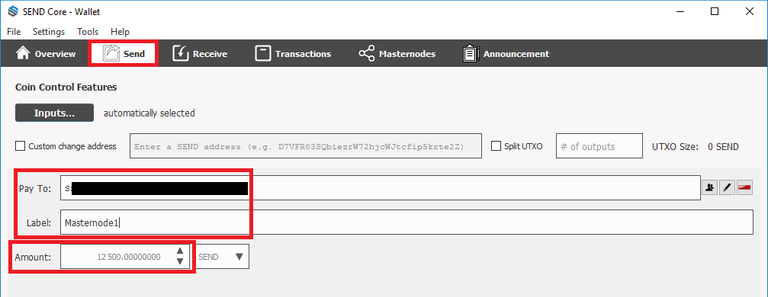
Step 1.3 - Now send exactly 12.500 SEND to your newly created MN-receiving address and wait for at least 15 confirmations.
Afterwards head over to "Tools > Debug console" again and enter the following command: "masternode outputs". The output should look similar to this:
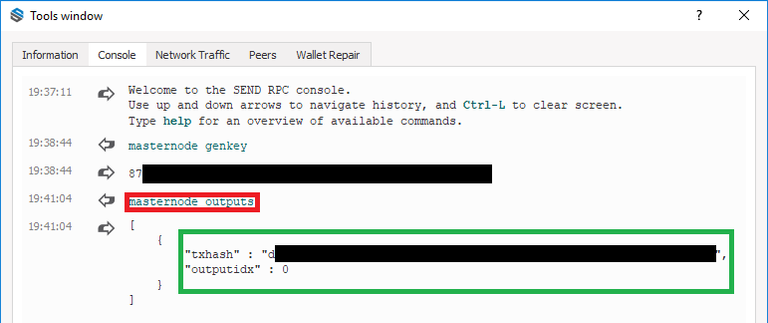
Save the output to your "SEND-MN-Setup-Info.txt" (we will need it later on).
---
Step 2. - Prepare your VPS
---
Step 2.1 - Get your VPS up to date
Log into your VPS via SSH.
sudo apt-get update
sudo apt-get upgrade -y
sudo apt-get autoremove -y
---
Step 2.2 - Create a new send user
sudo adduser send (set the UNIX password for the send user, additional information like name etc. is optinal)
sudo adduser send sudo
---
Step 2.3 - (Optional, but recommended) - Configure the firewall
sudo ufw default deny incoming
sudo ufw default allow outgoing
sudo ufw allow ssh/tcp
sudo ufw limit ssh/tcp
sudo ufw allow 50050/tcp
sudo ufw logging on
sudo ufw --force enable
sudo reboot
---
Step 2.4 - (Optional, but recommended) - Additional security through fail2ban
sudo apt-get install fail2ban -y
---
Step 2.5 - (Optional, but recommended) - Permit root login
sudo nano /etc/ssh/sshd_config
Search for the line: "PermitRootLogin yes" or "PermitRootLogin without-password" and change it to "PermitRootLogin no" (CTRL+X, Y, Enter to save your changes).
After you have saved your changes restart the ssh daemon with: "sudo service ssh restart".
---
Step 2.6 - Set up swap space (as root user)
sudo su
fallocate -l 3G /swapfile
chmod 600 /swapfile
mkswap /swapfile
swapon /swapfile
echo -e "/swapfile none swap sw 0 0 \n" >> /etc/fstab
---
Step 2.7 - Install dependencies (as send user)
su send
sudo apt-get install pkg-config build-essential autoconf automake libtool libboost-all-dev libgmp-dev libssl-dev libcurl4-openssl-dev git software-properties-common unzip -ysudo add-apt-repository ppa:bitcoin/bitcoin
sudo apt-get update
sudo apt-get install libdb4.8-dev libdb4.8++-dev -y
---
Step 3. - Install the Social SEND daemon and client to your VPS
---
Step 3.1 - Clone the Social SEND github repo
cd
sudo git clone https://github.com/SocialSend/SocialSend.git
---
Step 3.2 - Make the installation scripts executable
cd SocialSend
sudo chmod +x share/genbuild.sh
sudo chmod +x autogen.sh
sudo chmod 755 src/leveldb/build_detect_platform
---
Step 3.3 - Preconfigure the Social SEND installation
sudo ./autogen.sh
sudo ./configure
---
Step 3.4 - Install the Social SEND daemon and client
sudo make
sudo make install
---
Step 3.5 - Make the SEND daemon and client globally accessible on your VPS
cd
sudo cp ./SocialSend/src/sendd /bin
sudo cp ./SocialSend/src/send-cli /bin
---
Step 3.6 - Test the SEND daemon and client
sendd -daemon -txindex
send-cli getinfo (The first time you run this code you might get an error saying: "error: {"code":-28,"message":"Loading wallet... (50.25 %)"}" -> This only means that your wallet hasn't been loaded yet. Give it a few more seconds and rerun the command.
---
Step 3.7 - Get the Socials SEND wallet to sync and install the latest bootstrap
send-cli stop
cd
Now get the downloadlink for the latest bootstrap from SocialSend.io or from me (Voxcon) in our Discord channel. The current download command is (09/07/2018):
wget --header 'Host: uc1b76f399101a682ceadacf263b.dl.dropboxusercontent.com' --header 'Accept: text/html,application/xhtml+xml,application/xml;q=0.9,*/*;q=0.8' --referer 'https://www.dropbox.com/' --header 'Upgrade-Insecure-Requests: 1' 'https://uc1b76f399101a682ceadacf263b.dl.dropboxusercontent.com/cd/0/get/AP0vP5iaQICppBf2uNCXGlD9n5Okm9e62I69Dm_Aws3c9lbto1HcLPfFfqA3573fNvtt9R5QSoV4Rc3iY-_TPodQnyo3wOtpRawXJoYmB9VTW8qhIP7DCrHod7U4-HIEJ8nnUXcrKgzZN6rrf_pXeKrDK0cWd_B-dViQnOM-dvLXZ4IS_jUiMAHv54lvPL45Vxk/file?_download_id=86035074198974732975068810561815808133861356315339787518060399774&_notify_domain=www.dropbox.com&dl=1' --output-document 'bootstrap.zip'unzip ./bootstrap.zip -d ./bootstrap
sudo rm -rf ~/.send/blocks
sudo rm -rf ~/.send/chainstate
sudo rm ~/.send/peers.dat (Don't worry if you get an error saying: "No such file or directory". This only means the file does not yet exist)
sudo cp ./bootstrap/blocks ~/.send
sudo cp ./bootstrap/chainstate ~/.send
sudo cp ./bootstrap/peers.dat ~/.send
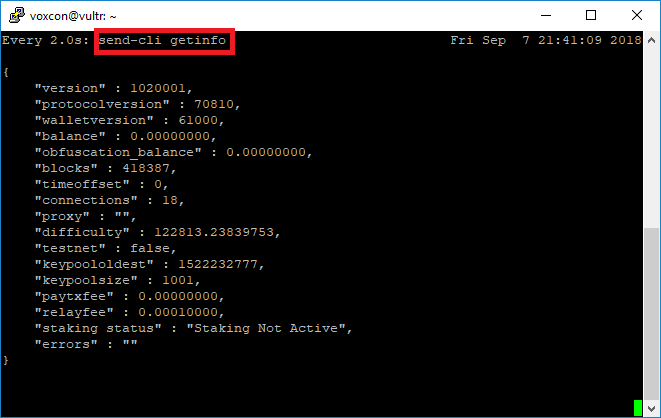
sendd -daemon -txindex
watch send-cli getinfo (Have a look at the blockheight and compare it to the blockheight of your local wallet or our block explorer and let your VPS daemon sync. Use CTRL+C to stop watching)
---
Step 4. - Configure SEND on your VPS
---
Step 4.1 - Configure SEND on your VPS
send-cli stop
sudo nano ~/.send/send.conf
---
Step 4.2 - Post the following lines into your send.conf and adjust them to fit your settings (CTRL+X, Y, Enter to save your changes)
rpsuser=CHOOSE-ANY-RPCUSERNAME-YOU-WANT-EXCEPT-"send"
rpcpassword=CHOOSE-ANY-PASSWORD-YOU-WANT
rpcallowip=127.0.0.1
listen=1
server=1
staking=1
daemon=1
logtimestamps=1
maxconnections=256
masternode=1
masternodeprivkey=THE-OUTPUT-OF-MASTERNODE-GENKEY-FROM-STEP-1.1-GOES-HERE
externalip=YOUR-VPS-IP-GOES-HERE
---
Step 4.3 - Restart the SEND daemon
sendd -daemon -txindex
watch send-cli getinfo (Let the daemon sync and close the watch command with CTRL+C)
---
Step 5. - Configure your local wallet
---
Step 5.1 - Configure the masternodes.conf on your local machine
Open your local wallet and go to: "Tools > Open Masternode Cofiguration File" and enter the following line at the bottom of the file and adjust the values according to your settings:
Masternode1 YOUR-VPS-IP-GOES-HERE:50050 OUTPUT-OF-MASTERNODE-GENKEY-GOES-HERE-FROM-STEP-1.1 TXHASH-FROM-MASTERNODE-OUTPUTS-GOES-HERE-FROM-STEP-1.3 OUTPUTINDEX-FROM-MASTERNODE-OUTPUTS-GOES-HERE-FROM-STEP-1.3When you have adjusted your values correctly, the last line of your masternode configuration file should look something like this:
Masternode1 45.32.155.138:50050 88ZXmAF8is6XnfD6z7LnCZrHxishnnzzyuSeYQz4KYib9AvjmMT 7337a48d396798cf61a124eed5c619a29a998ba533650839edb2bd7fdbbd42e9 0---
Step 5.3 - Configure the send.conf on your local machine
Open your local wallet and go to: "Tools > Open Wallet Cofiguration File" and enter your rpcusername and rpcpassword form step 4.2 as follows:
rpsuser=THE-RPCUSER-YOU-HAVE-ENTERED-IN-STEP-4.2
rpcpassword=THE-RPCPASSWORD-YOU-HAVE-ENTERED-IN-STEP-4.2
Save the changes and close your local wallet.
---
Step 5.4 - Sart Alias
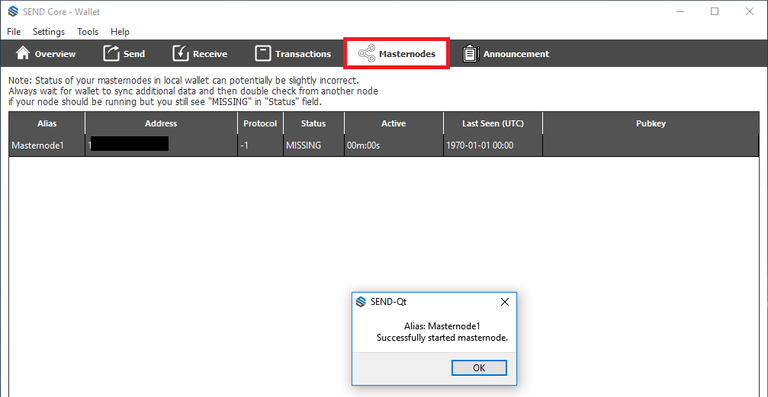
Reopen your local wallet and enable your masternode within the "Masternodes" tab by clicking on "Start alias".
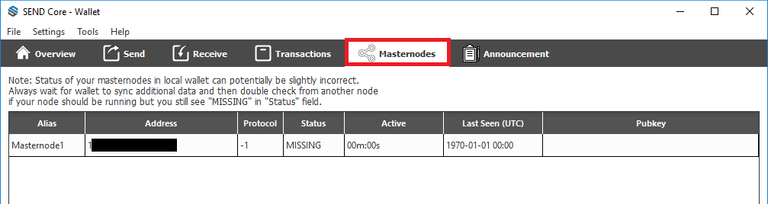
You should see the following message:
---
Step 6. - Check if your masternde is running correctly
---
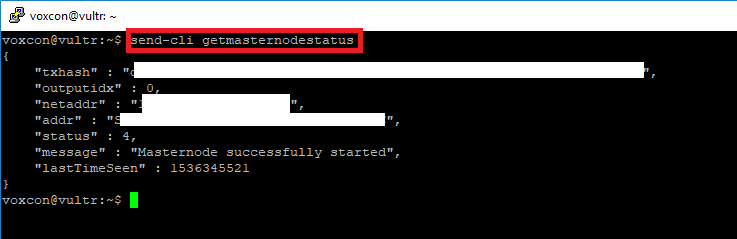
Step 6.1 -VPS check
Switch to your VPS and execute the following command: send-cli getmasternodestatus
---
Step 7. (Optional) - Automatically restart the SEND daemon when your VPS restarts
---
Step 7.1 - SSH into your VPS as user "send" or change your current user to "send" with the command "su send"
---
Step 7.2 - Add a cronjob to the bootprocedure of your VPS
crontab -e (choose nano as the editor to open the crontab file)
Add the following line to the bottom of your crontab file:
@reboot sleep 15; sendd -daemon -txindex (CTRL+X, Y, Enter to save your changes)
---
Awesome, now you have successfully setup your Social SEND masternode :-)
If you have run into any problems, please let me know and i'll try to help you.
---
With best regards,
Voxcon
PS: A simple masternode setup script is already in the making, but it needs a little more tweaking here and there. Please be a bit patient.
Correction - Step 4.2 - the first line should read "rpcuser" not "rpsuser" as shown above.
Great guide! Thanks for taking the time, it was extremely helpful!
Thanks Jimmy, you are right it should be "rpcuser" instead of "rpsuser"!
Somehow that little typo sneaked in there, but im happy you found it :-)
The latest bootstrap (10/22/18) is now downloadable via the following link:
wget --header 'Host: doc-0s-20-docs.googleusercontent.com' --user-agent 'Mozilla/5.0 (Windows NT 10.0; Win64; x64; rv:62.0) Gecko/20100101 Firefox/62.0' --header 'Accept: text/html,application/xhtml+xml,application/xml;q=0.9,/;q=0.8' --header 'Accept-Language: de,en-US;q=0.7,en;q=0.3' --referer 'https://drive.google.com/drive/my-drive' --header 'Cookie: AUTH_phlq2thqnh8bscioh0bq9psfbaig1hfl_nonce=hmmtcllothv22' --header 'Upgrade-Insecure-Requests: 1' 'https://doc-0s-20-docs.googleusercontent.com/docs/securesc/p9ocr0te7qrspevvc3geutpl0jcdvoa0/b8es561t24e2328mtl0r074rebmnault/1540238400000/14036031197448977727/14036031197448977727/1CP9ceYrv8XUOu9-_b80YUFg_xyasI_9e?e=download&nonce=hmmtcllothv22&user=14036031197448977727&hash=htr82hg15jcvg271q7n1ucgo3jpne8tc' --output-document 'SEND_BOOTSTRAP_22_OCT.zip'
I'm creating a masternode on AWS and after step 3.3 I got error:
configure: error: Detected LibreSSL: This is NOT supported, and may break consensus compatibility!
the solution was to run also:
sudo apt-get install libzmq3-dev
sudo apt-get install libssl1.0-dev
and for step 3.7 I used this:
wget 'https://www.dropbox.com/s/rxzq0ofafh0dfpb/bootstrap.zip' --output-document 'bootstrap.zip'
Thank you for the great guide! ;)
Congratulations @voxcon! You received a personal award!
Happy Birthday! - You are on the Steem blockchain for 1 year!
Click here to view your Board
Congratulations @voxcon! You received a personal award!
You can view your badges on your Steem Board and compare to others on the Steem Ranking
Vote for @Steemitboard as a witness to get one more award and increased upvotes!