Even if you’ve just started in cryptocurrency you likely know that new Bitcoins are created through a process known as mining. You might not know that Bitcoin isn’t the only coin that can be mined — in fact there are many.
One very interesting mineable coin is the privacy conscious Monero, and today I’m going to go through the steps you need to take to mine Monero yourself right from your home laptop or desktop computer.
And don’t worry. There’s nothing terribly tech heavy in the instructions, and you can have everything set up and running within 30 minutes or less.
Monero (XMR) is a decentralized, scalable cryptocurrency that has the benefit of providing complete anonymity for its users. In fact, it was created exactly for that purpose. Monero was launched in 2014 and has been steadily increasing in popularity. It is not a fork of Bitcoin or Ethereum like so many other coins, but is its own unique coin that runs off the CryptoNoteV7 protocol.
In fact, Monero became so popular that recently one of the major mining companies created an ASIC chip capable of mining Monero. Because the project is adamantly opposed to ASIC mining, claiming it fosters centralization, they almost immediately forked the project, disabling the ability of the new ASIC miners.
This was accomplished by changing the minimum ring size on transactions from 5 to 7. The Monero hard fork occurred on April 6, 2018 and while the hashrate dropped 75% immediately following the fork, it has since recovered, showing miners are supporting the new fork.
One change that has come about due to the fork is that many of the software Monero mining packages that previously worked when it was using the 5 ring CryptoNote protocol no longer work with the new 7 ring CryptoNoteV7 protocol.
Fortunately Monero itself supports mining directly through its GUI wallet, and there is at least one other option that is a bit more involved.
Why Mine Monero?
Image via Fotolia

There are many Proof of Work (PoW) coins that you could mine, so why choose mine Monero? There are actually several reasons that make Monero an excellent choice for a new miner.
The first is that mining runs very well on AMD hardware, as well as on Nvidia GPU’s. In fact, Monero typically sees one of the best hash rates of any cryptocurrency on an AMD card.
Next, the CryptoNightV7 algorithm used by Monero is optimized for CPU mining. Most cryptocurrencies are unprofitable when mined using a CPU, either because they aren’t optimized, or because of the ASIC mining.
Finally, Monero has become an extremely popular coin in and of itself. The privacy and anonymity provided by Monero has made it useful to scores of cryptocurrency enthusiasts, particularly since one of the goals of cryptocurrency is to avoid the snooping that global governments have become so good at.
Solo-mining Monero with its GUI Wallet
Solo-mining is not the most profitable way to mine Monero, but it is preferred by many users for several reasons.
The first reason is that solo-mining helps to strengthen the entire Monero network. When you mine solo without a pool you add to the decentralization of the network by putting your hash rate against that of the rest of the network. If you join a pool of miners you are simply contributing the that pool’s hash rate, which actually makes the network more centralized as these pools gain more and more power.
You can see how this type of pool centralization hurts a cryptocurrency by looking at the issues that Vertcoin has had, where a mining pool known as Coinotron has gained control of 51% of the network hash rate. This is known as a 51% attack and gives Coinotron the ability to change transactions on the network, and potentially double-spend coins. Another privacy coin — Zcash — has seen similar issues.
Setting Up Monero GUI Wallet Mining
Getting solo-mining set up is simple and easy, with the functionality built right into the official Monero GUI wallet.
Just as with Bitcoin mining, if you successfully find (solve) and mine a block before the rest of the network, you’re entitled to the full block reward. This is a lot more than you would receive if you were mining in a mining pool, although pool rewards are far more consistent.
Solo-mining is generally far less profitable than pool mining, unless you get lucky. Because the hashing power of your machine is so low compared to the hashing power of the entire network, the chances of you actually finding and mining a block yourself are incredibly small.
In most cases you’ll just be using up electricity, rather than striking it rich. Solo-mining can still be fun and rewarding however, and it’s a great introduction to cryptocurrency mining in general.
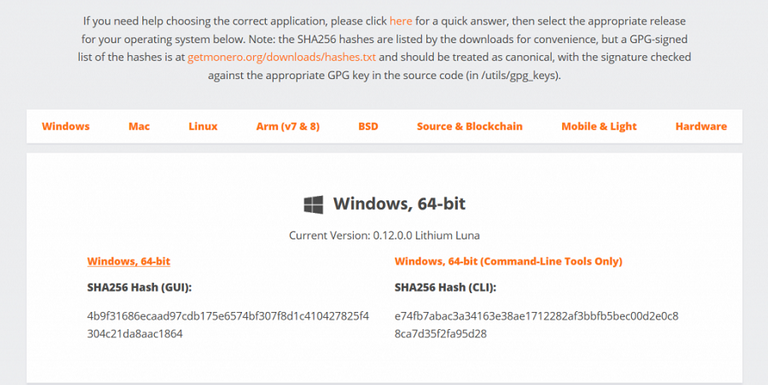
To get started on your Monero solo-mining adventure you’ll first go to the official Monero website and download their GUI Wallet. They make it easy in that all the major operating systems (Windows, OS X and Linux) are supported. Click the appropriate link to download.
After downloading you can install the wallet, which will generate your seed and address. (Note: You may need to run the installer as administrator)
After generating a seed and address, you’ll want to click on the Advanced tab, then on Mining.
Source: GetMonero.org

From here, you have the ability to change the number of CPU threads (cores) to mine with (#1), as well as the option to enable background mining (#2). You can also start (#3) and stop (#4) mining. The more cores you enable, the more hashrate you will be contributing. Be sure to have sufficient cooling if you plan to enable mining on all of your processor’s cores.
Two other things to take note of before you begin mining Monero. First, you must wait for the daemon to finish synching (you can see the status in the lower left corner of the wallet). And secondly you can’t enable more cores than your processor actually has, or the wallet is likely to begin to act strangely.
So, once you have the wallet installed and running, be sure to go back and launch monerod.exe to start the daemon and allow your wallet to synch to the network, otherwise you will get an error and will be unable to mine.
Once you’ve installed the wallet, let it synch and started mining. That’s all there is to it. It should be noted here that the only way to solo-mine like this is through the official Monero wallets.
Pool-mining Monero with XMR-Stak
While pool mining doesn’t have you making a contribution to the network security of Monero, it is more profitable than solo-mining. There were several very good pool mining software packages, but since the hard fork many of them no longer work, and are no longer supported by their creators. It’s a shame, but there is still a good option in XMR-Stak, which you can download from Github. It supports the newer CryptoNoteV7 and is recommended by the official Monero site.
This open-source software supports all the major operating systems and allows for mining on both CPUs and GPUs of all the major manufacturers. This is a tradeoff because the performance is somewhat worse than other software that supports specific hardware, but at this time there aren’t many other options, and XMR-Stak has the benefit of being quite easy to install and use.
I should also note that XMR-Stak is preconfigured to donate 2% of hashing power to the developer. You can change that if you like by editing the donate-level.hpp file before you build the binaries.
Go ahead and download XMR-Stak.
Once your download is complete you’ll want to go ahead and run/set-up XMR-Stak. To do that look for the xmr-stak.exe file in the downloaded folder and double click it to run. You may get a warning from your anti-virus program, but it’s a false positive and you can go ahead and run the program.

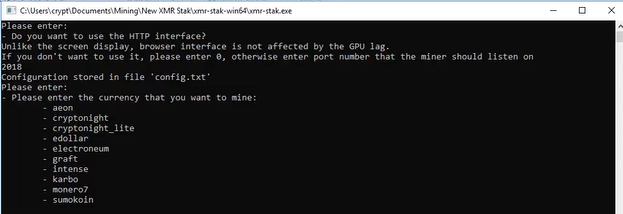
The setup for XMR-Stak runs in the command line, but is easy to follow along with. The first question you’ll be asked is if you want to use the http interface. This allows you to see your hashrate right in your browser. If you want to use this feature enter an unused port number (I used 2018), otherwise enter “0” to disable this functionality. Next it will ask which currency you’d like to mine. Type “monero7” and hit ENTER.
Now you’ll be asked for a pool address. Here’s a handy list of Monero pools you can use when pool mining. You want to choose a pool that has servers close to your location, and in my case that’s MoneroHash in the USA section. Simply click the button that says “Go to Pool” for your chosen pool and then find the “Getting Started” section of the mining pool’s website.
This is where you can find the list of ports associated with that pool. You’ll choose your port based on the quality of hardware you’re mining Monero with.
For example, on MoneroHash:

If I were going to mine on this pool with both a high end CPU and GPU, I would choose port 5555.
So, go ahead and type in the pool and port and then press ENTER. Next you’ll be prompted for a Username. This can be either your wallet address or your pool login. It is recommended that you use your wallet address here. This will send all your pool earnings directly to your Monero wallet.
I recommend using the official Monero wallet, which can be downloaded here. If you prefer a web wallet you can use MyMonero, but understand that a web wallet is not as secure as a desktop wallet, since you have to enter your private every time when accessing the wallet.
Next you’ll be prompted for a password and you can leave that blanks and simply press ENTER. XMR-Stak next asks if your pool supports TSL/SSL. This will be dependent on the port you’re using. As you can see from the screenshot above, with MoneroHash port 9999 does support TSL/SSL, but none of the other ports do. If you’re in doubt, or if your pool doesn’t explicitly state that it does use TSL/SSL you can enter “n” here. After that you’ll be asked if you want to use nicehash, followed by a question if you want to use multiple pools. You can type “n” for both.
That’s all there is to it. Your miner should be started and mining away!
You can check several stats from the command line as follows:
- “h” for your hashrate
- “r” for results
- “c” for connection
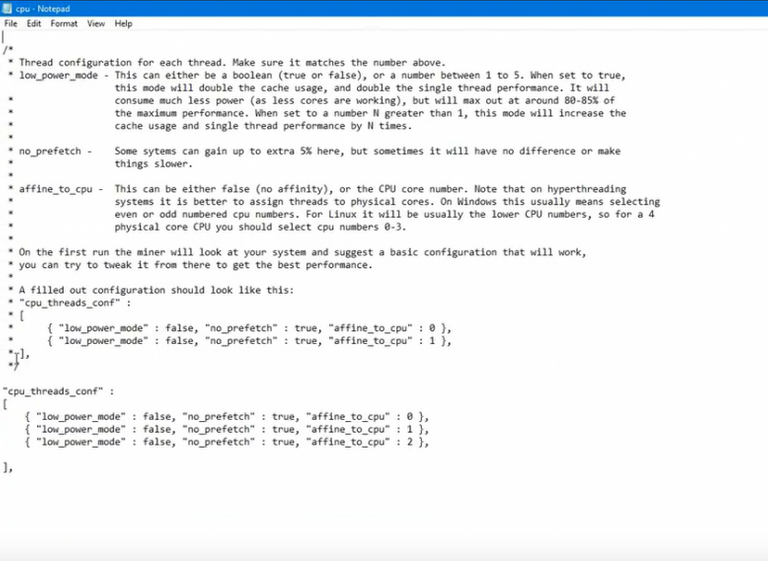
All of the settings you entered during setup can be easily changed by editing the config file in your XMR-Stak folder. Simply open the file using Notepad or your favorite text editor.
Source: Youtube

If your miner seems to continually crash, you may need to reduce the number of threads it is using on your graphics card. That can also be easily changed by editing either the nvidia.txt or amd.txt files (depending on the manufacturer of your graphics card).
Source: Youtube

You can set the GPU thread amounts to 0 in the file if you don’t want to mine with your graphics card at all. XMR-Stak will try to mine using all your hardware (GPU and CPU), so if you disable GPU mining you’ll still be mining with the CPU.
If you have more than one GPU you will see configuration information for each card in the GPU config file. If you don’t want to use all of your CPU cores, you can also modify the cpu.txt file, however this won’t be necessary for most people as XMR-Stak will leave one core free.
Source: Youtube
In Conclusion
The recent hard fork of Monero has made the coin even more privacy focused, and has likely sent the message to the ASIC mining folks that Monero will do whatever is needed to remain ASIC free.
This makes it ideal for individual miners, who can be certain that ASIC rigs won’t dominate the hash power on the network. Monero also remains a very in-demand coin, and there is a good likelihood that the price will continue to increase as more cryptocurrency users become interested in privacy coins.
The recent hard fork has also decreased the difficulty of mining Monero, making it a very good choice right now. While solo-mining can be fun, using a mining pool will almost certainly be more profitable, and the XMR-Stak software is about as easy as it gets when it comes to setup and configuration.
Once you’re comfortable with mining like this, you can even think of exploring other options, such as adding more GPU cards to your PC for increased hash rate, or setting up a machine that is dedicated to mining — but that’s a subject for another tutorial.
Featured Image via Fotolia
Originally published at www.coinbureau.com on April 12, 2018.

If you got at least 0.001 STEEM worth of value from this post please upvote below and resteem so others will see the post too.
If you really like what you've read consider following @moneyinfant - I'd love to have you join me.


I love the idea of Monero being privacy focused. This is a really great article and taught me loads about how to start up. Don't think my little laptop would cope though :P
What would you suggest as a basic starting computer to do this?
#originalworks
Something with a decent video card. An AMD Radeon RX470 or RX480 is a good start, but honestly you can do Monero with almost any video card. Any Nvidia card will work as well. Just don't expect to get rich :-)
Thanks Money :D.
That looks like a foreign language to me so I'm gonna be googling for a while :P
Cheers
Congratulations @moneyinfant! You have completed some achievement on Steemit and have been rewarded with new badge(s) :
Click on any badge to view your own Board of Honor on SteemitBoard.
To support your work, I also upvoted your post!
For more information about SteemitBoard, click here
If you no longer want to receive notifications, reply to this comment with the word
STOPThis is really good
Mining may be a feasible project for me
As long as you have a somewhat decent GPU in your computer, mining Monero can bring in some small monthly profits, which could grow to large monthly profits if the price of Monero keeps rising.