
I have been exploring the blockchain tech and crypto space for only about a year or so, and one thing I have always wanted to do is learn how to build a smart contract. What does it take to create a working smart contract on Ethereum? I had never taken a coding class up until the first quarter of graduate school, and that class was by no means comprehensive. I am a major n00b when it comes to programming, I know there are different languages and I understand what they entail, but I have never built anything.
I have read numerous articles and posts on the topic, but ultimately most of them assume you have some programming experience. This post is for someone with no technical knowledge in the space; although, it does require a little effort.
So let’s get started, and I hope you will find this as interesting as I do! Nothing helps me learn more than being able to recreate theoretical concepts in a working prototype. If you don’t understand the fundamentals, don’t worry, just copy what I am doing, and ultimately I believe by going through the process you will learn more than you ever expected, and the entire concept will become clearer to you.
First, we should install an Ethereum client that will allow us to interact with the Ethereum blockchain. I chose Geth because it was the most popular option I found and the installation instructions were straightforward. I am using a Linux distribution called Elementary, which is based on the latest version of Ubuntu. Geth install instructions for Linux, Mac, and Windows are available here.
After installation completes, you can initialize Geth with the command ‘geth,’ which will start synchronization with the Ethereum network and might take a while. I opted to setup a Dev network so that I could get to work immediately. A Dev network allows you to mine tokens and set up a smart contract instantly, without connecting to the main network. It’s like your own playground to run a localized Ethereum blockchain!
To set up a Dev network simply enter the commands:
cd ~
geth --datadir ./.ethereum/devnet --dev console
Now we can create a test account by typing the command:
personal.newAccount()
After inputting a passphrase you should see your account address. Type ‘exit,’ hit the return key, and enter the command to start mining:
geth --datadir ./.ethereum/devnet --dev --mine --minerthreads 1 --etherbase 0
Minerthreads refers to how many CPU cores you want to use to mine, and the 0 after etherbase implies you are sending the mined coins to the account you created in the previous step.
Now that you are mining ether and depositing them in your account, you can start working on the smart contract. You need a working network to initialize and run a functional smart contract, and the miner you are running brings your network to life.
Open a new terminal window and enter the command to connect to the mining client:
geth --datadir ./.ethereum/devnet --dev attach ipc:./.ethereum/devnet/geth.ipc
Go ahead and check your account balance:
eth.getBalance( eth.accounts[0] )
Now we have to unlock our account so that we can use it for our smart contract:
personal.unlockAccount(eth.accounts[0])
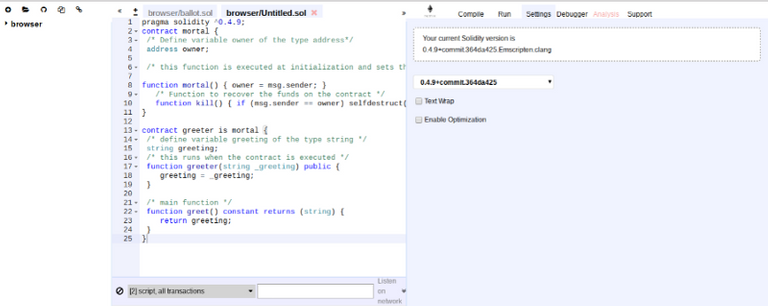
At this point, the official Ethereum site directs you to run a compiler within the console; however, this feature has recently been disabled. Instead we will use the online Solidity compiler, Remix. A compiler, “…is a program that translates human-readable source code into computer-executable machine code.” Here is the original code we will be using for our “Hello World” smart contract:
pragma solidity ^0.4.9;
contract mortal {
/* Define variable owner of the type address*/
address owner;
/* this function is executed at initialization and sets the owner of the contract */
function mortal() { owner = msg.sender; }
/* Function to recover the funds on the contract */
function kill() { if (msg.sender == owner) selfdestruct(owner); }
}
contract greeter is mortal {
/* define variable greeting of the type string /
string greeting;
/ this runs when the contract is executed */
function greeter(string _greeting) public {
greeting = _greeting;
}
/* main function */
function greet() constant returns (string) {
return greeting;
}
}
It is important to note that when using this source code, you need to go to ‘Settings’ and select the latest version of Solidity 0.4.9, or the program will not work. After you copy and paste the source code into the compiler, and choose the correct version of Solidity, the settings page should look something like this:
Next, on the ‘Compile’ page, hit ‘Details’ and copy the contents found in the section, ‘Web3Deploy,’ into a text editor, such as Sublime. Make sure to turn off ‘Word Wrap’ before copying. In the text editor, replace /* var of type string here */ in the first line of the ‘greeter’ contract, with whatever text you would like the contract to produce. Make sure to include quotation marks, I chose “Smart Contracts 101 by Shokone.” The beginning of the first two lines should look something like this:
var _greeting = "Smart Contracts 101 by Shokone" ;
var greeterContract = web3.eth.contract([...
Now copy and paste the contents in the text editor back into the Geth console, and press ‘enter.’
Back on the compiler website, select the ‘mortal’ contract from the dropdown menu on the ‘Compile’ page, and then hit ‘Details.’ Disable ‘Word Wrap’ and copy and paste the contents from ‘Web3Deploy’ into the text editor and make sure the beginning of the first two lines look like this:
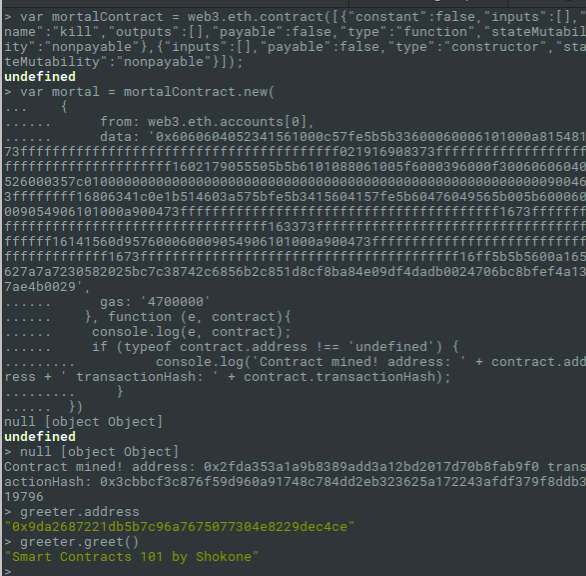
var mortalContract = web3.eth.contract([{"constant":false...
var mortal = mortalContract.new(...
Once it looks right, go ahead and paste in back into Geth and run it.
After a minute or so, the output should read, ‘Contract Mined!’ Now check your work by running the code:
greeter.address
and…
greeter.greet()
The output should look something like this:
We have officially created a smart contract using Ethereum! A final thing to note is that if we follow these instructions while using the main Ethereum network, we could allow anyone, anywhere, to access and run the contract with this command:
var (name) = eth.contract(ABI).at(Address)
Where ABI is just a copy of the ‘Interface’ field from the ‘Details’ section of the ‘greeter’ code on the compiler website, and Address refers to the address of the contract (found with the command: greeter.address). Once a user inputs this code, they can use the contract as though they have built it themselves with greeter.greet().
I hope you enjoyed this tutorial, the original can be found here. Stay tuned for more updates, Shokone will be covering the basics of building your own blockchain soon!
If you enjoyed this article, or think someone else might, please share. If you want to talk, or debate my points, leave a comment below, or contact me on linkedin
Wow! Supercool and super interesting article! Thank you!!