
I've recently begun blogging about my efforts working with RPG-JS trying to integrate Bitshares, EOS and BeetEOS into a tech demo.
I've picked up some tips and tricks which I'll be sharing in several upcoming blog posts!
Now onto this post's purpose - teleporting!
That's right! Something you'll need to enter any building you add to your RPG-JS project, better get it right! Best follow my tutorial ;)
How to teleport the user in RPG-JS
The RPG-JS docs provide the following information:
Change Map
Method: player.changeMap(mapId,positions)
Arguments:
{string} mapId. (Optional: false)
{ {x: number, y: number, z?: number} | string } positions. (Optional: true)
Return: Promise< RpgMap | null> if map not exists
Usage:
Change your map. Indicate the positions to put the player at a place on the map

The map must be added to RpgServer beforehand. Guide: Create Map

You don't have to give positions but you can put a starting position in the TMX file.
.
So, you need to run some TypeScript code, calling the changeMap player class function, providing the destination map id (Tiled map TSX file's name) and optionally the exact coordinates to teleport the user to.
So in order to trigger the TypeScript code chunk which performs the teleport action we need the user to interact with either an event or a shape/object!
In this tutorial we'll be focusing on the use of Tiled objects for tracking user positioning and for correct action interception.
So first, within your current Tiled map, you need to create a new object layer. Once created, select it and you'll have a set of new tools made available to you in the toolbar; we're interested in the "rectangle tool"
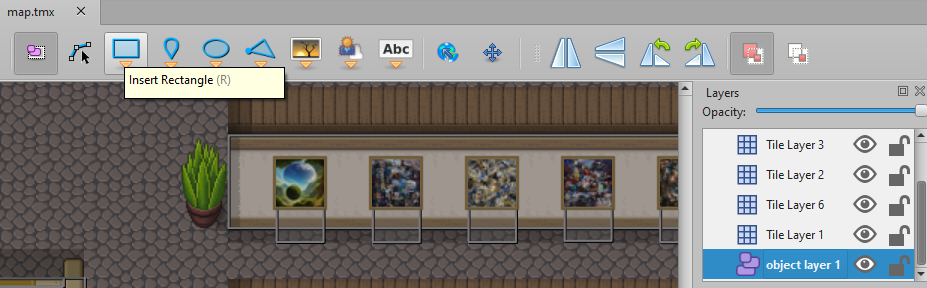
With this rectangle tool selected, draw a rectangle in a natural doorway like so:
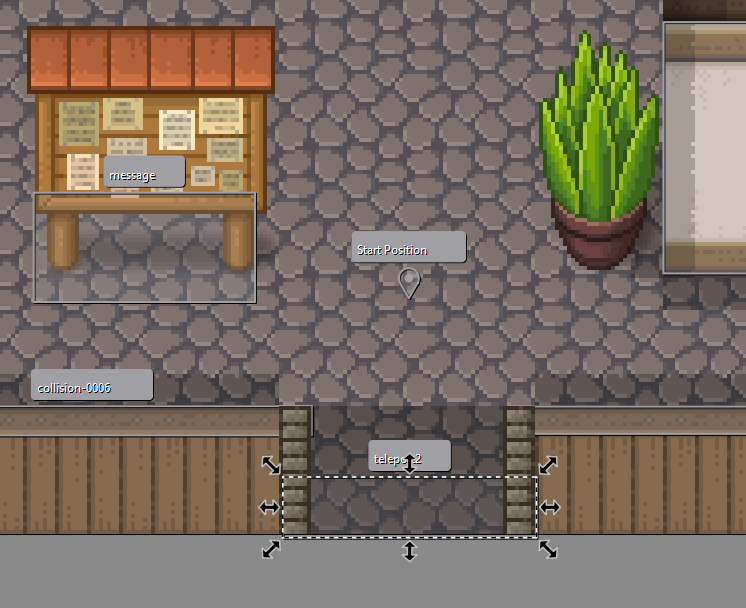
All objects/shapes need an unique name, otherwise duplicate named objects simply aren't included in the compiled map product. So, we can call it "teleport1" and iterate as we add more teleporters to a map.
Note that object IDs only need to be unique to each individual map, you can use the same "teleporter1" name in different maps, just not within the one map. It's similar to the rules of react, items need unique identifiers or things start going wrong.
With the teleporter still selected, we're now going to go to the object properties side window to add several custom properties!
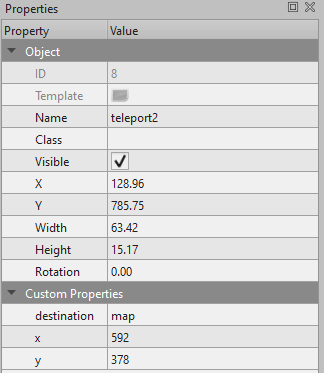
Right click the custom properties section, and add "destination" as a string. Then when added as a property, provide it the file name of your desired destination map.
When you change map, you can optionally provide the x and y coordinates, add these x and y coordinate integers within the teleporter's custom object properties, otherwise when you teleport to the destination map you'll be teleported to the starting point on the map, which can be jarring if it's far away from where you expected to teleport to (e.g. leaving a door and ending up miles from the building..).
Just a quick sidebar - at this point you've completed your teleporter in Tiled, make sure you deselect the object, select a normal tile layer, and save the map. It's easy to accidentally place additional rectangles, even outside the boundaries of your Tiled map oddly enough.
So, with these x and y coordinates in mind, I wouldn't try to get these coordinates from Tiled, I've not had success doing it that way, comment below if you have.. but I've got a trick for you!
In your player.ts file, where we will soon focus this tutorial on, you can add a listener for the action button and console log the user's current coordinates. This way you can have the dev version running, and get the exact coordinates as they are in game for inclusion in your Tiled map.
const player: RpgPlayerHooks = {
  async onInput(player: RpgPlayer, { input }) {
    if (input === Control.Action) {
      console.log({ x: player.position.x, y: player.position.y });
    }
  }
}
.
The code above is truncated, however it focuses on what we're interested in, and that's detecting when the user presses action and console logs the info we need, easy!
You can also optionally include direction as an integer, with north = 1, east = 2, south = 3 and west = 4, so that the user is facing the correct direction when leaving a shop for example.
OK, so with the rectangular teleporter object created, and the destination properties properly configured, we want to implement the teleporting functionality for when the user walks into the object!
const player: RpgPlayerHooks = {
  async onInShape(player: RpgPlayer, shape: any) {
    if (shape.name.includes("teleport") && !shape.obj.properties.x && !shape.obj.properties.y) {
      await player.changeMap(shape.obj.properties.destination);
      if (shape.obj.properties.direction) {
        player.direction = shape.obj.properties.direction;
      }
      return;
    }

    if (shape.name.includes("teleport") && shape.obj.properties.x && shape.obj.properties.y) {
      await player.changeMap(shape.obj.properties.destination, {
        x: shape.obj.properties.x,
        y: shape.obj.properties.y,
      });
      if (shape.obj.properties.direction) {
        player.direction = shape.obj.properties.direction;
      }
      return;
    }
  },
};
.
Again, we're truncating a lot of other code out of the player class and focusing on the interesting bit - teleporting!
So, this code will trigger upon you walking into the object (shape), and if its name includes "teleport" (and optionally x & y coordinates) will teleport the user to the destination set within the shape's custom properties set in Tiled!
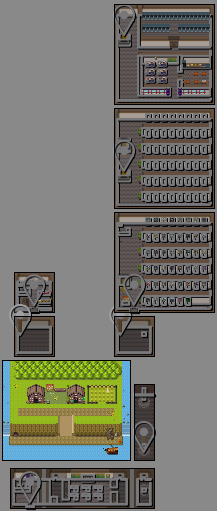
Now, bear in mind in Tiled you need to be adding all your maps to your Tiled world file, this teleporter function only teleports between maps not between worlds and not to maps not added to your current world. Check out the Tiled docs on Worlds for a deeper explanation of worlds.
Here's how you add a map to your world:

And here's what my world currently looks like - none of the maps currently touch because we're using teleporters to go between them, as we're entering buildings not walking across land map segments.
Also make sure to 'save all' when making changes to the world, otherwise you'll run into version mismatches when running your development environment.

Congrats, you've now implemented teleportation in your RPG-JS project! You can now add as many teleporters to any map as you want without writing another line of code!
Let's see the result in action!

Awesome! The user can be seen rapidly teleporting between maps, going to both exact coordinates and to starting points within the gallery!
Have fun using teleporters to build your game world now!
Have any questions? Need help with teleporting in RPG-JS/Tiled? Comment below!
These developments were brought to you by the NFTEA Gallery.
Consider collecting an NFTEA NFT to or donate to the following BTS or EOS blockchain accounts directly, to continued developments.
Your level lowered and you are now a Red Fish!
Check out our last posts: