Little Free Library DIY
Welcome to another little #DIY tutorial!
If you haven't heard of Little Free Library, allow me to fill you in!
The idea behind Little Free Library is to create a public place for books to be readily available to anyone and everyone, especially in places that don't have close access to libraries. Ever since I saw these years ago I was determined to make one dedicated to my children. Reading is such an important aspect of every day life and I want to provide another option for those who are unable to go to the library, or have an option for kids stop to grab a new book on the way to or from school.
I've come to realize recently that larger woodworking projects have ended up becoming somewhat of a hobby of mine. From raised garden beds, to a custom shoe benches for our house, a loft bed for my daughter, and now this Little Free Library. For the most part I always just saw them as necessary projects, but as many as I've done within the past 2-3 years they've certainly seemed to turn into more of a hobby than anything. Unfortunately I didn't take any progress pictures of my other projects, but if anyone is interested I'll gladly post pictures of the finished product.
Enough about me, on with the Little Free Library!
About
Little Free Library is a nonprofit organization that inspires a love of reading, builds community, and sparks creativity by fostering neighborhood book exchanges around the world.
Through Little Free Libraries, millions of books are exchanged each year, profoundly increasing access to books for readers of all ages and backgrounds.
LittleFreeLibrary.org is a registered non-profit organization and recently has been recognized by Great Nonprofits Organization, GuideStar, as well as many others.


Little Free Libraries have been growing in numbers not only across North America but there are more and more globally. One of the many great things about registering your library is the ability to add it to the map search on their website: https://littlefreelibrary.org/ourmap/. By registering your library you get a unique charter number, get it listed on their site map (if you want), keep you in touch with other stewards, and from time to time will get contacted by publishers for distribution of material.
Another reason I love this organization is their encouragement for creativity. While I don't see myself as a very artistic or creative person, I was able to come up with my own design and concept for my build. Alternatively, if you don't want to design it yourself they do offer kits that you can buy directly from their website: https://littlefreelibrary.myshopify.com/ as well as different build plans that can easily be found with a little internet research.
Building the Library
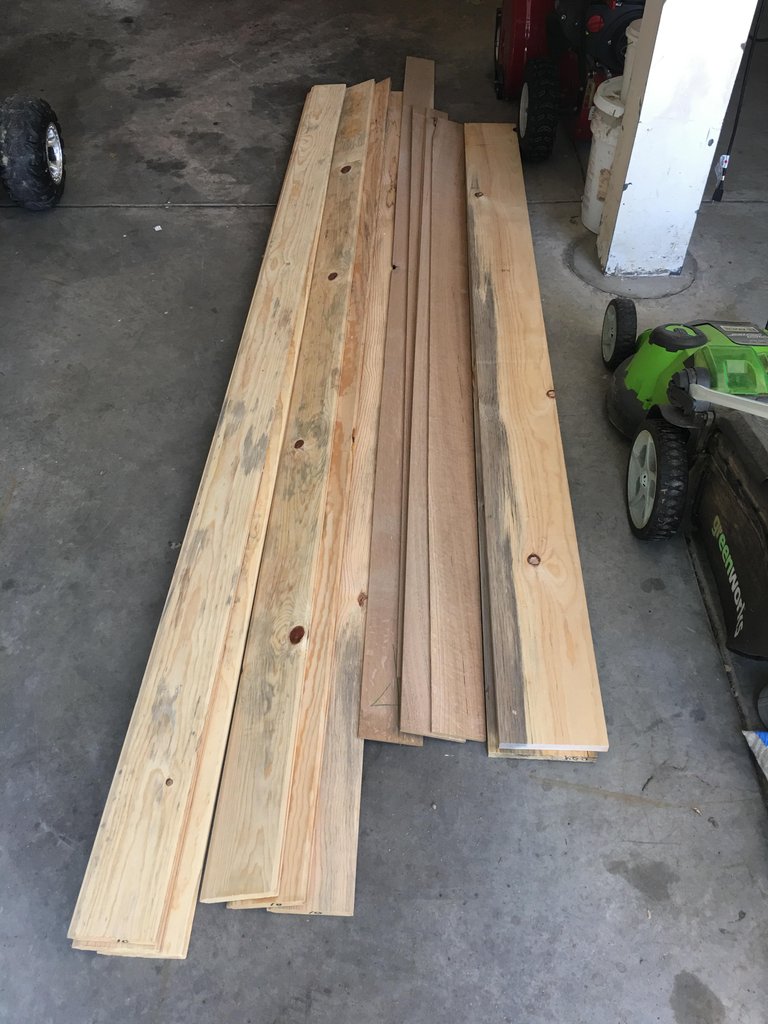
I kicked around quite a few ideas but ultimately ended up going with something practical while supporting local lumber yards for my supplies as well as a few used items for the sake of repurposing things.
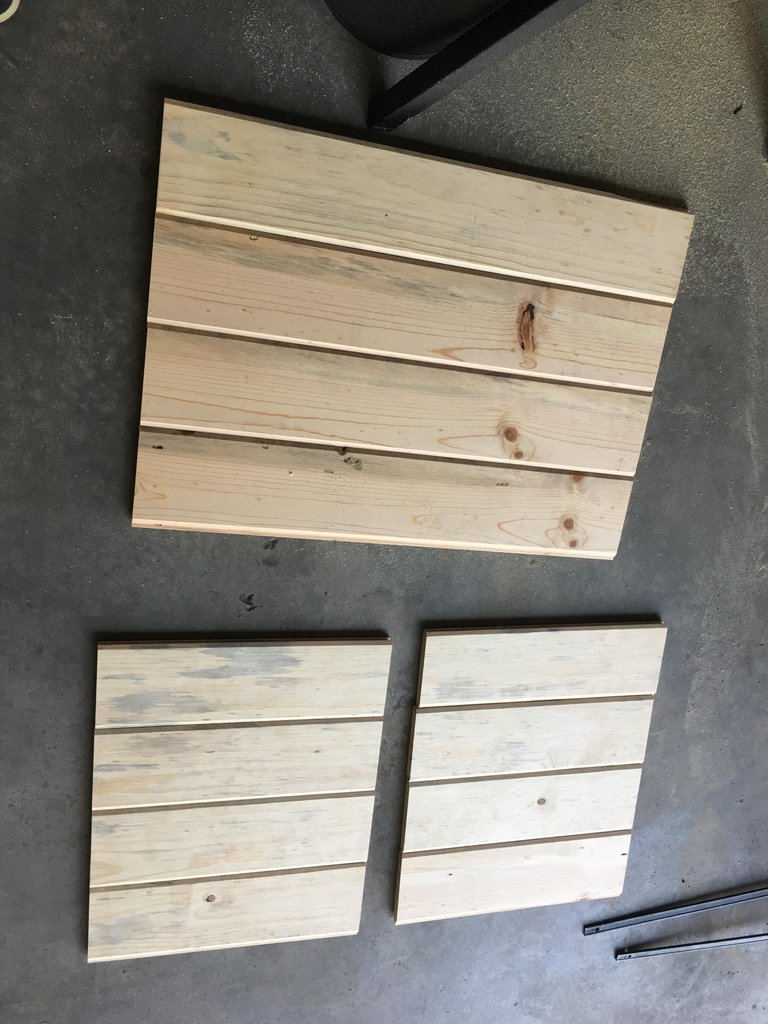
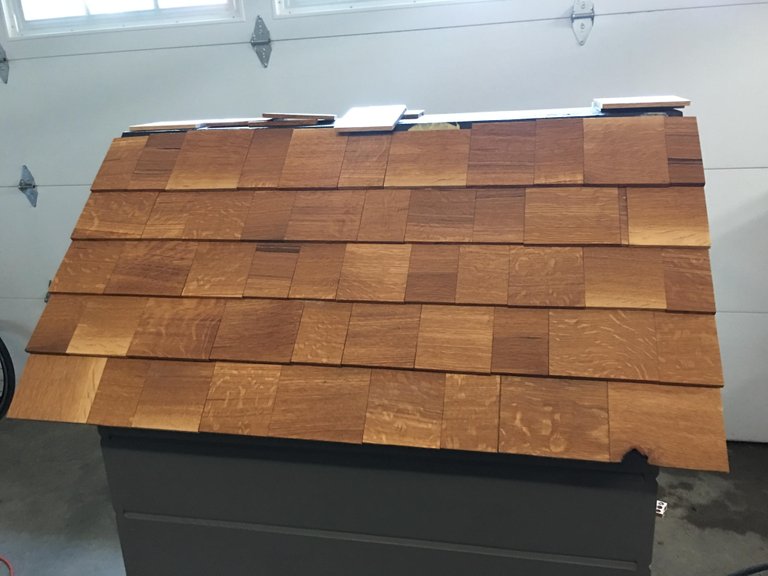
I "winged" the initial process and decided to just go to the lumber yard, find some wood I was happy with then begin to develop a style. I took my son with me to the lumber yard and allowed him to pick between some options. He chose Tongue & Groove Pine. I actually liked this idea a lot. not only would it give the box a fair amount of character, but it would make putting it together quite a bit easier. We also chose some White Oak to use for shingles to put on top when it was complete.
The Build
BEFORE YOU BEGIN: One of the most important things you need to do before ANY of this is make sure there are no gas, electric, or utility lines of any sort where you plan to put your post. In the U.S. there is a service called 811: Call Before You Dig. They will schedule all utility companies in your area to come out and mark your ground. I cannot stress how important this is. Not only for your safety but for the sake of your neighbors as well. I don't imagine many will easily forget or forgive you for killing their power or causing a gas leak due to neglect or laziness.
Moving on...
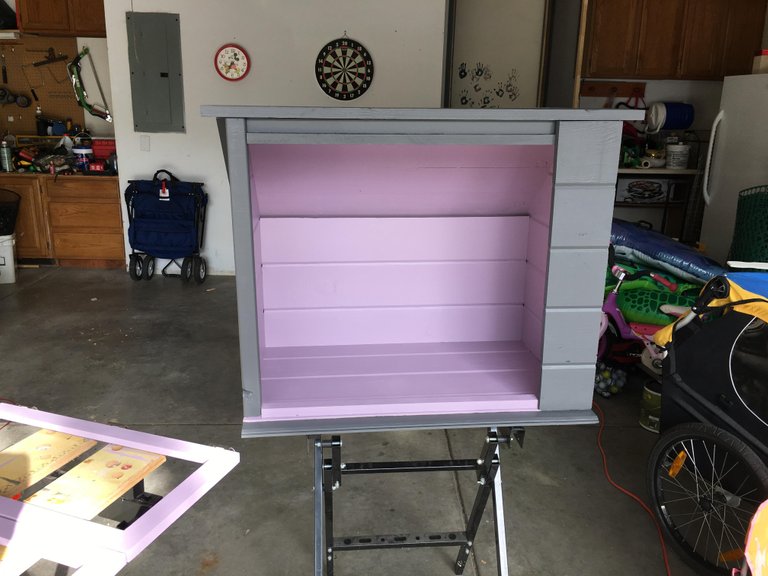
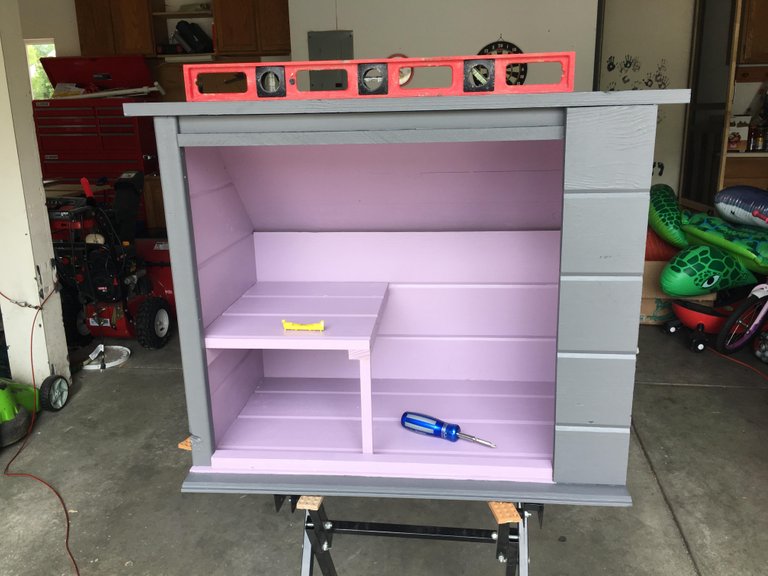
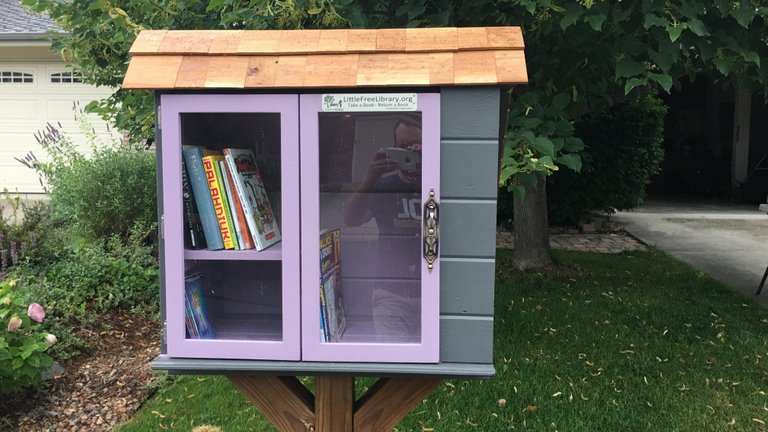
I initially decided that I wanted to have 2 doors. One side for "bigs" and the other side for "littles" (adults and kids, respectively). So I started with basic dimensions, decided how wide, high, and deep I wanted it to be. I built the side walls first then the back.
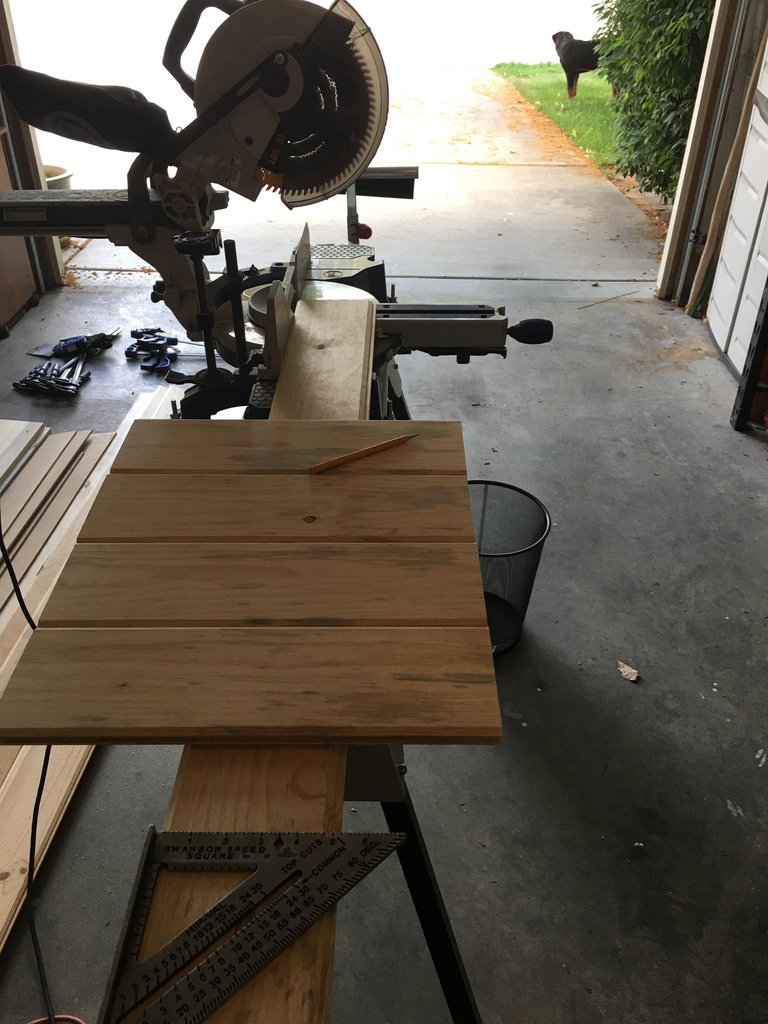
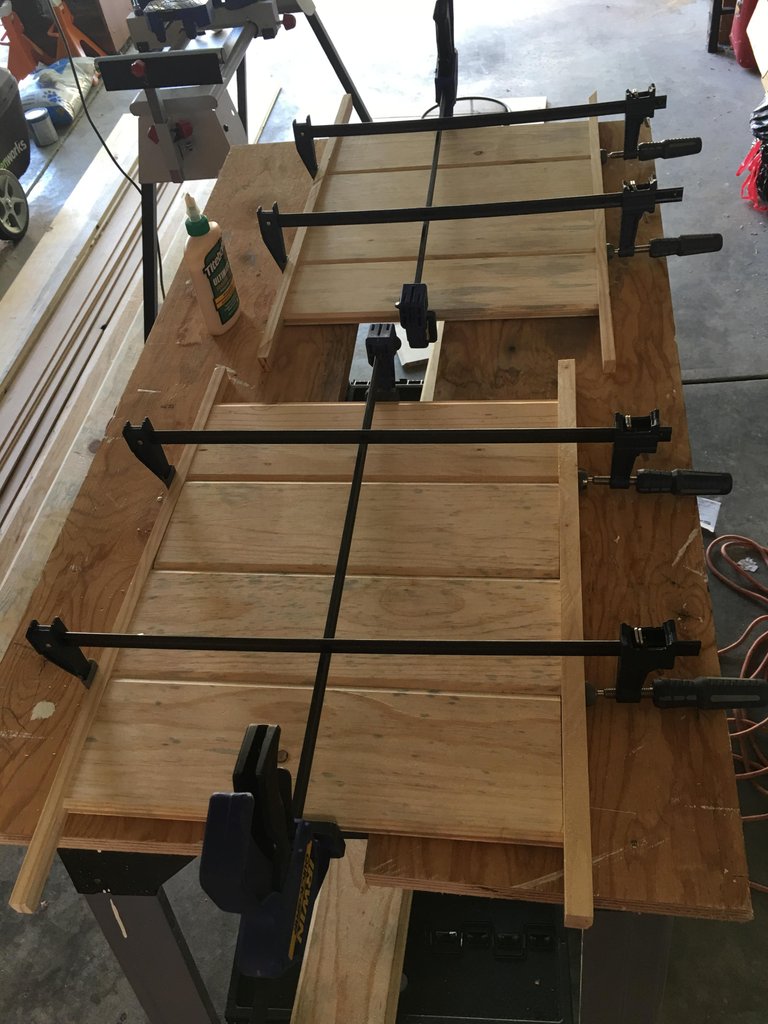
I decided to just make the roof a 45° angle for the sake of making my cuts easier, so I made those and added them to the sides and ripped a thin piece of a 2x4 to make a little threshold on the bottom in order to prevent water or weather from coming in and used the remainder to create a frame for the front. I used finish nails and wood glue to secure the sides, bottom, back, & front frame,

After the glue dried I cut some 1x to make a flat foundation for the roof shingles to lay on.


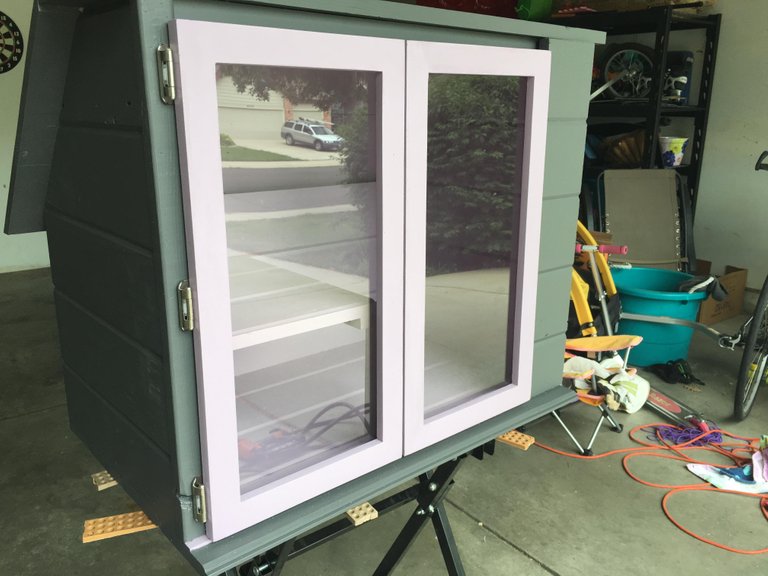
I visited my local Habitat for Humanity ReStore and found some simple wooden frames that were very close to the size of the front as well as some decent paint options. Stopped for plexiglass at the hardware store, and used a blade to cut to size in order to fit within the frames. The frames side by side were slightly shorter than the overall width of the box, so I added a little piece on the right side of the face to cover the gap.
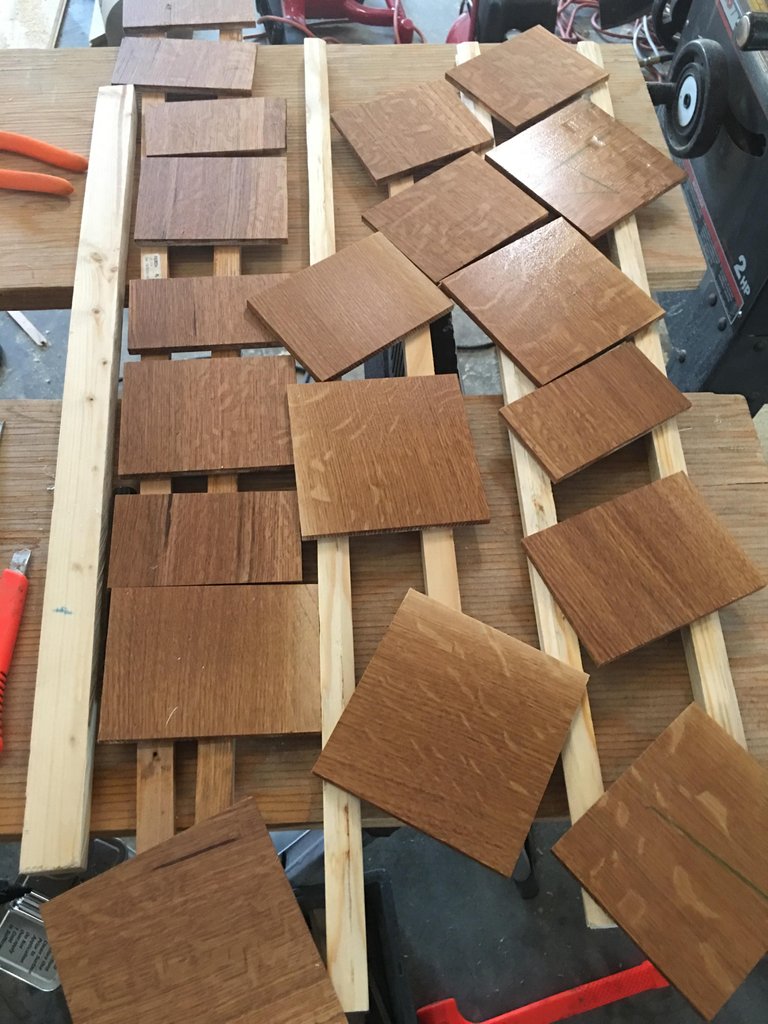
While the family helped paint the box, I worked on cutting and treating the White Oak I bought to use for shingles and got the post built and into the ground
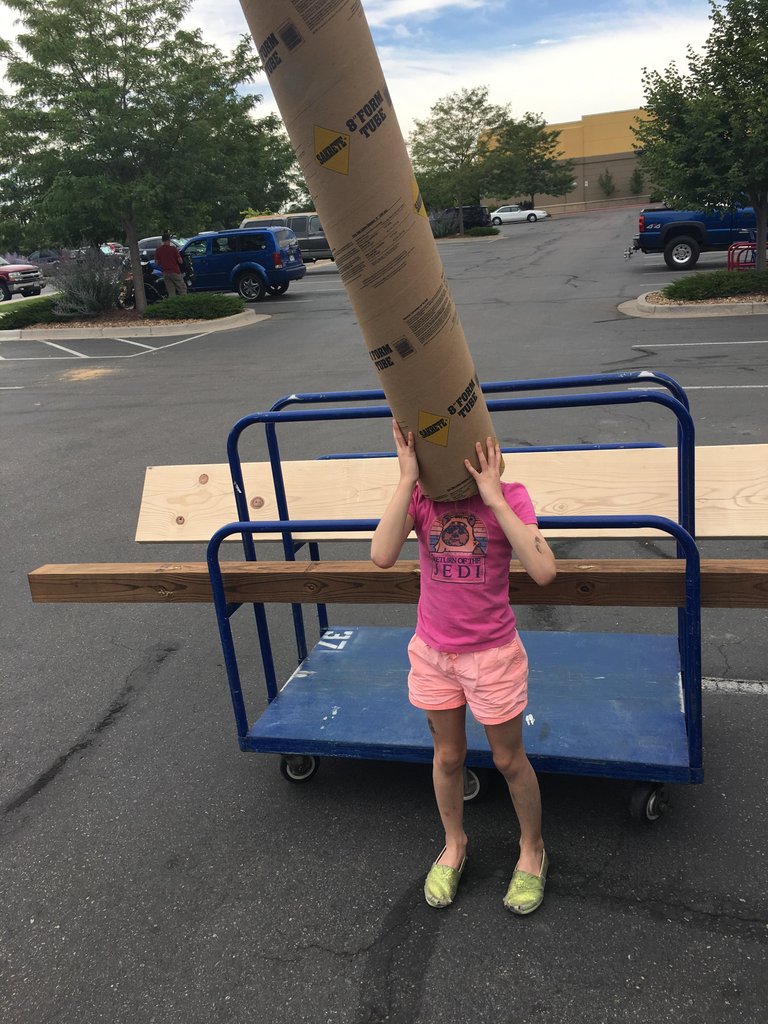
Hardware store helper
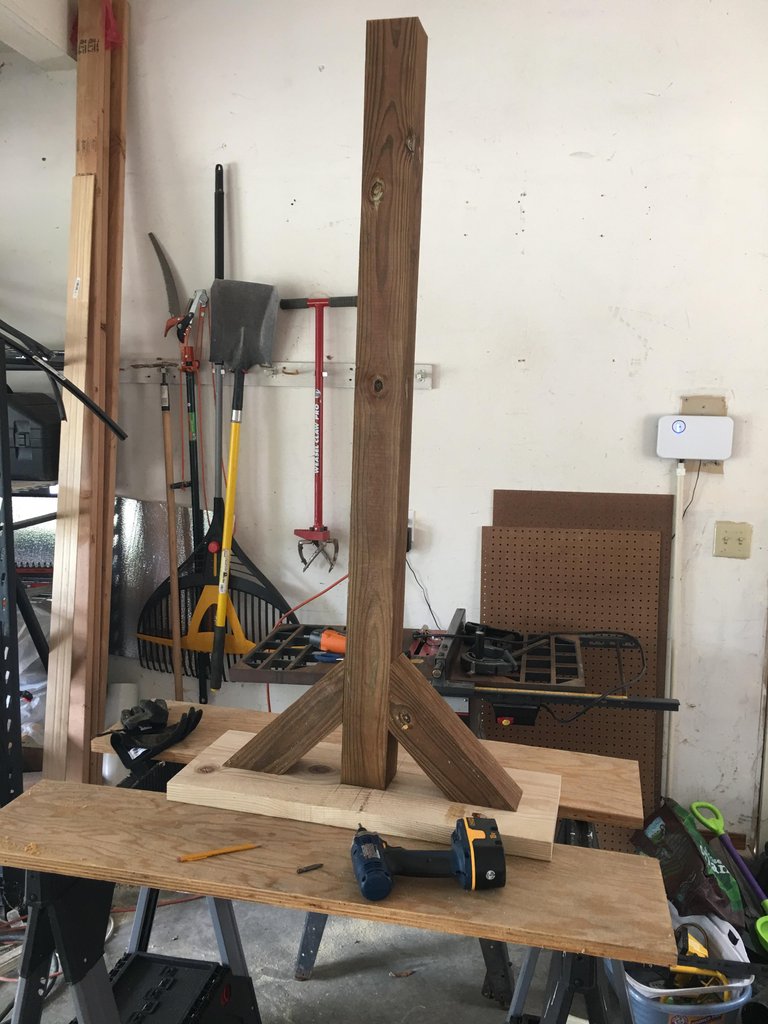
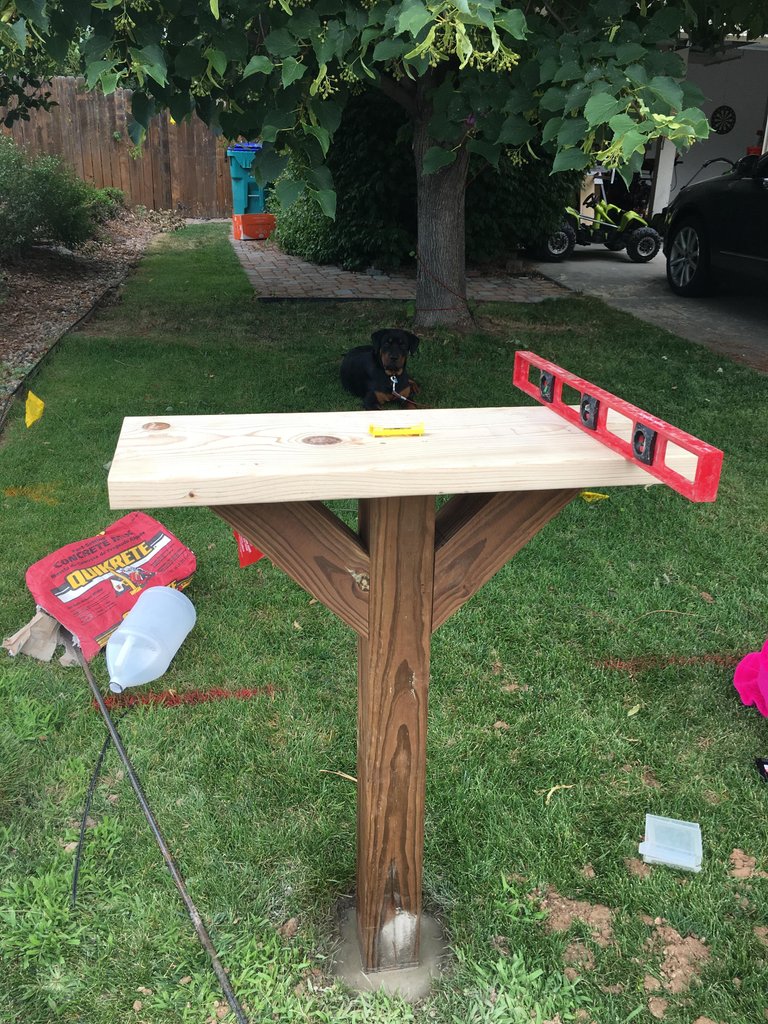
For the post I dug my hole about 2.5 feet down, took a pretreated 4x4x8, cut two 45°s in order to make the "Y" shape for support. Used a 2x10 to use as the base on which the box would be mounted to. I used 3" lag screws to secure the arms onto the 4x4 post. Make sure you pre-drill or you'll end up splitting your wood!
I put a few inches of gravel in the hole first, then put the post in, dumped my fast-setting concrete into it, then the water. Mixed with a piece of rebar, made sure it was level and it set within 30 minutes!
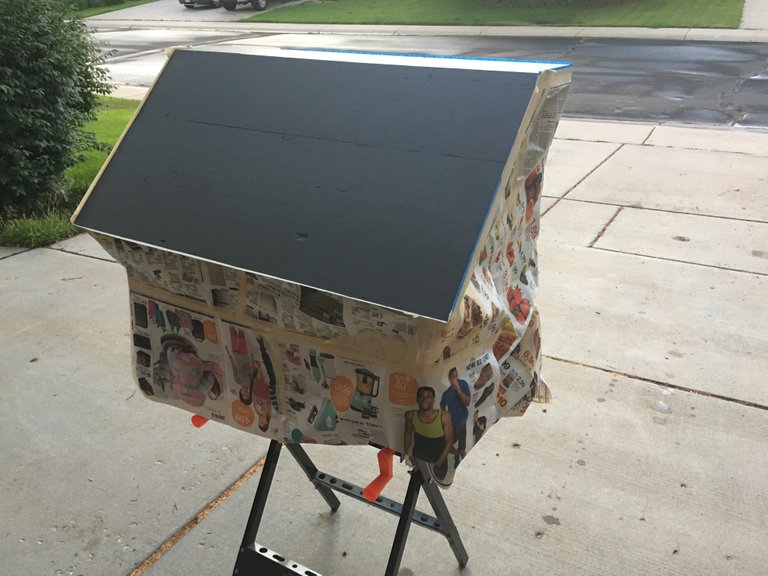
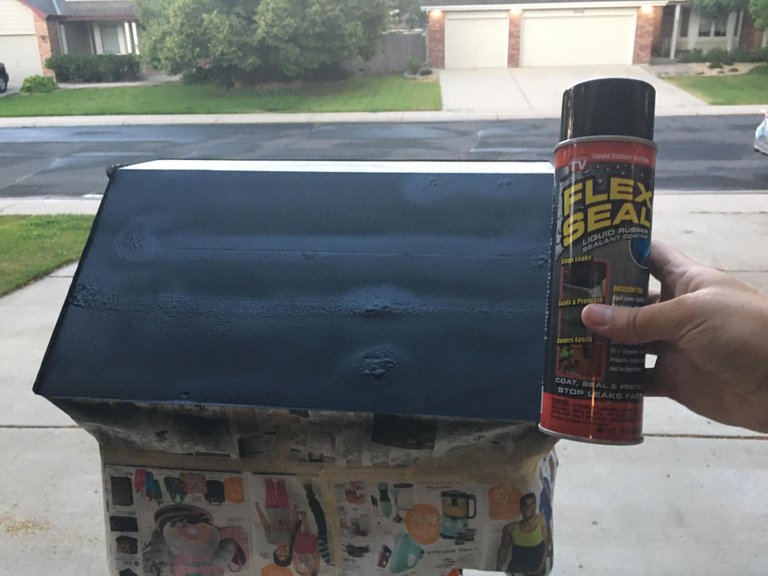
I had to let the sealer on the shingles sit a few days so the wood could soak it up, so in the meantime I use a Flex Seal spray to go over the top where the shingles would lay. This was used in place of shingle tar paper, as finding a piece that small was not an easy task and I didn't need a giant roll of it. I was sure to cover the entire box before spraying. It was a little messy but overall I think it'll do well to hold up in the weather.
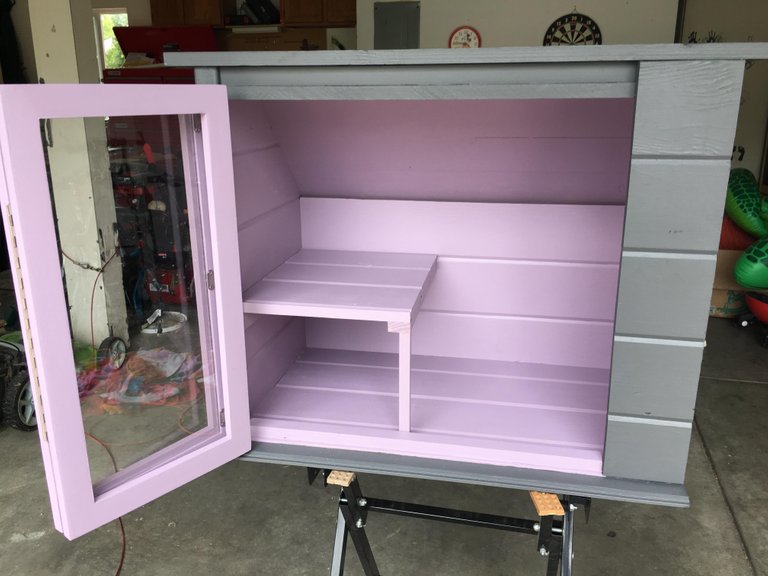
Shingles still were oily so it was time to build a little shelf and get the doors attached. I imbedded some strong magnets into the corners of the doors and the frame so that it would stay shut (forgot to get pictures of those).
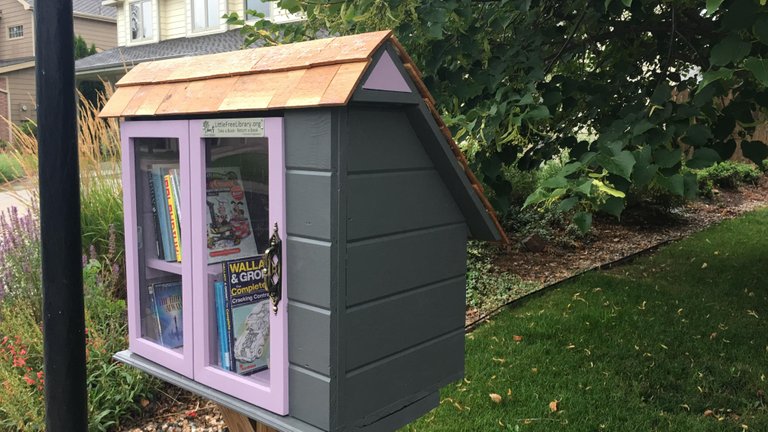
I used a construction adhesive to glue the shingles onto the roof. I cut them all to roughly 2.5", 3.5", & 4.5" wide in order to stager the seams between rows to prevent water flow from getting into too much of it. After I got most of them attached I realized that the wood grain was going the wrong way. Oh well!
Registered and received my Little Free Library charter sign!

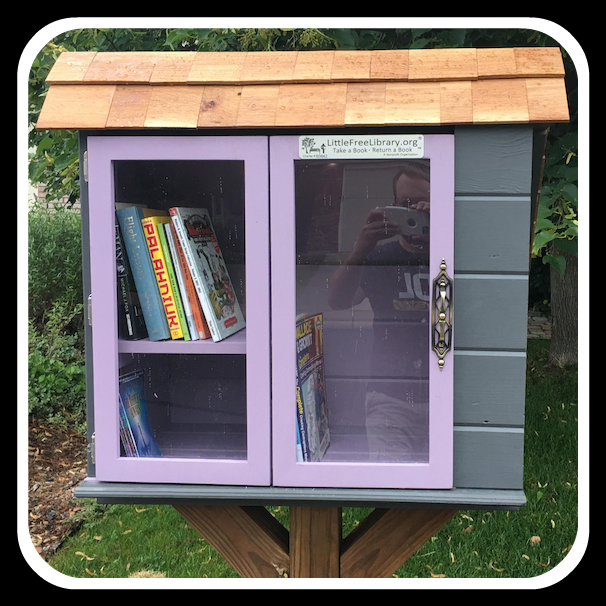
I was somewhat unhappy with the way the shingles were going to lay on the top so I extended the roof line to make a peak, cut some small pieces to fill in the triangle gaps on the sides and painted them purple to add a nice accent to the sides. Overall I think it turned out ok. Are my angles perfect and is the box square? Most definitely not, but for a #DIY home project I think it turned out ok. I'm sure I'll have tweaks to do from time to time as the wood swells. Finished and mounted! PHEW!
I Hope everyone enjoyed!
That is pretty awesome. I've been thinking about doing something similar lately. Thank you for sharing.
I love this post and tutorial. As me and my husband ran a shop in the main shopping street of Reykjavik for a long time we hosted the Anarkist library for a while and then later he @bragih went every morning to take care of a shelf on a square on the other side of the street where there was a free shelf. People could bring stuff there to give away. He has always wanted to make a library like this in our neighbourhood. Maybe he will some day. Maybe if I build the cupboard he will take care of it ;) Resteeming this and following you :)
P.s. I´m also doing tutorials if your interested ;)
:)
Upvote and follow me back
I have been a fan of this idea for some time. Looks like you did a fantastic job here, and thanks for promoting literacy and the joy of reading! :)
That's really cool! :) It's a really awesome idea. I have some books I could probably do this with. It seems like it could be fun.
.
.
.
̴̢̩̲̝̟͚̥͕͈̺̼͇̇̂ͣͩͮͥ͐́͜͟C̶͙͙̳̰ͤ̇̐̄̌͐͘͢ͅ-̬̭̺͇̮͓̜̦͙͖̟͕̫̬̜͎̜̦ͥ̒̌͒͂̈́͊ͣͯ͑̉̎ͧ̿͂͞͞L̷̛̞̠̦͍͉̤̼̙̻̘̞̘͖̜̲̓͆̏̏̇͐ͬ͐̑ͪ͗͜͞o͎̮̩̲̺͇̹̲̬̙̼͕̟̻̱ͮ̓͆̿̐̊̀͋ͭͣͪ̋ͤ̉̉̐͑̀͞ͅo̢̡̞̪̤͖̦̱̫̞̼̞̒̀̐̎̕͟͝k̓ͫ͊̅ͪ͛̎͌͛̚̚͟͏̨̛̤̙͔̲̗̬̗̤̪̠͔̟̥͓͚̟̜͖͜ͅ-̶͂̿ͯ̚̚̕͘҉̫͈̮̘͓̘̘Ą̩̲̬̰͍̬̫̱͙̼̤̣͎̭̓ͨ̉͊ͫ̽́ͬ̌̾̊̈̔͗̿̚̕ͅt̓ͩͣ̌ͧͥ̽͂ͪ̏̑͊҉͏̣͔̱͙̥͎̠̺̗͎̖̭͍̖͘-̡̧̬͕̯͖̼̹̙̠̦͉̝̳̖͓͈͚̾̊̑̓͂̍̅͗ͤͮ̑͘͝ͅM̷̡̥̮̗̲̩̰͍͔͈̜͂͗ͫ̀̎̍ͯ́̎̅ͮ̿̔͐̿ͯ̃̀̚̚͢ͅy̍ͩ̿̓̑ͫ̉̂͛ͨͬ̚͏̶͎͈̪̫͓̞̙̖̯͖͖͔͉ͅ-̂̑̾́̓̌̿̎̍͗͛̈́̃ͩ̓̀́̚̚͏͇͎̱̜̲͉P̶̡̲̤͕̖͓̯̯̜͒̃̌ͫ́ͭ͘͞į̦͓̟̪͍̰̳̼̫̤̀̄ͦ̂̅̓̀ͥ̈́̑͜c̢̡̨̛̝̱̗͚̠̲̱͓̦̘͚̞̹̥̭̞͙̎͗͊ͫͩ͗̒ͬ͋̀ͦͬ͌̌͗́ͩ̂ ̨̨͙̗̜̪̠̲̌͑̓̉͘͞͞W̴̸̴̠̘͖͍̞̘̯͈͚̗̣̭̮̺̞͚͙̅̈ͯͮ́͢ͅͅả̸̞͍͔̩̪̻̹͕̦͕̠̅́͒ͤ̈ͣͬ̾̈̆ͪ͛̿̍ͫ͑̈́̚s͖̫͖͎̾ͥ̓͐ͨ͐̒ͬͫ͋ͥͪͯ̆͋̅̀̕͝͝ ̵̡̰̻̠̗̙̬̥̠͙̙̹̝̼̠̖͐̓̂̅̽ͭ͢͜ͅH̨̰̞͙͙̟̥ͤͫ̈́ͣͥͧͤͯ̌ͦ̍͘ȩ̣̗͔̺͈͓̮͒͛͌͛́ͥ̾̊͐̐̃͋͘͜͞ͅr̫̱̙͒͌̓͐ͯͨ̿̑ͩͧͧ͘͟͜͠ͅe̗̼͕̼̺͎̤͙̻̔̾̑͑̓ͭ̀͑̑̈͌̉́
.
.
i am new here. please guide me sir
Awesome post thanks !!
Is that Pygmy by pahlanuik I see? I've got that one on the shelf myself!
It definitely is Pygmy. Not one of his better books, but it was still decent.
Well done. Thanks for the effort in sharing the details.
This post has received a 5.56 % upvote from @minnowhelper thanks to: @eutectico. For more information, click here!
Those are so cool, there is one not far from me. A great way to share books you've already read and those that just need a new home.🐓
As a bookaholic and used book seller, I've seriously considered starting one. But I live too far out in the country, back a dirt road. Front main road is too busy with big trucks.
But you've pushed me to check around on public locations that might go in on the idea with me.
Great write-up! Loved being there to kick it off with free donuts!
If you contact a roofer, you might be able to get some off cuts of tar paper..... Just an idea for anyone inspired by this.
Very cool. I see these little libraries all over town where I live! cool to see it here on steemit too! :) upvoted, resteemed and followed :)
I am an avid reader (and writer) and take a book or my Kindle everywhere and to see someone take the time to do this makes my heart fill with happiness.
Thank you for promoting literacy and making books available to those who may not have had it before.
Bless you!
I love these ideas, they have a few around my town :)
Congratulations @stoner19! You have completed some achievement on Steemit and have been rewarded with new badge(s) :
Click on any badge to view your own Board of Honor on SteemitBoard.
For more information about SteemitBoard, click here
If you no longer want to receive notifications, reply to this comment with the word
STOPCongratulations @stoner19! You have completed some achievement on Steemit and have been rewarded with new badge(s) :
Click on any badge to view your own Board of Honor on SteemitBoard.
For more information about SteemitBoard, click here
If you no longer want to receive notifications, reply to this comment with the word
STOP