Here are the basics of DAW (Digital Audio Workstation) editing and managing your vocal track to make it sit well with your music.

These are the fundamentals that you need to know if you want to get the best possible sound from basic recording gear.
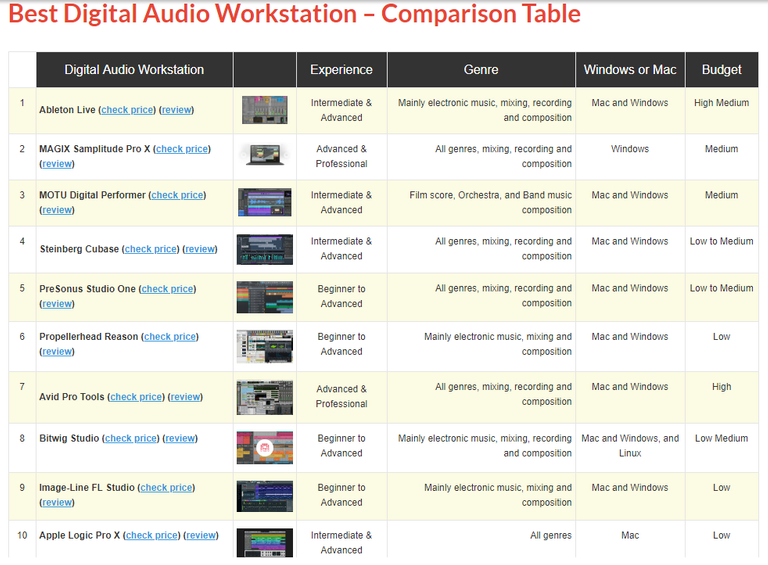
Some people ask which DAW software is best for recording. There isn’t really a ‘best’ DAW for everyone or for every single part of a project. It really depends on whether you can easily attain your goals (some examples of which I discussed in Part I). Based on my experience, the basic features I enumerated below are ‘must-learn’ features, especially for beginners, to make the job easier. Most DAWs have these basic features and the easier these are to learn and perform, I’d say the better a DAW is, especially for beginners.
Input metering and control
You can monitor input visually (via meters or waveforms) and/or by listening to your microphone/signal input in real-time. Another factor is learning how to decrease latency (being able to hear through your speakers or headphones what the mic is hearing with minimal or no delay). Consult your DAW’s manual on how to reduce latency as it can be a lot of guesswork without any guidance.
With a reliable volume meter, you can easily adjust your input volume levels and gains to optimized ranges. Generally, you want to make sure that when tracking/recording, your input volume is set to record without overloading or exceeding safe limits. I don’t usually allow the recording volume to exceed -10dB. Occasional spikes are ok for as long as you have room for them. Reaching 0 dB (the loudest possible) in most cases result in distortion (clicking sounds) or at least alter the dynamic range of the original material since you run out of bits (you hit the maximum amplitude that can be represented by numbers) to represent recorded audio. Anything in excess in terms of volume is cut off at maximum, making the sound a bit distorted or ‘gritty’.
Like what's covered in Part II, if your input signal is too weak, you might end up with a lot of hiss (low signal-to-noise ratio). It was also a major problem even with old recording media like vinyl or cassette tape since they naturally generate some hiss even when playing blanks. That’s why they recorded with the maximum volume possible (which I had trouble matching with an ordinary cassette recorder) to cover up the background hiss on playback. If you have a simple setup with just one mic plugged directly to the PC, there’s nothing much you can do about input volume settings. Even setting it to maximum may not be enough unless your sound source is very loud, like an acoustic drum.
If you use a mixer/interface with phantom power, overloading inputs becomes easier. However, if the recording device is fed with signal of a very low volume and you compensate through software amplification by turning up the input gain, cable noise will get amplified along with the useful signal. To avoid this issue, you want a mic with a good output volume to start with (also with optimal distance from the sound source). The mixer/interface should amplify it just enough to generate a strong signal that your computer can record at a relatively low input gain.

To make it easy to understand, avoid too much amplification at the end of the audio chain. Amplify audio from the source and use close-miking techniques as much as possible. Use less and less amplification down the chain to come up with a clean track without audible hiss when played back at normal levels. If the setup is ideal, you may not even have to trim off silent parts of the recording very tightly and you have enough SNR (signal-to-noise) ratio to avoid bringing out background noise and cable hiss during the next step which is:
Compression
Once you have mastered miking techniques and set your input volume to the optimal level, the next problem to address is usually too much fluctuation in the volume (amplitude) of the recorded material. Compression is perhaps the most important processing done to a vocal. During those times when each signal processor was a piece of expensive hardware (not just a software plugin), there was a saying that “If there’s only one compressor in the studio, it would probably wind up in the vocal track.” This is to stress the importance of compression in a vocal track.
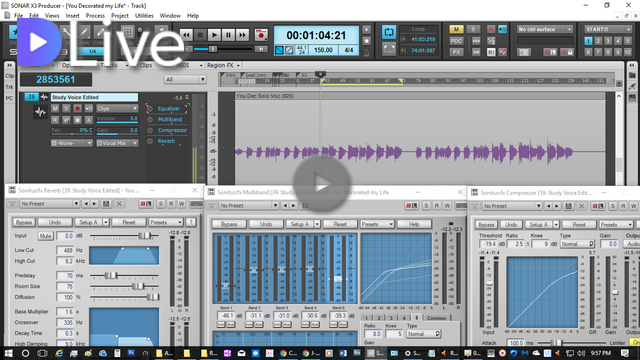
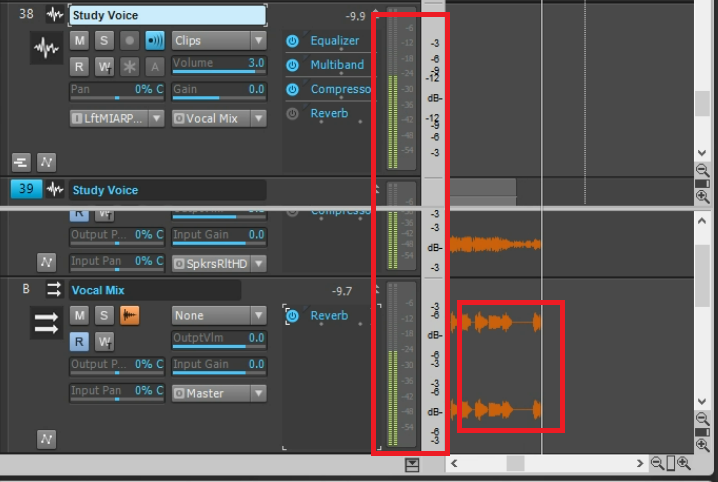
In this video, I demonstrate what the compressors are doing to the vocal track. The order/chain of effects start from the top to bottom in many Digital Audio Workstations (DAWs), so when I say I put an effect on top of the previous one, it appears below it.
My video is at DLive
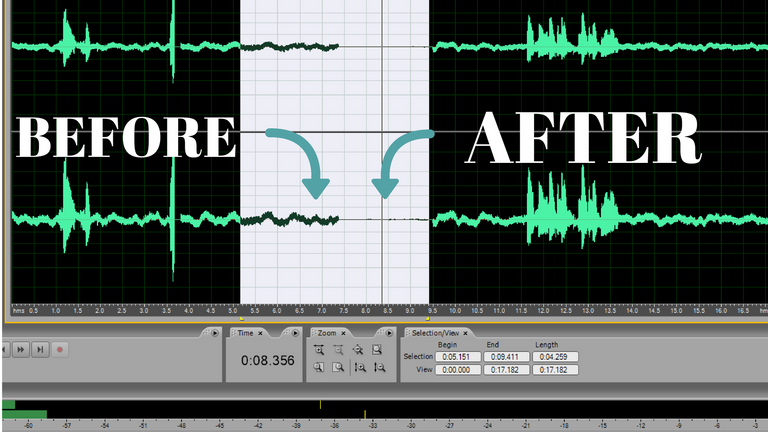
Without any compression, the vocal ‘jumps' in and out of the music (minus-1) track and doesn’t sit quite as well as when the compressor is on. The compressor attenuates (reduces the volume) of loud parts and brings up the overall volume of the material without overloading the DAW’s mixing console. Here are the parameters you want to learn to adjust:
Threshold
This is the limit you can set to the volume. Below this level, the compressor will allow the signal to pass through without doing anything. When the input to the compressor gets higher than the threshold, it will start lowering the volume by a factor set through the:
Ratio
For example: If you set the ratio to 1:1, there’s no processing done at all regardless of the threshold setting. If you set it to 2:1 and the threshold is set to -10dB, whenever the volume goes up to -8dB (2 dB louder), the compressor will lower it by 1 dB (down to -9dB). The other parameters (like attack and release time) are not very simple to learn or even discuss but I mentioned what they do in the video. Getting these parameters right is extremely important to get a professional-sounding track.
Equalizer
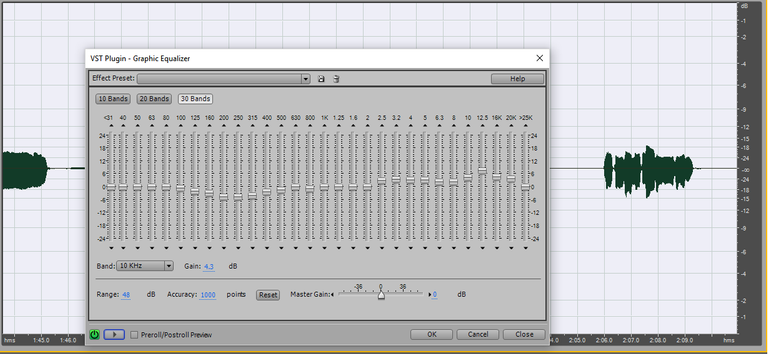
The equalizer is basically a filter which changes the balance of the sound passing through it in terms of frequency content. More simply, it’s a set of frequency-specific volume adjusters. It’s quite common in consumer gear and experimenting with it on your phone will immediately help you understand what it can do. Nowadays, we see it integrated in many music playback apps, devices and even smart TVs. For beginners with low-end microphones (with inaccurate frequency response), an equalizer can usually rescue the track from the delete button. Even pros use equalizers to manage and balance each part of a mix up to the mastering (final editing) stage. Here are two equalizer techniques you want to master early-on.
A-B-ing
To A-B means to compare. If you like the sound of a vocal in a particular song, play it for a few seconds and listen carefully, then, play your recording and adjust the EQ (equalizer) accordingly. For example, if you want ‘airy’ and soft sounding vocals, engineers usually boost around 10-13 kHz and control the midrange (around 2.5 kHz). It takes lots of practice so be patient with the equalizer.
Also, avoid using high monitor volume while experimenting as it can damage hearing or the speakers. Bypass the equalizer (turn it off) once in a while to compare the sound with the original. A-B with multiple professionally released materials like MP3s or CDs (Use the highest resolution available even for audio/video streaming to minimize quality degradation). This will keep things in perspective. Comparing your work with the pros usually gives a beginner a big boost in terms of output quality.
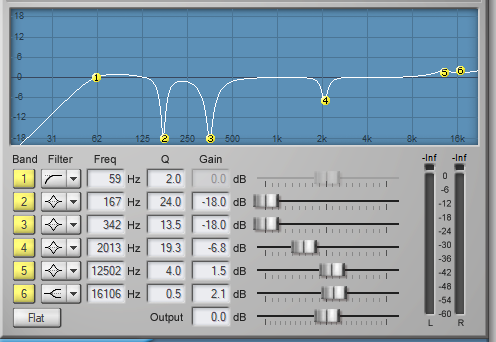
Frequency Sweeping
When you're already comfortable with the common (graphic) equalizer, you may want to learn using a parametric EQ which allows you to adjust the frequency range of each dial. It’s more versatile and useful for ‘frequency-hunting/sweeping’ when you need to identify good or offending frequency ranges while mixing. Make the sound worse first by 'hunting' the offending frequencies, then lower it so satisfactory levels. Adjust the Q (bandwidth) as appropriate. It all depends on how much of the material you need to remove or boost. Also, invest time in learning multiband compressors (frequency-dependent compressors) which essentially function as both compressor and EQ in one plugin.
Reverb
They say “reverb is a drug” so avoid overusing it. This is especially true when mixing with headphones as your main monitor. You don’t hear any room reverb and you tend to add more electronic reverb via the effects plugin. This can also happen if your studio is too dead-sounding. You still want to hear some natural reverb when playing back your tracks. After all, not all people listen to music on headphones or dead-quiet rooms alone. You want it to sound good in the ‘real world’. Here’s a simple technique that will prevent too much reverb from interfering with a vocal track:
Pre-Delay
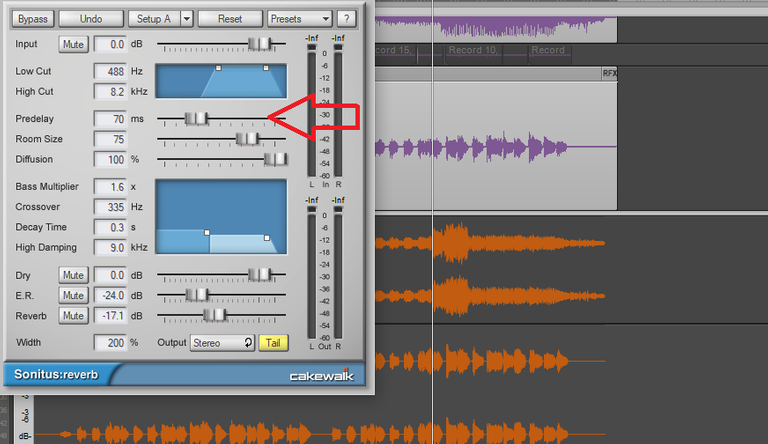
Set the pre-delay to 50-80 ms. This way, the reverb will be more like an echo that repeats part of the material after 50-80ms. If set to zero, there’s no delay and it’s ‘married’ to the original sound which can sound muddy (unclear). Experiment with the low-pass and high-pass filters as well. You don’t want distinct echoes to be audible in the low-frequency range (like the bass guitar or drum) or it would sound like music from a cave. On the other hand, too much reverb on the mid-high frequency end of the spectrum might make sibilants (S, Ch, and T) sounds harsh-sounding in a vocal track. If you want airy sounding vocals with boost on the mid-high range, consider using a de-esser or a multiband compressor set to compress the sound within the concerned range.
You can also experiment with the order you connect these plugins. The basic principle I follow is: “Start from the source.” i.e. Fix any problems early on. Get optimal volume ranges in tracking/recording, compensate for lapses in the original material with the volume fader (with automation), to avoid having to use multiple compressors or compressor settings. Use an EQ and/or a multiband compressor to correct the frequency content of the track before compression. This allows the compressor to work on an already balanced sound. Reverb is usually the final ‘coat of wax’ that makes everything shiny. Most beginners add only reverb (usually too much) to cover-up mistakes. Too much reverb won’t be necessary if everything was properly processed from the beginning.
All of this processing, especially EQ is hard to do well without accurate studio monitors. In Part IV, I will discuss with you how to adjust [for] your current monitor (speakers or headphones) to make them at least a little more accurate and transparent-sounding. Please stay tuned.
All images are my original work or actual screenshots.
Thanks for reading/viewing!
[Credits to the Author of Life]
Please consider casting your votes for the following witnesses: @curie, @surpassinggoogle, @steemgigs, @precise, @cloh76.witness, @ausbitbank, @teamsteem, @gmuxx, @hiroyamagishi, @elizahfhaye, @bayanihan, @papa-pepper, @steemph, @daveks, @jerrybanfield, @teardrops, @donkeypong, @davidpakman, @minnowsupport, @themarkymark, @blocktrades and @sndbox who have been adding invaluable contribution to the community.
To cast your votes, just go to
https://steemit.com/~witnesses


Please stay tuned for my favorite photos and the lessons I learned behind the scenes.
This is exactly what I need to learn to reduce our studio expenses. LOL! Thanks, see you around!
Nakakapuyat yan kua ah.. Ayos ba yang BM800 mic?
Nakakapuyat talaga boses ko.. Hahaha! Nahirapan lang ako sa screen recording para sa DLive. Iba setup ng audio, di marecord yung music through ASIO driver kaya direct plug-in lang yung mic sa PC. Uulitin ko pa siguro with phantom power.
Awesome!!! i'm currently starting to learn how to improve voice recording, from tune it right, to even EQ and master it.
i'll make sure my friend @amg.soundesign read this post also it may be helpfull for my band @funkmedia in the long run. thanks my friend.
have a nice day,
Thanks!
Awesome voice recording idea!