EOS New York is a top 21 Block Producer on the EOS Mainnet. If this guide is helpful to you, please consider voting for eosnewyorkio and all of the Block Producers that have contributed tools to this guide.
If you are like thousands of others then you chose to keep your EOS tokens on an exchange during the mainnet launch. Now that the dust has settled, you'd like to move your tokens to an EOS wallet.
There are multiple benefits to holding your EOS in a wallet vs. an exchange:
- Receiving airdrops
- Staking tokens for security and resources
- Voting for Block Producers
- Controlling your private keys
This guide can be completed in chunks. Do not worry if you do not have time to finish, the EOS Blockchain will be there for you when you're ready.
In this guide we will cover the following:
- Safely generate and validate both your Owner and Active keys.
- Create your 12 character EOS account ID.
- Download and create a Scatter ID for your EOS account.
- Reset your Owner Key pair for maximum security.
- Download an EOS wallet.
- Move your EOS tokens to your wallet
- Stake your tokens for security, resources, and voting.
- Set alerts on your account.
All tools in this guide are open-source and have been directly used and reviewed by EOS New York.
An Explanation of Owner Key, Active Key, and Account Name
In EOS, your tokens are tied to your Account Name. Your Account Name is the 12 character name you were assigned at Genesis or the one you've created yourself. For example, our Account Name is EOSNewYorkIO. If you are coming from an exchange, you have been using the exchange's account name and you do not have one of your own.
What is your Owner Key and what is your Active Key? To make it simple, you have two private keys and two public keys in EOS. One set is your Active Key and one set is your Owner Key. Your Active Key can be used to stake, unstake, and transfer tokens. Your Owner Key has the ability to reset your Active Key as well as complete any other action the Active Key can. This makes the Owner Key very valuable. It should never be stored online or on any machine connected to the internet. It should be stored securely, offline, and in a safe place. Please also consider keeping copies in multiple safe places to further reduce the risk that it is lost.
In this guide, we will create an Owner Key that is different from the Active key so that if your Active Key is ever compromised it can be reset. This creates a layer of security for yourself.
Step One: Generating EOS keys safely offline.
A.
If you'd prefer to build the EOSIO software from scratch and generate keys offline you can follow our guide here. To easily create new EOS public and private key pairs visit eoskey created by @eoscafe.
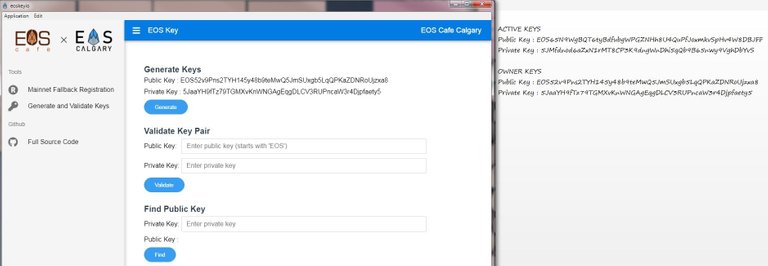
- Download the desktop application to your device and install
- Turn off your Wifi
- Hit the generate & validate keys tab on the left side of the application
B.
Generate and save the first key pair (public and private) in a text file on an external USB drive and label it your Active Key. This is a temporary measure, how you store your Active Key in the future is up to you. Storing it unencrypted on your machine is not recommended.
C.
Generate the second key pair. Grab your favorite pen or pencil and write it down on a piece of paper, check that it is accurate, and write it down again on a separate piece of paper. Label this your Owner Key.
D.
With your Wifi still off, enter both key pairs into the Validate Key fields. You will be prompted that each key is valid. If not, generate new key pairs.
Step Two: Using MyEOSKit to Create Your Account.
A.
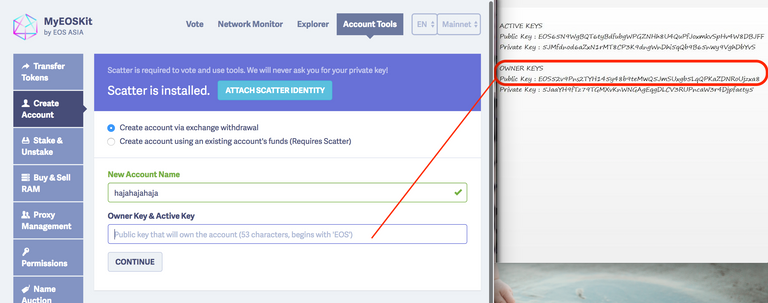
Visit MyEOSKit created by @eos-asia and click on account tools, then create account. Make sure create account via exchange withdrawal is checked.
B.
Input your desired 12 character account name to see if it’s available.
C.
Once you've chosen an available account name, enter your Active Public Key that you previously generated and labeled as Active in the field asking for the corresponding public key. Click continue.
DO NOT ENTER YOUR PRIVATE KEY HERE. PUBLIC KEY ONLY
D.
MyEOSKit leverages a smart contract on EOS that automatically purchases the RAM needed for a new account and stakes it to the account you create. This smart contract is open source and is safe to use. You will now be prompted to send a specific amount of EOS to signupeoseos, the smart contract. Head to your exchange and follow the steps below.
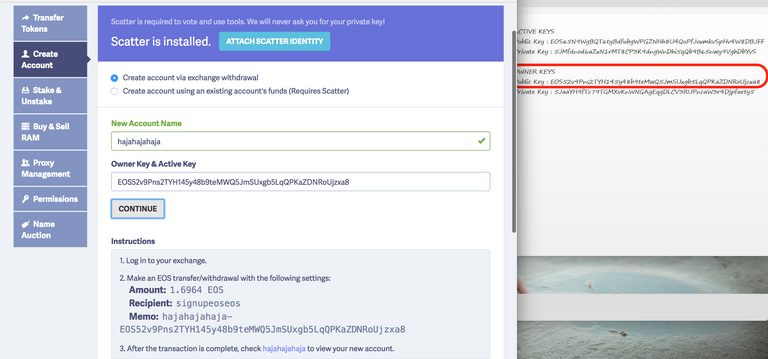
- When you're ready to withdraw, set the recipient address to signupeoseos.
- Set memo to [accountname-publickey] exactly as shown in the instructions, no spaces.
- Remember that exchanges charge a fee for withdrawals. Be sure to calculate the exact amount of EOS you are sending after accounting for the withdrawal fee.
- Visit an EOS block explorer such as Bloks.io and type in your new 12 character account name into the search field to see your new account.
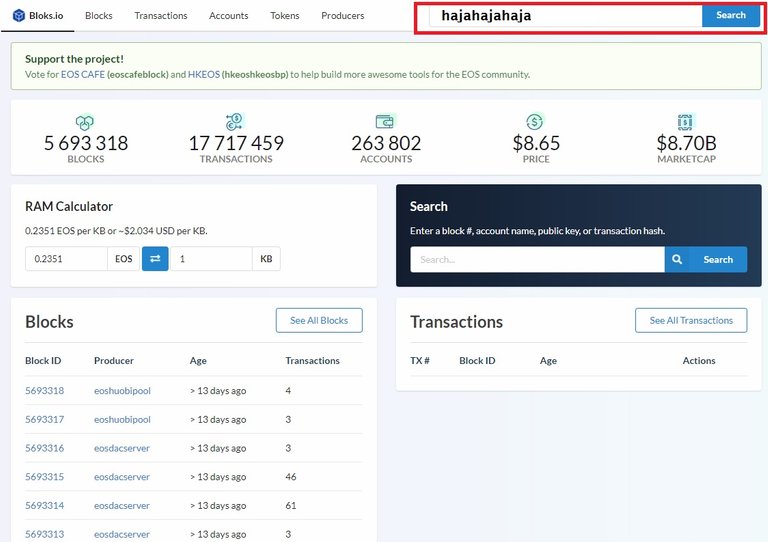
You should now see your new EOS account on the EOS main network along with a small amount of RAM, CPU, and Bandwidth staked. These staked resources are required to store the account on the EOS blockchain and enable feeless transactions.
Step Three: Creating an Account With Scatter
Scatter is a web application that securely signs transactions without exposing private keys or sensitive information, similar to Metamask. It can be used with many EOS web toolkits and dApps. It's open-source and safe to use. We will be using it to change your Owner Key to the one you've generated.
A.
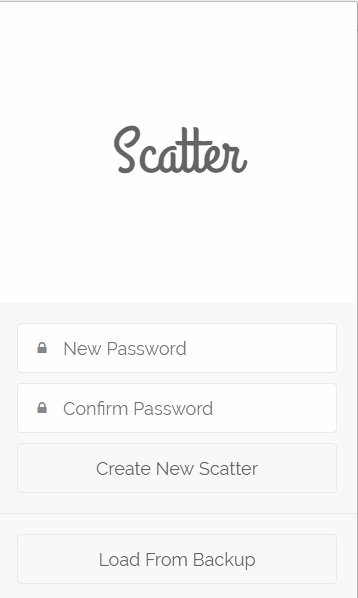
Download the Scatter Chrome extension here. Click the Scatter icon in the top right of Chrome and set a strong verbal password and write it down. Then click Create New Scatter.
B.
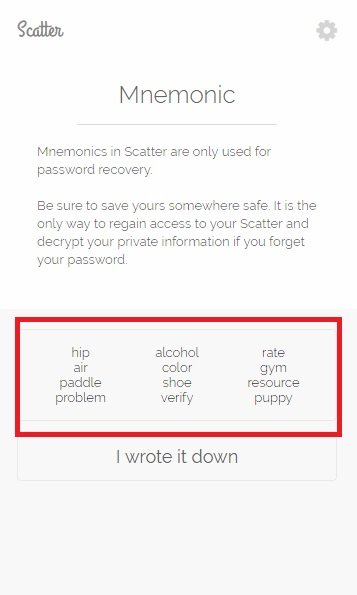
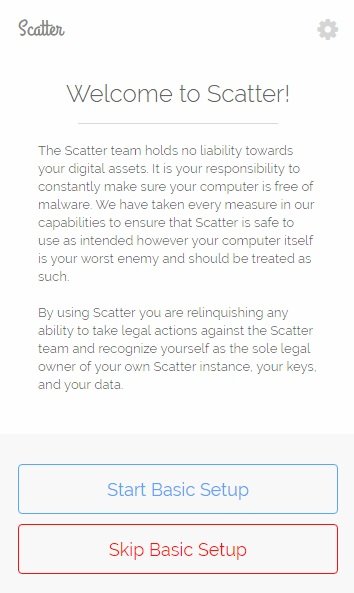
You will now be presented with a 12-word mnemonic backup phrase. This phrase should be written down on a piece of paper in the exact order that it appears. It can be used to recover your Scatter account on a new device. Click I wrote it down when finished.
C.
On the welcome screen click Skip Basic Setup
D.
Click the Key Pairs tab then select the new button in the upper right-hand corner. Input your account name and paste in your Active Key. Pasting in the private Active Key ensures it's correct rather than exposing yourself to an error by typing it. Verify that you now see your public key generated. Once verified hit SAVE.
.jpg)

E.
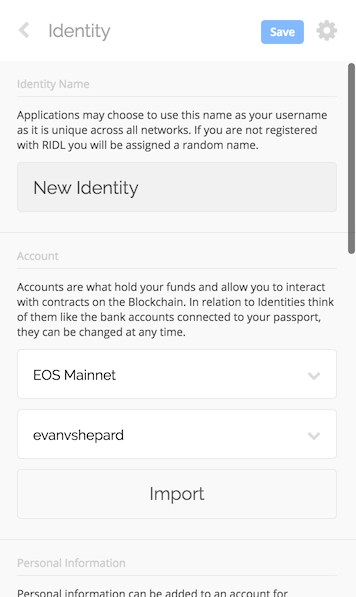
Now we will create your first Scatter Identity. From the home screen of Scatter, select Identities tab and click the blue new button in the upper right. Make sure EOS Mainnet is selected in the first drop-down. In the second drop-down, you should select your 12 character account name. Click the import button.
F.
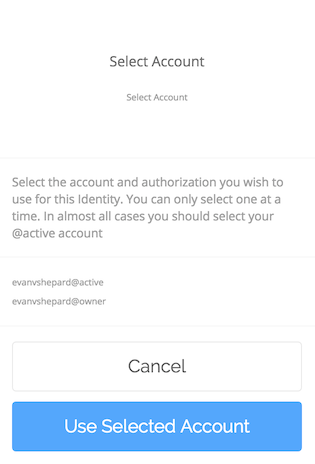
- Select [youraccount@owner] as the account authorization.
- Click use selected account.
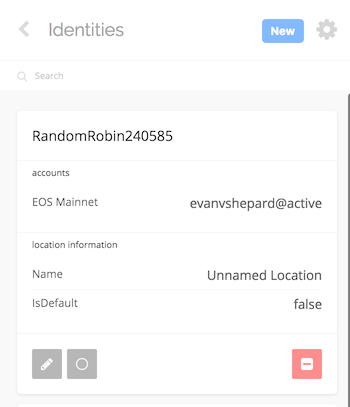
- Click the save blue button in the upper right.
- You will now see your first randomized Scatter Identity.
Step Four: Resetting Your Owner Key
A.
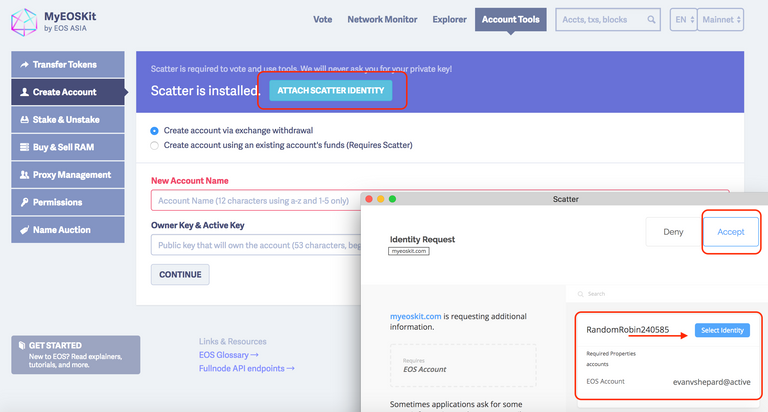
Right now both your Owner and Active keys are the same. Remember that an Owner Key and an Active Key should be different from one another so that if your Active Key is ever compromised you can reset it with you Owner Key. Head to MyEOSKit. Here you will click attach scatter identity and select [youraccount@owner] to use in the right box of the scatter pop-up window. Then click accept.
B.
WARNING: If you are using this guide to reset the key pair you used to register your EOS during the ICO do not lose it! That key pair will be required to access any EOSIO network launched that honors the token distribution. If you are moving your tokens off of an exchange then, unfortunately, you will not be able to access future EOSIO networks that honor the ERC20 token distribution.
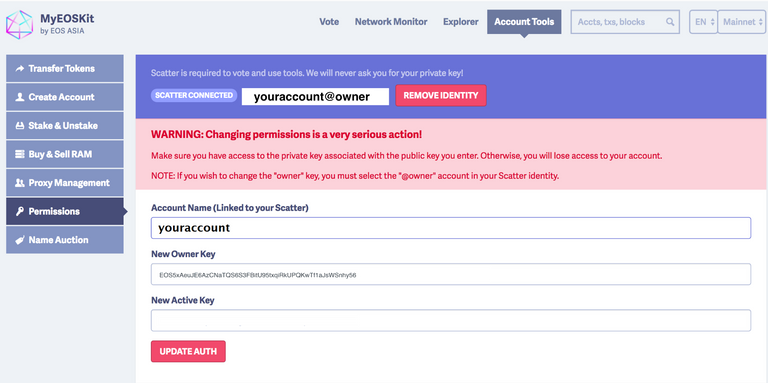
Enter the new public key that you previously generated and labeled as Owner in the Owner Key field. Be very sure you are correct here. Check, double check, and triple check. This action cannot be undone and if you do it incorrectly you will not be able to recover this.
DO NOT ENTER YOUR PRIVATE KEYS HERE. PUBLIC KEYS ONLY!
C.
Click on the update auth button and approve the transaction with Scatter pop-up.
D.
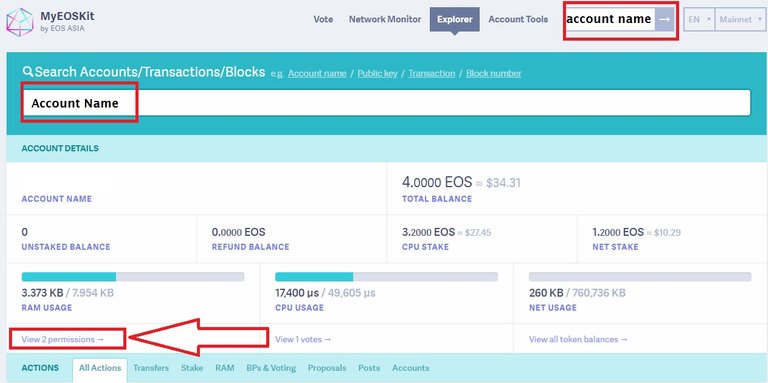
We will now verify the new Owner Key is set. In the upper right side of the MyEOSKit search your 12 character account name to pull up its information.
E.
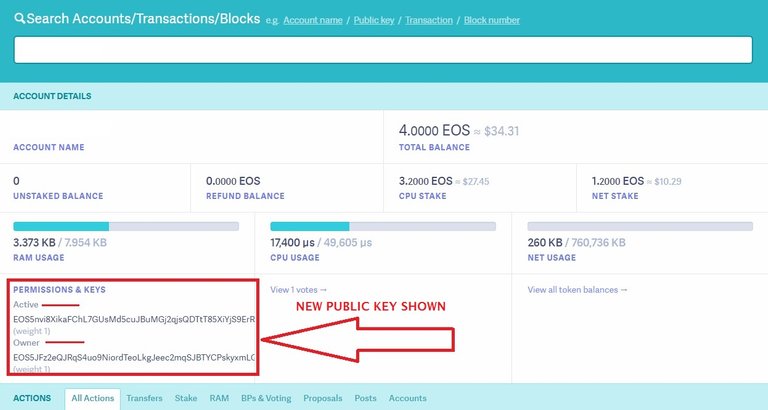
If the change in Owner Key was processed and submitted properly to the EOS blockchain you will now notice that your Active and Owner public keys are different from one another. You have now completed the process of changing the permission on the account. Do not enter your new Owner Key into Scatter or anywhere else. It should be kept offline and reset each time it's used. Please note that you should delete all Scatter identities created during this tutorial due to the Key Pair changes. You may recreate a Scatter identity following the same instructions in this guide using your Active Key.
Step Five: Accessing Your Account Using an EOS Wallet
EOS New York recommends the eos-voter by @greymass wallet which enables easy voting, transferring, staking/unstaking, account creation, airdrop token loading, and more.
A.
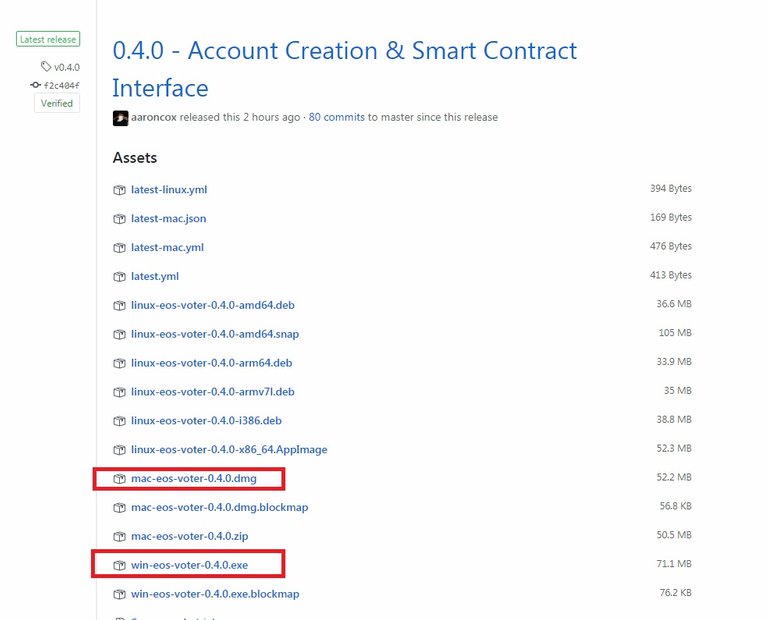
Visit the Official Greymass Github Release for the most up to date version of the application. Locate the download file for your particular operating system.
B.
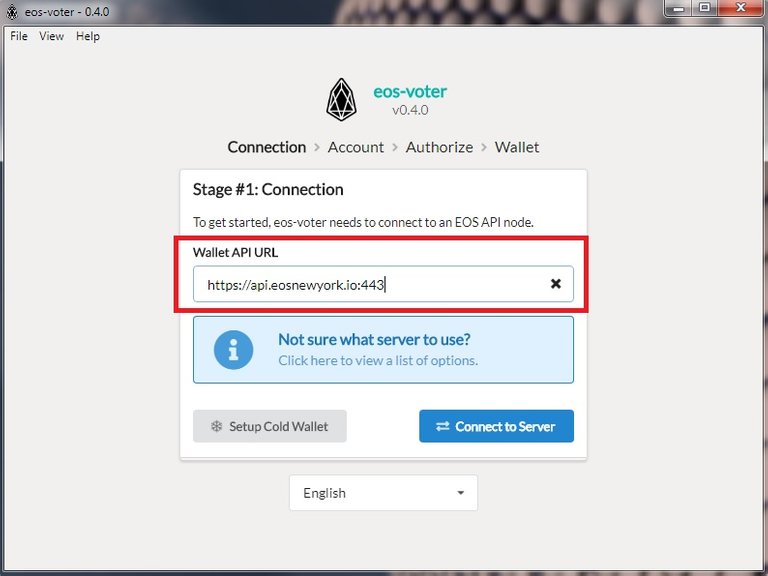
Install and open up the application. The first piece of information you'll need is a secure API endpoint to connect to. Here you can paste in the EOS New York API URL link. https://api.eosnewyork.io:443. Click Connect to Server once completed. For other known API Endpoints see our EOSdocs list created on github.
C.
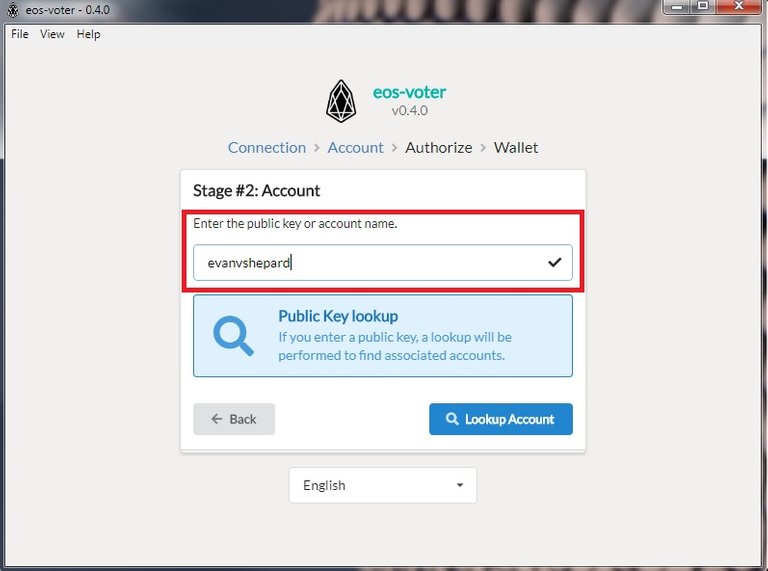
Next, you'll be asked to enter your 12 character EOS account name or EOS public key associated with the account you are wishing to access. Click lookup account when finished.
D.
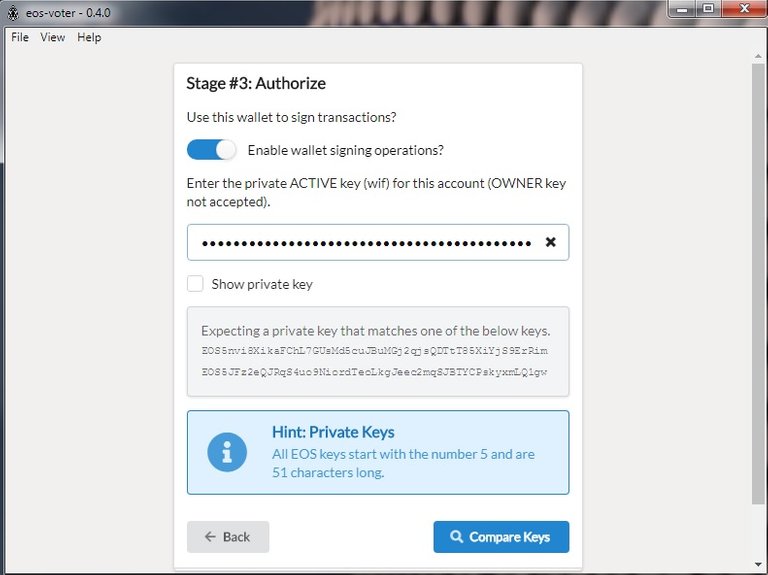
Next, the application will need you to provide your account private key. It is recommended to use your Active Key for logging into all tools and applications. If skipped Step 4 and your Active Key and Owner Key are the same then you will be using your Owner Key. This is not safe and we do not recommend continuing until you have reset your Active Key.
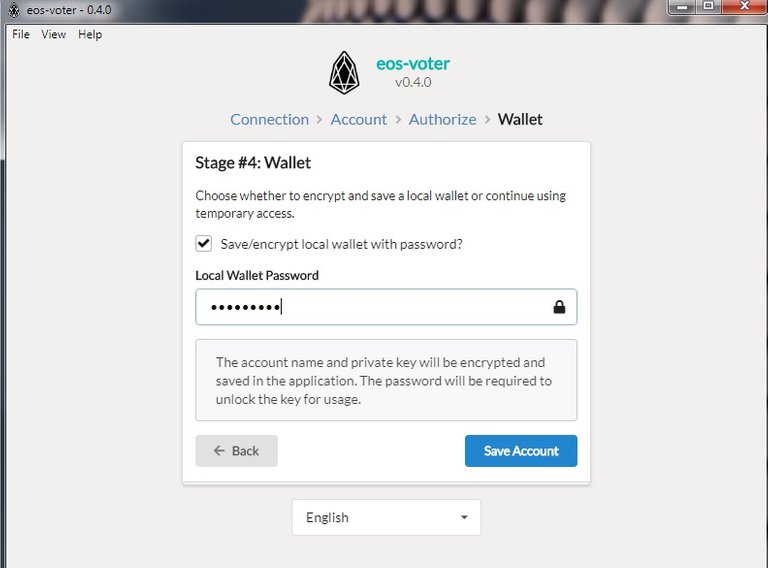
E.
Next, the application will ask you to set a verbal password. This should be a strong password that you won't forget. This verbal password will encrypt your private key locally and will be used to log into your wallet from now on.
If you choose to not set a local verbal password the application will not remember or store your private key and you will need to type your private key in manually each time you want to access and unlock the wallet tool.
Once entered, you will be asked to verify your verbal password one more time and then acknowledge and accept the terms of the EOS constitution to complete the setup process.
You have now set up your EOS-Voter wallet application and may start using it to submit transactions to the EOS blockchain. These transactions may include Voting, Transferring, Staking/Unstaking, Loading Custom Airdrops, etc.
Step Six: Moving Your Tokens.
A.
Head back to your exchange and withdraw your EOS tokens to your new 12 character account name. Deposits into your EOS account do not require a memo. You may wish to send a small amount first to verify everything is working properly before sending a larger amount.
Step Seven: Stake Your Tokens For Security & Voting.
A.
Staking your tokens in exchange for voting or network resources adds a three-day buffer for you to save your tokens from theft should your keys ever be compromised. Once you stake your tokens, there is a 72 hour cooldown period until you're able to transfer them out of your account.
B.
Open the EOS-Voter wallet and enter your password. Click on wallet in the top navigation. On the left-hand side, there will be update staked tokens. Increase the values of each (CPU and Networking) equally until all of your EOS is accounted for.
C.
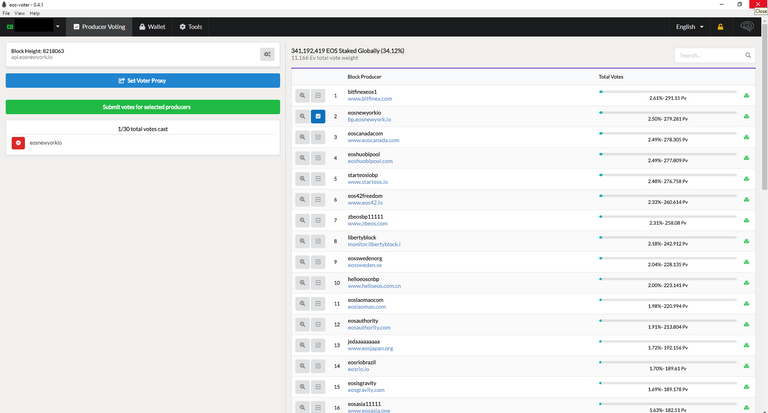
In the top navigation click on Producer voting. Then check up to 30 Block Producers that you wish to vote for. We recommend you exercise all 30 votes as this spreads out the network rewards to enable as many BPs to continue to secure the network as possible. If you have any questions about who to vote for, (please see our guide of recommended producers](https://steemit.com/eos/@eosnewyork/your-vote-matters-5-examples-of-good-block-producers). When you're finished select Submit votes for selected producers.
Step Eight: Set Up Alerts On Your Account.
Now that you're tokens are staked you have a 72-hour window to prevent any theft. But how can you monitor your account without checking it every day? @eosauthority has created a great tool that will notify you via telegram of any account changes that occur.
A.
Open the (EOS Authority Telegram Bot](https://telegram.me/eosauthoritybot) in the Telegram desktop or mobile app.
B.
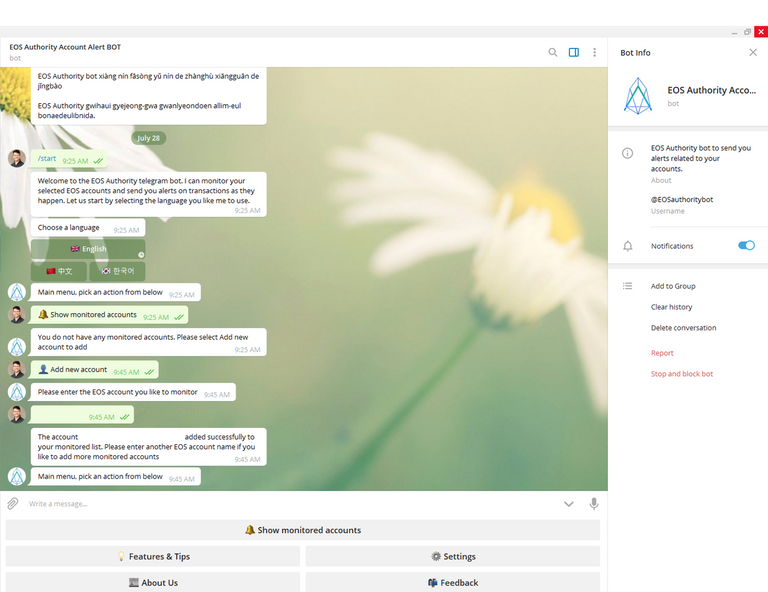
Select start, English, show monitored accounts, add in [youraccount]. Now you will receive a telegram notification any time a change is made to your account whatsoever.
That's it! You're done. You are now a participating member securely engaging with the EOS Mainnet Blockchain. Congratulations!
You should earn 1 million dollars just for this post alone, but that logo is so sexy. Bravo to whomever the designer was.
Yes, That's and not easy to put that up in 1 post as its large post ! : )
Great job!
thanks for the support!
So I’ve done nothing with my EOS tokens that I purchased through the ICO and registered, since the EOS mainet has been launched. Should I follow these steps with my tokens. Thanks for your help.
If you were included in the snapshot you already have an account made for you and your native EOS is waiting for you there. Visit EOS-Authority and type in your registered public ETH address. You will be given your 12 character main net account name. Use that account name and your private EOS key while following the steps above.
Ok. Awesome. Thanks!
No problem. Glad to help.
Great information! Thank you. However this tells us how far away we are from mainstream adoption.
For anyone who has been involved in crypto for awhile, it all seems pretty straightforward. However, before EOS is the next iOS or Android, there are going to need to be a lot less steps, papers, accounts, names, keys, passwords, and potential mistakes that can cause a person to lose everything.
The prospect of financial sovereignty is exciting, but there's something to be said for being able to call Amex if something goes wrong with purchasing or use of an app on Android vs. the idea that any misstep (out of dozens) could cause a person to lose all wealth associated with a particular account.
That being said, EOS is well ahead in terms of ongoing user-friendliness as well as a greater possibility for recovery of funds vs Ethereum where hundreds of millions of dollars have been lost due to complexity in coding.
Awesome guide! It pretty much covers everything people need to know, even for those who were having EOS tokens from the genesis block. Great security tips, kudos for the telegram bot!!
Could you maybe cover in another post how to set a multisig wallet? Thanks!
We will put this in the pipeline.
Great guide. By the way I think you can do everything here with the greymass wallet. create private and public keys. create new account. vote for BPs. Not sure about changing the ownership key?
To create a new account you must first already have an account (i.e. buy RAM). "signupeoseos" is a smart contract that enables users to create accounts without already having one. We don't believe Greymass can do this yet.
True only if you already have your first account. However, after that you can create 2nd account and so on. Hopefully, they will integrate with this contract.
Thank you so much! I was waiting for a detailed guide like this one before moving my funds.
glad to help. visit our telegram if you have questions that need immediate response.
Thanks a lot! Worked like a charm :)
Congratulations @eosnewyork! You received a personal award!
Click here to view your Board
Do not miss the last post from @steemitboard: