Over the past few weeks we have released a number of updates for eos-voter (0.6.x), which enabled support for Ledger devices. We still haven't even official announced these releases (we're still fixing some bugs), but now that users are upgrading we feel it's important to provide a bit of guidance on how to use it.
A more formal announcement of the 0.6.x release is still in the works. For now, all recent releases can be viewed on our github page:
http://github.com/greymass/eos-voter/releases
--
This post is to serve as a guide on how to setup your computer, ledger, and wallet to make use of these new features. These steps are valid as of eos-voter version 0.6.2 (released November of 2018). Newer guides may be available if you are viewing this guide months/years in the future.
Some important notes before you convert to use a Ledger device:
- Not all transaction types can be signed using the Ledger (yet). Support and features will be enabled as time progresses and as the Ledger App (on the device) is updated to support additional actions.
- Make sure you use the most recent version of the EOS Ledger App (v1.1). If you're using v1.0, uninstall, then reinstall to get the new version using Ledger Live.
- Some actions require you to change a setting on the EOS Ledger App itself. This can be done on the device by launching the EOS app, navigating to "Settings", then "Arbitrary Data", and setting the value to "Yes".
- If you have an account already using a Ledger, you can instantly import it into eos-voter either during Stage #2 of the setup (click "Load Existing Accounts from Ledger") or using the "Import Wallet" -> "From Ledger" under Manage Wallets.
- When using an account converted to a Ledger key - you can immediately use any other App (Scatter, FairyWallet, MEOW) without having to change anything. These apps are all cross-compatible as far as we are aware.
- The steps below can also be used in a Cold/Watch wallet setup, with the only difference being that you'll have to save the unsigned transaction and copy it to the Cold Wallet for signing, then broadcast using the Watch Wallet.
1. Install the Ledger Live application on your computer
The Ledger Live application is used to manage your Ledger device. It allows updating of firmware, management of Applications installed on the device, and many other features. Follow the guide below on the official Ledger website to get the application installed.
https://support.ledgerwallet.com/hc/en-us/articles/360006395553-Download-and-install-Ledger-Live
2. Install the EOS App using Ledger Live
After the installation of the Ledger Live app, use the app itself to install the EOS Application (v1.1 is the most current) onto your Ledger device.
https://support.ledgerwallet.com/hc/en-us/articles/360008913653-EOS-EOS-
3. Install the eos-voter ("Greymass Wallet") application on your computer
Next up is installing our wallet, if you don't already have it. Instructions are provided below in the README file on our official GitHub page:
https://github.com/greymass/eos-voter/blob/master/README.md
Make sure you're always downloading from this URL, which should always display https://github.com/greymass/eos-voter in your web browser. There are a few scams and phishing attempts out there, using our name, so always visit the above links to avoid them.
4. Launch eos-voter and import the account
After eos-voter is installed, if you don't have any accounts imported, follow the following steps to import the account you'd like to convert.
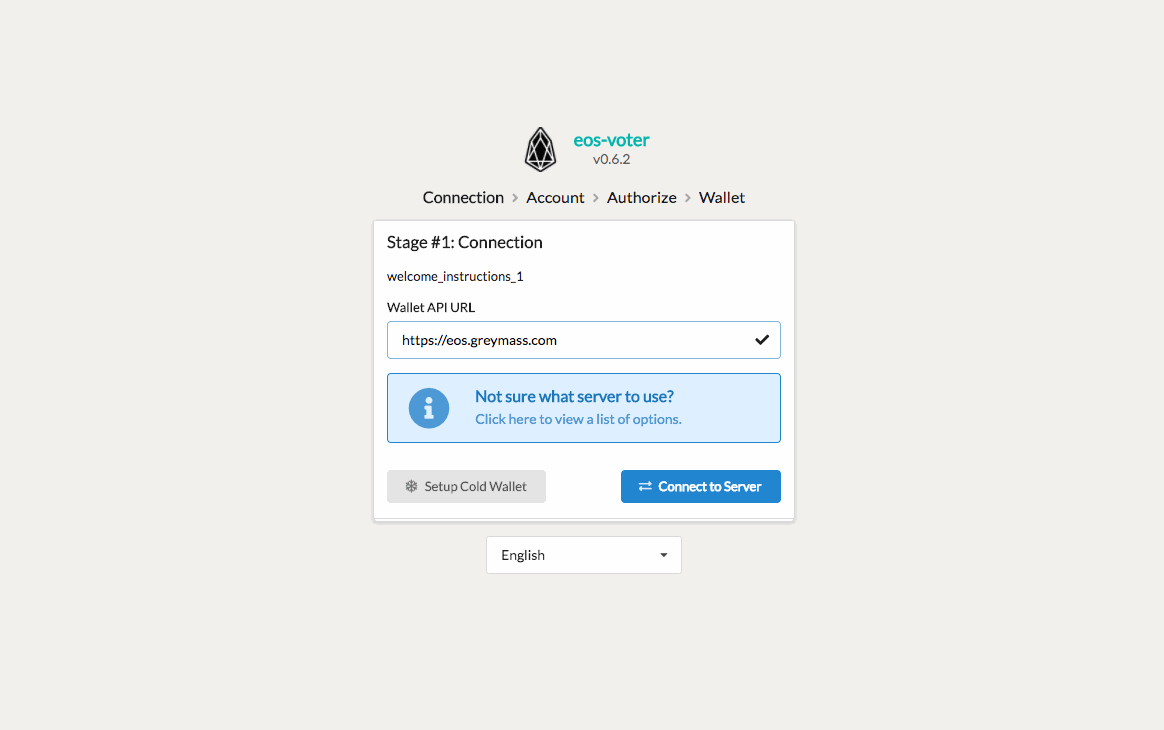
- Connect to the node of your choice (or the default of https://eos.greymass.com).
- Enter the Account Name you wish to use.
- Enter the Private Key of the account, with the permission you want to convert (active for active, owner for owner).
- Enter a local wallet password to encrypt the private key.
GIF showing these steps
5. Starting the Ledger Service (required to use a Ledger device)
With an active/owner account imported, you can now start using the wallet.
Make sure the Ledger is connected via USB to the computer, click the USB Icon in the upper right of the eos-voter application and start the Ledger Service.
- Click the USB icon in the upper right
- Click the "Enable Ledger Support" button and follow the prompts.
- Click "Automatically enable Ledger Support at Launch" if you'd like to automatically skip this step in the future.
GIF showing these steps
The "Ledger Connected" means you're ready to convert any loaded accounts to use the Ledger device.
7. Convert the Hot Wallet to a Ledger Wallet, which will change the account key for the loaded permission.
These steps will allow you to change the public/private keypairs of any loaded account to use the public keys loaded from the Ledger.
NOTE: These steps will change the keys on your account to match the Ledger.
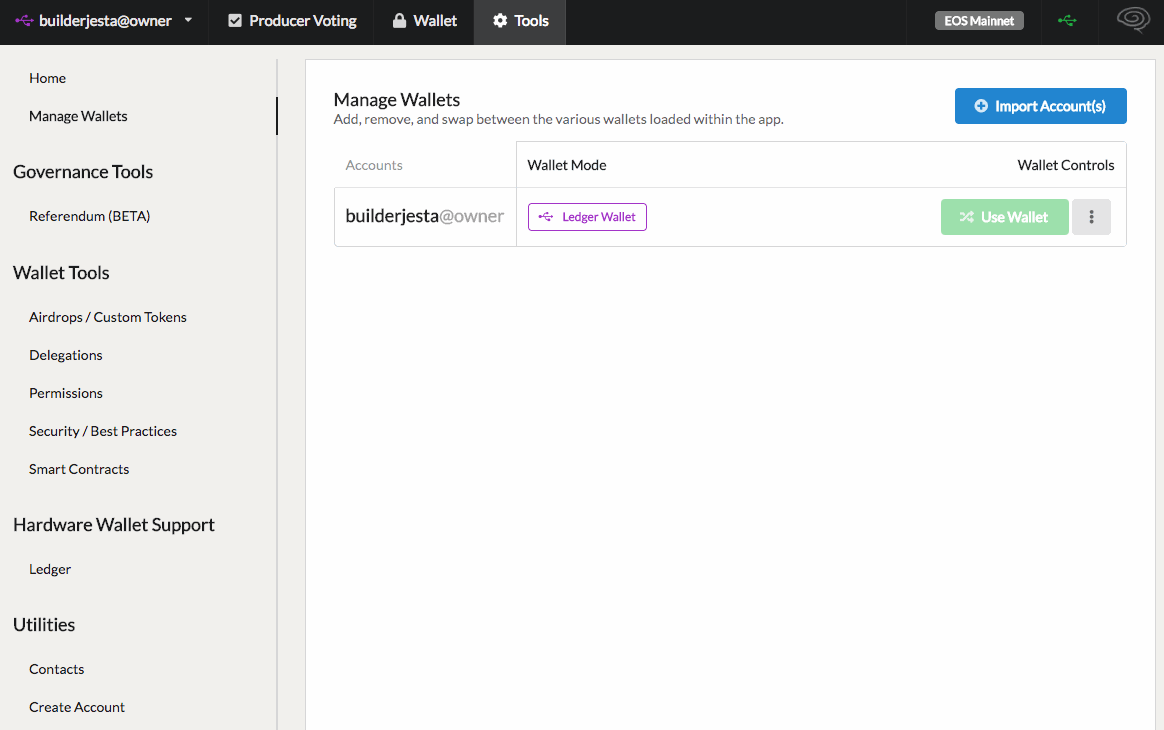
- Click "Tools" in the top menu bar, then "Manage Wallets" in the left column.
- Click the vertical ellipses on the far right of the account you wish to convert (you must "Use" the wallet first, if multiple accounts are loaded).
- A window will appear that displays the account and authority loaded, the current public key, the public key loaded from the ledger, and the path (advanced usage).
- To verify the public key you're changing to, you can click "Verify on Ledger", which will display the same key from "Public Key on Ledger" (in the App) on the Ledger devices screen.
- Click "Modify Account Permissions" to use the key from the ledger.
- Click "Update Permission" to confirm the transaction and update your account, changing it's key to match that of the ledger.
- Every 15 seconds the final screen will compare the keys from the blockchain to that of the Ledger. The "Update Account" button at the bottom forces this refresh. Once it's detected that the key update is completed, you can click "Complete Conversion" in the lower right to convert the local wallet format.
GIF showing these steps

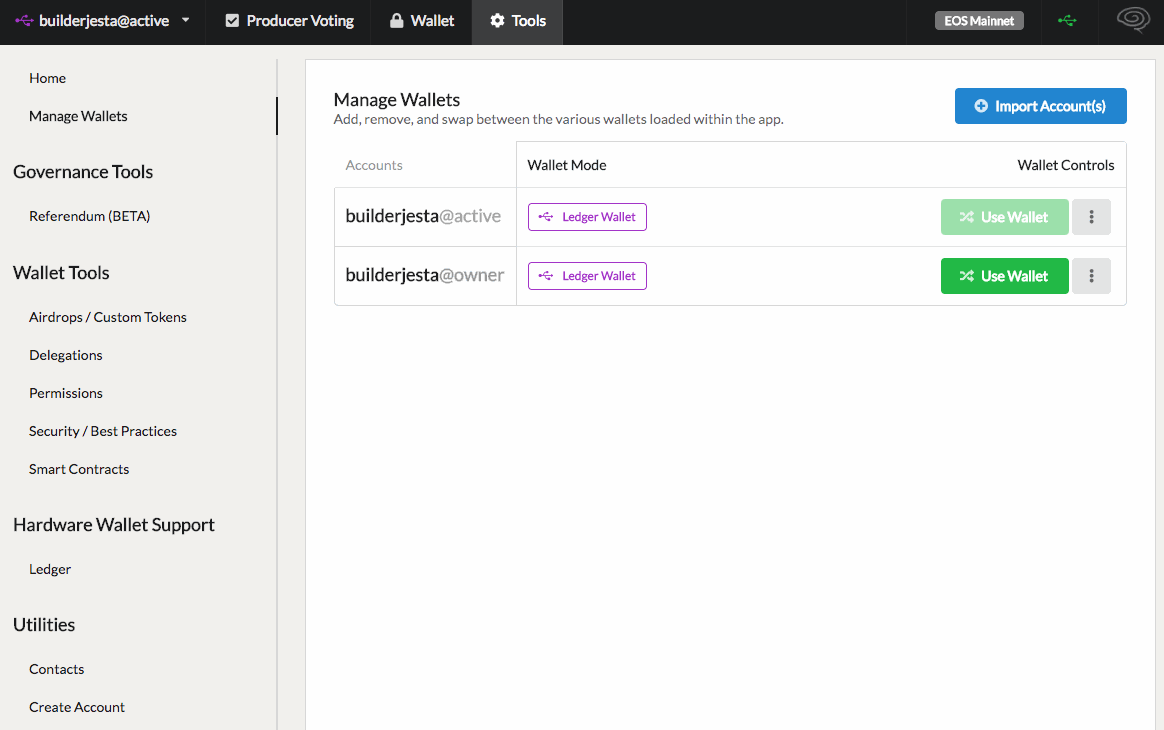
Notice at the end the "Wallet Mode" column of the account now says "Ledger Wallet" - the conversion is complete!
8. [Optional] Convert all permissions
If you'd like to convert the other permissions (in order to secure both the Active & Owner permissions), add another wallet with the permissions yet unchanged.
- Click "Import Account(s)"
- Import the Private Key for the other permission (which may be the same if you have a genesis account).
- "Use" the newly imported wallet, and repeat the steps in #7 above.
- Once completed, you will have 2 wallets, one for active and one for owner, both converted to use the Ledger device.
GIF showing these steps
9. Using the Ledger to sign transactions
Proceed to use the wallet as you normally would, with the only different being now that in order to perform any action, the Ledger needs to be plugged in and transactions need to be approved using the device.
GIF showing these steps
Congratulations!
Your account is now converted to use a Ledger, which offers an increased level of security for your account!
This might be the answer to start selling hardware keys to people for plug an play with your app... have you thought about it? A different way to create an account where the user has to “know” less initially. If you are going into it, let me know. I want some to start with...
Posted using Partiko iOS
We haven't looked into doing anything like that ourselves, but have been open to integrating hardware keys like that as they become available.
so with this, you change your keypair: private and public key of your imported account forever?
another question: can i create another account with eos voter? to have another public and private key, how can i do that?
i have only one account from the genesis, from the beginning of the blockchain and want a new one
Sorry for the really delayed response, it's hard to keep up with comments at times.
Yeah - you are changing your keys on your account. It's "forever" until you decide to change it to something else.
Yes, it's under Tools -> Create Account. It requires an existing account to create (and pay for RAM) for the new account.
Yep! Tools -> Key Generator will let you generate an unlimited number of new key pairs.
so i just follow those steps and its done? create a new account with my existing account and then create a new keypair. Do you have a tutorial i can reach to? im not really tech savy as you may notice haha
Super article - thank you!
If I want to do the reverse and move the account name to a hot wallet - assume I create new key pair then change permissions for that account to the new public key?
Do you have an interface working for the Ledger Nano X yet? I get a spinning wheel that never ends when trying to connect a Nano X to Eos voter.
It never gets past the above condition.
Sorry for the late reply - our rebranded/replacement wallet for eos-voter (called Anchor) should resolve this issue. I think what happened is the USB connection library in eos-voter is out of date and all of our effort has gone into Anchor, which is now causing the older versions of eos-voter to not connect.
The latest version is 1.0.0-RC6 and can be found on our github page:
https://github.com/greymass/eos-voter/releases/tag/v1.0.0-rc6
It's a brand new interface with some familiar features. If you need more support, feel free to join us in our telegram channel: https://t.me/greymass
Yes, I tried Anchor a couple of weeks ago but it won't recognize my Trezor Model T. Did you only support Trezor One?