As part of my own education process, I wanted to create my own Ethereum token that would be viable to sell on an exchange. ICOs are all the rage these days, and I see them as a valuable avenue to raising funds for important projects in the world.
Thus The Most Private Coin Ever was born.
Since I’ve launched the coin, I’ve gotten a lot of messages from people asking me how they can do the same. They’ve wanted to create their own token for fun, to learn, or for a business that they’re starting…
…but they don’t know where to start.
The challenge with programming in Ethereum is that their aren’t a ton of resources out there for how to do things. It’s still pretty new, with limited documentation and Stack Overflow responses.
And so in this tutorial, I’m going to make it simple.
I’m going to show you how to create your own Ethereum Token in as little as one hour, so you can use it for your own projects.
This token will be a standard ERC20 token, meaning you’ll set a fixed amount to be created and won’t have any fancy rules. I'll also show you how to get it verified so that it's uber legit.
Let’s get started.
Step 1: Decide what you want your token to be
In order to create an ERC20 token, you need the following:
- The Token’s Name
- The Token’s Symbol
- The Token’s Decimal Places
- The Number of Tokens in Circulation
For The Most Private Coin Ever , I chose:
- Name: The Most Private Coin Ever
- Symbol: ???
- Decimal Places: 0
- Amount of Tokens in Circulation: 100,000
The decimal places is where things can get tricky. Most tokens have 18 decimal places, meaning that you can have up to .0000000000000000001 tokens.
When creating the token, you’ll need to be aware of what decimal places you’d like and how it fits into the larger picture of your project.
For me, I wanted to keep it simple and wanted people to either have a token, or not. Nothing in between. So I chose 0. But you could choose 1 if you wanted people to have half a token, or 18 if you wanted it to be ‘standard’.
Step 2: Code the Contract
Here is a contract that you can essentially "Copy/Paste" to create your ERC20 token. Shoutout to TokenFactory for the source code.
pragma solidity ^0.4.4;

contract Token {

    /// @return total amount of tokens
    function totalSupply() constant returns (uint256 supply) {}

    /// @param _owner The address from which the balance will be retrieved
    /// @return The balance
    function balanceOf(address _owner) constant returns (uint256 balance) {}

    /// @notice send `_value` token to `_to` from `msg.sender`
    /// @param _to The address of the recipient
    /// @param _value The amount of token to be transferred
    /// @return Whether the transfer was successful or not
    function transfer(address _to, uint256 _value) returns (bool success) {}

    /// @notice send `_value` token to `_to` from `_from` on the condition it is approved by `_from`
    /// @param _from The address of the sender
    /// @param _to The address of the recipient
    /// @param _value The amount of token to be transferred
    /// @return Whether the transfer was successful or not
    function transferFrom(address _from, address _to, uint256 _value) returns (bool success) {}

    /// @notice `msg.sender` approves `_addr` to spend `_value` tokens
    /// @param _spender The address of the account able to transfer the tokens
    /// @param _value The amount of wei to be approved for transfer
    /// @return Whether the approval was successful or not
    function approve(address _spender, uint256 _value) returns (bool success) {}

    /// @param _owner The address of the account owning tokens
    /// @param _spender The address of the account able to transfer the tokens
    /// @return Amount of remaining tokens allowed to spent
    function allowance(address _owner, address _spender) constant returns (uint256 remaining) {}

    event Transfer(address indexed _from, address indexed _to, uint256 _value);
    event Approval(address indexed _owner, address indexed _spender, uint256 _value);

}


contract StandardToken is Token {

    function transfer(address _to, uint256 _value) returns (bool success) {
        //Default assumes totalSupply can't be over max (2^256 - 1).
        //If your token leaves out totalSupply and can issue more tokens as time goes on, you need to check if it doesn't wrap.
        //Replace the if with this one instead.
        //if (balances[msg.sender] >= _value && balances[_to] + _value > balances[_to]) {
        if (balances[msg.sender] >= _value && _value > 0) {
            balances[msg.sender] -= _value;
            balances[_to] += _value;
            Transfer(msg.sender, _to, _value);
            return true;
        } else { return false; }
    }

    function transferFrom(address _from, address _to, uint256 _value) returns (bool success) {
        //same as above. Replace this line with the following if you want to protect against wrapping uints.
        //if (balances[_from] >= _value && allowed[_from][msg.sender] >= _value && balances[_to] + _value > balances[_to]) {
        if (balances[_from] >= _value && allowed[_from][msg.sender] >= _value && _value > 0) {
            balances[_to] += _value;
            balances[_from] -= _value;
            allowed[_from][msg.sender] -= _value;
            Transfer(_from, _to, _value);
            return true;
        } else { return false; }
    }

    function balanceOf(address _owner) constant returns (uint256 balance) {
        return balances[_owner];
    }

    function approve(address _spender, uint256 _value) returns (bool success) {
        allowed[msg.sender][_spender] = _value;
        Approval(msg.sender, _spender, _value);
        return true;
    }

    function allowance(address _owner, address _spender) constant returns (uint256 remaining) {
      return allowed[_owner][_spender];
    }

    mapping (address => uint256) balances;
    mapping (address => mapping (address => uint256)) allowed;
    uint256 public totalSupply;
}


//name this contract whatever you'd like
contract ERC20Token is StandardToken {

    function () {
        //if ether is sent to this address, send it back.
        throw;
    }

    /* Public variables of the token */

    /*
    NOTE:
    The following variables are OPTIONAL vanities. One does not have to include them.
    They allow one to customise the token contract & in no way influences the core functionality.
    Some wallets/interfaces might not even bother to look at this information.
    */
    string public name;                   //fancy name: eg Simon Bucks
    uint8 public decimals;                //How many decimals to show. ie. There could 1000 base units with 3 decimals. Meaning 0.980 SBX = 980 base units. It's like comparing 1 wei to 1 ether.
    string public symbol;                 //An identifier: eg SBX
    string public version = 'H1.0';       //human 0.1 standard. Just an arbitrary versioning scheme.

//
// CHANGE THESE VALUES FOR YOUR TOKEN
//

//make sure this function name matches the contract name above. So if you're token is called TutorialToken, make sure the //contract name above is also TutorialToken instead of ERC20Token

    function ERC20Token(
        ) {
        balances[msg.sender] = NUMBER_OF_TOKENS_HERE;               // Give the creator all initial tokens (100000 for example)
        totalSupply = NUMBER_OF_TOKENS_HERE;                        // Update total supply (100000 for example)
        name = "NAME OF YOUR TOKEN HERE";                                   // Set the name for display purposes
        decimals = 0;                            // Amount of decimals for display purposes
        symbol = "SYM";                               // Set the symbol for display purposes
    }

    /* Approves and then calls the receiving contract */
    function approveAndCall(address _spender, uint256 _value, bytes _extraData) returns (bool success) {
        allowed[msg.sender][_spender] = _value;
        Approval(msg.sender, _spender, _value);

        //call the receiveApproval function on the contract you want to be notified. This crafts the function signature manually so one doesn't have to include a contract in here just for this.
        //receiveApproval(address _from, uint256 _value, address _tokenContract, bytes _extraData)
        //it is assumed that when does this that the call *should* succeed, otherwise one would use vanilla approve instead.
        if(!_spender.call(bytes4(bytes32(sha3("receiveApproval(address,uint256,address,bytes)"))), msg.sender, _value, this, _extraData)) { throw; }
        return true;
    }
}
Throw this into your favorite text editor (Sublime is my personal favorite).
You’re going to want to replace everything in the area where it says “CHANGE THESE VARIABLES FOR YOUR TOKEN”.
So that means, change:
- The token name
- The token symbol (I'd go no more than 4 characters here)
- The token decimal places
- How much you as the owner want to start off with
- The amount of tokens in circulation (to keep things basic, make this is the same amount as the owner supply)
Some things to keep in mind:
- The supply that you set for the token is correlated to the amount of decimal places that you set.
For example, if you want a token that has 0 decimal places to have 100 tokens, then the supply would be 100.
But if you have a token with 18 decimal places and you want 100 of them, then the supply would be 100000000000000000000 (18 zeros added to the amount).
- You set the amount of tokens you receive as the creator of the contract.
That’s what this line of code is:
balances[msg.sender] = NUMBER_OF_TOKENS_HERE;
Whatever you set here will be sent to the ETH wallet of wherever you deploy the contract. We’ll get to that in a few.
But for now just set this equal to the supply so that you receive all the tokens. If you’re wanting to be more advanced with the token logic, you could set it with different rules, like different founders of your projects would receive different amounts or something like that.
Once you have all the variables in, it’s now time to deploy it to the blockchain and test it.
Step 3: Test The Token on The TestNet
Next we’re going to deploy the contract to the Test Net to see if it works. It sucks to deploy a contract to the MainNet, pay for it, and then watch it fail.
I may have done that while creating my own token….so heed the warning.
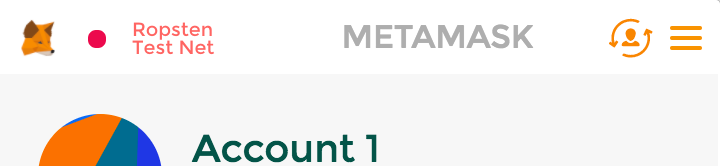
First, if you don’t have it already, download MetaMask. They have an easy-to-use interface to test this.
Once you’ve installed MetaMask, make sure that you’re logged in and setup on the Ropsten test network. If you click in the top left where it says ‘Main Ethereum Network’ you can change it to Ropsten.
To confirm, the top of your MetaMask window should look like this:
This Wallet is going to be the ‘Owner’ of the contract, so don’t lose this wallet! If you’d like it not to be Metamask, you can use Mist or MyEtherWallet to create contracts as well. I recommend using MM for simplicity, and you can always export your private key to MyEtherWallet for usage later.
Now head to the Solidity Remix Compiler - it’s an online compiler that allows you to publish the Smart Contract straight to the blockchain.
Copy/Paste the source of the contract you just modified into the main window. It'll look something like this:

Now, go to settings on the right and select the latest release compiler version (NOT nightly), as well as unchecking ‘Enable Optimization’.
So it should look something like this:
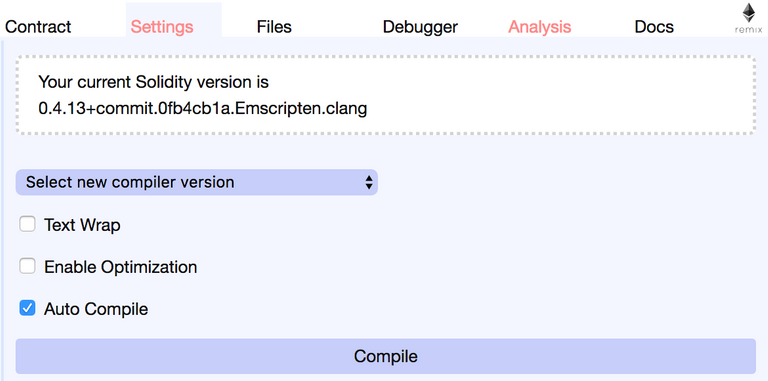
Keep note of the current Solidity version in the compiler. We’ll need that later to verify the contract source.
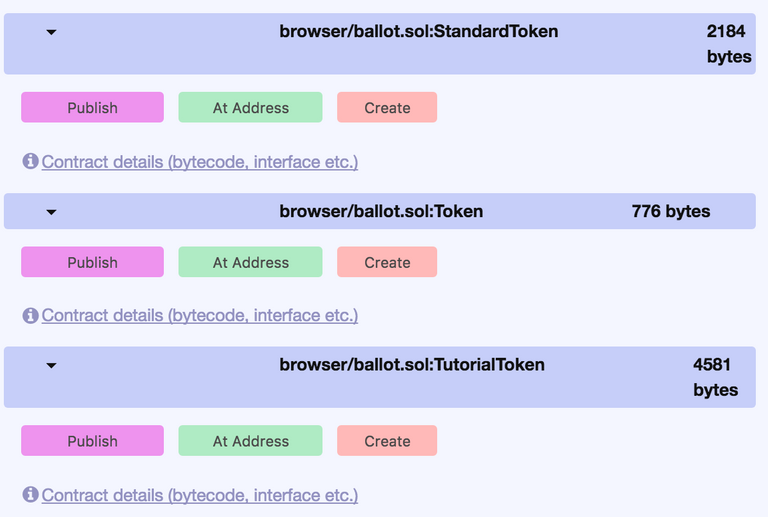
Now go back to the Contract tab and hit ‘Create’ under the name of the Token function that you created.
So you’d hit ‘Create’ under ‘TutorialToken’.
What will happen is MetaMask will pop up asking you to hit ‘Submit’ to pay for the transaction.
Remember, this is the Ropsten test net, so it’s not real Ether. You can double check to make sure you’re on the test network in MetaMask before you hit submit just to be sure.
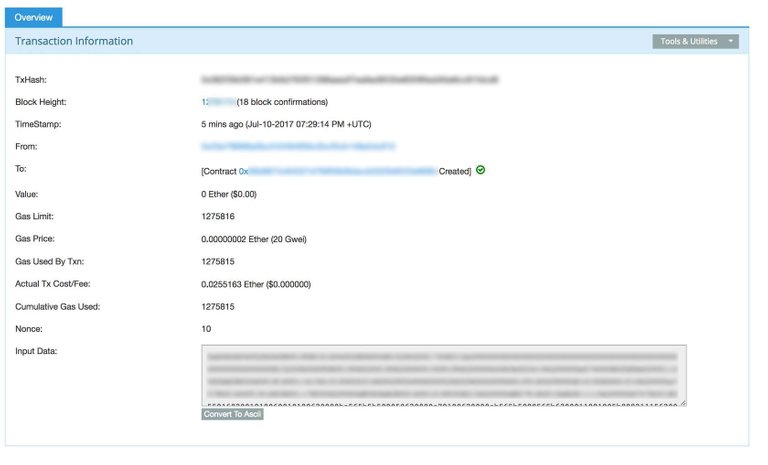
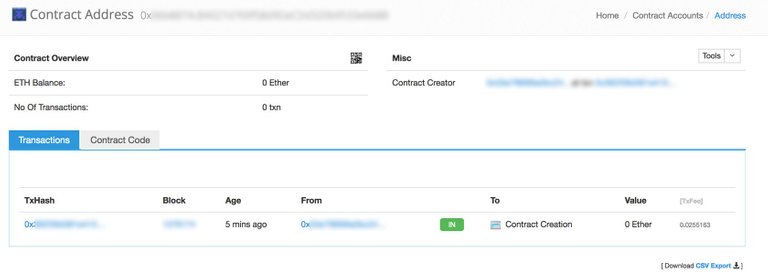
When you hit Submit, it’ll say ‘Contract Pending’ in MetaMask. When it’s ready, click the ‘Date’ and it’ll bring up the transaction in EtherScan. Like this:
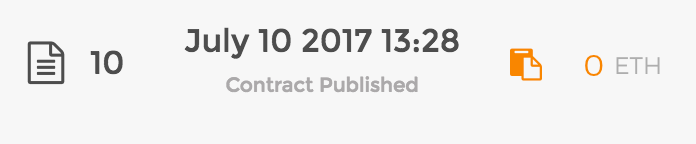
If you click the date, it’ll bring up the following screen:
If this process worked, it’s now time to verify the source code.
If not, you’ll want to go back to the code and modify the source to get it to work.
I can’t say exactly what that’d look like, but this is where having a “programmers mindset” comes in. A lot of time there’s unexpected bugs that can’t be predicted until you just do it.
Step 3.5. Watch The Custom Token
Now let’s see if it actually created the tokens and sent them to me.
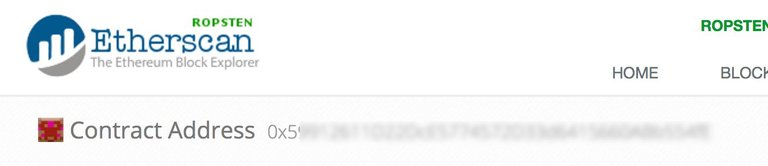
Copy the Contract Address that’s listed in the Transaction information (see screenshot above).
In this case, for me, it’s 0x5xxxxxxxxxxxxxxxx.
I’m going to add that to MetaMask ‘Tokens’ tab:
When I click the “+” button, I can paste it in there and it’ll automatically insert the information of the token, like so:
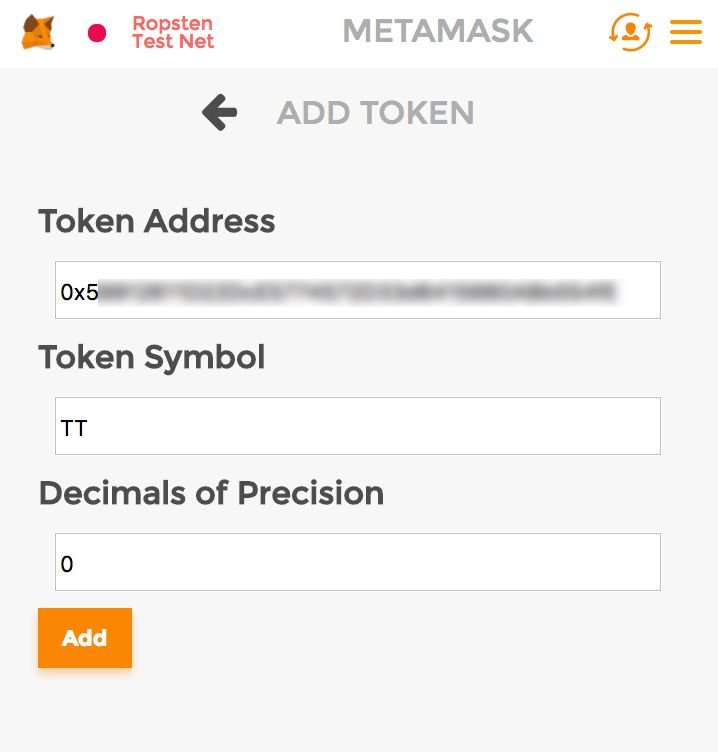
Let’s hit ‘Add’.
Sweet! It says I have the 100 tokens that I created - it worked!
Now I can send those tokens, or sell them on a market if I decide to do so.
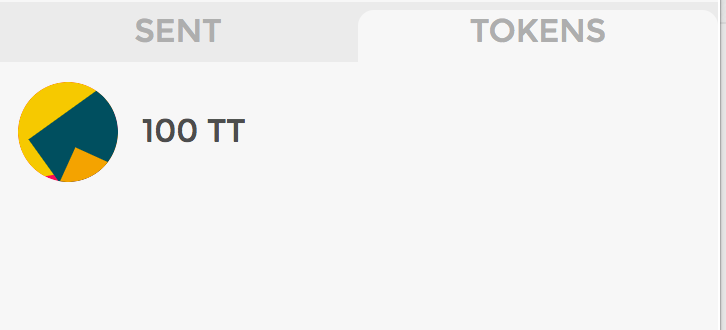
Boo ya!
Step 4. Verify the Source Code
This is going to be important for various reasons, mainly verifying the validity of your token to the public.
It doesn’t technically matter, and your token will still be usable if you don’t do it, but it’s good practice to verify it so people know that you’re not doing anything shady.
When you’re on the Transaction screen from the previous step, click where it says [Contract xxxxxx Created] in the To: field. That’s the Contract we just published.
Then click the ‘Contract Code’ tab.
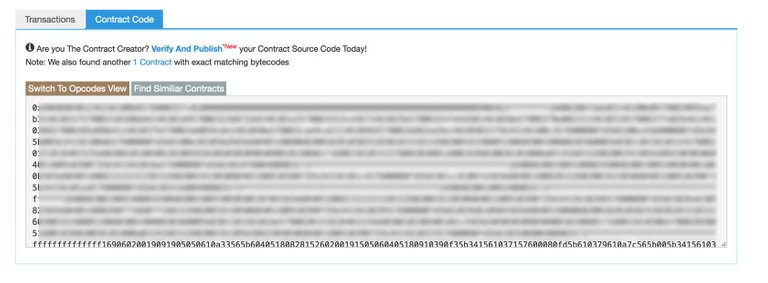
Hit ‘Verify and Publish’. That’ll bring you to this screen:
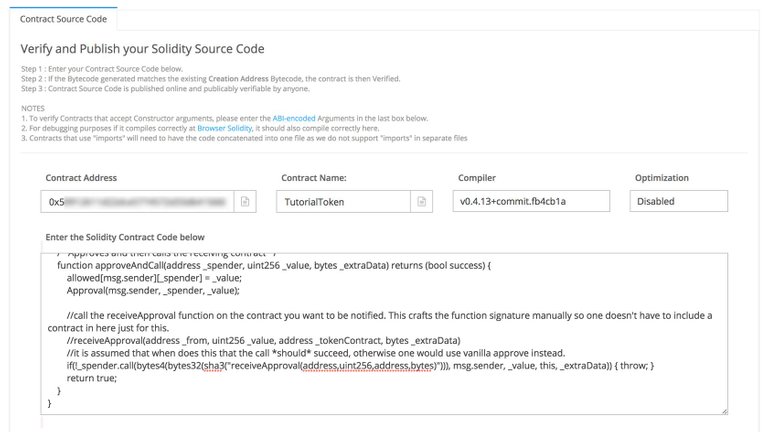
Here’s where you NEED to have the right settings.
The Contract Address will already be filled in.
For Contract Name, make sure to put the name of the function that you modified for your custom token. The default in the code I gave you is ERC20Token, but if you renamed it, make sure you put that.
I renamed mine ‘TutorialToken’ for this tutorial, so I put that.
For Compiler, select the SAME compiler you used in the Solidity Compiler. Otherwise you will not be able to verify your source code!
Make sure Optimization is disabled as well.
Then Copy/Paste the code from the compiler right into the Contract Code field (the big one).
Hit submit.
If you did the steps right, you’ll get something like this:

That means it was verified. Woot!
If you go to the Contract address page, you’ll see that ‘Contract Source’ says Yes and says that it’s Verified. Like this:

If not, double check your steps, or make a comment in this thread and we’ll see what went wrong.
Step 5. Get it on The Main Net
Now that everything’s working, it’s time to deploy it on the MainNet and let other people use it.
This part is simple.
Just do steps 3 & 4, but instead of being connected to the Ropsten Test Network, you want to be connected to the MainNet. Make sure your MetaMask account is in Mainnet mode.

You’ll need to fund your contract with real Ether to do this. This cost me ~$30 USD when I did this for The Most Private Coin Ever
Step 6. Get it Verified on Etherscan
This step is not required, but it adds to the validity of your token if you get it verified by them.
You can see how my token is verified by how it has the logo and it doesn't say "UNVERIFIED" next to it.
To do this you’ll need to go to the Etherscan Contact Us Page) and send them an e-mail with the following information:
1. Ensure that you token contract source code has been verified

2. Provide us with your Official Site URL:

3. Contract Address:

4. Link to download a 28x28png icon logo:
So yes, you'll need to have a website with a stated purpose of the token.
They’ll get back to you and let you know if they’ll verify it or not. Remember, Etherscan is a centralized service so it's very possible that they will not verify your token if they don't deem it worthy.
Congrats! & Next Steps
You now have a token on the ETH MainNet that other people can use. It's now primed to be sent to others and received.
To buy and sell, you'll need to get your token listed on an exchange. But that's a tutorial for another day :)
For now, enjoy your newly created (and personal) ERC20 & Verified Ethereum Token!!
Follow me at @maxnachamkin to get notified when new tutorials and reports come out.
To freedom,
Max
EDIT: It's been 3 years since the original post - it's likely that the contract code has updated so that will no longer work. If you'd like to create your own token with MyEtherWallet, the same process will still work you just need to find that new contract code. Since then I've heard about some tools that do this for you - Guarda & WAVES are two that I've heard of (but haven't tried).
Great info mate. :)
Even though this is pretty straightforward a video tutorial would be awesome to cover some more advance stuff as well as how get the token listed on exchanges.
Hey @olsonmino, I've thought about video tutorials for this but the challenge comes with security of showing addresses, private keys, etc. Not sure how to handle that one in a simple way in the video format yet.
Gotcha, appreciate the feedback and suggestions.
That's not a problem at all. Simply use a dummy address and private key. Anyway, thanks for this tutorial. Although I would like to request a section where each and every line on the pre-written code that needs to be changed is highlighted or mentioned. I am trying to do my own token on a test net. For knowledge purposes.
@maxnachamkim thnks for sharing. I really appreciate that you did this for the community. I hope to launch my own ERC20 token soon and this will definitely allow for that. Thanks a million. When I launch I will make sure to send you some tokens
can u send me too?thx
And me??? lol
That sounds funny.
thanks for the heads up, im going to try this asap... I have a idea for a coin that with revolutionise the world but cant say more than that ...cheers upvoted and resteemed
Nice, best of luck with your project!
Cheers ^_^
Good job, with all the info.
Thanks for this guide, very helpful. Your websites is offline i see?
Does ethereum has a manual for this? They should make it more user friendly.
Hi, what could be the problem be when verifying and publishing in Ropsten test ntw I get this error: Error! Unable to generate Contract ByteCode and ABI.
I tried to follow the instructions carefully, but I am not an experienced programmer so.. will need your help, folks.
This post was excellent - I don't know why it didn't get more attention when you published it.
I know that the article was released a year ago, but spending an hour on deployment is too much. It’s good that on a MyWish service it will take a couple of minutes to create a token. https://mywish.io/eth-token
Thanks! Fantastic! A+++++
My pleasure @tomm. And thank you sir.
very good tutorial.
I had no idea it was this straightforward. Thanks for your thorough explanation @MaxNachamkin.
TheMostPrivateCoinEver.com is hilarious.
My pleasure @mikeslavin. It's pretty straightforward for people that have some sort of tech background. It's a basic token, but my hope is that it inspires people to launch their own token and start projects.
Haha cheers ^_^
Nice post bro....this is really helpful
Happy to hear that @solextin!
It looks quite technical but alas, this should be doable for most people. $30 for creating the tokens is not the worst either.
I made 'tokens' on the Byteball network which is a bit more straight forward but has a few issues. Devs need to solve this before it is usable for Byteball users.
Anyway, good to see that knowledge is spread. I am already thinking about the possible applications when you're able to create your own tokens on the spot.
Totally.
Interesting. I haven't heard of Byteball, I'll take a look.
Agreed.
I am curious to see if ICO's will evolve into a new form of GoFundMe campaigns. Appreciate the tutorial, this is great!
How did you cover yourself from a legal perspective with The Most Private Coin Ever? What is to prevent someone from buying into the coin not knowing what it is, and then upon realizing exactly what they purchased coming after you for "damages". I know you are explicit on your site, but it seems like a gray area to me...
That's a legitimate concern. And one that I don't know all answers to - I agree it's a gray zone. I'm not making any false promises, so I'm not concerned about that specifically.
That being said I'm keeping an eye on it and doing what I can as more awareness comes into do what I need to do to keep it in good legal standard.
There already exist crypto crowdfunding website's. Doing an ICO is more like doing an IPO without all the paperwork and regulations.
Awesome! Thanx for sharing! resteemed and upvoted + followed :)
My pleasure. Right on.
Hello Max, Great Guide! On the final step to verify the contract, I get a few errors regarding the name. Any ideas?
Sorry! The Compiled Contract ByteCode for 'CoinMarkertAlert' does NOT match the Contract Creation Code for [0xb623864cc5ea683ecab9f41a822a49901d03978d].
Contract name(s) found: 'CoinMarketAlert' , 'StandardToken' , 'Token'
Unable to Verify Contract at this point time.
Hey rodw, make sure that your compiler in the online browser is the same as the one that's being tested when you're trying to verify the contract.
Otherwise the bytecode won't be the same and it won't verify.
Ok thanks. I'll try it again
This is an awesome article, I've been researching this topic, thanks so much for sharing all of this @maxnachamkin !
I've just now joined Steemit, and I'm researching for creating my own ERC20 token for a new project that I'll be launch, very helpful indeed.
Happy to help! Good luck with your project :)
Please make the next post about getting the token listed in an exchange, I'm involved with a couple new tokens and this is hard and expensive.
How much ether does it normally costs to create a custom token?
Amount of Ether would depend on spot price. It cost me around $30 USD.
Does this depend also on the number of tokens you are creating? Also does it need to be on an exchange in order to use it? For instance, in my case it would be a coin to be used for trade between people in our little community. For example, one person sells coffee and someone else sells rice. Can we use this token as a kind of money to trade between them? Would I need to make a custom wallet for that or can I use any wallet the uses ETH? If I wanted to have custom aspects to the wallet can I build on top of the ETH wallet or is it something that needs to start from scratch?
Good article. Following.
Thank you. Cheers.
Does the example code for the contract work anymore? I edit the names and get errors when trying to verify. This outline does not show where to edit these other spots
Contract name(s) found: 'ERIC' , 'StandardToken' , 'Token'
I got it to work. had to turn off optimization on the confirming
Nice :)
This is great. Thanks for taking the time to show people how easy and quick it is to make a token. People seem to think it takes a lot of funding to get an ICO going and throw endless amounts of funds at companies just because they taken an hour of there time to follow the steps you just explained.
My pleasure.
It's important to note that I wouldn't use this contract for an ICO - it's very basic, and doesn't have any rules attached to it that a legitimate ICO would most likely require.
Maybe a tutorial for that part now?
Hi there. Thanks for the great tutorial. I'm looking into creating my own coin as well and I am wondering how to incorporate values/rules at some point. Can these be added later or do they have to be encoded from the very start? I'm a noob and just wondering about the future viability of the coin I'd like to make. Thanks again!
It depends on what the rules and values are and how they play into your bigger picture strategy. You could always create the token and then put them into another contract with rules, though.
Cheers!
Freaking awesome. Thanks man. Upvoted and followed
Cheers!
One of the best posts on Steemit and only $2.55 payout shows the shallow nature of today's social media. Thanks for posting this information.
Thanks bangkokhearts, and my pleasure.
Hi please can you make or link me to a post on how to create an ico from scratch
Honestly I agree. Wow. This is a GREAT post! It is exactly what I have been looking for for weeks. I still have gaping holes in my knowledge here but this goes a long way to giving me some understanding.
Thank you for writing this up
You're welcome.
very useful info! will try to create one
Nice ^_^
Thank you for the great content. Made my first token
Boo ya, nice astroboysoup!!
how? i get errors
Great read mate. Thanks so much for this!
My pleasure!!
Hey, good tutorial! But I have a problem... I create the contract in testnet, It says Contract created, but tokens don't show up in my address when I add it to MetaMask... I dont know what to do
Same problem, any idea?¿
Same problem, any idea?
Did you add the Contract Address for the token in Test Net to your Custom Token list in MetaMask?
Thanks for the hard work there is no one explained simply like you did
one question : what fee needs for a 150m total supply token project instead of 30$ for your work .. regards
No prob.
I'm not sure, it would depend on the gas price. Try publishing it to the MainNet and it'll give you the exact number.
Well explained! Upvoted! I wonder if there are further costs other than the initial $30 for the coin to be used on the network..
Hi there, the cost isn't a flat fee that's static. It depends on the gas price at the current moment.
NICE ARTICLE
Thanks.
Hi, I don't know if you're still monitoring this article.
I found it really helpful, however I hit a snag; when I copied your modified code into the solidity compiler, I just got a bunch of errors on the right. The interface looks different as well, and I don't see any 'create' button.
Do you have any tips for me?
I downloaded Metamask as well..
Thanks
Cg
Hi cryptogee,
Are they errors on the right (in red?) or are they just warnings? I get a lot of warnings when I compile with this code but it never seems to be an issue.
As far as the UI - it looks like it's changed quite a bit. Try going to the 'Run' tab and hitting 'Create' on the function.
If that doesn't work I'll have to play around a bit to see how they changed it.
HI Max,
Thanks for the reply, I really appreciate it; since I posted that question I got a little bit further; I realised the error was in the Pragma Solidity version, in your code it was .4 and it has since been upgraded to .18.
So as soon as I changed that it worked; however my latest problem is, the coin seems to publish fine; and gives me an address, however I can't get it to show up in my wallet when I try and add the coin to Metamask.
Any ideas?
Thanks again.
Cg
If this is still an issue and the coin gave a contract address, audit the contract on EtherScan to see if the coins are in there.
If they are and it’s still not showing up in MetaMask I’d contact their support, if they have it.
Hi Maxnachamkin - I too got these errors and it seemed a bit different. I am a newb but will soldier on regardless as my job depends on it - lol - Thanks for taking the time to do this
Thanks for this tutorial! I have just created my first token! I am not a developer so this was very encouraging to be able to create an ERC20 token so easily! Guess it's time for my ICO!
Hi Richard, nice dude!!!
Haha right??
oh man why can I only upvote this once ??
u r a ****ing star dude!!!!!!
great post :)
Haha thanks dude!!!
where i have to paste the code of contarct?
in my pc ethereum wallet and geth is not running properly. when i run the applications it always show an error??
please help bro!!
thanks!
You don't need Ethereum Wallet or Geth. Just MetaMask, then use the online solidity browser as I talked about in the tutorial.
wow..that's amazing...i think now there are so many different #ICO's based on #etherum that it's so hard to judge which ones will survive and which ones will die quickly...thanks for sharing the info
Indeed. My pleasure ecoboss.
This looks interesting. I would love to test it. Time to launch sublime.
Do it.
Thank you for sharing this all,
I've followed all what is mentioned here, all things are going well on test but at the time of add token on Ropsten Test Net I'm failed, It's not responding anything there
Thanks for rhe tutorial helped me alot
Thank you Max, this was of great help.
Do you know how to change the icon that is assigned to the token?
You need to fill out a form on etherescan and submit icon along with a bunch of other information.
Thanks!
Thanks a lot for the tutorial Max! However MM ask me to pay to confirm the transaction even in on the Ropsten test net and it is very frustrating... How can I fix this?
You will have to pay to publish the contract. Ropsten ETH isn’t real ETH though. If you don’t have Ropsten ETH look up the Ropsten faucet to get some.
Hi Max, thanks for your post, it's ****ing awesome. I ran into some issues with step 3. After I select my Solidity Version, I go to Run and when I click create button nothing is happening. It looks like it was redesigned, so I am not sure what to do?
Please help, thanks a lot !
Yeah, the redesign kind of made it a bit more confusing. Have you figured this out yet?
I’d love to update this tutorial at some point soon.
thanks a lot for this nice how-to!!!
when i want to Create the Token for the Main Network, i got the following error: "Gateway timeout. The request took too long to process. This can happen when querying logs over too wide a block range." can i do anything to short the block range?
ok, i need more ETH;) gas limit 1251480 and gas price 90 gwei means transaction fee from 0.112633 ETH...
Interesting. Did you get this handled? I’ve never seen that error before, and that transaction fee is quite high.
Hi, I hope someone can assist me. I get the response from Remix solidity that states as follows: creation of Awesome errored: Error: URI Too Long.
How do I resolve this?
Have you figured this out? Post some more specifics, like which line of code it’s throwing the error on.
@maxnachamkin,
Awesome guide!
For educational purposes, what would be the drawbacks to walking a group through the guide that the Ethereum Foundation provides versus your guide? If you've had a chance to check it out, what essential items do you feel they skip and how would it impact the outcome of the token?
Guide referenced: https://www.ethereum.org/token
Warmest Regards
Thanks, I appreciate that.
I don’t know about drawbacks. I’ve seen that tutorial and it felt like it had things in there that I didn’t need initially (like freezing assets). I just wanted to learn how to create a token, in reality, with standards (ERC20) quickly. I don’t think that tutorial is for an ERC20 token but I could be mistaken.
Thanks for adding this to the community. This was exactly what I was searching for and to see it here on steemit is wonderful.
Nice, happy to hear it was what you were looking for.