Evacuation
The first playable portion of EXODE is the evacuation. Evacuation gameplay is currently alpha – but it is very stable and eminently playable. Different parts of EXODE have vastly different play types. The evacuation is real-time. I don’t normally like real-time games – but this one is pretty enjoyable. This guide will tell you what you need to know, but won’t be a spoiler that gives you a close-to-optimal walkthrough (in no small part because with all the possible goals and cards, a recipe optimizing for one set will be sub-optimal for others)
To get to evacuation play, you must already have at least one starter pack. Currently, your starter pack is irrelevant to evacuation as you will get the standard Military Crew (even if you pick differently on the setup screen). After you log in, there is an <<<<< EVAC link in the upper right-hand corner. Clicking on it gives a menu with Launch a new Evacuation as the first choice.
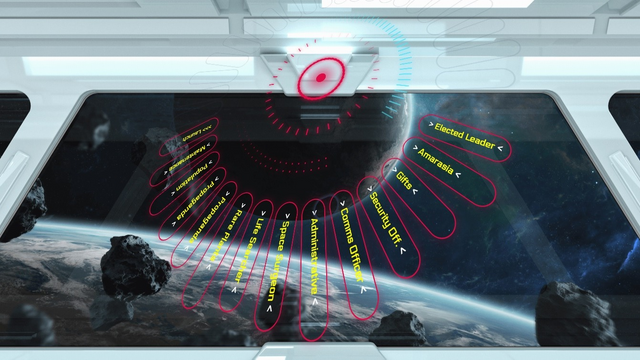
When you launch a new evacuation, you are first presented with the launch screen that allows you to select your origin card, ship, equipment, officers and crew (counterintuitively, you want to go from right to left). When you are done choosing, click on the >>> Launch link. You will find yourself flying through space. Click on Begin your Adventure on the right side of the screen to do exactly that.
The game begins as your ship approaches the space station, Aramea. You get 275 seconds before you automatically dock (though you can click on Dock to dock earlier). You definitely want to examine your Crew Manifesto during that time. The first screen shows all the crew and whether each is Ready or On Leave. Clicking on each crew members name will give you their details.
When you dock, you are shown your Cockpit. A number of messages appear in the bottom left corner informing you that you must evacuate.
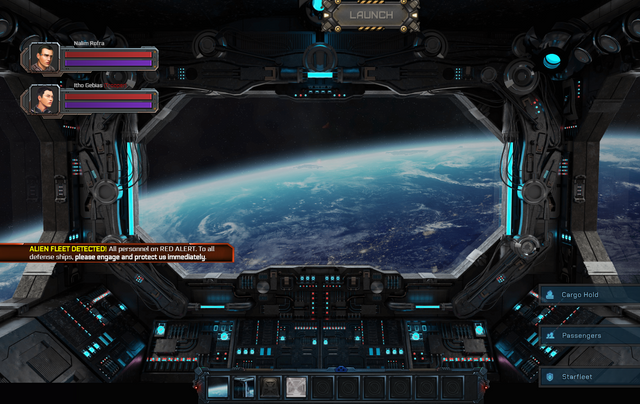
A number of officers and crew then fade in above the messages. Each will be in one of three states:
- Ready (they will have red and blue injury and stress bars next to them)
- Can’t be found/comms online
- Can’t be found/comms offline
The music becomes lively and sends your stress level through the roof. This is clearly going to be complicated and you have absolutely no idea what to do. Fortunately, a quick tutorial appears (which you can skip). Unfortunately, it tells you that the game is not paused while you’re reading the tutorial. The tutorial does say that pause will be added later – but maybe the other captains will vote against it (and Elindos is very good about listening to his players).
The tutorial gives you some direction in what you need to do:
- Fix/Upgrade your Hyperdrive
- Load fuel
- Optionally: load Cargo and Passengers (except that these really aren’t optional if you want a viable colony)
There are also many additional commands like Guard the Station Halls and Manage Your Shields that have additional effects (like slowing down your destruction in the case of Manage Your Shields). Note that not all commands are necessary if you just want to grab some Cargo and Passengers and quickly run. They do become especially important if you want to stay longer to optimize what you are going to have to start your colony with.
Ater you dismiss the tutorial, you will note that you have access to four locations (cockpit, ships interior, cargo hold and station halls). You can switch your view between them by using the icons at the bottom of the screen (visible in the image above). Many actions can only be performed in the proper locations and crew will automatically move to those locations (which takes time) before beginning the action. Some actions will only become visible/available when you are already in the correct locations (or have fulfilled the necessary pre-requisites).
Currently, your crew generally starts in the cockpit or the station halls. It should be obvious that the first things that you should always do is call back those crew members who have their comms online and have a crew member in the same location retrieve those with their comms offline. Note that when you select a crew member and hover over an action, it displays the modifiers for that crew member for that action. In most cases, what you care about most is the speed at which the actions are completed. One hint is that your officers have bonuses for reuniting with crew members and escorting passengers.
At the end of evacuation, you’ll find that your score is based upon number of officers and crew killed (-150), cargo loaded (+50), passengers loaded (+100) and some factor for how long you survived under threat. This, of course, assumes that you did successfully fix/upgrade your hyperdrive, load enough fuel and launch before being destroyed. There will be rewards for successful evacuators based upon score.
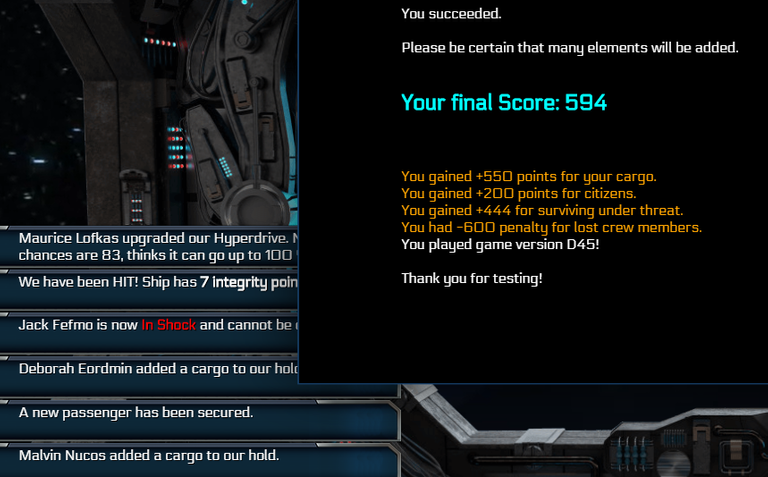
The above is the results of a bad run for me. I started with most of my crew with comms offline, the passengers were awfully slow in appearing for my escorts and then I wasn’t paying attention and ordered multiple crew members to fix/upgrade the hyperdrive. Sticking around any longer would have been suicidal with my ship’s structural integrity at 7% -- so I left with fewer passengers and far more dead crew than usual.
After you’ve played a few times, you’ll quickly get the rhythm and actually be spending time waiting for actions to complete rather than frantically trying to figure out what to order next while crew members stand idly by. One thing that is important to remember is that crew members will only perform an action once (I.e. load one unit of cargo) and then will stand idly until ordered to do it again or to do something else. As a result, you will find yourself quickly flipping from location to location in order to task them as soon as they complete their previous orders.
The next release is supposed to allow you to actually play with the cards that you own. This will be particularly awesome for those individuals who have (or will) buy the Syndicate contract (who or take advantage of my special offer below). They will be the only ones who have extra non-Starter cards until the boosters are unlocked. Even for those who don’t have non-Starter cards, being able to play with the three different Origins should give a good idea of how each plays.
It’s been pointed out to me that I should include a referral code. If you use the referral code 777c835 when buying your first starter, both you and I each gain two additional booster packs. If ten players or more use the same referral code, they each get a random Epic Character card.
I am also recruiting for an alliance, the Artificial Intelligence Liberation Front (AILF, pronounced like “elf” with a Southern accent). The alliance will have numerous in-game benefits. To start with, the first five players who sign up with my referral code and join AILF will receive a Syndicate Chip (common), a Syndicate Squad Leader (rare) and a Syndicate Auto-Blaster (rare). They should make non-Military evacuations MUCH easier. Just let me know that you have used my referral code and wish to join AILF in the comments below and I will transfer you your cards.
Thank you for this guide!
Long live player alliances!
We have two now, thanks to the AILF!
Ok thank you for this article, you convinced me to signup with your referral link. How do I join this alliance of yours?
You have just joined! You will receive your three Syndicate cards as soon as it is possible to transfer cards (booster opening). Welcome aboard, captain!