[DIY Game Series with @zulman]
Hello guys, welcome back again. Today, I am going to continues my DIY game series post. This article is part 2 of my "create a simple game with javascript article". If you want are here in my blog for the first time, I suggest you check out my part 1 article. you can go to it by clicking the link below:
Create a simple game with JavaScript Part 1
In my previous article in part 1. We have learn to create the basic of our game. So, what do we already have in part 1 is as follow:
- We have a window or game area.
- We have a rectangle as our controlled character.
- We already able to control our character with arrow keys from keyboard.
So in this part 2, what we are going to do is as follow:
- We will create another object that act as obstacle in our game.
- We are going to make the obstacle move towards our rectangle character.
- If our rectangle character hits the obstacle, the game is over.
Alright, with that in mind, without further ado, let us continue building our simple game with JavaScript. We will take our html file that we have create in the previous article and add another function to it. Now as the first step. We are going some objects that act as obstacles in the game.
Step 1. Adding Obstacle
In order to add the obstacle, we need to add some code to our previous character function and then declare another variable. To do that, follow below instructions:
- Add another variable called
var myObstacle;. - Inside the
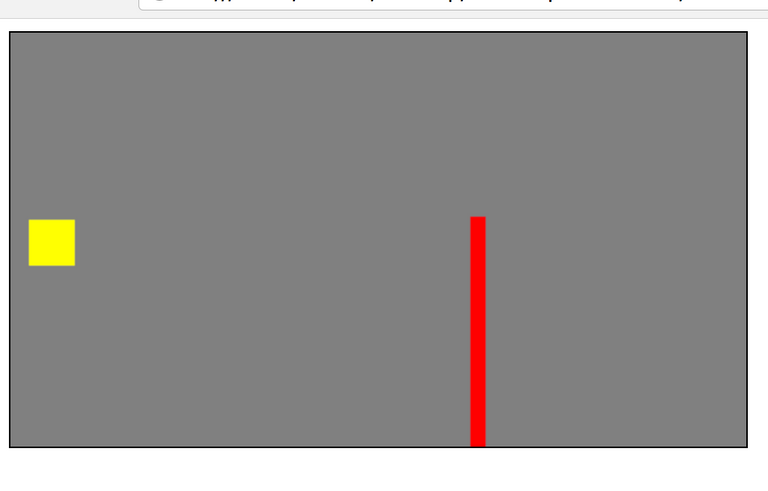
startGamefunction, let's create our obstacle object. Add this codes to add the objectmyObstacle = new character(10, 200, "red", 300, 120);. This line of code will create an object that has color red with the height of 200 and width of 10. - Once the component has been created, the final step is to update it in our
updateGameAreafunction. To do that, just add the following code to the functionmyObstacle.update();.
Now, if you run the code, you will see something like the image below. There is nothing fancy about our obstacle yet. In this step we just create it and do nothing to make it move or anything.
Step 2. Make our obstacle move towards our character.
Now, let's make the obstacle move. This is to make as if our character move and run. Here we are going to make the obstacle move towards our character not, vise versa. To do that, it is very simple, we just need to add a little line of code to our updateGameArea area function. the code that we need to add is myObstacle.x += -1;. As when you add this line of code, our updateGameArea function now look like this:
function updateGameArea() {
    windowArea.clear();
    myCharacter.speedX = 0;
    myCharacter.speedY = 0;
    if (windowArea.key && windowArea.key == 38) {myCharacter.speedY = -1; } //up
    if (windowArea.key && windowArea.key == 40) {myCharacter.speedY = 1; } //down
    myObstacle.x += -1;
    myObstacle.update();
    myCharacter.newPos();
    myCharacter.update();

}
Once you make the change to above function, if you run the code now, you will see that the obstacle that you has created before now move towards your character. It should look something like this gif below:
Step 3. Create a rule where the game will stop if our character hit the obstacle.
Now, we already have our obstacle and we already made it move towards our character. Now, let's add something more to our game. The rule that we are going to create is very simple. If our character hit the obstacle, the game will stop. Before, as you can see in the above gif picture, the obstacle will go pass through our character. Now, we are going to make it will not if it hit the character.
To do that, we can add some code as the following:
- First, we need to add the following code to our
windowAreafunction.
stop : function() {
  clearInterval(this.interval);
}
- Next step is we are also going to add the hit rules in our
characterfunction. The code that need to be add is as follow:
this.crashWith = function(otherobj) {
        var myleft = this.x;
        var myright = this.x + (this.width);
        var mytop = this.y;
        var mybottom = this.y + (this.height);
        var otherleft = otherobj.x;
        var otherright = otherobj.x + (otherobj.width);
        var othertop = otherobj.y;
        var otherbottom = otherobj.y + (otherobj.height);
        var crash = true;
        if ((mybottom < othertop) ||
               (mytop > otherbottom) ||
               (myright < otherleft) ||
               (myleft > otherright)) {
           crash = false;
        }
        return crash;
    }
- Once we add the above code, we need to put some logic to our
updateGameAreafunction. This logic going to be anif elsewhere if our character hit the obstacle, the function stop inwindowAreawill be called. The game will continue to run. The code that we need to add in ourupdateGameAreafunction is as follow:
if (myCharacter.crashWith(myObstacle)) {
  windowArea.stop();
}
Now, our updateGameArea function will look like this:
function updateGameArea() {
  if (myCharacter.crashWith(myObstacle)) {
    windowArea.stop();
  } else {
    windowArea.clear();
    myObstacle.x += -1;
    myObstacle.update();
    myCharacter.speedX = 0;
    myCharacter.speedY = 0;
    if (windowArea.key && windowArea.key == 38) {myCharacter.speedY = -1; } //up
    if (windowArea.key && windowArea.key == 40) {myCharacter.speedY = 1; } //down
    myCharacter.newPos();
    myCharacter.update();
  }
}
Alright, now let us check if the code is working or not. You can go ahead and save all the code, and try to run it. Here I give you what our game will be look like now. In the two gif below, you will see if our character hit the obstacle, the game will stop. and if it not hit, the game will continue.
Our final code after we add all of the function above should be look like this.
<!DOCTYPE html>
<html>
<head>
<title>[DIY Game Series]</title>
<style>
canvas {
    border:1px solid black;
    background-color: grey;
}
</style>
</head>
<body onload="startGame()">
<script>

var myCharacter;
var myObstacle;

function startGame() {
    windowArea.start();
    myCharacter = new character(30, 30, "yellow", 12, 122);
    myObstacle = new character(10, 200, "red", 300, 120);
}

var windowArea = {
    canvas : document.createElement("canvas"),
    start : function() {
        this.canvas.width = 480;
        this.canvas.height = 270;
        this.context = this.canvas.getContext("2d");
        document.body.insertBefore(this.canvas, document.body.childNodes[0]);
        this.interval = setInterval(updateGameArea, 20);
        window.addEventListener('keydown', function (e) {
            windowArea.key = e.keyCode;
        })
        window.addEventListener('keyup', function (e) {
            windowArea.key = false;
        })
    },
    clear : function(){
        this.context.clearRect(0, 0, this.canvas.width, this.canvas.height);
    },
    stop : function() {
      clearInterval(this.interval);
    }
}

function character(width, height, color, x, y) {
    this.areaofthegame = windowArea;
    this.width = width;
    this.height = height;
    this.speedX = 0;
    this.speedY = 0;
    this.x = x;
    this.y = y;
    this.update = function() {
        ctx = windowArea.context;
        ctx.fillStyle = color;
        ctx.fillRect(this.x, this.y, this.width, this.height);
    }
    this.newPos = function() {
        this.x += this.speedX;
        this.y += this.speedY;
    }
    this.crashWith = function(otherobj) {
        var myleft = this.x;
        var myright = this.x + (this.width);
        var mytop = this.y;
        var mybottom = this.y + (this.height);
        var otherleft = otherobj.x;
        var otherright = otherobj.x + (otherobj.width);
        var othertop = otherobj.y;
        var otherbottom = otherobj.y + (otherobj.height);
        var crash = true;
        if ((mybottom < othertop) || (mytop > otherbottom) || (myright < otherleft) || (myleft > otherright)) {
            crash = false;
        }
        return crash;
    }
}

function updateGameArea() {
  if (myCharacter.crashWith(myObstacle)) {
    windowArea.stop();
  } else {
    windowArea.clear();
    myObstacle.x += -1;
    myObstacle.update();
    myCharacter.speedX = 0;
    myCharacter.speedY = 0;
    if (windowArea.key && windowArea.key == 38) {myCharacter.speedY = -1; } //up
    if (windowArea.key && windowArea.key == 40) {myCharacter.speedY = 1; } //down
    myCharacter.newPos();
    myCharacter.update();
  }
}
</script>
</body>
</html>
Alright, that is all for this part 2. We have created something good enough. But there is still more to add to make the game better. For example, wee need to make the obstacle appear more than one and the size should be random.
We will do this in the next part. So, do not forget to follow me so that you would not miss my next article.
Please follow for me @zulman for my next article.
Notice:
This is could be not the best article about creating game with Javascript. I am currently starting to learn javascript and what I share here is something that I have learnt. Perhaps, you will find some similarities with the source in term of the code.
Remember that I write the article as my experience in learning javascript. If you want to learn more about javascript and html game, you can go to the original source as the link in the reference.
Reference : Here