A sack garden is one of the most creative food and income generating activities, an urban/city household, with little and/or confined outdoor space, can profitably engage in.

Credit: ROB GOODIER
You can grow about all types of vegetables and several types of root crops, a host of cereals, in a sack garden.
Including, spinach, carrots, pepper, tomatoes among others, for home consumption, even for income.
The good thing is that it is not as labor and/or capital intensive as field farming, so any household can practice it. Moreover, it also makes use of local, easily available materials, so again you hardly have to buy, unless you really must.
So how do you prepare your sack garden? Let me take you through a few basic steps you only need to follow and boomerang…you will be eating from your sack garden in 3-4 months!
Here is what you need
- A sack, preferably a burlap coffee sack, or in deed any large sack, of say between 50 to 90kg
- Soil, preferably compost, from the waste bin/pit, chicken droppings mixed with black soil. Overall, a sol that is nutrient enriched, as would benefit the healthy growth of any given crop.
- A large container cut to make open-ended from both ends
- Pebble stones/gravel or in deed, large coarse containers.
- A kitchen knife or any other capable of what a knife is naturally used for.
- Optionally, you can have a shovel for scooping and setting the soil.
Preparing your sack garden
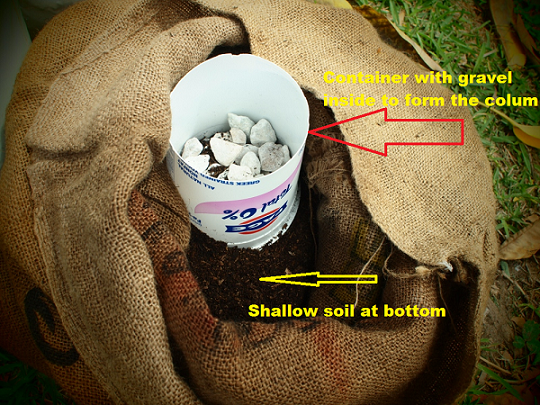
- The first step is to make the center column. Start by putting a shallow layer of soil bottom of the sack.
Credit:ROB GOODIER
- Place the open-ended container, which can be a coffee can or in deed any similar container/structure that can facilitate the creation of a column of gravel/stone upright through the center of the sack.
- Shovel soil around the stone/gravel filled container until you have filled out the sack edges from bottom to top.
- Once the soil fill reaches the top edges of the column container, gently pull out the container. You will notice that a column of the gravel/stone remains through the center of the soil.
The purpose of this gravel/pebble stone column is to facilitate the distribution of water as a passage way in and out of the sack from the top to the bottom.
Now your sack garden is ready for planting
- Plant on top of the sack, with whatever you thin can thrive there. From experience, I find that planting root crops on top and leafy vegetables on the sides strikes a better balance between in terms of plant nutrient uptake, watering convenience as you will have to occasionally water it, and moreover ensures your sack garden is aesthetically appealing.
- Notch small holes on the sides of the sack where you will plant around the sack periphery. Try to make the notch/cut an inverted T, and then scoop some little soil out to create room.
- Into this room/shelve created inside the notch, is where you plant. Make sure to firm the soil around the newly set plant.
- There you have it! Your sack garden.
Sources consulted
Engineering for Change
Instructables
Send a cow
GOAL Stories