Going to go over the basics on how to go about building your own AR-15 with the various configurations, legal details you need to be aware of, and the general process of picking out these parts.
When looking to purchase an AR-15 there are 2 options. Go to your local gun store or trusty gun auction site and purchase a completed rifle from a firearms manufacturer is the easiest method. No building required. However, this option can have some drawbacks. You pay more for something pre-assembled. You also are sort of put in a box so to say. You get what the manufacturer built the rifle with. Often, when purchasing an AR, you want to customize it, add upgrades, or add your own personal flair. When purchasing a ready built rifle you are potentially purchasing parts that you might later swap out and never use. You also might have upgrades in areas where you don't need/want upgrades and have basic parts in areas you might want to upgrade. The second option available is to build your own AR-15 from parts that can be purchased online and at gun stores.
Legal
Please note that I will attempt to reference any laws where applicable or where I can. This is by no means meant to be taken as legal advice and you should do your own research on gun laws specific to your state.
As far as the federal law goes there are a few quirks to the law regarding the weapon classification, barrel length, and specific attachments and accessories. An AR-15 can be bought or built in the following 3 categories according to the configuration of the gun.
Rifle
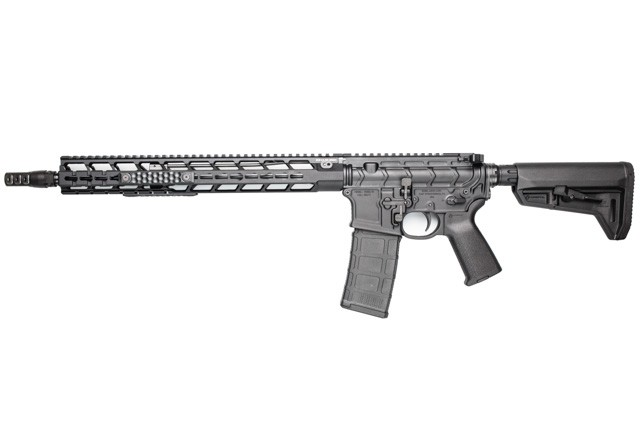
Notice the longer length and collapsible stock
An AR-15 designated as a rifle is your basic everyday AR-15 that can be bought with no additional tax stamps or checks. This is the easiest of the AR platforms to buy and build. In order for the rifle to fall into this category the overall barrel length of the weapon must be at a minimum 16 inches. Some build their gun with a 14.5 inch barrel. Since this falls below the minimum length of 16 inches, the compensator/flash hider/muzzle brake when attached must meet or exceed that 16 inch minimum and must be pinned and welded to the end of the barrel to prevent easy removal. This essentially makes the barrel now 16 inches.
Short Barrel Rifle (SBR)
*AR-15 SBR: Notice the collapsible stock, vertical fore grip, and shorter barrel length
An AR-15 designated as a short barrel rifle is essentially the same as your standard rifle mentioned above. Except the barrel is shorter than the minimum 16 inches. An SBR can also have, like a rifle, a collapsible stock, and a vertical fore grip. This is what is now considered an NFA (National Firearms Act) item and would require the user to fill out a form, register the item, and pay an additional $200 for a tax stamp. When building a short barrel rifle one must apply, be approved, and receive their tax stamp in the mail before they can even begin building their SBR. Another twist to note that is very important. Even if you purchased all of the parts to build your SBR and you did not receive your approval and tax stamp you can still be arrested. Owning all of the parts to create an SBR without actually assembling it can be interpreted as "constructive intent" meaning, you had the parts and were intending on building an unregistered SBR. Wait until approval comes in before purchasing parts.
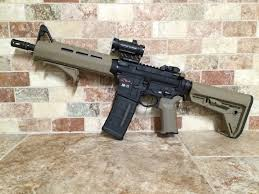
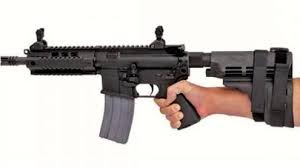
Pistol
AR-15 pistol with stabilizing brace: notice the fixed stock and shorter length
AR-15 pistol with featureless buffer tube: shorter length but still a pistol
An AR-15 designated as a pistol is like an SBR with a few differences but does not require the additional form 1, tax stamp, or ATF approval. It can be bought and built just as easily as your standard AR rifle. One major difference between an SBR and a pistol is that a pistol cannot have a collapsible stock or a vertical fore grip. Often times a "stabilizing brace" which does not adjust on the buffer tube and looks very similar to a normal stock is used or the buffer tube itself is just left featureless. The idea is, the brace shouldn't be shouldered but rather help to support your forearm when firing it as a pistol. Note that the ruling by the ATF is kinda obscure on this. Some say shouldering the brace is fine. Others say that shouldering the brace turns the pistol into an unregistered SBR. However, this is not enforced. Some other stipulations that need to be understood here. If one previously owned an AR-15 built in the rifle configuration (16 inch barrel, collapsible stock), they cannot then put a short barrel on the rifle and a pistol brace and call it a pistol. This is the illegal modification of the rifle.
Parts
Lower Receiver

This is the heart of your build. The lower receiver is the lower portion of the gun. It contains the fire control group, magazine catch/release, and selector. Every other part on the rifle builds off of this piece. Because this piece is an essential piece to the build, this is also the only part of the build that is serialized and considered a "firearm" by the ATF. Meaning, even though this is essentially a stripped piece of junk metal completely incapable of shooting, it still qualifies as a firearm. In order to purchase a stripped lower receiver one must pass a background check just as if they were buying a gun.
There is an option that do not require you to go through the background check or a transfer from your local gun store. That would be what's called an 80% lower receiver. An 80% lower receiver is a lower receiver that has been completed 80% of the way. In this configuration it technically does not classify as a firearm and thus does not require any background check. These can be purchased online just as you would purchase any other item online. In order to make this into a functional lower some additional work needs to be done. Additional drilling and milling of the receiver is needed to finish the remaining 20%. There are many jigs and "guides" out there to easily aid you in this process. The benefit of an 80% lower build is there is no need to go through the additional background check and fees required. Also, this is considered a "ghost gun" meaning, since you built it from something that technically wasn't a firearm, there is no record of it ever being a firearm. I am going to base this article off a 100% stripped receiver purchased through a gun store to avoid confusion.
As far as product selection there are a few things to take into consideration. There are two main types of manufacturing processes for creating the lower receiver: forged and billet. A forged lower is made by manipulating red hot metal into the desired shape. A billet lower is cut from a single block of metal. Some like the look of either or better. This is more up to your personal preference. Also something to take into consideration, the roll mark. Which is the logo/design/lettering that appears on the side of the receiver by the magazine. Pick a logo/design you like as well as what safety selections you would like.
Lower Parts Kit
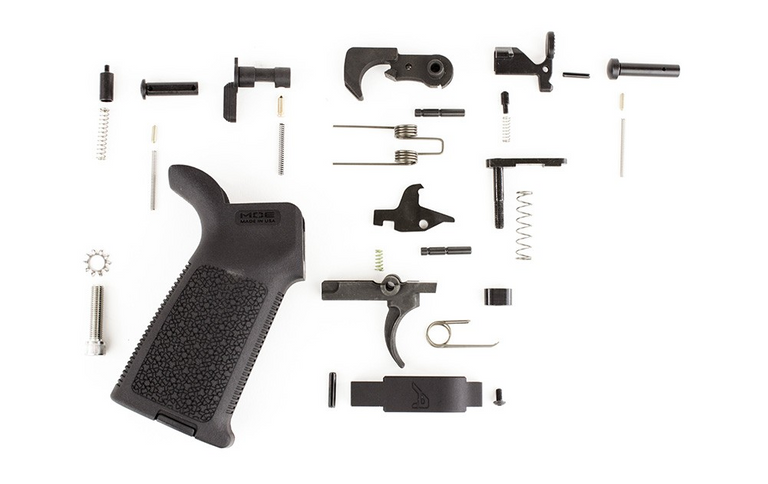
To finish the assembly of the lower receiver you will need to purchase a lower parts kit. This consists of the fire control group, magazine catch, safety selector, and other various pins and springs needed. There is a lot of variation in parts kits. Some people choose to purchase these individual parts separately, some choose to also upgrade different aspects such as the trigger. In this guide I will focus on just the basics. A lower parts it will also usually include a trigger guard. Some lower receivers come with the trigger guard already built into it. Some don't and will require you to install one. A lower parts kit usually includes a grip. However, sometimes this is not the desired grip. Choose a kit with your desired grip or one without a grip and purchase a grip you like later.
Buffer Tube/Stock
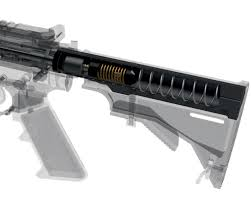
The buffer tube consistes of a metal tube that attaches to the back end of the lower receiver that houses a buffer and a spring. When the weapon is fired the bolt cycles to the rear of the rifle. As this happens the buffer and spring absorb this recoil and push the bolt back into position chambering another round. Sort of like a trampoline.

In the above image you can see there is a metal cylinder object in the spring. This is the buffer itself. It's the weighted object helping to slow down the bolt and absorb the energy. The buffer tube assembly can have various weights and resistances depending upon certain custom builds and configurations. Usually it's safe to stick with a standard buffer tube setup for a normal rifle build.
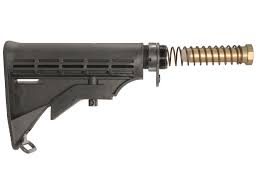
The stock of the rifle fits over the buffer tube. The stock is adjustable to usually three positions allowing for the user to customize to their comfort or current conditions.
With the lower receiver, lower parts, grip, buffer tube, and stock you now have the parts selected to complete your lower receiver.
Upper Receiver
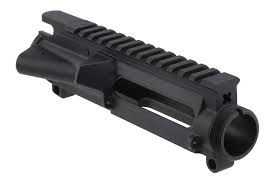
This is the top half of the lower receiver. It houses the bolt carrier group and the barrel and hand guard attach to it. There are a few options when choosing an upper receiver. The most common style is the typical flat top upper receiver which has a flat picatinny rail on the top. There are other styles including the A1/A2 styles that have the carrying handle style top that is typical of your retro looking ARs. These are all a matter of preference and how you want your build to look. I would recommend researching your lower receiver and finding reviews on upper receivers that "match" well to your particular lower. Some companies have different tolerances and sometimes you might get upper receiver "wobble" meaning the upper and lower tolerances are off enough that the upper receiver sort of moves around a little. Not anything crazy but when spending time and money on a build, you want things to fit together nicely.
Bolt/Bolt Carrier Group (BCG)
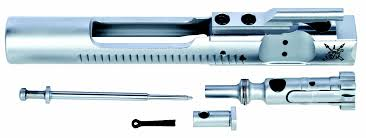
The bolt carrier group is the housing the holds the firing pin. This is the part that the trigger hits to fire the round and which is propelled backwards form the gas system which is absorbed by the buffer tube. Bolt carrier groups come in many flavors. Usually a standard BCG works fine however different finishes, colors, and metal types are available.
Charging Handle
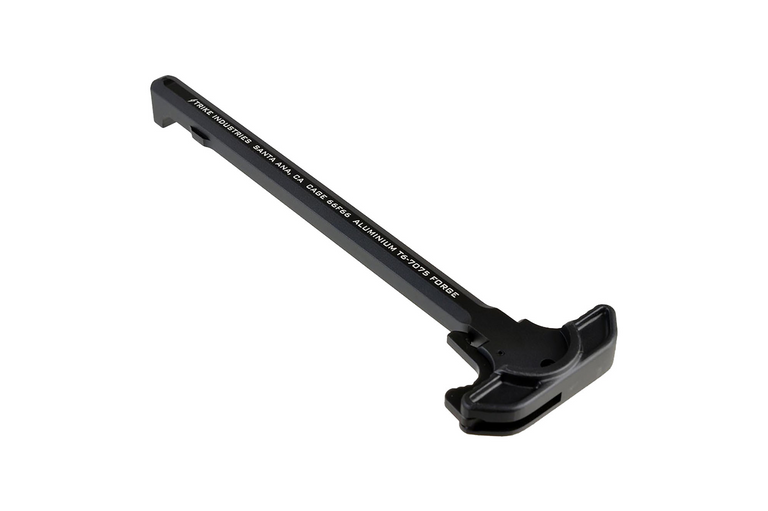
The charging handle fits into the upper receiver and the hook in the front holds on to the bolt. When initially loading the rifle, the charging handle is pulled rearward and released. This is the manual cycling of the bolt backwards to chamber a round. Charging handles also come in various types and prices. Your basic charging handle works fine however some choose to upgrade for personal preference.
Barrel
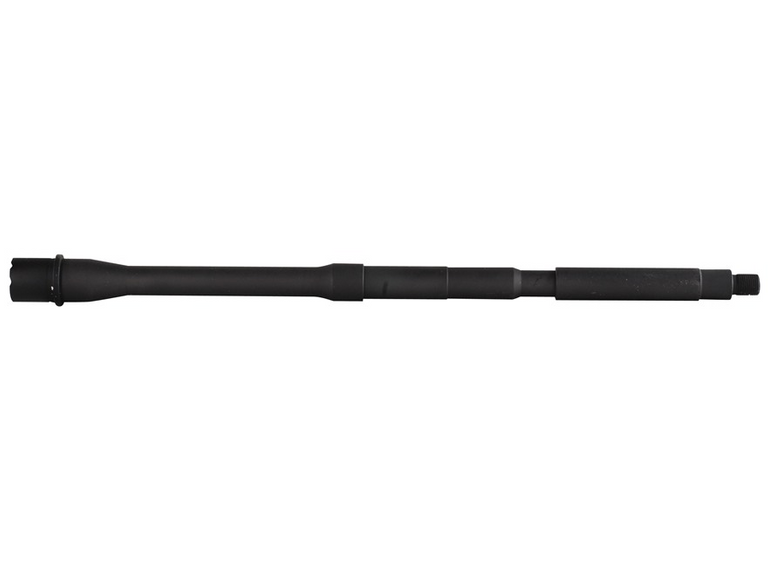
The barrel is the rifled tube which the bullet travels down. This is where the size/length laws and metrics come in to play. If you are building a rifle, keep it simple and just purchase a 16 inch barrel. If not, do the proper research on your local laws and purchase the size you wish for your SBR or pistol configuration. The barrel will also have a gas port. The gas port is what your gas block and gas tube (next sections) connect to. This bleeds off gasses from when the round is fired and propels the gases backwards towards the bolt carrier group. It pushes the bolt carrier rearwards to cycle the weapon loading the next round.
Barrels also come in many different materials. Some are made from stronger metals for precision shooting and durability. Different materials are used for more precise machining for greater accuracy. Also, some have chrome lined barrels which have a thin layer of chrome to help maintain durability.
There is another metric you need to determine when choosing a barrel and that is the rate of twist. The rate of twist is a calculation based off of how many inches of travel down the barrel does it take for the bullet to complete one full rotation. The two common rate of twists used are 1:7 and 1:12. For example, the 1:7 metric states that the bullet will make one full rotation every 7 inches. Usually 1:12 is pretty standard. This is a metric usually used by long range/precision shooters as bullet weight and other bullet dynamics come in to play here.
Gas Block/Gas Tube
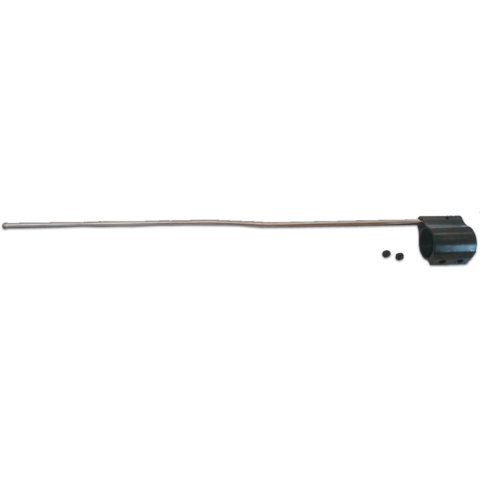
As previously mentioned, the gas block and gas tube are the parts involved in the gas system that makes this weapon a semi-automatic weapon. There are also different lengths of gas systems for you to choose based upon your preference and build goals. Picking the wrong length gas system could cause the system to run "over gassed" meaning more than enough gas is entering the gas system causing the gun to run hard. Under gassed is the opposite. The gun does not have enough gas pressure to efficiently cycle the bolt.
A general guide based upon your barrel length can be used to get an idea of the proper length gas system you need.
| Barrel Length | Gas System Type |
|---|---|
| < 10 Inches | Pistol Length |
| 10-18 Inches | Carbine Length |
| 14-20 Inches | Mid Length |
| 20+ Inches | Rifle Length |
The gas block is, for simplicity, a metal collar that slides over the barrel. On the top of the block there is a hole for the gas tube to enter. In the gas block there is a hole at the top that opens up into the gas tube hole. The gas tube slides into the gas block with it's bottom hole lined up with the gas block hole. The other end of the gas tube slides into the upper receiver and lines up with the gas key. When fired the gases from the tube will propel the bolt carrier group rearwards.
Muzzle Brake/Compensator/Flash Hider
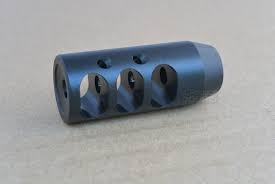
This is the piece that screws on to the end of your barrel. There are various types with different intended purposes. You have a typical muzzle break which aims to mitigate some recoil to the user. There are compensation devices which aim to direct gases that come out of the barrel upwards aiming to help mitigate recoil. Then there are devices that aim to trap and/or deflect the flash from the end of the barrel when fired. This is more of a personal preference and aesthetics part. Remember, if you are building a rifle and your barrel is 14.5 inches you cannot simply screw a muzzle brake on the end and be in compliance with the law. Since this can be easily screwed off you must weld and pin this to your barrel. If building with a 16 inch barrel you can simply screw the brake on and be in compliance. Use some lock tight though.
Handguard
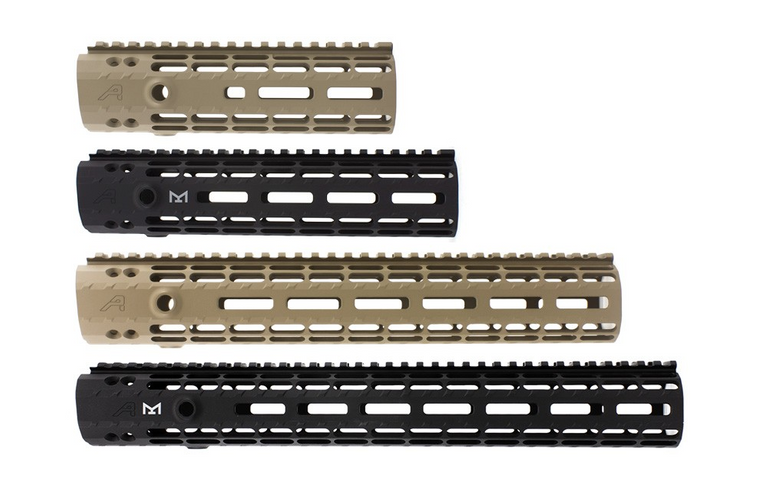
Various Sized Free Float Handguards
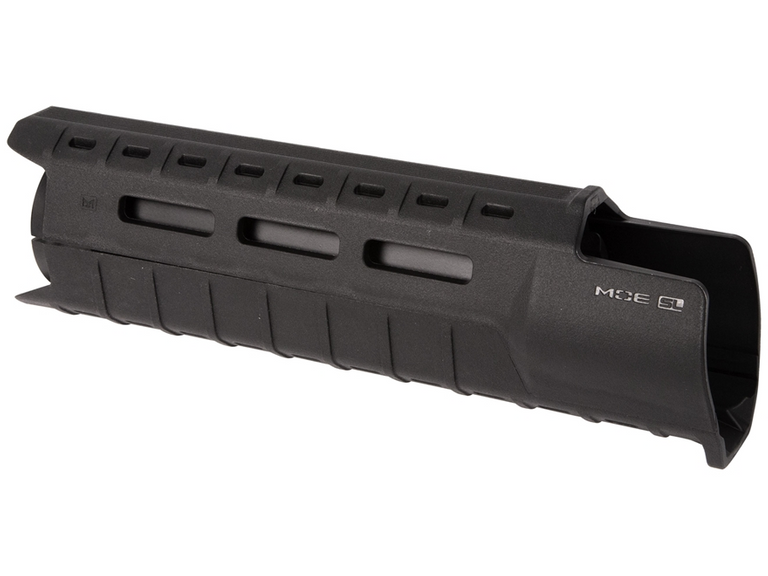
Non-Free Float Handguards
This is where some of the fun in building and customizing your rifle comes in to play. Out of the gate there are two main types of handguard installations. There is the standard non-free float handguard which connects directly to the barrel of the weapon. Then there are free float handguards which connect to the upper receiver never touching the barrel. The benefits of a free float are that the user when shooting isn't applying pressure to the handguard which in turn is applying pressure to the barrel and sights. One can imagine that it's possible to push the barrel when applying upwards pressure to the bottom of the barrel just slightly enough to impact accuracy. Usually non-free float handguards are the cheaper option.
There are various different attachment styles for how accessories are installed.
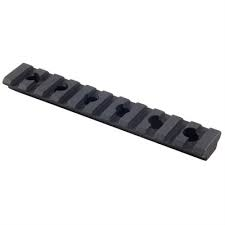
Picatinny
There is the old classic picatinny rail style which resembles train tracks. Disadvantages here is that it tends to have more wieght
KeyMod with a picatinny top
There is KeyMod which gets it's name from it's unique shaped lug holes. This allows the user to add only specific sections of rails to their rifle without having the entire handguard setup to have attachments everywhere. It eliminates the added weight of a picatinny and allows the user to only add weight when and where it's needed.

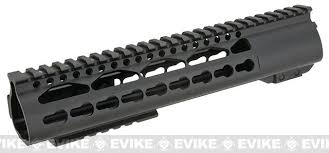
M-LOK with a picatinny top
The M-LOK system does not have the unique KeyMod openings but rather simply a uniform slot in which a T-shaped lug fits into. When turned it moves to lay across the slot locking whatever piece or attachment was put in place
Conclusion
Hopefully this gives you a rough idea on what parts go into building an AR-15, the differences between the various configurations of ARs, and what you need to know when searching for parts for your AR-15 build. If this article gets enough attention I can make another detailed post on the actually assembly of the parts as well as various additional accessories you can get.
Great post!
Thank you!
Congratulations @catdaddy09! You have completed some achievement on Steemit and have been rewarded with new badge(s) :
Click on any badge to view your own Board of Honor on SteemitBoard.
To support your work, I also upvoted your post!
For more information about SteemitBoard, click here
If you no longer want to receive notifications, reply to this comment with the word
STOP