ENGLISH
Greetings to the whole community. If you allow me today I will tell you about my experience during these summer months that are increasingly intense in terms of high temperatures. It is no secret that with the increase in ambient temperatures also increase the options we seek to dissipate the heat and make our lives more enjoyable. I start talking in this way because it is precisely in these times that the use of household appliances that we use at home to dissipate the heat of this intense summer is intensified.
Particularly I am talking about the fans, those that spend hours working without problems, but that in these dates double their hours of uninterrupted work, and if you add to that that they have a poor maintenance or none at all, you run the risk of having a partial or total failure, which would lead us to have to allocate a budget for repair if you get fatal and the problem becomes serious.
After having given you this little preamble 😁, I'm going to get down to business, and that is that I will relate as a tutorial, my experience during the total maintenance of the fans of my in-laws, which by delegation of functions fell to me 😂.
I am going to tell you how with just a few tools and materials that we can easily obtain at home, we will be able to avoid spending money on a possible breakdown due to lack of maintenance.
In the following image I show you the tools and materials I used to maintain the fans.
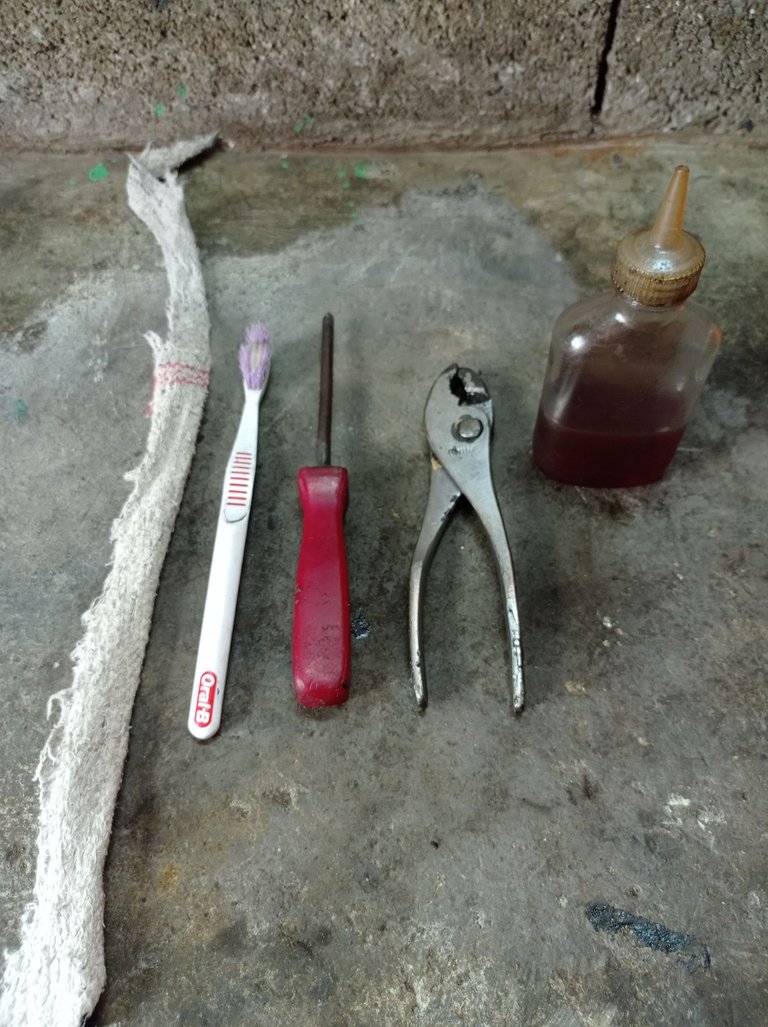
1 - 20-30 cm piece of cloth.
2- Toothbrush in disuse.
3-Spline screwdriver.
4- Pliers.
5-Thin oil for fan or other that can be used.
Once we have these instruments in hand we start with the total disassembly of the fan.
To do this I executed the following steps that will be described in the following images and the information associated with each one of them.
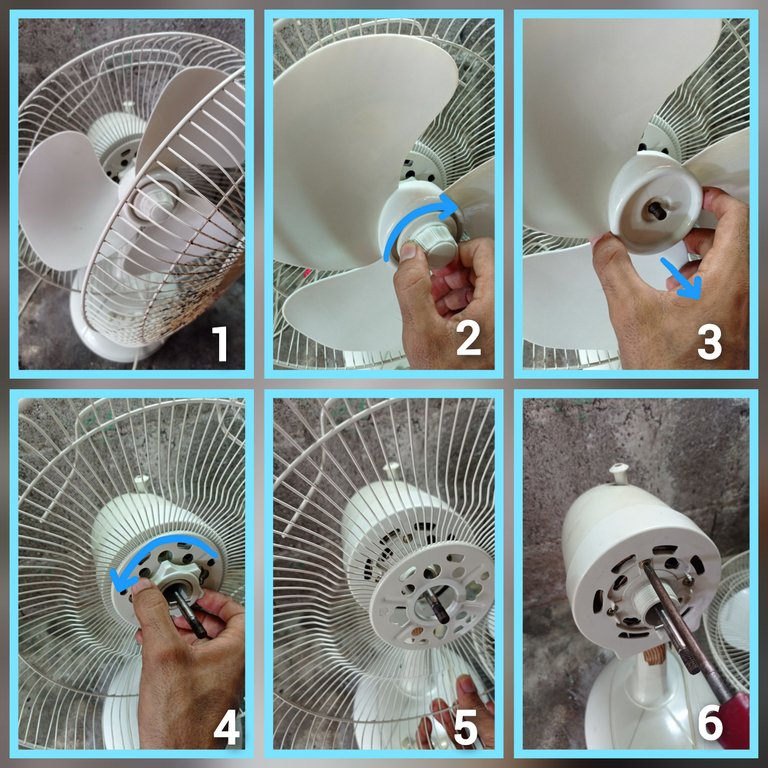
1-Remove the front protection grille.
2-Turn clockwise the plastic nut that holds the blade in place.
3-Extract the blades by pulling it towards us..
4-Turn counterclockwise the plastic nut that holds the rear protection grille.
5-Remove the rear protection grille.
6-With the help of a screwdriver, we remove the four screws and we extract the plastic base where the rear protection grille is fixed.
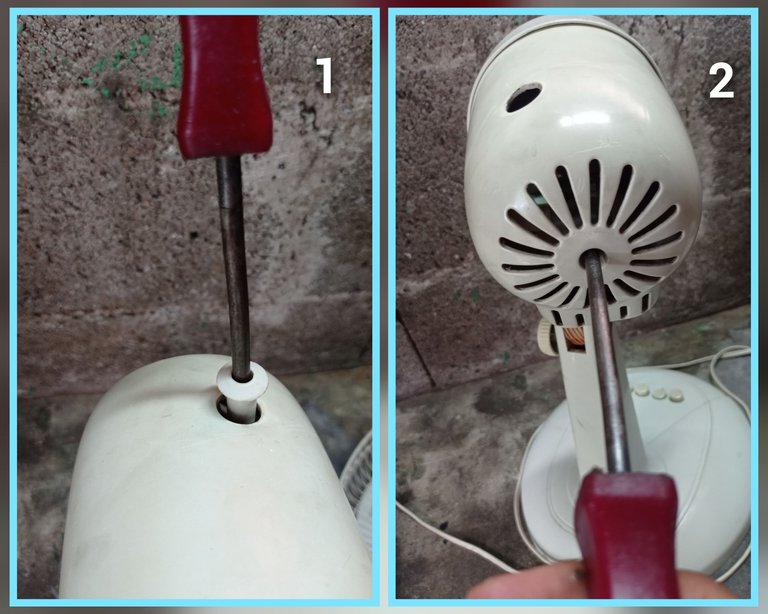
1-Remove the screw of the mechanism by means of which the rotation is activated or deactivated.
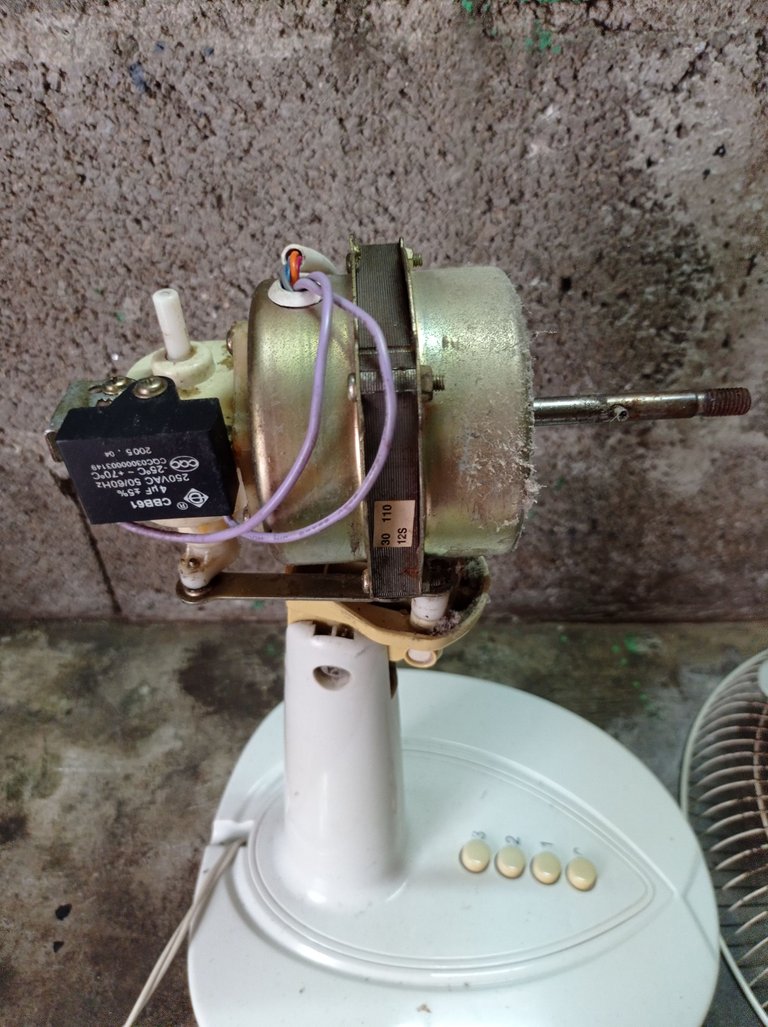
2-Remove the screw that holds the housing that protects the motor.
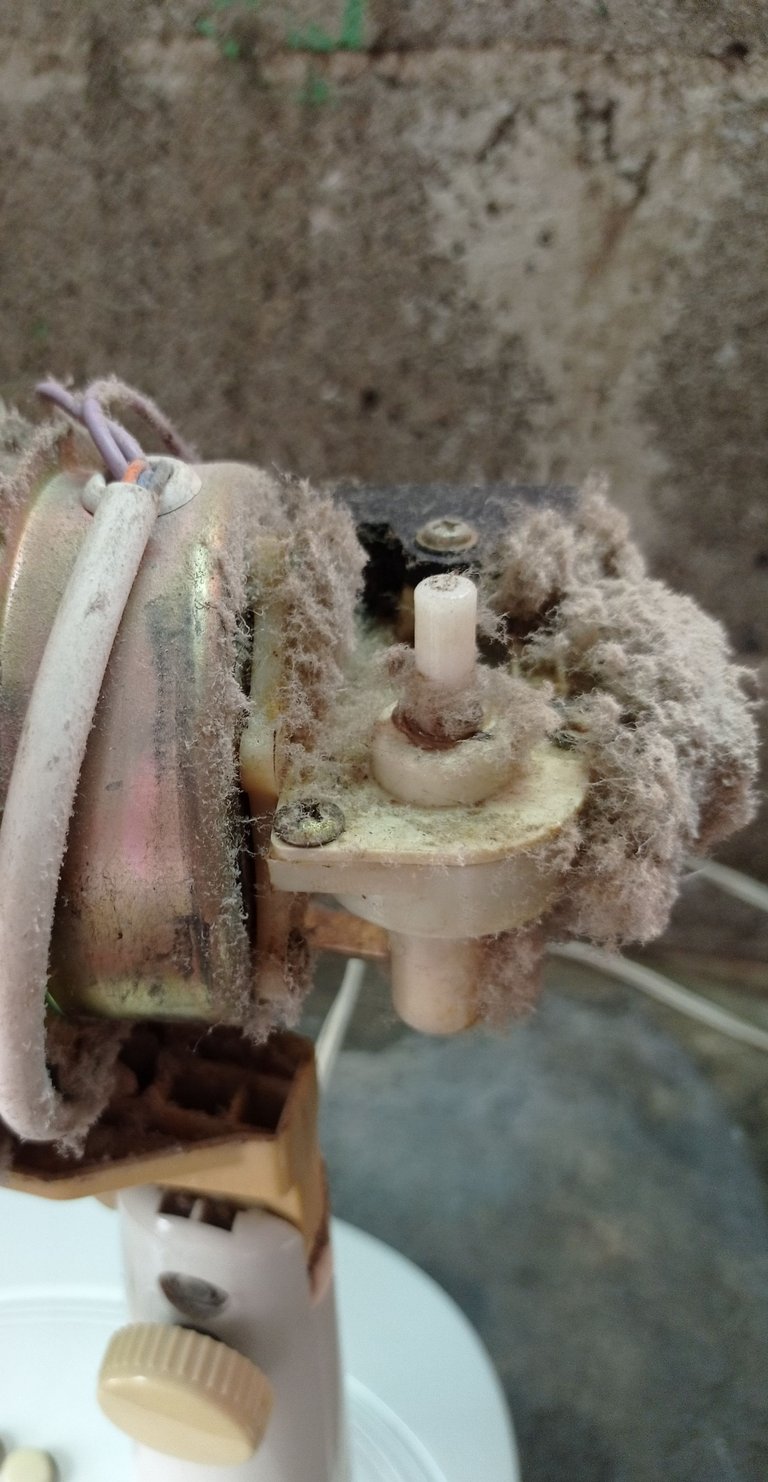
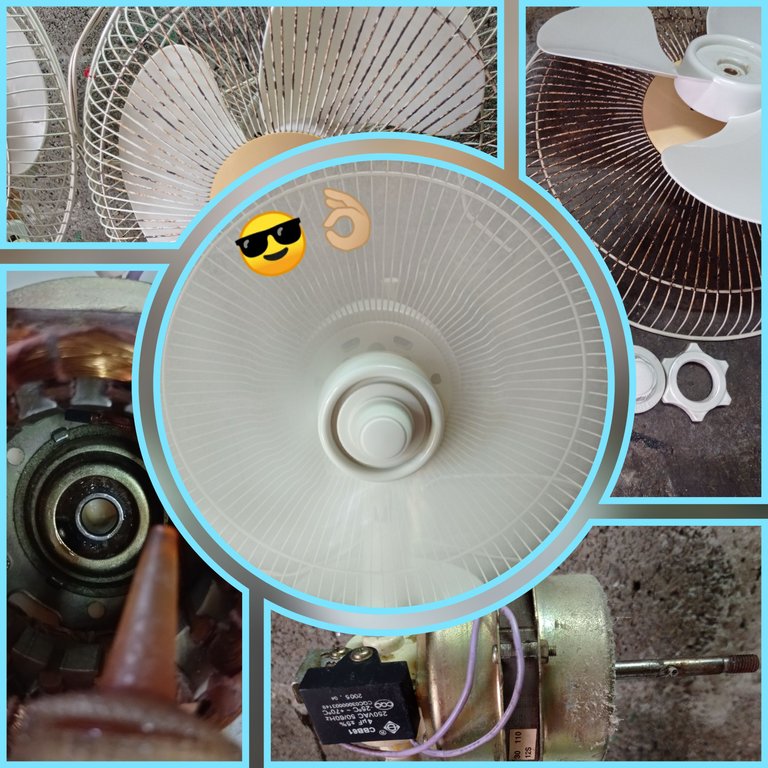
Upon discovering the engine, it is evident that it has not been serviced for quite some time.
It was necessary to dust it off a bit to continue with the disassembly 😂.
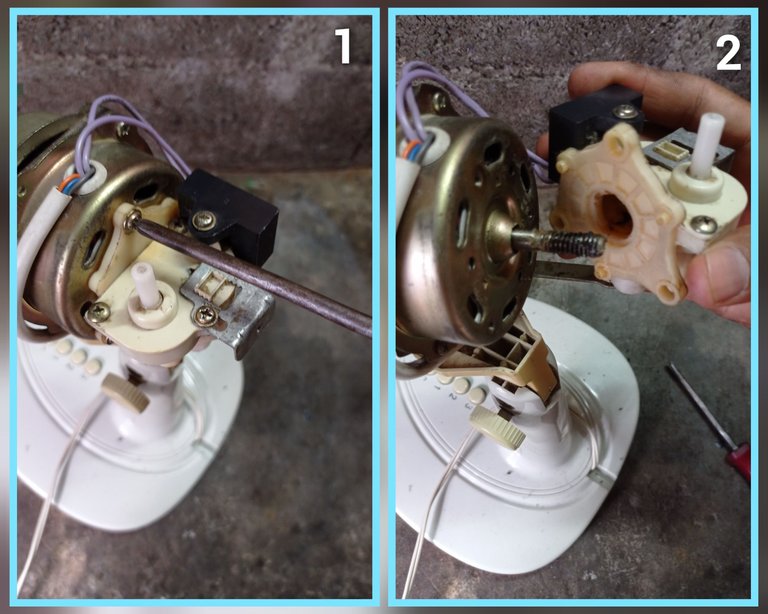
1-Remove the screws that fix the system of gears that facilitates the rotation of the fan.
2- Extract outwards.
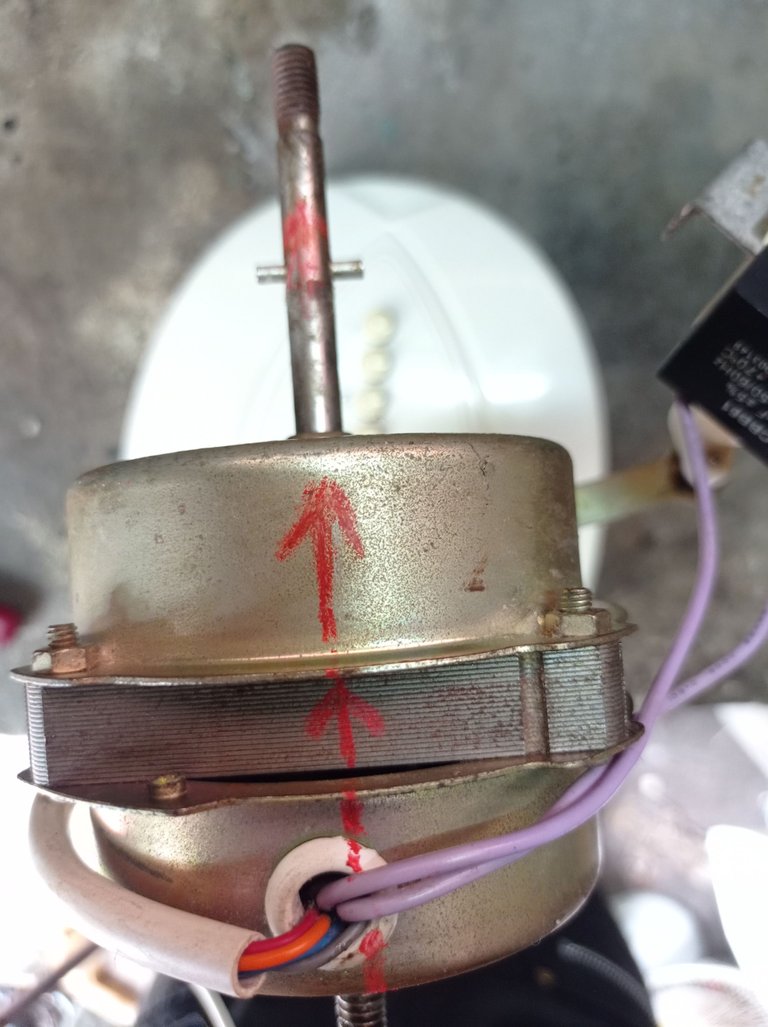
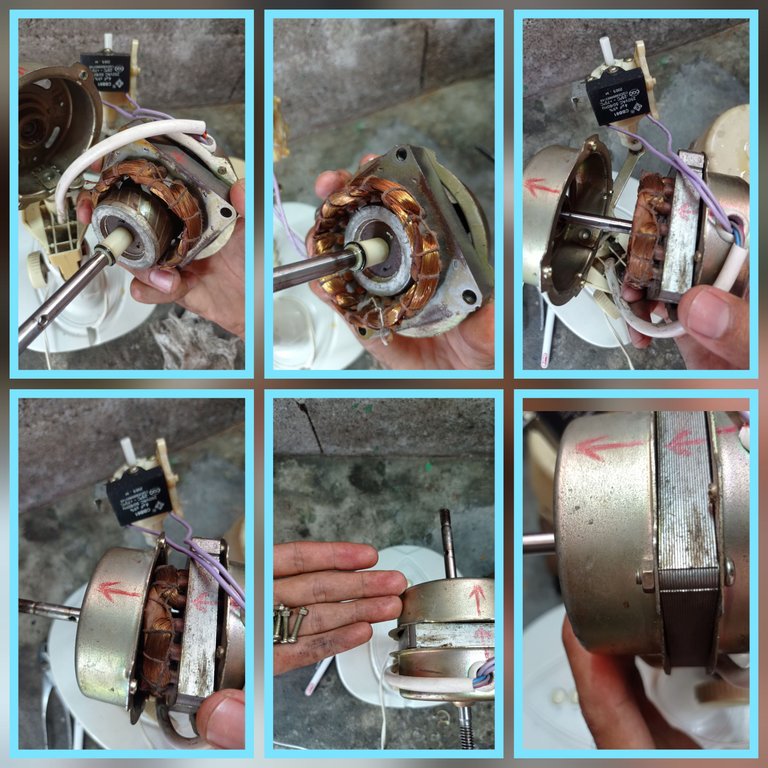
Before disassembling the metal casing that protects the stator and the rotor, it is convenient to make a mark as shown in the image, in order to place the parts exactly where they were before disassembly.
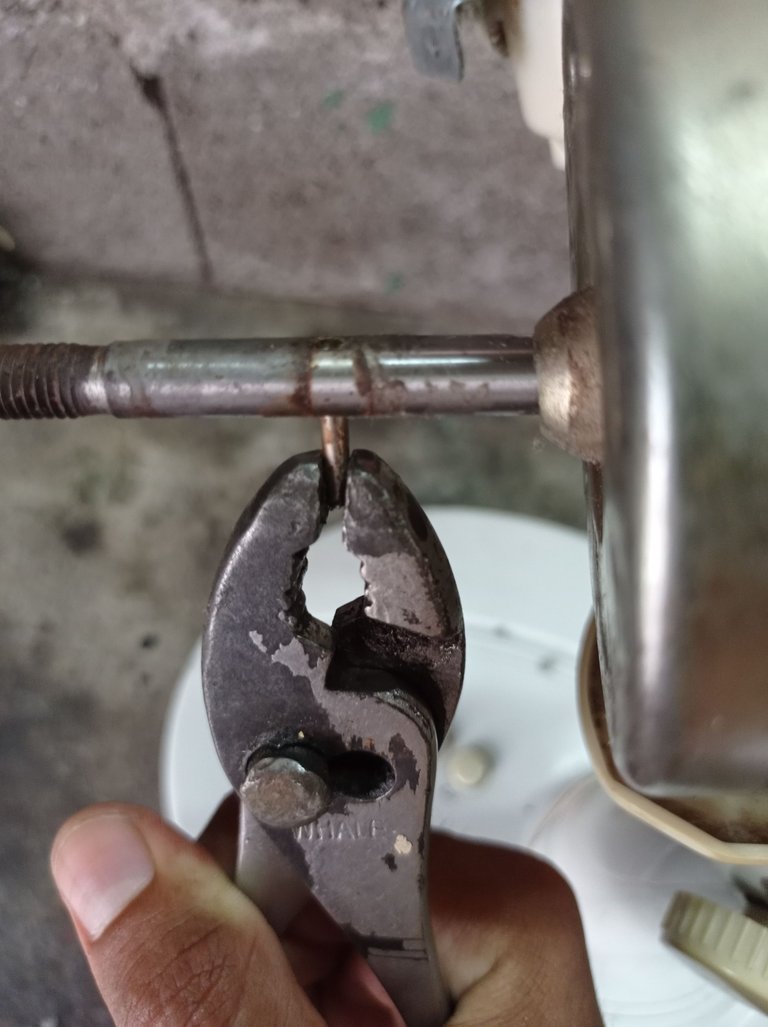
With the help of the pliers extract the pin shown in the picture
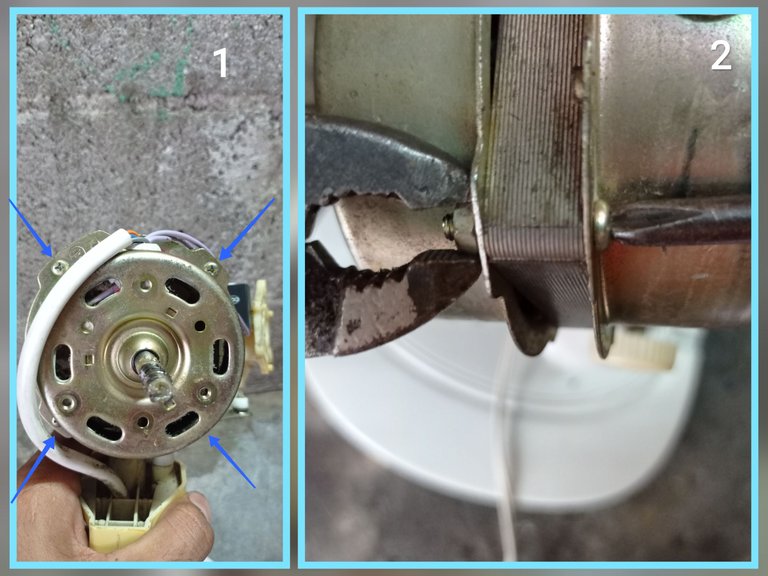
1-Screws to be removed with the aid of a screwdriver and pliers.
2-Extraction of screws.
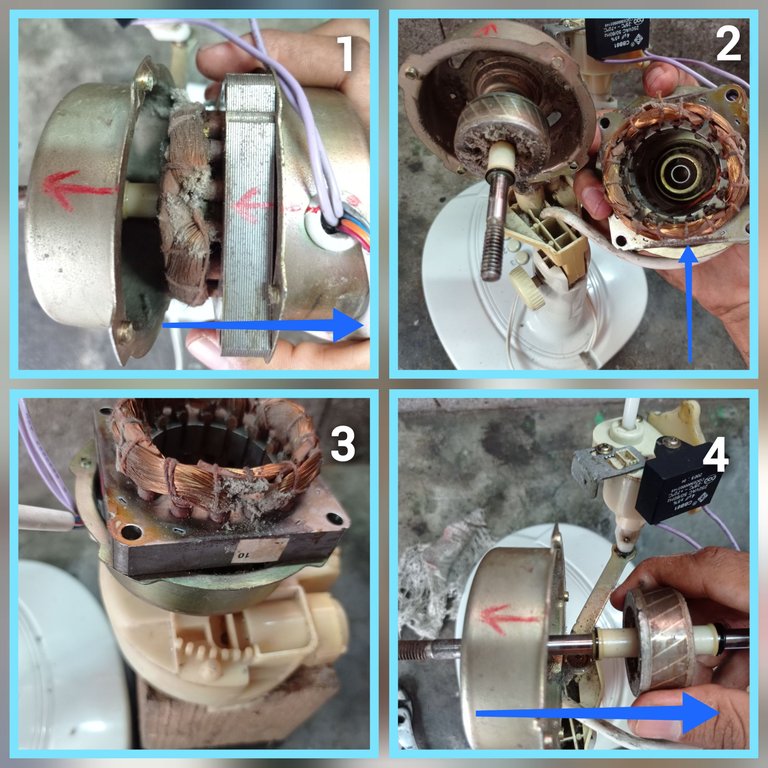
1-Separate the pieces in the direction indicated by the arrow, and always holding the back cover together with the stator, as shown in the picture, avoiding damaging the winding.
2- Keep the two pieces together (stator and back cover), avoiding tensioning the wires that connect to the winding.
3- Place both parts on a support to avoid hanging and tensioning the wires.
4-Remove the rotor in the direction indicated by the arrow.
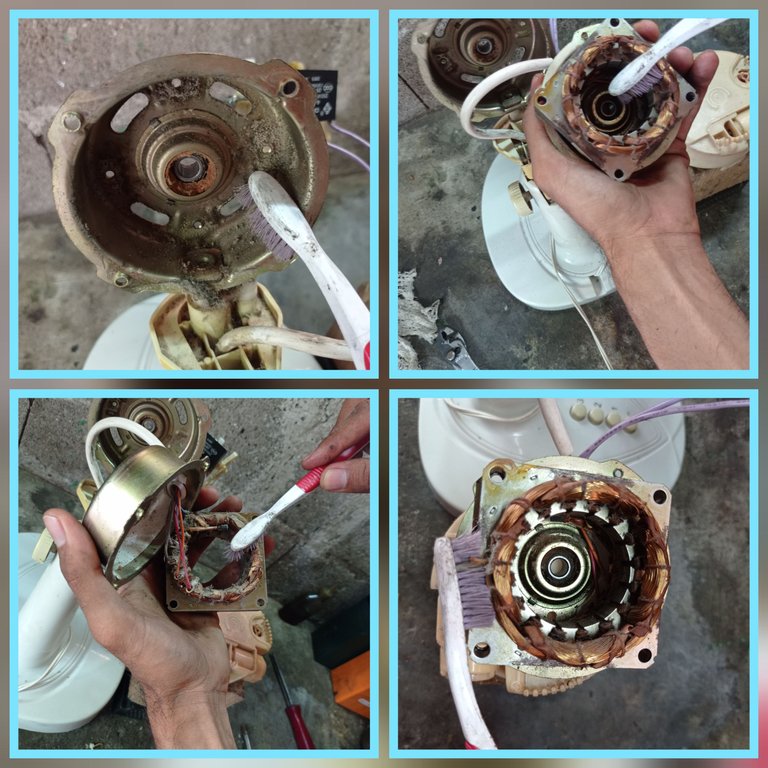
After having the pieces separated, with the help of a toothbrush, clean all the areas where there is dust, as shown in the images, it is of vital importance that this process is done with extreme care not to break one of the fine wires of the winding.
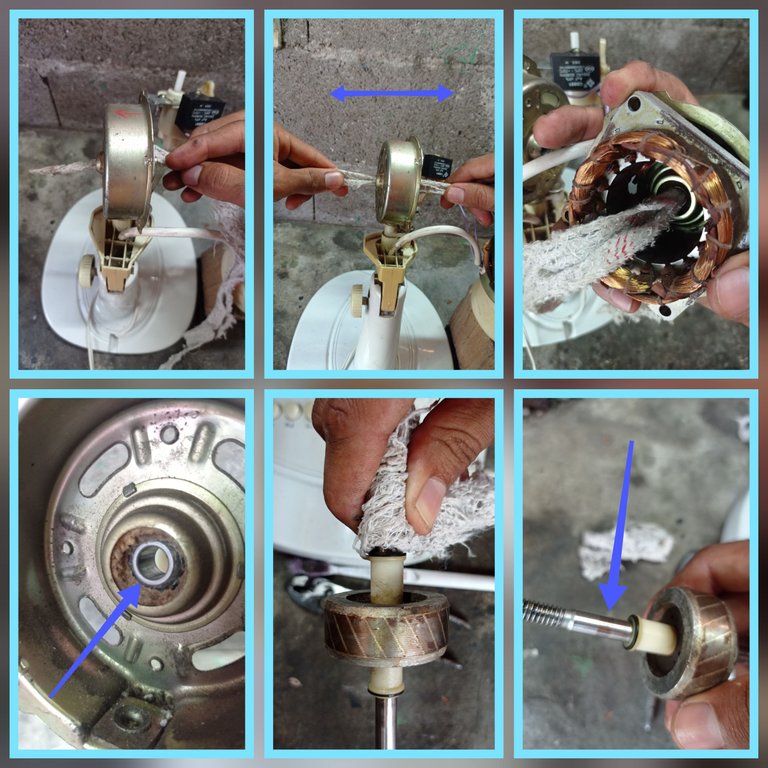
With the help of the piece of cloth, clean the bushings by rubbing in both directions as shown by the arrows in the second image of the collage, repeat the process until they are well polished inside, this process is also applied to the rotor shaft at both ends.
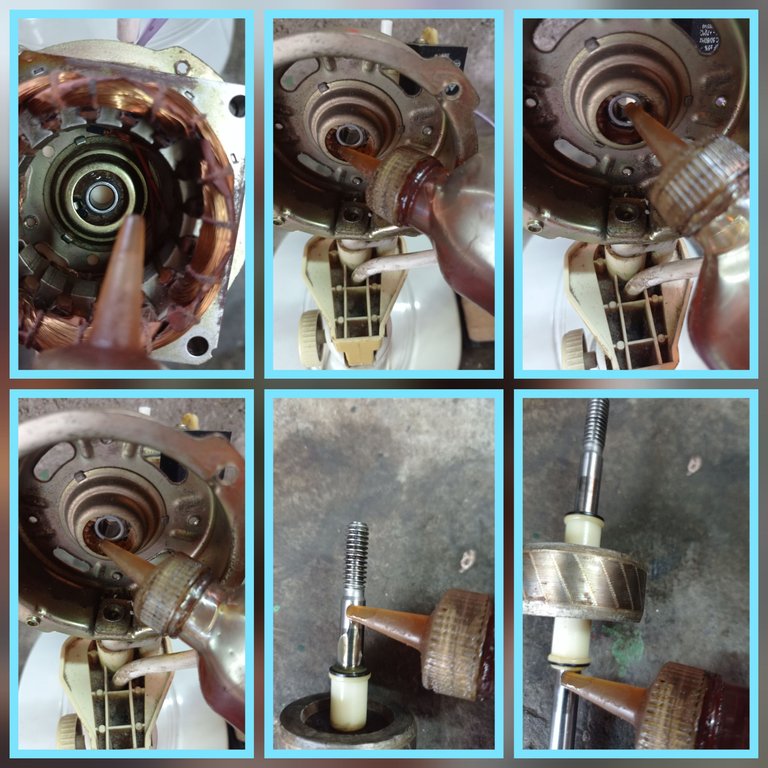
Once you have all the parts cleaned you should grease the bushings, the pads surrounding the bushings and the rotor shaft, as shown in the pictures of the collage above. For this you should use a thin oil, never use solid grease as I have seen in other occasions, because the rotor will end up blocked in the bushings after a couple of days working.
With the parts cleaned and lubricated, it's time to assemble.
We put the rotor back in place so that it is exactly as it was before removing it, then the pieces are joined by matching them so that they are aligned, for this we rely on the marks that were made at the beginning with the colored pencil, it is essential that they are well aligned and without visible gaps between them, as this ensures that the engine works again, because if they are not aligned, or do not fit well with each other to put the screws, the engine will not work.
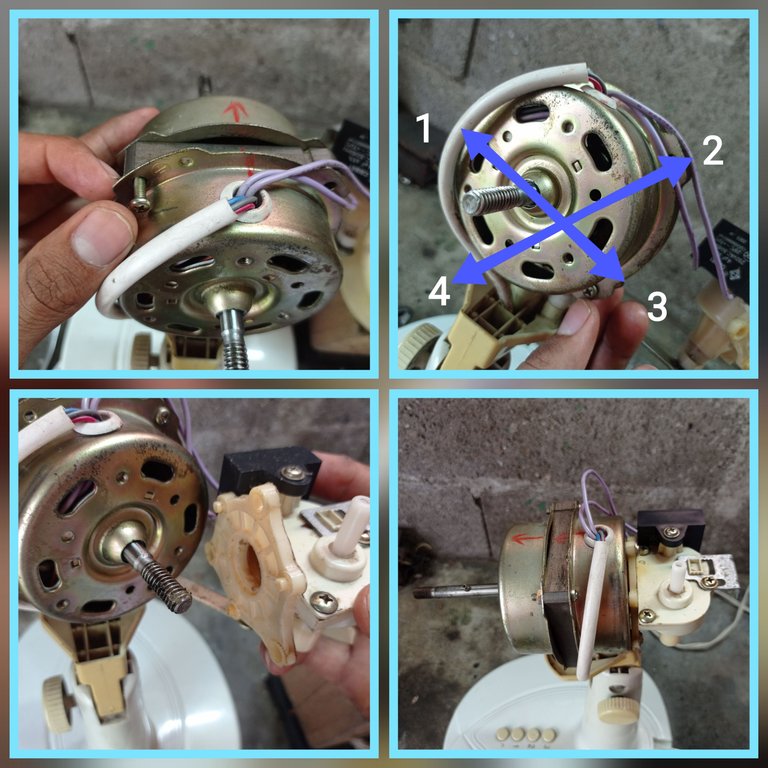
We place the screws with their nuts, and we tighten little by little the screws in a crossed pattern, for example 1--3 and 2--4, as shown in the second image of the collage, with this we guarantee that the pieces are aligned and well adjusted, we finish assembling the other pieces exactly as we disassembled them but doing the inverse process.
FINAL RESULT

Ready to freshen up
Note: This type of maintenance is of vital importance if we want to increase the useful life of the equipment, and the frequency with which it should be given depends on the place where you live, particularly I give it every three or four months, because my house is in a place where the level of dust in the environment is considerable.
Regards and see you next post😉
The images were taken with my Xiaomi Redmi Note 6 Pro cell phone.
Images edited in the "Gallery" application of the phone and the application Photo Collage-GridArt.
Text translated to English in Deepl translator..
You can see me on Facebook
ESPAÑOL
Saludos a toda la comunidad. Si me lo permiten hoy les contaré sobre mi experiencia durante estos meses de verano que cada vez son más intensos en cuanto a las altas temperaturas. No es un secreto que con el aumento de las temperaturas ambientales también aumenten las opciones que buscamos para disipar ese calor y hacernos la vida más amena. Empiezo hablando de esta forma porque precisamente es en estos tiempos en los que se intensifican el uso de los equipos electrodomésticos que destinamos en casa para disipar el calor de este intenso verano.
Particularmente les hablo de los ventiladores, esos que se pasan horas funcionando sin problemas, pero que en estas fechas duplican sus horas de trabajo ininterrumpido, y si a eso se le suma que tinen un deficiente mantenimiento o ninguno en absoluto pues se corre el riesgo de tener una avería parcial o total, lo que nos llevaría a tener que destinar un presupuesto para su reparación si te pones fatal y el problema se torna grave.
Luego de haberte dado este pequeño preámbulo 😁, voy a lo que importa, y es que voy a relatar a manera de tutorial, mi experiencia durante el mantenimiento total de los ventiladores de mis suegros, que por delegación de funciones me tocó a mi 😂.
Te voy a contar cómo con solo unos pocos instrumentos y materiales que podremos obtener fácilmente en casa, lograremos evitar un gasto de dinero en una posible avería por falta de mantenimiento.
En la siguiente imagen te muestro los instrumentos y materiales que utilicé para dar el mantenimiento a los ventiladores.
1- Trozo de tela de 20-30 cm.
2-Cepillo dental en desuso.
3-Destornillador de estría.
4-Alicate.
5-Aceite fino para ventilador u otro que se pueda emplear.
Una vez que tenemos en mano estos instrumentos comenzamos con el desarme total del ventilador.
Para ello ejecuté los siguientes pasos que serán descritos en las siguientes imágenes y la información asociada a cada una de ellas.
1-Retirar la rejilla de protección delantera.
2-Girar en sentido horario, la tuerca plástica que sujeta el aspa.
3-Extraer las aspas tirando de ella hacia nosotros.
4-Girar en sentido antihorario la tuerca plástica que sujeta la rejilla de protección trasera.
5-Extraer la rejilla de protección trasera.
6-Con ayuda de un destornillador, quitamos los cuatros tornillos y extraemos la base plástica dónde se fija la rejilla de protección trasera.
1-Retiramos el tornillo del mecanismo mediante el cuál se activa o desactiva el giro.
Retiramos el tornillo que sujeta la carcasa que proteje al motor.
Al descubrir el motor es evidente que hace bastante tiempo que no se le hace un mantenimiento.
Fue necesario desempolvarlo un poco para continuar con el desarme 😂.
1-Retiramos los tornillos que fijan el sistema de engranajes que facilita el giro del ventilador
2- Extraer hacia afuera.
Antes de desarmar la carcasa metálica que proteje al estator y al rotor, es conveniente hacer una marca como se muestra en la imagen, con el objetivo de colocar las partes exactamente dónde estaban antes del desarme.
Con ayuda del alicate extraer el pasador que se muestra en la imagen
1-Tornillos que se deben extraer con ayuda de un destornillador y un alicate.
2-Extración de los tornillos.
1-Separar las piezas en el sentido que indica la flecha, y siempre aguantando la tapa trasera junto con el estator, cómo se muestra en la imagen, evitando dañar el bobinado.
2- Mantener las dos piezas unidas(estator y tapa tracera), evitando tensar los cables que conectan al bobinado.
3- Colocar ambas piezas en un soporte para evitar que cuelguen y se tensen los cables.
4-Extraer el rotor en el sentido que indica la flecha.
Luego de tener las piezas separadas, con la ayuda de un cepillo dental se deben limpiar todas las áreas donde exista polvo, cómo se muestra en las imágenes, es de vital importancia que este proceso se haga con extremo cuidado de no quebrar uno de los finos alambres del bobinado.
Con ayuda del trozo de tela, limpiar bien los bujes frotando en ambas direcciones como muestran las flechas en la segunda imagen del collage, repetir el proceso hasta que queden bien lustrados en su interior, este proceso también se le aplica al eje del rotor por ambos extremos
Una vez que se tienen todas las piezas limpias se deben engrasar los bujes, las almohadillas que rodean los bujes y el eje del rotor, cómo se muestra en las imágenes del collage anterior. Para esto se debe usar un aceite fino, nunca usar grasa sólida como he visto en otras ocasiones, pues el rotor terminará bloqueado en los bujes , después de un par de días trabajando
Ya con las piezas limpias y lubricadas, es hora de armar.
Colocamos el rotor nuevamente en su sitio de forma tal que quede exactamente como estaba antes de extraerlo, luego se unen las piezas haciéndolas coincidir de forma tal que queden alineadas , para esto nos apoyamos en las marcas que se hicieron al inicio con el lápiz de color, es fundamental que queden bien alineadas y sin espacios visibles entre ellas , pues esto garantiza que el motor funcione nuevamente, ya que si no están alineadas, o no encajan bien unas con otras al poner los tornillos, el motor no funcionará
Colocamos los tornillos con sus tuercas, y vamos apretando poco a poco los tornillos en un patrón cruzado , por ejemplo 1--3 y 2--4, cómo se muestra en la segunda imagen del collage, con esto garantizamos que las piezas queden alineadas y bien ajustadas, terminamos de armar las demás piezas exactamente como las desarmamos pero realizando el proceso inverso
RESULTADO FINAL
Listo para refrescarnos
Nota: Este tipo de mantenimiento es de vital importancia si queremos aumentar la vida útil del equipo , y la frecuencia con la que se debe dar está en dependencia del lugar donde resides, particularmente lo doy cada tres o cuatro meses, pues mi casa está en un lugar donde el nivel de polvo en el ambiente es considerable
Un saludo y hasta el próximo post😉
Las imágenes fueron tomadas con mi celular Xiaomi Redmi Note 6 Pro.
Imágenes editadas en la aplicación "Galería" del teléfono y la aplicación Foto Collage-GridArt.
Puedes verme en Facebook
Excelente nivel de detalles, esta muy bien explicado el paso a paso, felicitaciones. Me gusto mucho que marcaras el estator con relación a la carcaza, también me llama la atención el aceite que utilizastes para lubricar el rodamiento, es automotriz?
Hola , saludos amigo, gracias por comentar. El aceite que utilicé no es el más indicado, pues no poseía el que lleva, acá en mi país venden uno que le dicen 3 gotas, y es un aceite blanco ideal para los ventiladores, sin embargo como ese trabajo lo hice en la casa de mis suegro , el solo tenía ese aceite que sí es automotriz, por lo que es probable tenga que dar mantenimiento antes de lo previsto. Saludos
Welcome to Hive Motors. Thank you for telling us about your experience with this maintenance. Excellent work.
Hello, thanks for the welcome, it is a pleasure to belong to the community to learn from it and give my contributions in whatever way I can. Greetings
Saludos amigo, bienvenido a Hive y a esta comunidad. Gracias por compartir con nosotros este mantenimiento, te ha quedado muy bien y bueno, leyendo por allí lo del aceite, a veces toca es resolver.
Gracias amigo, es así, en ocasiones hay que trabajar con lo que tenemos a mano. Saludos
Esto me recuerda mi niñez cuando repara mi súper ventilador hacia le decía para esa época ponía de a 2 porque el calor era infernal.
😂 Hola, me alegro que le recordara a su niñez, pero con el calor que hace por acá en estos tiempos ni con dos a la vez te refrescas jjj, y si quieres conservar el ventilador hay que darle mantenimiento porque entonces el mal es mayor: sin ventilador y con calor 😆. Saludos, gracias por comentar.
Congratulations @darknapol! You have completed the following achievement on the Hive blockchain And have been rewarded with New badge(s)
Your next target is to reach 700 upvotes.
You can view your badges on your board and compare yourself to others in the Ranking
If you no longer want to receive notifications, reply to this comment with the word
STOPCheck out our last posts:
Genial, mientras yo ahorrando para comprar uno nuevo cuando arrancan a fallar 😅 🤣
😂😂, Bueno ya sabe que puede ahorrarse ese dinero para otra cosa si da los mantenimientos periódicamente 😁. Saludos amigo, gracias por comentar.