Hello all community, here we are at another mechanical feat by Eros struggling with his Alfa 75, this time we will replace the rear discs with pads and valve cover gasket.
Background
Some people are familiar with the particular mechanics of the Alfa 75, while others are not, hence a little foreword.
Heir to the Giulietta of the 1970s, it retains the Alfetta structure derived directly from the F1 grand prix cars, the Alfa 158 and 159 (renamed by sportsmen, precisely Alfetta because of its narrow wheelbase). Taking up such mechanics, the name was accordingly assigned to the famous Alfa sedan.
The special feature was the positioning of the engine at the front, and to have 50/50 weight distribution, the gearbox en bloc with clutch and differential were moved to the rear. To make the unsprung masses even less, the rear brake discs and calipers were moved to the sides of the gearbox at the exit of the differential.
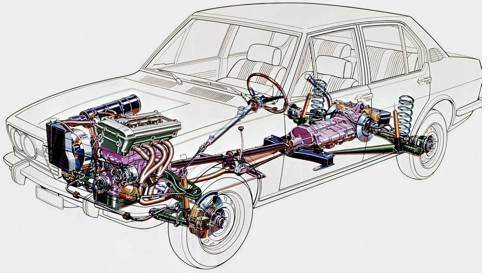
Source: https://www.autotecnica.org/sospensioni-lo-dellarte/
The whole thing was stably connected to the vehicle chassis by a semi-rigid bridge called the DeDion and to increase the stability of tie rods that kept the wheels perfectly perpendicular to the asphalt called Watt's parallelogram.
Here is an indicative diagram of the operation
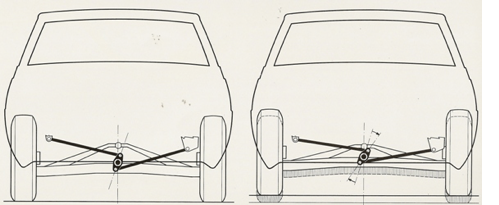
Source: http://www.alfasport.net/webPage/View.asp?id=737
Having made a brief introduction, let's start putting on our suits and getting our tools ready.
Here are the day's components
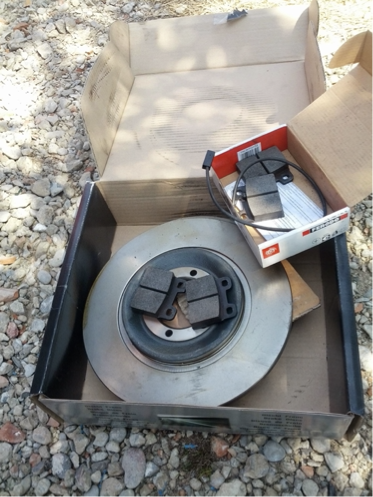
Source: Author
So rear discs and their pads.
First, since we can't keep the gear engaged and the handbrake on, we need to block the car with chocks in the front and work one wheel at a time. Ideally, we should have a nice lifting bridge, but I haven't been able to set it up yet, in the backyard!
Having lifted the car by levering the hydraulic lift over the DeDio's hitch plate and secured it with a stand on the outside, I crawled underneath.
Being a high-end car for the time, the rear calipers, like the front ones are opposed cylinders (called 2-pump) instead of being floating like most vehicles on the road.
Since the pad wear recovery in the rear is mechanical, in order to slide the pads out, the pistons have to be retracted so that the used friction linings can be pulled out.
Since I also have to change the discs, I retract them just far enough to be able to slide the disc out. I unscrew the axle shaft bolts and the disc comes out.
Said like that, it's pretty simple, but due to the fact that these bolts have a hexagonal hollow head, and placed under the vehicle they are subject to all the mud splashes that the wheels raise, so in order not to ruin the bolts it is necessary to clean them well and insert the wrench well all the way through.
Once the disc is removed, we release the old pads and retract the pistons to make room for the new pads.
We fit and secure the pads and mount the new disc, attach the axle shaft and secure the 6 bolts on the axle shaft flange.
Very, indeed extremely important detail is to put threadlocker in the fastening bolts on pain of unscrewing with vibration!
After reassembling everything the end result is the following
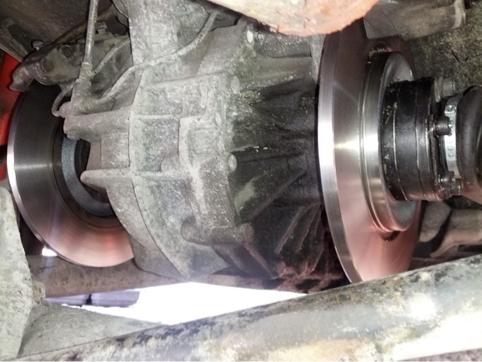
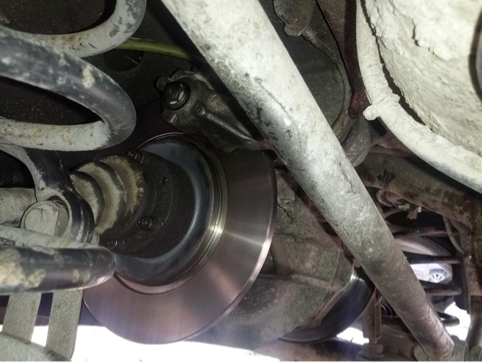
The steel bar in the very foreground is one of the struts of Watt's parallelogram.
Now to the replacement of the valve cover gasket.
We were pretty quick to change the brakes, weren't we?
It may be because we got lost in small talk while I was explaining the secrets of this car, but it's already been almost 2 hours!
No matter, when doing these jobs we need to be calm and quiet: we give the brakes the responsibility of our lives!
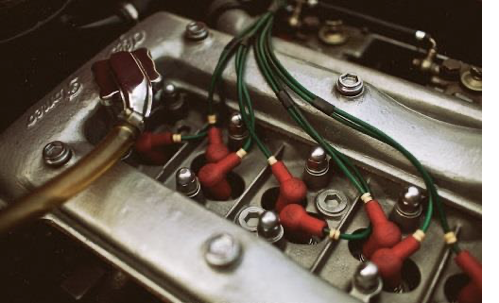
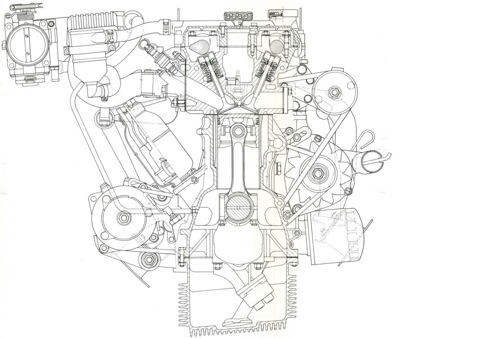
Well now the car is resting on top of its "feet" and we can devote ourselves to the beating heart. The very famous twin-shaft!
The engine in my car is a bit special because it was the first engine with dual a ccension (2 spark plugs per cylinder) to become standard on a road car.
The other car that was lucky enough to be equipped with a similar engine was the Giulia GTA .
I say similar because the valve angle of the Twin Spark engine, is not 88 degrees but much less; in fact, the combustion chamber is not hemispherical like that of the twin-shaft with 88° valves.
But back to us, this the engine compartment still closed.

First the ignition cables must be removed and marked to make it quicker when reassembling (even if you know the ignition order 1-3-4-2).
With the cables removed, proceed with removing all the Allen screws around the perimeter of the cover.
CAUTION: Exhaust side we need to put paper towels otherwise oil spills could fall on the manifolds with an indescribable stench when we start the engine.
Without the cover, the engine looks like this
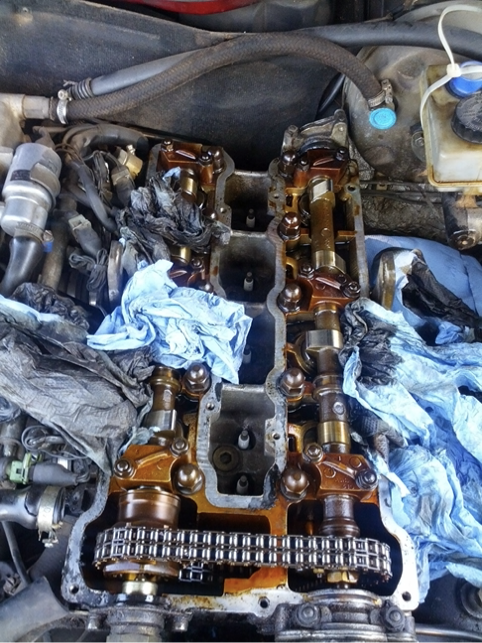
We perfectly clean both the base of the cover on the head and the cover itself, being careful not to scratch the tops otherwise the new gasket is useless.
Since we are dealing with aluminum and it is not possible to tighten the bolts with disproportionate torques, we can use some high-temperature silicone paste to help the seal.
Once we put a coat of paste on the top of the head, we gently lay the gasket down, put a coat of paste on the top of the cover, and we can lay it in place.
Now the most important thing: tightening the bolts.
Tightening should be done starting from the center and going outward alternately.
This is to avoid distortions of the cover that could originate oil leaks; by all means if one does not trust to do the procedure, one can always refer to the workshop manual available on almost any site in the sections dedicated to the Alfa 75.
That's the end of our engine journey for today as well; see you next time!
Oh, I forgot: I have connected the circuit I built for the oxy sensor, but there are some shorting problems that are taking me some time, as soon as I have solved them, I will share with you what I have managed to do!
HTTP is in use instead of HTTPS and no protocol redirection is in place. Do not enter sensitive information in this website as your data won't be encrypted.
Read about HTTP unsafety: [1] [2]
_ Vote for our WITNESS to support this FREE service!
Congratulations @mikezillo! You have completed the following achievement on the Hive blockchain And have been rewarded with New badge(s)
Your next target is to reach 550 posts.
You can view your badges on your board and compare yourself to others in the Ranking
If you no longer want to receive notifications, reply to this comment with the word
STOPTo support your work, I also upvoted your post!
Check out our last posts:
Yay! 🤗
Your content has been boosted with Ecency Points, by @mikezillo.
Use Ecency daily to boost your growth on platform!
Support Ecency
Vote for new Proposal
Delegate HP and earn more