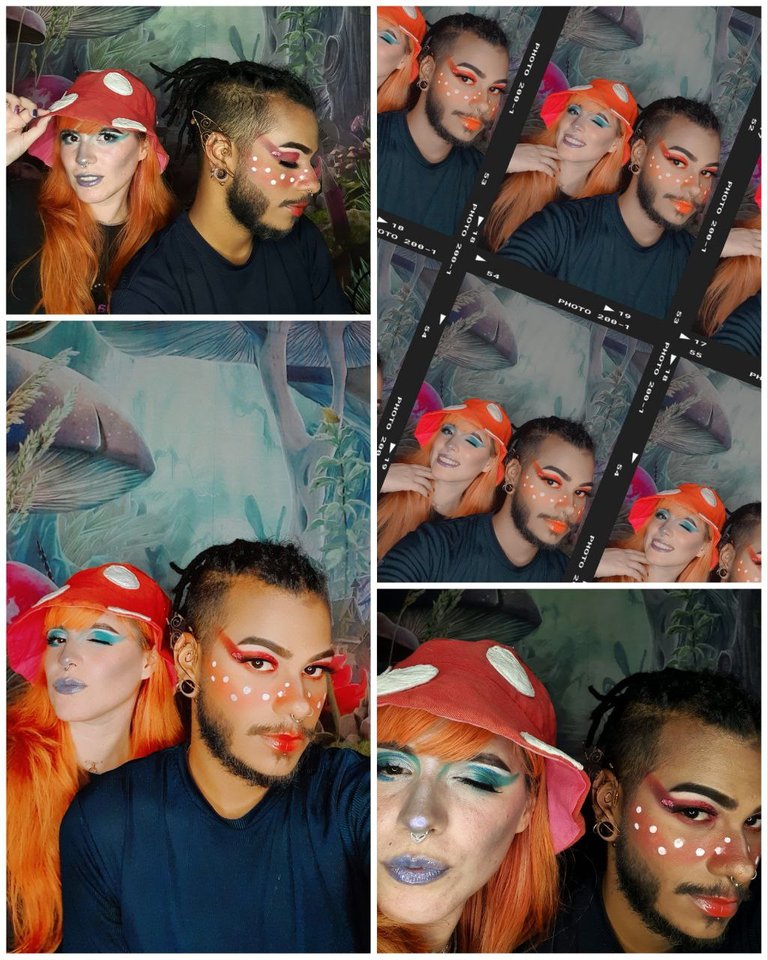
Hello beautiful humans from @hive this is my first post ever in this platform, well today I'm going to do my best to explain to anyone who might want to learn in how to recreat this beautiful mushroom makeup
(I love mushrooms)
And in collab with the amazing and talented @charliefix
Hola hermosos humanos de @hive, esta es mi primera publicación en esta plataforma, bueno, hoy voy a hacer todo lo posible para explicarle a cualquiera que quiera aprender cómo recrear este hermoso maquillaje de hongo.
(Me encantan los Hongos)
Y en colaboración con la increíble y talentosa
@charliefix
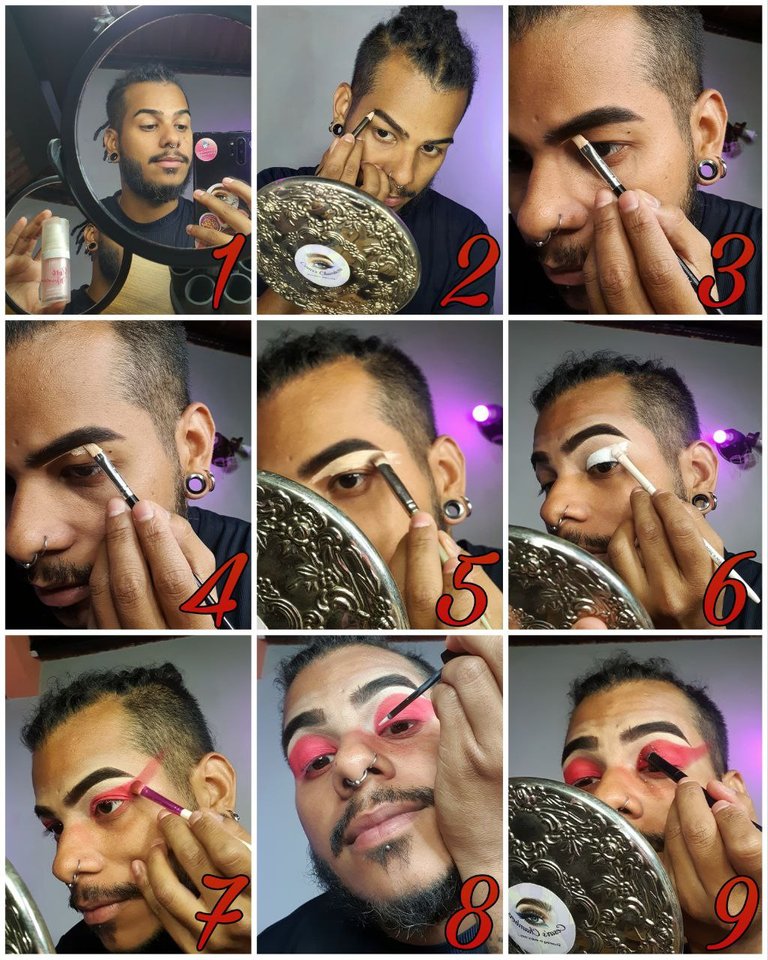
Pic 1: I started with the necessary amount for my face of primer so I can have a smoother skin.
Pic 2: then I proceed to do my eyebrows with a eyebrow pencil.
Pic 3 and 4: I applied concealer with a angular brush underneath the Brow to clean and define the Brow.
Pic 5: I blend it with a blend fluffy brush
Pic 6: With a flat brush I applied eyeshadow primer on the eyelid with the desired form.
Pic 7: With a eyeshadow brush I use red eyeshadow and applied on top of the eyeshadow primer and extended to the temple blending.
Pic 8 and 9: I add glitter adhesive and red glitter with a flat and soft brush.
Foto 1: Empecé con la cantidad necesaria de primer para mi rostro para poder tener una piel más tersa.
Foto 2: Luego procedí a hacerme las cejas con un lápiz de cejas.
Fotos 3 y 4: Apliqué corrector con una brocha angular debajo de la ceja para limpiar y definir la ceja.
Foto 5: Lo difumino con una brocha esponjoso para difuminar
Foto 6: Con una brocha plana apliqué base de sombra de ojos en el párpado con la forma deseada.
Foto 7: Con una brocha de sombra de ojos, uso sombra de ojos roja y la aplico sobre el primer de sombra de ojos y la extiendo hasta las sienes.
Foto 8 y 9: Agrego adhesivo de brillantina y brillantina roja con una brocha plana y suave.
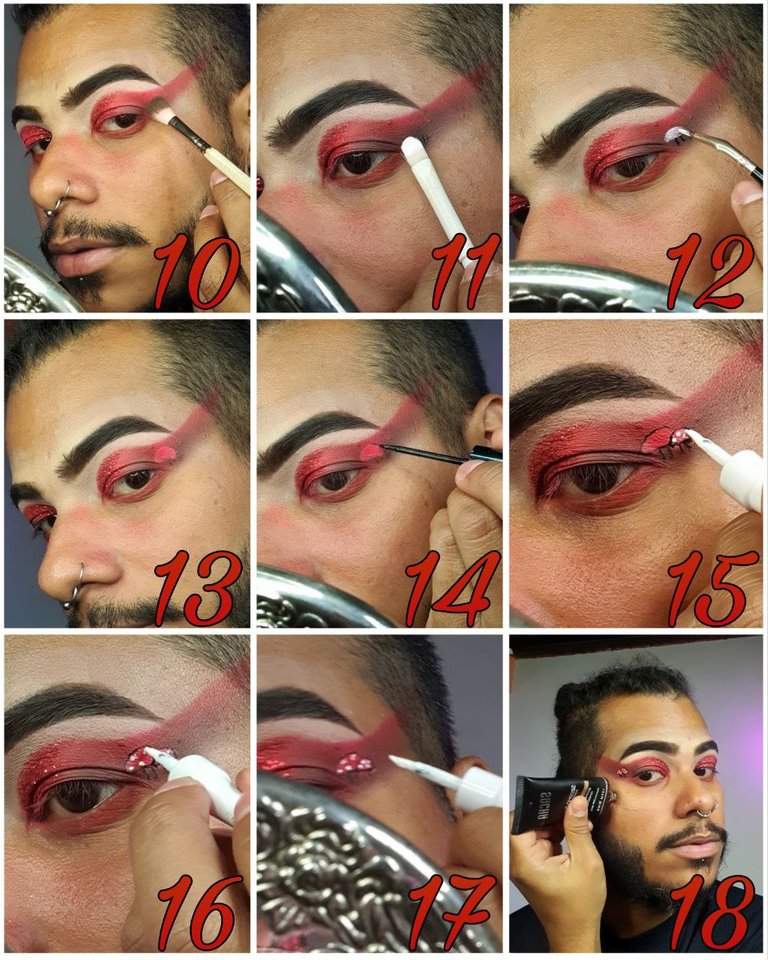
Pic 10: I added a little of brown eyeshadow to give some dimension to the eye and blended as well towars the temple.
Pic 11 and 12: With a flat brush I make the form of the head of the mushroom with eyeshadow primer and perfected with a smaller brush.
Pic 13: I applied the same Red eyeshadow on top the white primer to colour the head of the mushroom.
Pic 14 To 17: With black eyeliner I outline the whole mushroom and with white eyeliner I did the details (the small dots on the head of the mushroom.
Pic 18: I proceed to applied foundation.
Foto 10: Agregué un poco de sombra de ojos marrón para darle un poco de dimensión al ojo y lo difumine también hacia la sien.
Foto 11 y 12: Con una brocha plana realizo la forma de la cabeza del hongo con primer de sombra para ojos y perfecciono con un pincel más pequeño.
Foto 13: Apliqué la misma sombra de ojos roja sobre la base blanca para colorear la cabeza del hongo.
Foto 14 a 17: Con delineador negro delineé todo el hongo y con delineador blanco realicé los detalles (los puntitos en la cabeza del hongo).
Foto 18: Procedo a aplicar la base.
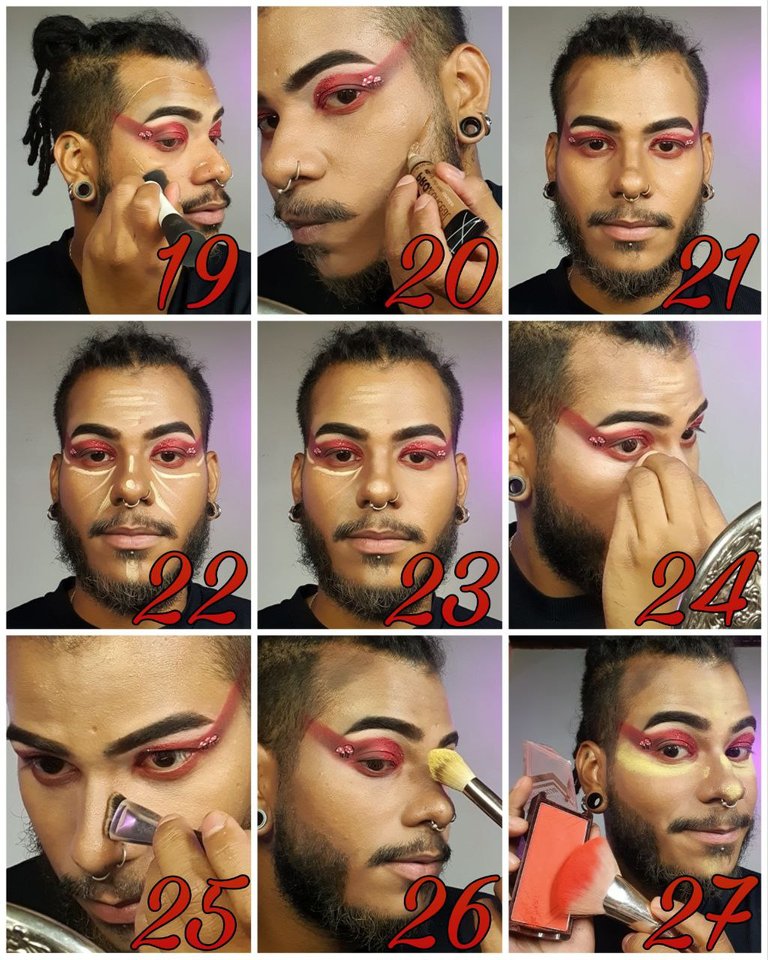
Pic 19: With a kabuki brush I blended the foundation.
Pic 20 to 22: With a concealer 2 tones darker than my skin tone I proceed to contour my face and create shadows on my forehead, nose and cheeks, with concealer 3 tones brighter than my skin tone I create lights on my forehead, under my eyes, nose and chin.
Pic 23: On this pic you guys can see how half of my face is blended.
Pic 24: I continue blending with a beauty blender.
Pic 25: With a contour brush I blend the contour.
Pic 26: Now I started baking with a translucent powder just on the parts of the face where I created the lights which is my forehead, under my eyes, nose and chin.
Pic 27: I leave the translucent powder on my face for a little while I applied the blush, and because I'm creating a Mushroom look I'm going to use alot of blush.
Foto 19: Con una brocha kabuki mezclé la base.
Foto 20 a 22: Con un corrector 2 tonos más oscuro que mi tono de piel procedí a contornear mi rostro y crear sombras en mi frente, nariz y mejillas, con un corrector 3 tonos más claro que mi tono de piel cree luces en mi frente, debajo de mi ojos, nariz y barbilla.
Foto 23: En esta foto pueden ver como la mitad de mi cara está difuminada.
Foto 24: Continúo difuminando con un beauty blender.
Foto 25: Con una brocha de contorno difumino el contorno.
Foto 26: Ahora comencé a hornear con un polvo translúcido justo en las partes de la cara donde creé las luces que son mi frente, debajo de mis ojos, nariz y barbilla.
Foto 27: Dejo el polvo translúcido en mi cara por un rato. Apliqué el rubor, y como estoy creando un aspecto de hongo, voy a usar mucho rubor.
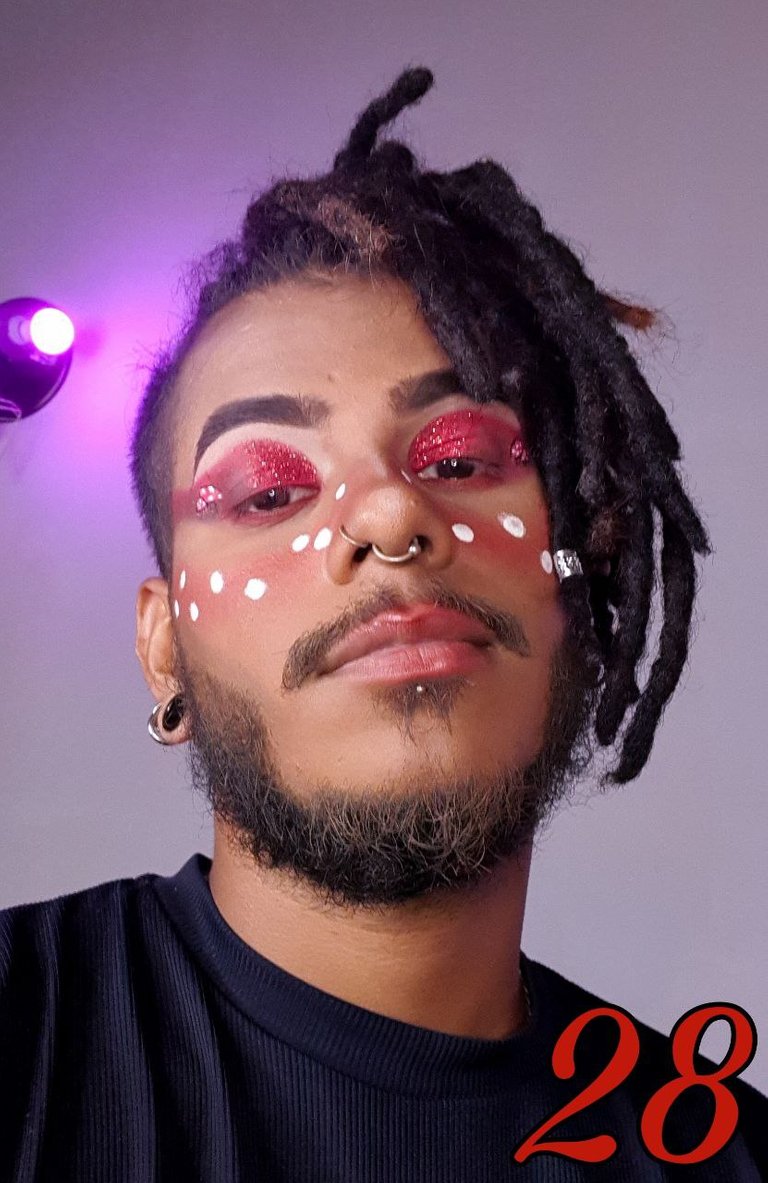
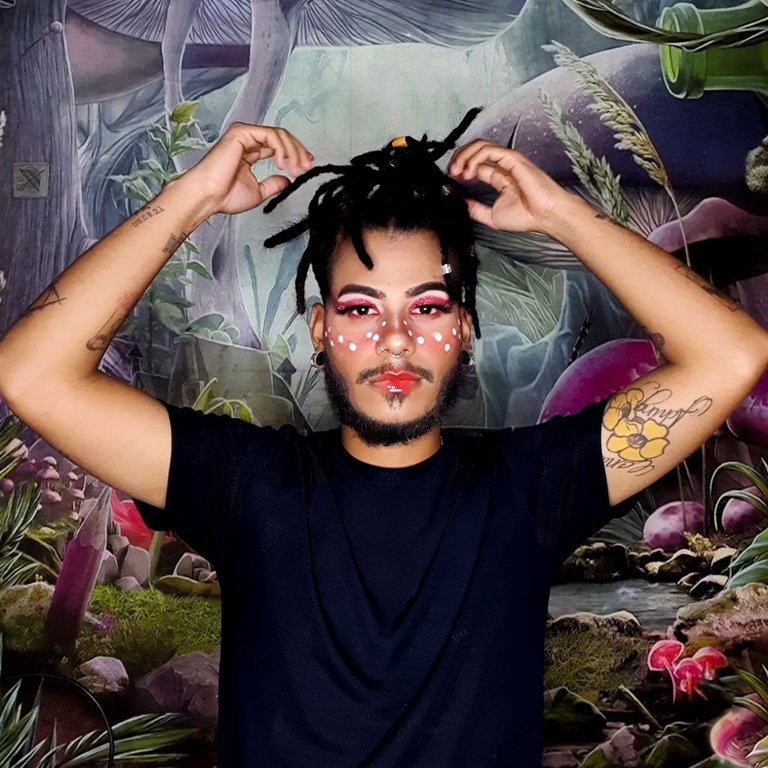
Pic 28: With alot of blush on my face I applied face powder and after I added some dots on top to simulate the scales of a mushroom.. Just to add some lashes and some lip gloss and... VOILAA
Foto 28: Con mucho rubor en la cara, apliqué polvo facial y luego agregué algunos puntos en la parte superior para simular las escamas de un hongo ... Solo queda agregar pestañas y un poco de brillo de labios y... VOILAA
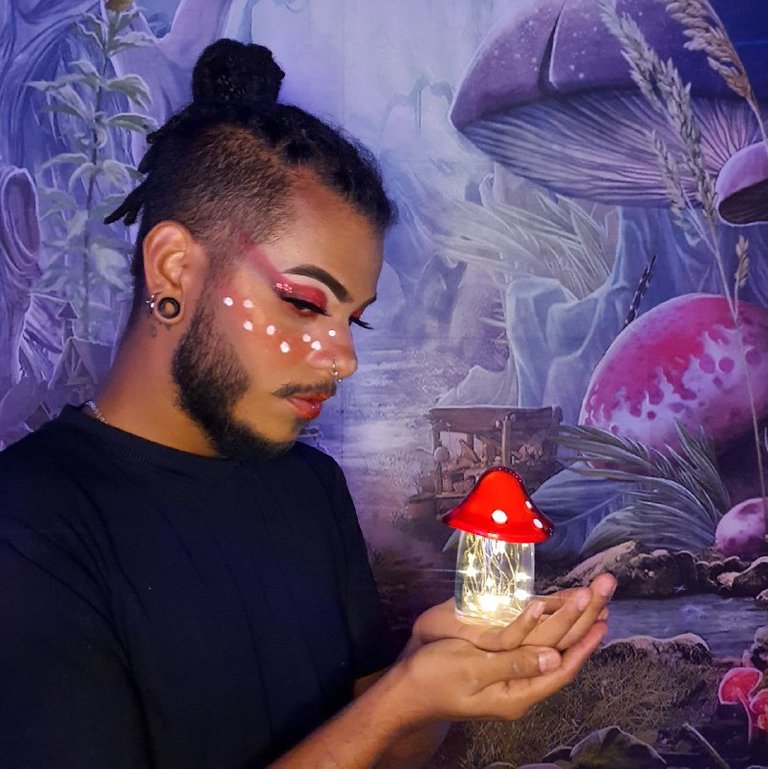
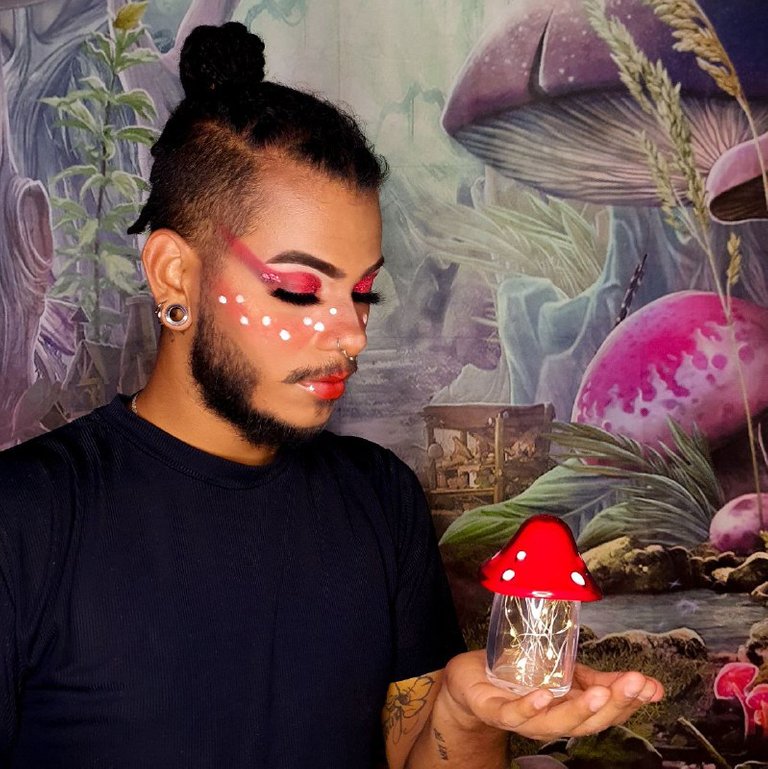
And as I promise this is my friend @charliefix, She's a wonderful makeup artist as well and she cooks very good too, Check her blog.
Y como lo prometido es deuda, esta es mi amiga @charliefix, Ella es una maquillista asombrosa y tambien cocina muy rico, Chequea su blog