HOLA MI LINDA COMUNIDAD
HELLO MY BEAUTIFUL COMMUNITY
Volvimos, después de terminar varios trabajos retrasados y a punto de comenzar mis clases, decidí hacerles este tutorial paso a paso de un lindo maquillaje en tonos verdes, espero que les guste
We are back, after finishing several late works and about to start my classes, I decided to make you this step by step tutorial of a nice make up in green tones, I hope you like it.

Paso a paso | Step by step
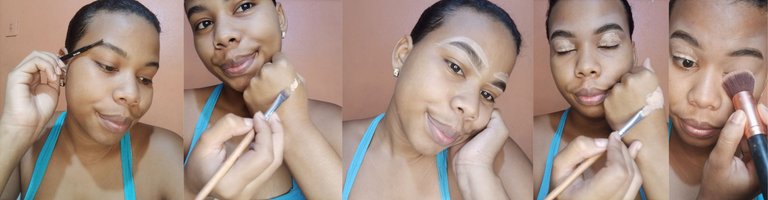
Siempre inicio mis maquillajes por las cejas, así que con ayuda del lápiz de cejas AOA hago la forma y las relleno, luego las corrijo usando ésta base que compré hace un tiempo y que es demasiado clara para mí🤭 y una brocha plana, cómo ven, tomo un poco de producto, lo coloco en mi mano y enmarco mis cejas para darles más definición, luego lo difumino y procedo a aplicar la misma base en mi párpado para que funcione como prebase de sombras, luego la difumino con ayuda de una brocha para bases.
I always start my makeups by the eyebrows, so with the help of the AOA eyebrow pencil I make the shape and fill them in, then I correct them using this foundation that I bought some time ago and that is too light for me🤭 and a flat brush, how do you see, I take some product, put it on my hand and frame my eyebrows to give them more definition, then I blend it and proceed to apply the same base on my eyelid to work as a pre-base for shadows, then I blend it with the help of a foundation brush.
Ahora aplico una sombra similar a mi tono de piel para sellar la base de los párpados y llegó el momento de colocar el primer color: un verde claro, que irá por toda la V externa de nuestro ojo, hasta llegar a la mitad del mismo. Yo lo apliqué con una brocha para difuminar. Luego con una brocha de difuminar más pequeña aplico un verde más oscuro, también en la V externa pero sin tapar el color más claro.
Now I apply a shade similar to my skin tone to seal the base of the eyelids and it's time to apply the first color: a light green, which will go all over the outer V of our eye, until it reaches the middle of the eye. I applied it with a blending brush. Then with a smaller blending brush I apply a darker green, also on the outer V but without covering the lighter color.
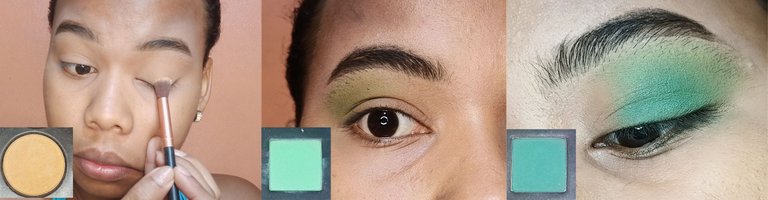
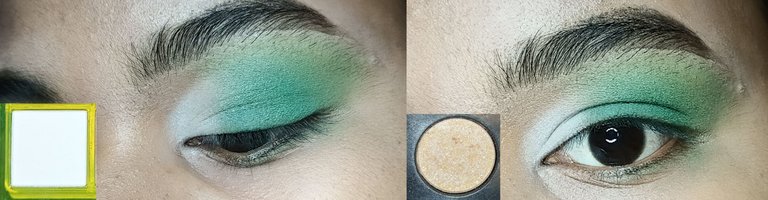
Ahora en la parte del lagrimal y hasta la mitad del ojo vamos a colocar una sombra blanca y sobre ella una sombra shimmer perlada. Recuerda pasar una brocha para difuminar entre el verde y el blanco para que se vea mejor tu maquillaje.
Now on the tear trough and up to the middle of the eye we are going to place a white shadow and on top of it a pearl shimmer shadow. Remember to use a brush to blend between the green and the white to make your makeup look better.
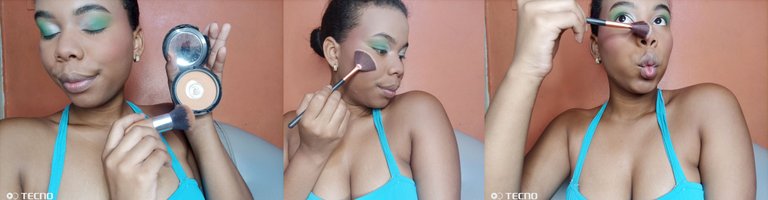
Ahora vamos con el resto del rostro. Yo comienzo aplicando un corrector naranja en ojeras y bozo para neutralizar, porque esas zonas las tengo más oscuras, lo difumino y luego aplico mi base, llevo bastante tiempo usando la SuperStay de Maybelline (luego les dejaré una reseña)
Now let's move on to the rest of the face. I start by applying an orange concealer on the dark circles under the eyes and the cheeks to neutralize, because those areas are darker, I blend it and then apply my foundation, I've been using Maybelline's SuperStay for quite some time (I'll leave you a review later).

Una vez difuminada la base, comienzo con los contornos, estos los hago con una base oscura, en mejillas y nariz. Luego uso un labial para que funcione como rubor.
Aclaratoria: Tanto el rubor como el contorno los apliqué en grandes cantidades para que se note en la cámara, si deseas un efecto más natural, puedes aplicar menos cantidad.
Once the foundation is blurred, I start with contouring, I do this with a dark foundation, on cheeks and nose. Then I use a lipstick to work as a blush.
Disclaimer: I applied both blush and contour in large amounts so that it shows on camera, if you want a more natural effect, you can apply less.
Ahora sello todo con mi polvo compacto y aplico iluminador. Para dar los toques finales, coloco mis pestañas postizas (luego les hablo de técnicas para ponerlas de la mejor forma).
Now I seal everything with my pressed powder and apply highlighter. To give the final touches, I apply my false eyelashes (I'll talk about techniques to apply them in the best way later).
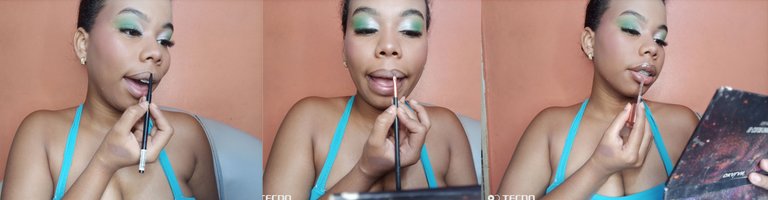
Ya para dar el toque final, toca pintar los labios, para lo que decidí usar un truco que aprendí hace un tiempo y hacerlos con mi mismo lápiz de cejas. Por lo que me delinee los labios, luego difumine las lineas con una brocha para labial y mis dedos y por último, apliqué un brillo labial. Y listo con eso termine mi máquillaje.
To give the final touch, it's time to paint the lips, for which I decided to use a trick I learned some time ago and do them with my own eyebrow pencil. So I lined my lips, then I blurred the lines with a lipstick brush and my fingers and finally, I applied a lip gloss. And that was it, I finished my makeup.
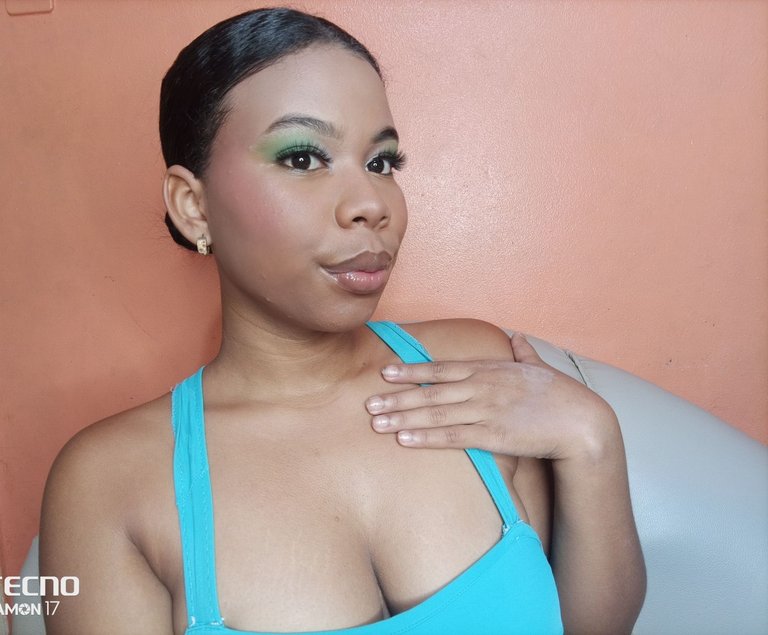
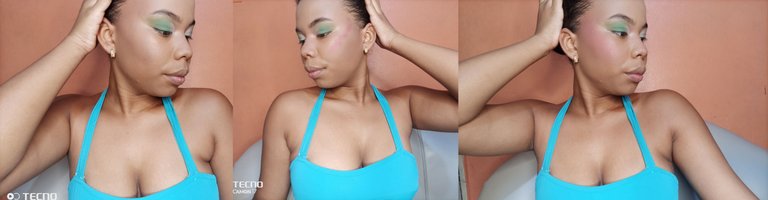
Fotos finales | Final photos

Y bueno, éste fue mi tutorial paso a paso de un maquillaje de noche en tonos verdes. Espero que el resultado les haya gustado tanto como a mí. Pronto volveré con más contenido, ésta vez con temática de halloween 🤭
And well, this was my step by step tutorial of an evening makeup in green tones. I hope you liked the result as much as I did. I'll be back soon with more content, this time with a halloween theme 🤭.
Gracias por leerme y hasta un próximo post
Thanks for reading and see you in a future post
Traducción: Deepl // Traslation: Deepl
Hi @gabyr02
Do you know you could have used #diy tag for this post to earn some BUIDL tokens in addition to Hive crypto?
In case you are not aware, read this post to know the kinds of content, among others, you could post using #diy tag.
You could also use the #diy tag when you share content showcasing your DIY skills.
When you use #diy tag your posts will also appear on https://built-it.io website, giving you wider exposure.
Because most people are not aware of the potential of BUIDL token, it can still be bought at very cheap price now.