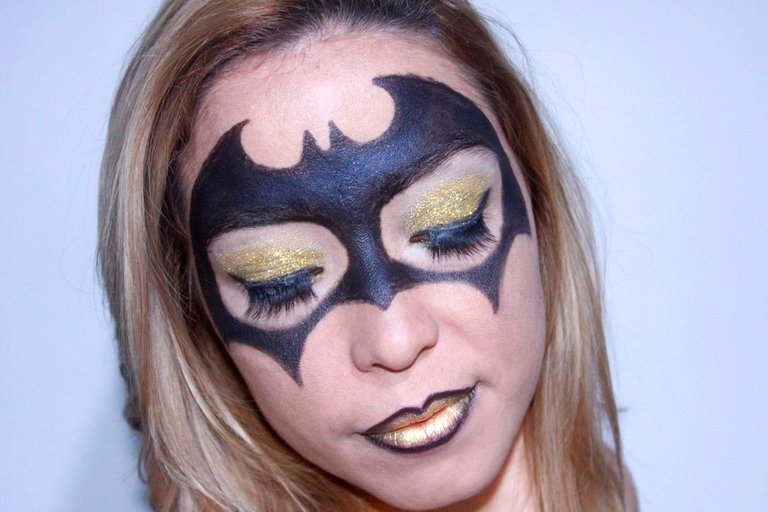
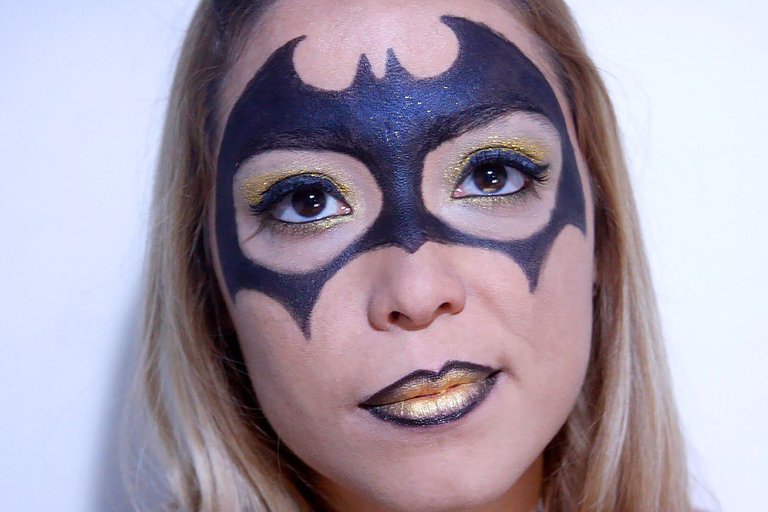
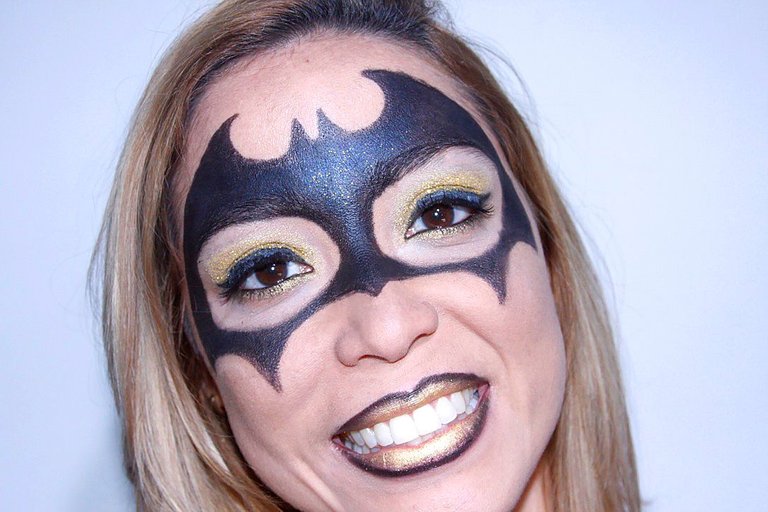
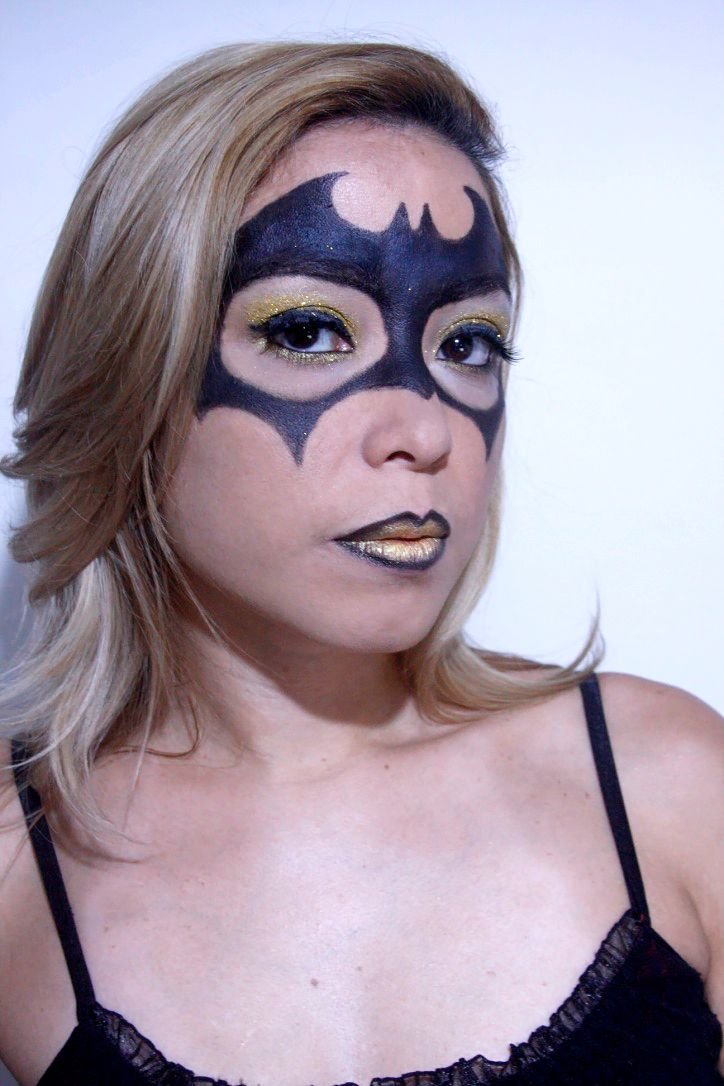
Hello my dear #Hive and #MakeUpPower, without going into polemics or deep reflections on the female scope in all areas of human development, it is clear that when it comes to comics and superheroes this premise is more than proven. We live in an era that is revolutionizing this fantastic world of metahumans and we females are not left behind. A few days ago I was able to see the superproduction that Zack Snyder versioned about the Justice League. The version of this great director is much darker and impressive than the previous one and as everyone knows, Batman despite not having superpowers has an important weight in the story. This character inspired me and I decided to go for the gothic influence to try a dark Batgirl style.
Materiales a utilizar :
- Corrector
- Lápiz corrector
- Base líquida
- Brochas para polvo, lengua de gato (para base), ventilador (para cuenca de ojos) y cejas, pincel delineador.
- Lápiz de ojos negro
- Sombra blanca, negra, azul oscura, amarilla
- Escarcha dorada
- Compacto
- Pestañas postizas
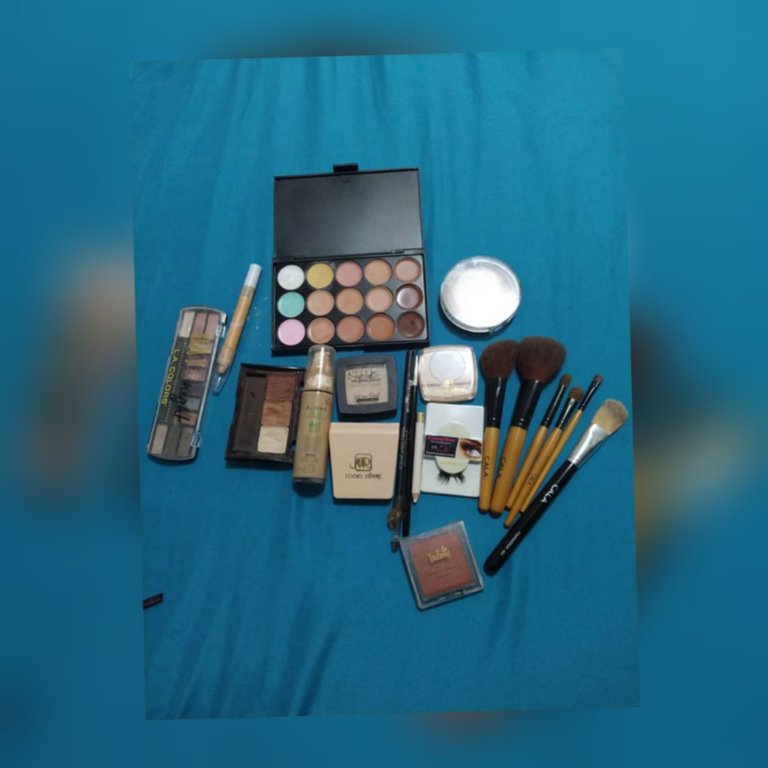
Materials to use :
💄 Concealer
💄 Concealer pencil
💄 Liquid foundation
💄 Powder brushes, cat tongue (for foundation), fan (for eye socket) and eyebrows, eyeliner brush.
💄 Black eye pencil
💄 White, black, dark blue, dark blue, yellow eye shadow
💄 Gold frost
💄 Compact
💄 False eyelashes
Piel natural: para lograr una piel natural sólo debes colocarte una base que sea un tono parecido a tu piel.
Tips: antes de maquillarte debes preparar tu rostro con productos que hidraten tu piel. Yo me aplico ácido hialurónico o alguna crema hidratante. El acabado del maquillaje será genial.
Natural skin: to achieve a natural skin you only need to apply a foundation that is a similar tone to your skin.
Tips: Before applying makeup you should prepare your face with products that moisturize your skin. I apply hyaluronic acid or a moisturizing cream. The makeup finish will be great.
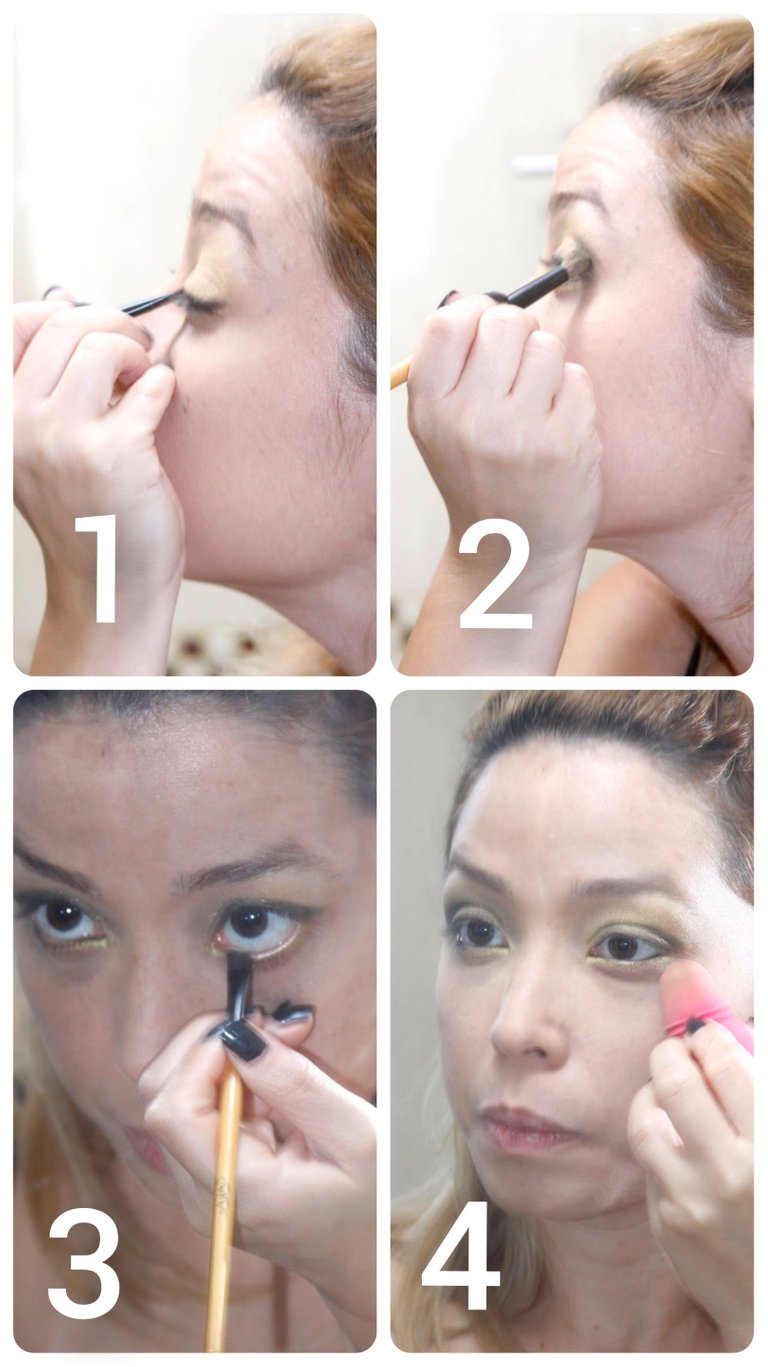
1er paso
Prepara tu delicada piel.
Debes aplicarte el corrector en ojeras, luego la base líquida con la brocha lengua de gato y dar toques suaves. Como se puede apreciar en la foto.
Sella el maquillaje con polvo compacto utilizando una brocha tal como se ve en la foto.
Coloca sombra amarilla en el párpado móvil y difumina en la cuenca dando toquecitos poco a poco hasta llegar al arco ciliar (el arco ciliar es el borde del hueso debajo de las cejas).
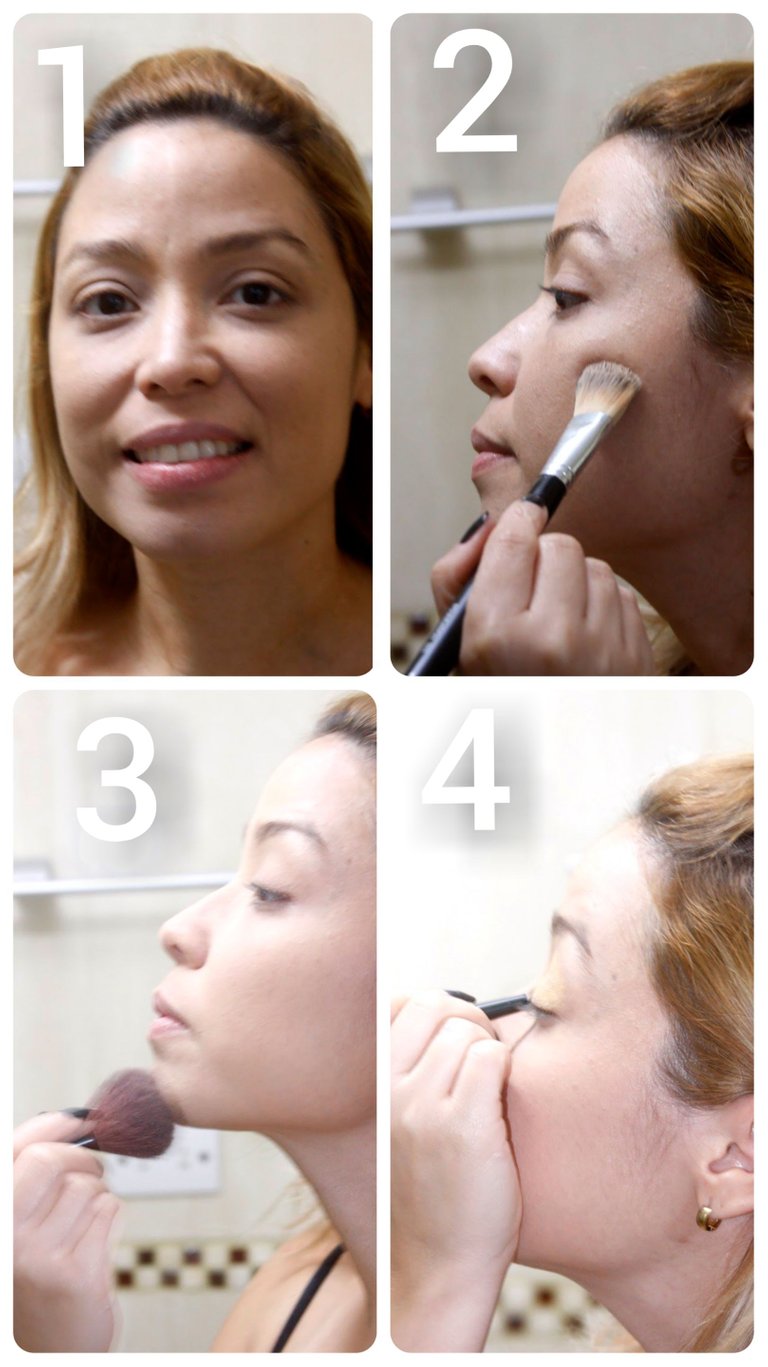
1st step
Prepare your delicate skin.
Apply the concealer under the eyes, then the liquid foundation with the cat tongue brush and dab gently. As you can see in the picture.
Seal the makeup with pressed powder using a brush as shown in the photo.
Place yellow shadow on the mobile eyelid and blend in the socket, dabbing little by little until you reach the ciliary arch (the ciliary arch is the edge of the bone under the eyebrows).
2do paso
Luego con un delineador negro traza una línea fina a ras de las pestañas y termínala con un “rabillo”.
Tips: si no tienes delineador puedes utilizar una sombra. Simplemente mojas el pincel y lo pasas por la sombra.Luego difumina con el pincel la cuenca de tus ojos. Debe quedar un efecto de ojos ahumados.
Delinea el borde inferior del párpado con un pincel de sombra amarilla.
Luego aplica polvo suelto o compacto en el área de las ojeras. (para limpiar cualquier residuo de sombra negra).
2nd step
Then use a black eyeliner to draw a thin line at the lash line and finish it with a "corner".
Tips: if you don't have eyeliner you can use a shadow. Simply wet the brush and run it through the shadow.Then blend with the brush in the socket of your eyes. You should get a smoky eye effect.
Line the lower edge of the eyelid with a yellow shadow brush.
Then apply loose or pressed powder to the under eye area. (to remove any black shadow residue).
3er paso
Corrije con un lápiz negro el rabillo (línea fija a ras de las pestañas).
Delinea el lagrimal con un creyón de color negro.
Aplica glitter. Si no tienes puedes hacerlo con escarcha dorada. Debes colocarte un poco de base en el párpado móvil y luego aplicar la escarcha. Así quedará pegada.
Colocar pestañas postizas y corregir nuevamente el rabillo del ojo.
3rd step
Correct with a black pencil the corner of the eyelashes (fixed line at the lash line).
Line the tear line with a black crayon.
Apply glitter. If you don't have any, you can do it with gold glitter. You should put a little foundation on your eyelid and then apply the glitter. This way it will stick.
Apply false eyelashes and correct the corner of the eye again.
4to paso
Listo el maquillaje de los ojos.
Procede a pintar la máscara en forma de murciélago en tu rostro.
Delinea poco a poco tu rostro. Ten paciencia.
Al terminar de delinear, rellena poco a poco con la ayuda del lápiz.
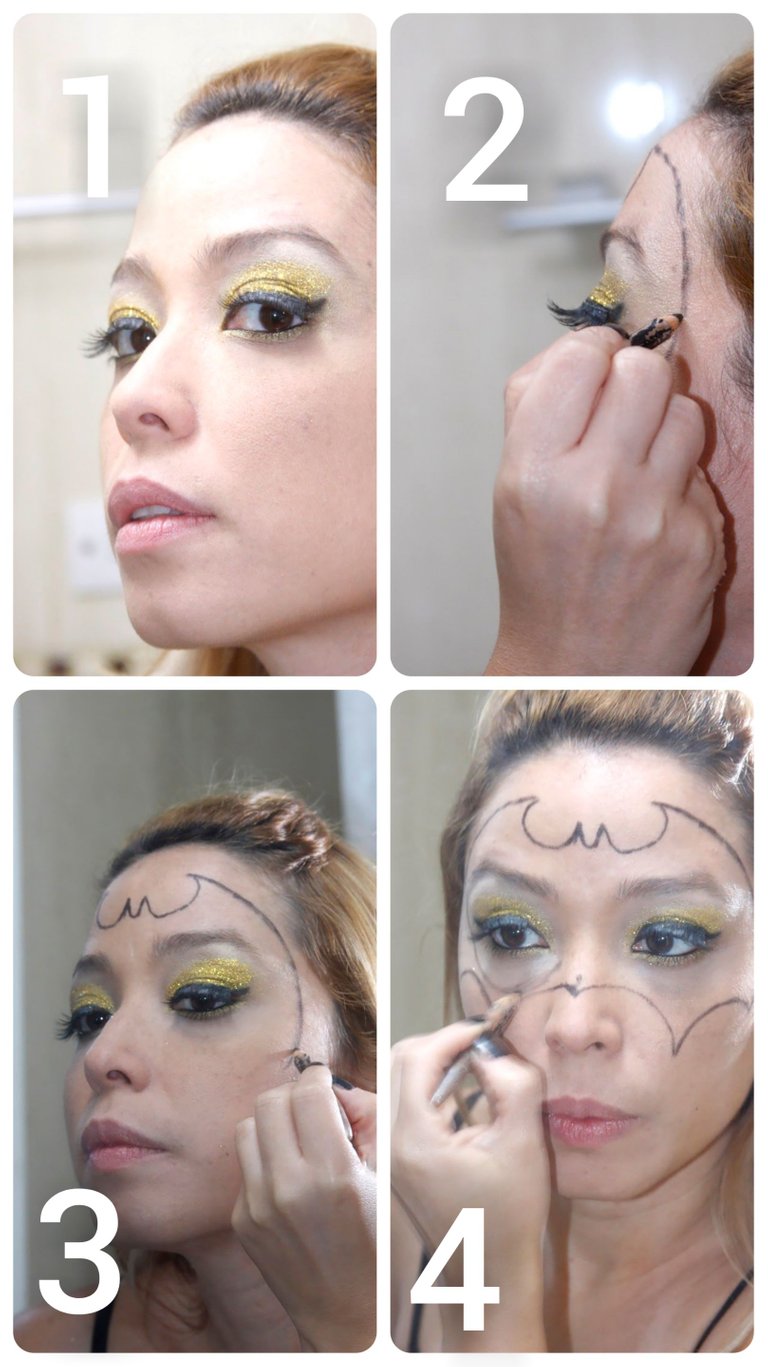
4th step
Ready the eye makeup.
Proceed to paint the bat-shaped mascara on your face.
Outline your face little by little. Be patient.
When you finish outlining, fill in little by little with the help of the pencil.
5to paso
Con la ayuda de un lápiz y sombra negras vas rellenando poco a poco con toques. La idea es que quede con un acabado satinado.
Máscara terminada.
Coloca el bálsamo en tus labios. Delinea tus labios de color negro.
Aplica sombra amarilla en tus labios y comienza a rellenar poco a poco.
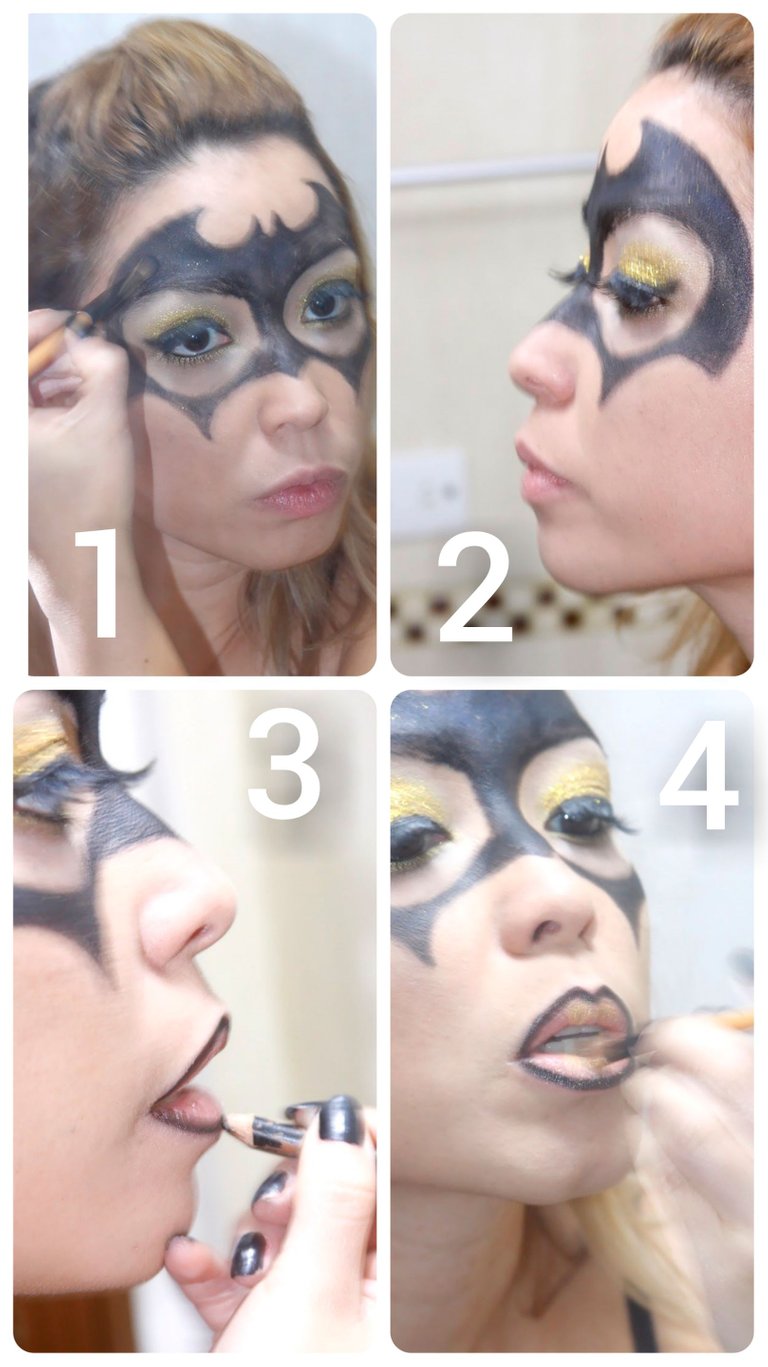
5th step
With the help of a pencil and black shadow you fill in little by little with touches. The idea is to get a satin finish.
Finished mascara.
Put the balm on your lips. Line your lips in black.
Apply yellow shadow on your lips and start filling in little by little.
Espero les haya gustado. Me divertí muchísimo haciendo fotos y maquillándome. Los espero en el próximo post. Gracias por leerme.
Todas las fotos son propias.
Fotógrafo: Charles Prato
Cámara: Canon EOS 4D.
Edición fotográfica: InCollage y Adobe Photoshop
Traductor: Deepl
I hope you liked it. I had a lot of fun taking pictures and doing my makeup. I hope to see you in the next post. Thanks for reading.
All photos are my own.
Photographer: Charles Prato
Camera: Canon EOS 4D.
Photo editing: InCollage and Adobe Photoshop.
Translator: Deepl
Simplemente Hermoso!!! que bello maquillaje amiga ¨La Batichica¨ me acordé cuando Miranda tenia 2 años la disfrace de Batichica.
@ayleenr gracias 🤣. Me imagino a Mirandita con ese disfraz.🙂
Hermoso tu maquillaje 😍 Batichica 🌃
@isaale muchas gracias 🙂
Te quedó genial!!! Me encantó el look
@tibaire gracias 😘
Le pones un mundo al maquillaje, estoy encantada con lo que haces. <3
@paogcv muchas gracias linda 😘 😀
Te quedó súper genial!!!
Batman es una de mis series favoritas. Y cuando aparecía Batichica en la pantalla de rctv nananananana <3 bellísima! Te quedó súper bien felicidades ;)
@nahupuku muchas gracias leerme. 🙂
no hay de que! esta muy cool tu contenido! exitos :D