Hola a toda la comunidad de Hive y a quienes ven mis publicaciones en Makeup Power.
Hello to all the Hive community and to those who see my posts on Makeup Power.
Tenia algunos días sin poder compartir nuevos maquillaje y contenido, pero ya estoy de vuelta!! Hoy con un look muy colorido, y continuando con los maquillajes inspirados en… Quise para esta oportunidad trabajar en un maquillaje inspirado en un arcoíris, desde pequeña me ha causado mucha curiosidad y sobre todo ahora grande me parece un fenómeno espectacular, debido a su aparición en el cielo formando un arco multicolor. Realmente ame este resultado, espero que puedas ver todo este proceso completo que no es para nada complicado y además puedas arriesgarte y realizarlo.
I haven't been able to share new makeup and content for a few days, but I'm back! Today with a very colorful look, and continuing with the makeup inspired by... I wanted for this opportunity to work on a makeup inspired by a rainbow, since I was little it has caused me a lot of curiosity and especially now I think it is a spectacular phenomenon, due to its appearance in the sky forming a multicolored arc. I really loved this result, I hope you can see the whole process, it is not complicated at all and you can take the risk and do it.
Para este maquillaje utilice mis productos del rostro que siempre uso, y pigmentos de colores que irán viendo en las imágenes.
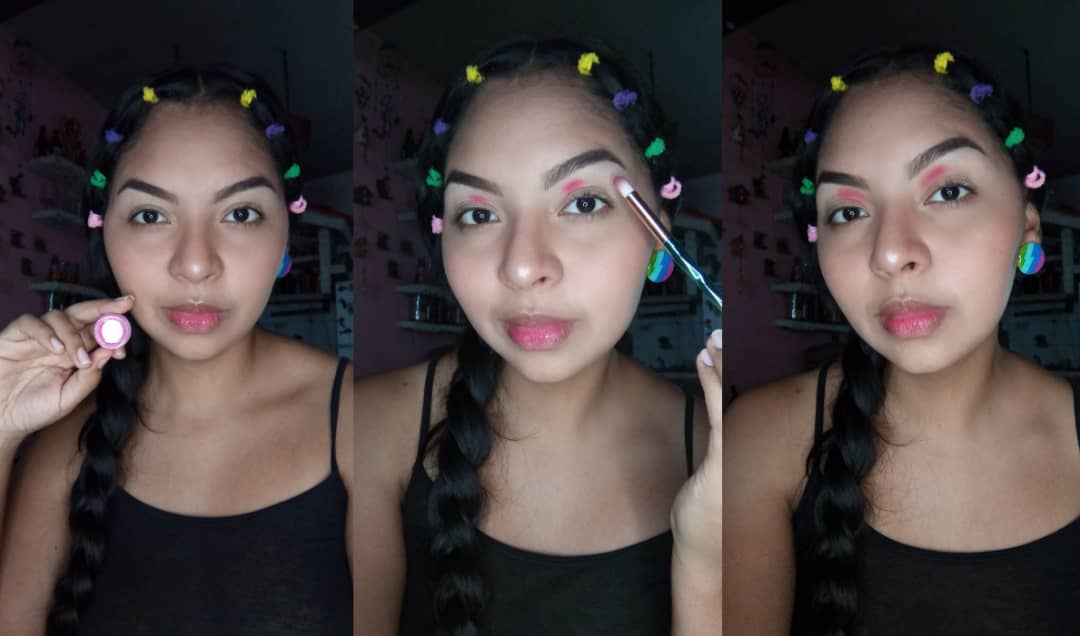
Pará dar inicio a este maquillaje de ojos y explicarles como fui realizándolo paso a paso, es importante decirles que para este maquillaje y pictorial comencé preparando todo mi rostro, aplicando hidratante, primer, base, corrector y polvo compacto, así mismo, un rubor, contorno e iluminador en la punta de la nariz. Es por eso que no verán en las fotografías este proceso si no solamente el de los ojos.
To start this eye makeup and explain how I did it step by step, it is important to tell you that for this makeup and pictorial I started by preparing my face, applying moisturizer, primer, foundation, concealer and pressed powder, as well as blush, contour and highlighter on the tip of the nose. That's why you won't see in the pictures this process but only the eyes.
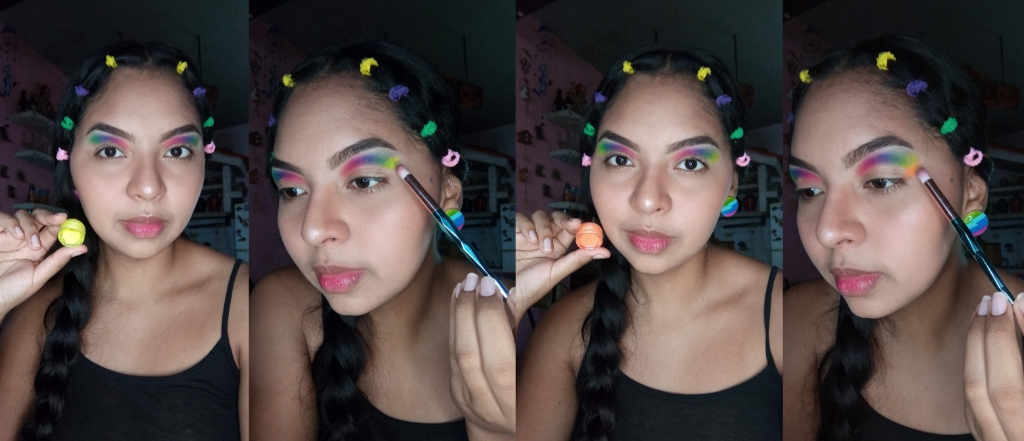
Ahora bien, cuando me hice la idea de querer hacer un maquillaje inspirado en un arcoíris o en sus colores, vi algunas referencias y decidí ordenar los colores de una manera en especifico. A medida que avances y veas las fotos te darás cuenta que fue de la siguiente manera : Rosado, Morado, Azul, Verde, Amarillo y naranja.
Now, when I got the idea of wanting to do a makeup inspired by a rainbow or its colors, I saw some references and decided to order the colors in a specific way. As you progress and see the pictures you will realize that it was as follows : Pink, Purple, Blue, Green, Green, Yellow and Orange.
Claramente tu puedes cambiar este orden. Empezando por el naranja y terminando en rosado, o quitándole algunos de ellos. Todo queda a tu elección. Como yo decidí comenzar con el rosado, tomé de este pigmento y lo aplique a toques con una brocha cerrada que no es para difuminar y como pueden observar en la imagen tampoco lo hice desde el inicio de mi ojo, si no mas atrás, y fui difuminando.
Clearly you can change this order. Starting with orange and ending in pink, or removing some of them. It's all up to you. As I decided to start with the pink, I took some of this pigment and applied it in dabs with a closed brush that is not for blending and as you can see in the picture I didn't do it from the beginning of my eye, but from the back, and I blended it out.
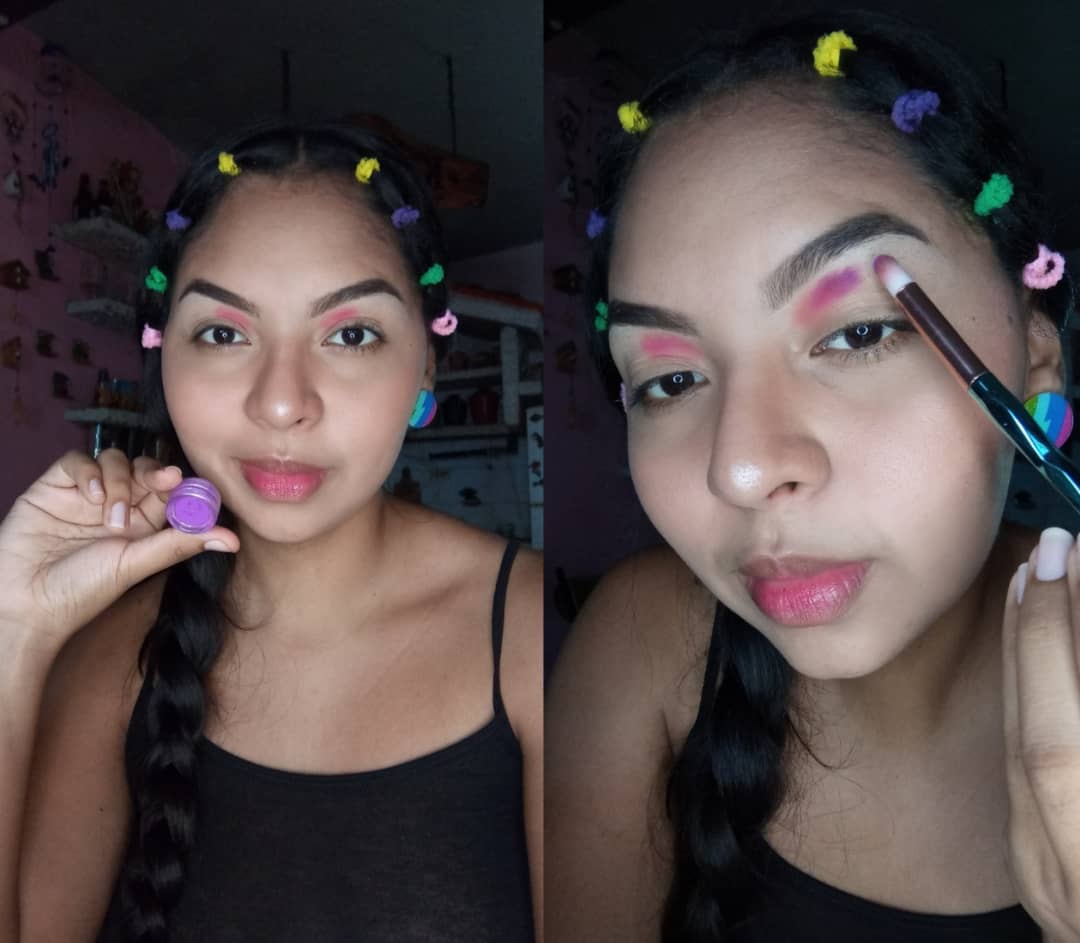
El siguiente paso fue aplicar el morado, y trabajado con los mismos pigmentos lo tomé e hice el mismo procedimiento que con el rosado, claramente, que este al lado del otro. Tratando de mezclarlos para ir haciendo ese degradado entre ellos.
The next step was to apply the purple, and worked with the same pigments I took it and did the same procedure as with the pink, clearly, that this one next to the other. Trying to mix them to make that gradient between them.
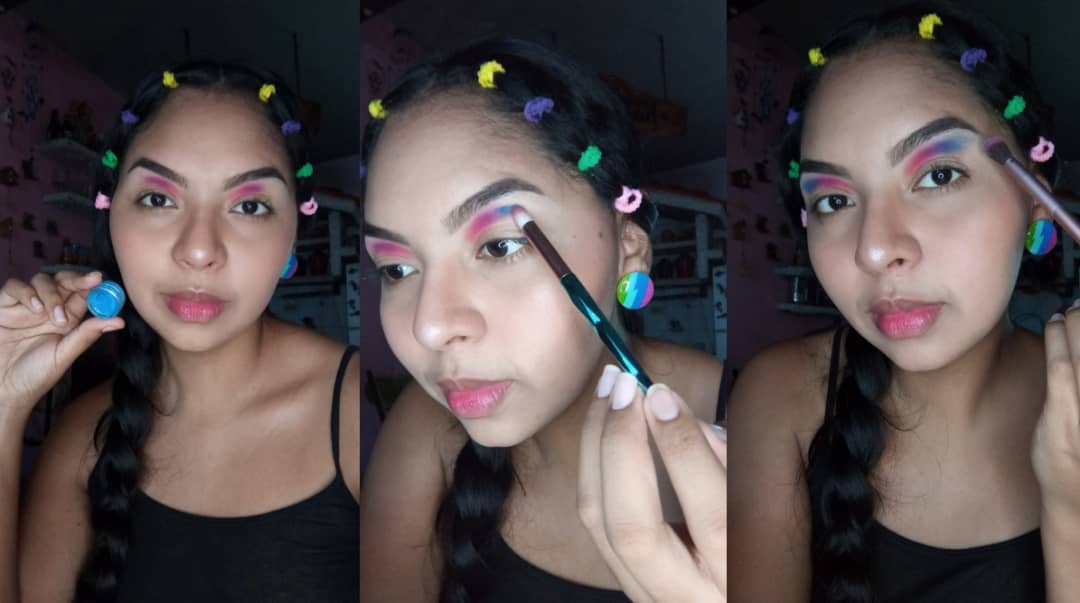
El procedimiento con el resto de los colores fue el mismo. Lo que cambiaba era la ubicación de ellos.si te puedes dar cuenta ninguno a excepción del naranja fue llevado hasta atrás completamente. Aplicaba a toques, difuminaba y mezclaba con el color anterior. En este caso el azul con el morado que ya había aplicado.
The procedure with the rest of the colors was the same. What changed was the location of them. If you can see, none of them, except for the orange, was taken to the back completely. I dabbed, blended and mixed with the previous color. In this case the blue with the purple that I had already applied.
Como cuarto color y seguido del azul, tomé y trabaje con el pigmento verde. Realizando el mismo procedimiento. Aquí ya iba casi llegando al final de mi cuenca. Aún faltaban 2 tonos más..
As a fourth color and following the blue, I took and worked with the green pigment. Performing the same procedure. Here I was almost at the end of my basin. There were still 2 more shades to go...
Y estos fueron los dos tonos que faltaban y con los que se terminaba la secuencia del arcoíris que estaba realizando.. El amarillo y por ultimo el naranja, que fui mezclando y difuminado en mi V externa.
And these were the two shades that were missing and with which the sequence of the rainbow I was doing was finished... The yellow and finally the orange, which I was mixing and blending in my outer V.
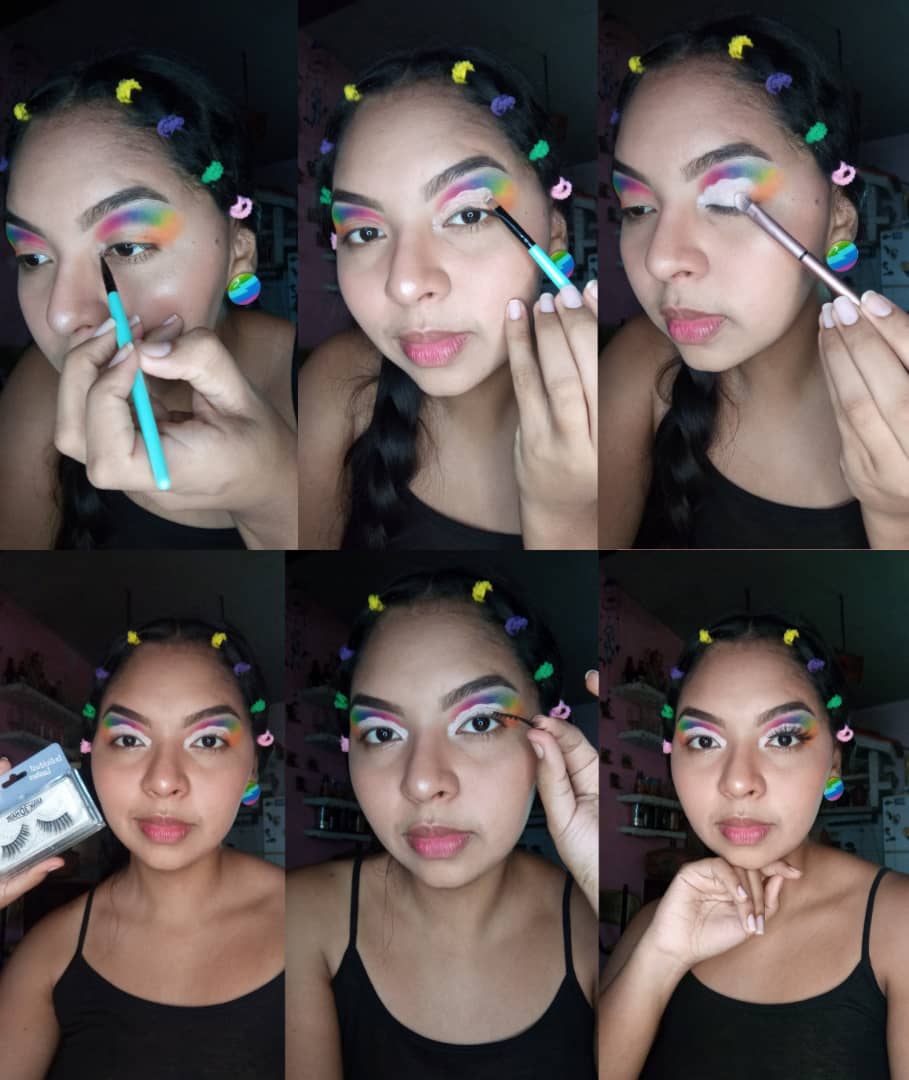
Para marcar mi cuenca, no limpie como lo he echo en ocasiones anteriores. Esto porque no sabía exactamente como iba a ir quedando la forma que quería hacer. Comencé con una brocha plana pequeña a marcar círculos que poco a poco hicieron que se viera como una nube y fue exactamente lo que quería lograr, lo rellene con corrector y selle con sombra color blanca.
To mark my basin, I did not clean up as I have done on previous occasions. This is because I didn't know exactly how I was going to get the shape I wanted to make. I started with a small flat brush to mark circles that little by little made it look like a cloud and it was exactly what I wanted to achieve, I filled it with concealer and sealed it with white shadow.
Pará este look de ojos hice algo diferente, que no había mostrado en el blog y fue aplicarme pestañas postizas. Quiero que vean en las fotos muy bien el cambio tan grande que pueden hacer unas lindas pestañas.
For this eye look I did something different, which I had not shown on the blog and that was to apply false eyelashes. I want you to see in the photos how big a change a few lashes can make.
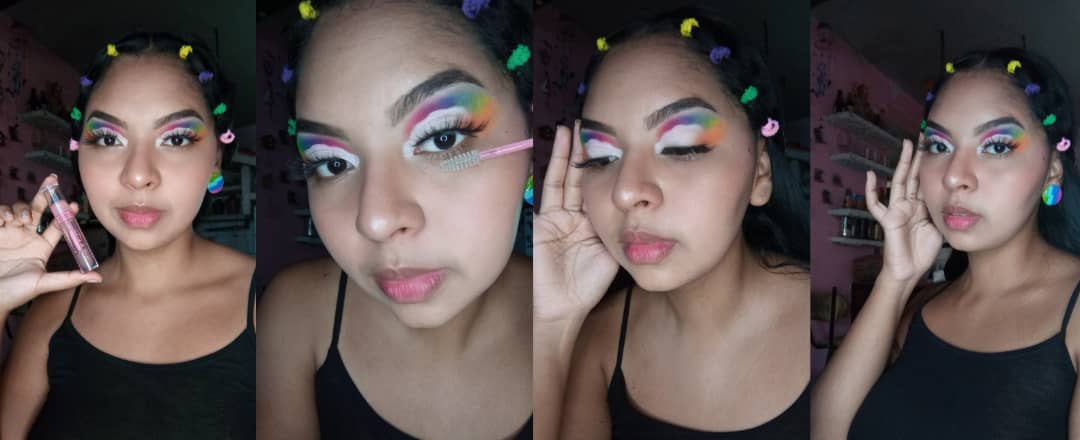
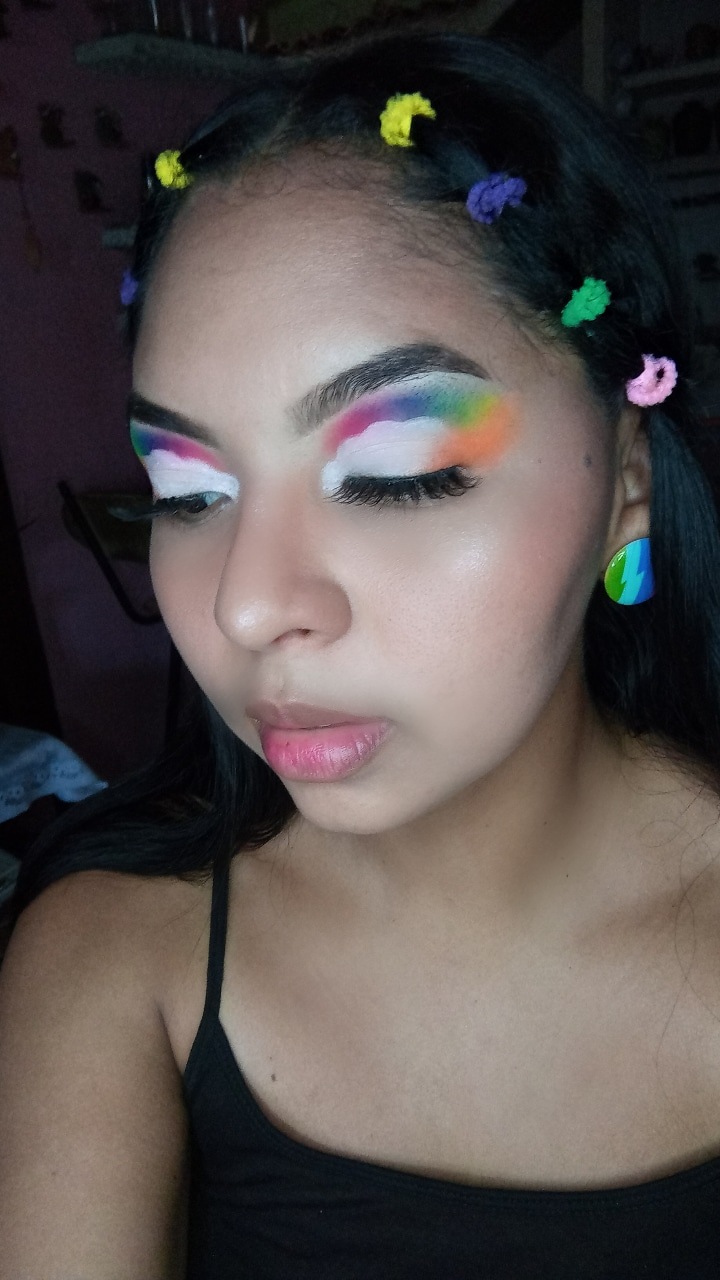
Cuando ya me las había pegado, tomé un rimel transparente y aplique en mis pestañas inferiores, también en las postizas para que se unieran con mis pestañas naturales. Y listo! El resultado de este maquillaje me gustó muchísimo. La combinación de colores, la definición de la nube y sobre todo el gran efecto que hizo colocarme pestañas. Cuéntame que te pareció este maquillaje a ti y si te gustaría recrearlo?
Once I had glued them on, I took a clear mascara and applied it on my lower lashes, also on the false lashes so they would blend with my natural lashes. And that was it! I really liked the result of this makeup. The combination of colors, the definition of the cloud and above all the great effect it gave me. Tell me what you thought of this makeup and if you would like to recreate it?
Espero que les haya gustado tanto como a mi este maquillaje y mi contenido.
I hope you liked this makeup and my content as much as I did.
Texto traducido en DeepL/Text translated at DeepL
Primera imagen realizada en Postermywall/First image made in Postermywall
El resto de las imágenes fueron capturadas con mi teléfono Honor8A/The rest of the images were captured with my Honor8A phone.
@maria2001 Muy linda ☺️❤️
@naty16 muchísimas gracias por leer mi post, y que te haya gustado.