
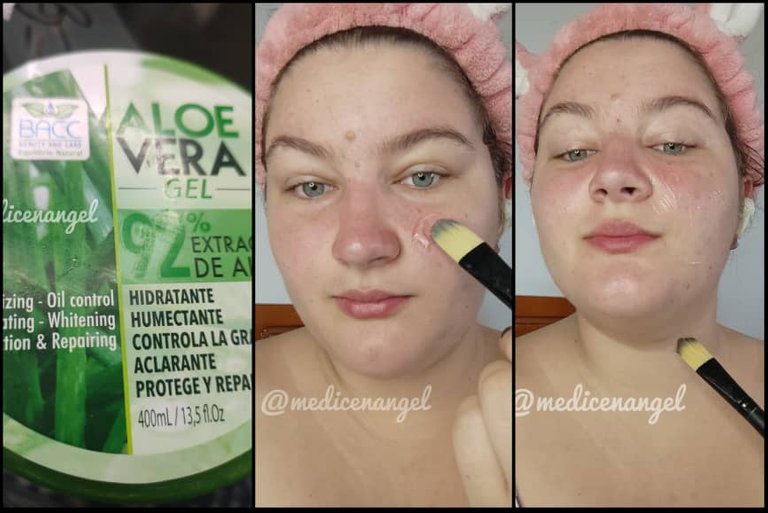
¡Hola a todos! Soy Angel y en el post de hoy estaré realizando un maquillaje en tonos morados, rojizos, naranjas y amarillos, inspirado en los atardeceres tan hermosos y característicos del estado la guaira. Comenzaremos hidratando el rostro y el cuello, yo utilizo este gel de aloe vera de BACC y dejaremos que la piel absorba el producto.
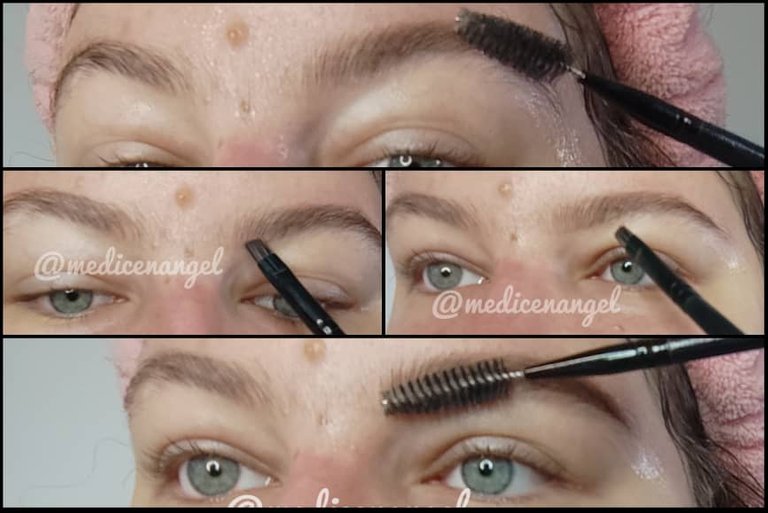
Ahora haré las cejas, primero las peinare hacia arriba, luego con una sombra de cejas hare una línea desde el principio hasta el final de la ceja por la parte de abajo y empezare a rellenar los espacios vacíos con más sombra, difuminare con el mismo cepillo que utilice para peinarla.
Ahora corregiremos los bordes con un poco de corrector liquido y una brocha plana lengua de gato. Difuminaremos con una esponjita (beauty blender).Ahora prepararemos el parpado para poder aplicar las sombras. Colocare corrector en el parpado, lo difuminare con una beauty blender y sellare con una sombra clara.
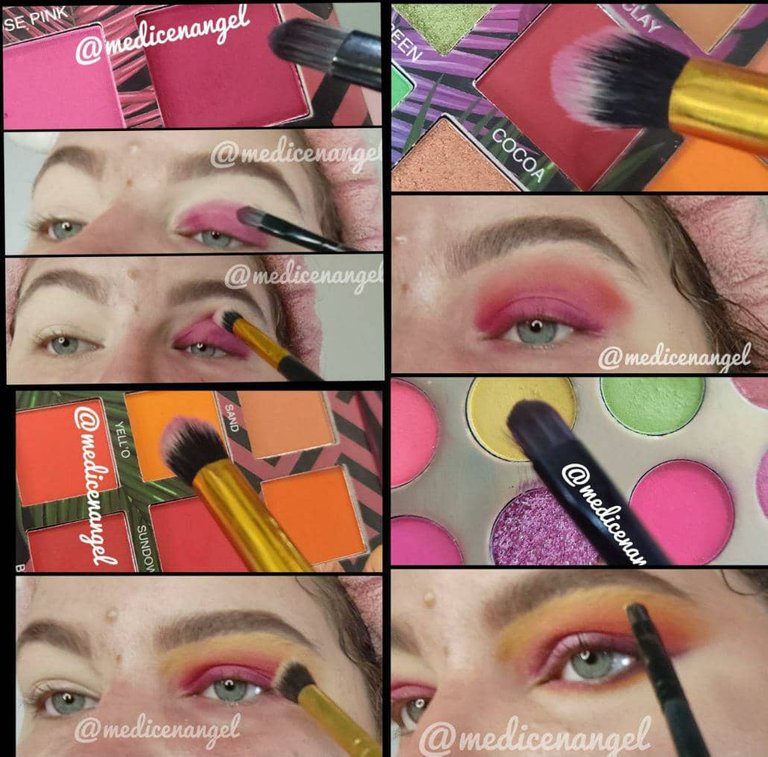
Recuerden quitar el exceso de sombra dando leves toques en el mango de la brocha, para que no queden parches (este tip aplica para todas las brochas y sombras) Ha llegado el momento de comenzar con las sombras, yo estaré utilizando la paleta carnival III de coco urban como colores principales.
El primer tono que empleare será twilight, un color vino, lo depositare en el, parpado móvil a toquecitos y lo subiré un poco hacia el parpado fijo. Posteriormente lo difuminare en círculos con una brocha balita sin producto. A continuación agregare el tono cocoa (rojo ladrillo ) para terminar de difuminar el tono anterior y subir un poco mas el color y sobre el tono cocoa colocare un naranja (tono yell’o) para ir creando ese degradado característico de los atardeceres, lo depositaremos en círculos con una brocha amplia balita. Encima del naranja, por debajo de la línea de la ceja aplicaremos amarillo con una brocha lengua de gato delgada, este tono lo tome de otra paleta, es un amarillo “pollito”.
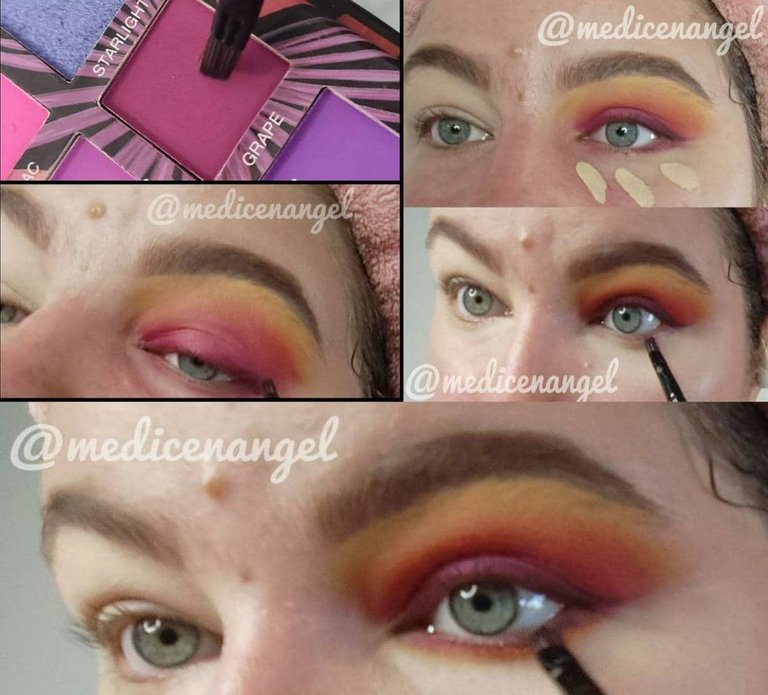
Hare un delineado de la esquina del ojo hacia adentro, pegado a las pestañas con sombra en el tono grape (es un color morado opaco) con una brocha plana diagonal y lo difuminare hacia arriba. Intensificare el delineado con un poco de negro en la esquina externa de ojo sin difuminarlo mucho. Ahora colocare corrector en la zona de la ojera y lo difuminaré con una beauty blender, luego aplicare muy pegado a las pestañas inferiores el mismo tono morado que aplique para el delineado de arriba con una brochita plana delgada y lo difuminare con el color naranja “yell’o”.
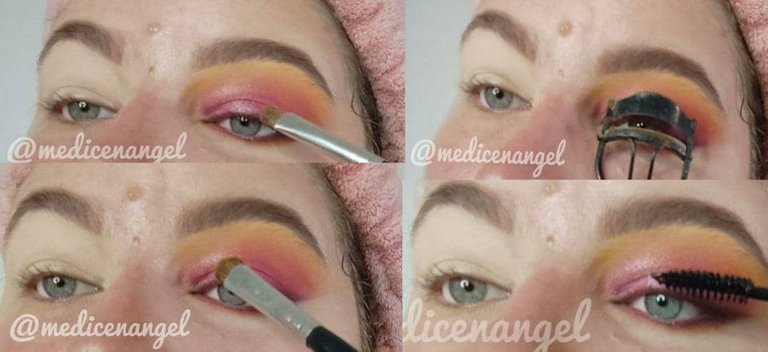
Para colocarle un pop de brillo al maquillaje colocare esta sombra satinada rosada en el parpado en forma de semicírculo con una brocha plana, como se aprecia en la imagen.Rizare mis pestañas y colocare mascara de pestañas
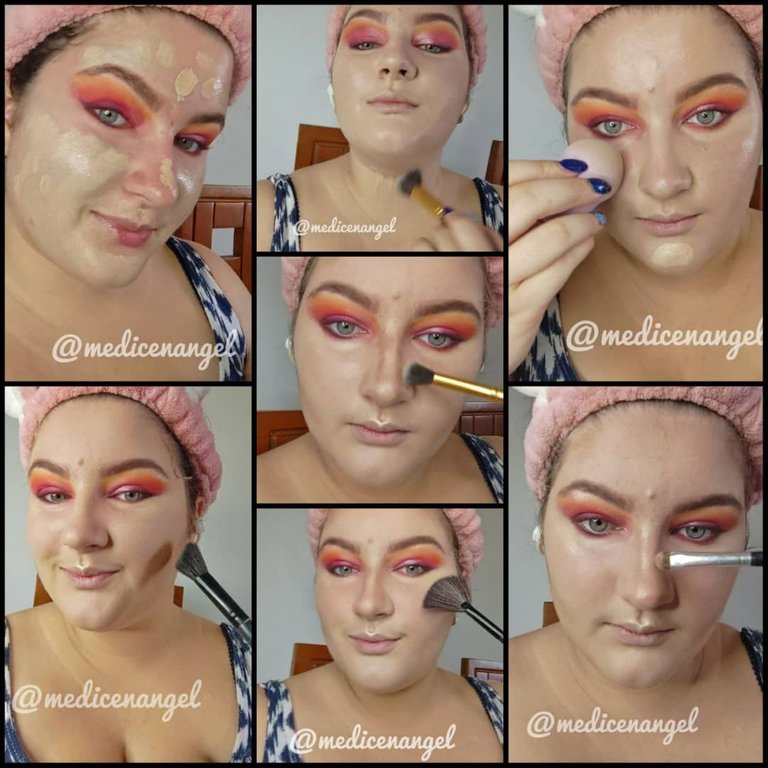
Luego seguiré los mismos pasos para hacer el maquillaje del otro ojo y ahora hare la piel. Con el rostro y el cuello previamente hidratado aplicare primer, dejare que se seque y aplicare la base, coloco puntos de base por todo el rostro, a mi me gusta esparcirla con una brocha y luego difuminar con la esponja. Sellare la base con polvo suelto.
A continuación, hare los contornos y puntos de luz. El contorno lo voy a realizar con un polvo 3 tonos más obscuro que mi rostro con una brocha angular grande. Para el contorno de los cachetes nos vamos a guiar de la oreja hacia la comisura de la boca, y para el contorno de frente y mentón usaremos la misma brocha y difuminaremos el contorno. Para la nariz trazaremos una línea de cada lado con una brocha tipo kabuki pequeña angular, las líneas tienen que estar juntas, pero dejando un pequeño espacio, que será el punto de luz.
Ahora colocaremos rubor he iluminaremos, estaré utilizando un rubor en tono coral y un iluminador rose gold. Para aplicar el rubor sonreiremos y lo aplicaremos en los cachetes con una brocha de cabezal ancho, en lo personal me gusta aplicar un poco en la nariz. Para el iluminador aplicaremos en los pómulos con una brocha abanico. En el tabique, en la punta de la nariz, en el arco de cupido y debajo de la ceja lo aplicaremos con una brocha plana.
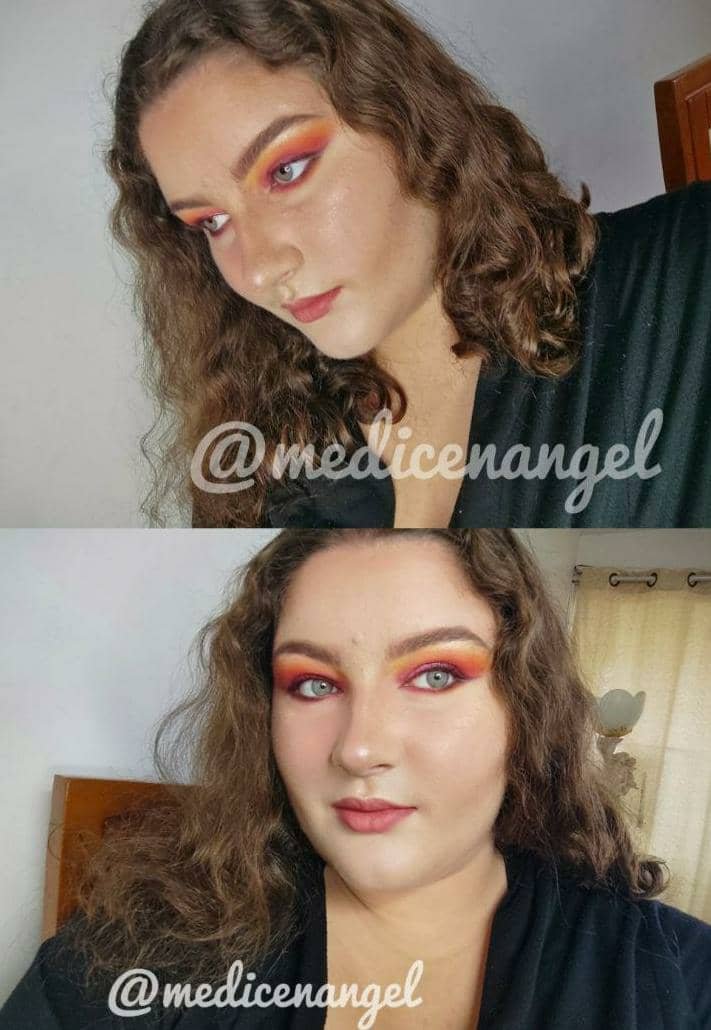
Aplicare un labial rosado opaco mate para finalizar el maquillaje y si necesitamos que el maquillaje dure varias horas usaremos fijador de maquillaje en todo el rostro. Y el look final estaría listo.
Ahora haré las cejas, primero las peinare hacia arriba, luego con una sombra de cejas hare una línea desde el principio hasta el final de la ceja por la parte de abajo y empezare a rellenar los espacios vacíos con más sombra, difuminare con el mismo cepillo que utilice para peinarla.
Ahora corregiremos los bordes con un poco de corrector liquido y una brocha plana lengua de gato. Difuminaremos con una esponjita (beauty blender).Ahora prepararemos el parpado para poder aplicar las sombras. Colocare corrector en el parpado, lo difuminare con una beauty blender y sellare con una sombra clara.
Recuerden quitar el exceso de sombra dando leves toques en el mango de la brocha, para que no queden parches (este tip aplica para todas las brochas y sombras) Ha llegado el momento de comenzar con las sombras, yo estaré utilizando la paleta carnival III de coco urban como colores principales.
El primer tono que empleare será twilight, un color vino, lo depositare en el, parpado móvil a toquecitos y lo subiré un poco hacia el parpado fijo. Posteriormente lo difuminare en círculos con una brocha balita sin producto. A continuación agregare el tono cocoa (rojo ladrillo ) para terminar de difuminar el tono anterior y subir un poco mas el color y sobre el tono cocoa colocare un naranja (tono yell’o) para ir creando ese degradado característico de los atardeceres, lo depositaremos en círculos con una brocha amplia balita. Encima del naranja, por debajo de la línea de la ceja aplicaremos amarillo con una brocha lengua de gato delgada, este tono lo tome de otra paleta, es un amarillo “pollito”.
Hare un delineado de la esquina del ojo hacia adentro, pegado a las pestañas con sombra en el tono grape (es un color morado opaco) con una brocha plana diagonal y lo difuminare hacia arriba. Intensificare el delineado con un poco de negro en la esquina externa de ojo sin difuminarlo mucho. Ahora colocare corrector en la zona de la ojera y lo difuminaré con una beauty blender, luego aplicare muy pegado a las pestañas inferiores el mismo tono morado que aplique para el delineado de arriba con una brochita plana delgada y lo difuminare con el color naranja “yell’o”.
Para colocarle un pop de brillo al maquillaje colocare esta sombra satinada rosada en el parpado en forma de semicírculo con una brocha plana, como se aprecia en la imagen.Rizare mis pestañas y colocare mascara de pestañas
Luego seguiré los mismos pasos para hacer el maquillaje del otro ojo y ahora hare la piel. Con el rostro y el cuello previamente hidratado aplicare primer, dejare que se seque y aplicare la base, coloco puntos de base por todo el rostro, a mi me gusta esparcirla con una brocha y luego difuminar con la esponja. Sellare la base con polvo suelto.
A continuación, hare los contornos y puntos de luz. El contorno lo voy a realizar con un polvo 3 tonos más obscuro que mi rostro con una brocha angular grande. Para el contorno de los cachetes nos vamos a guiar de la oreja hacia la comisura de la boca, y para el contorno de frente y mentón usaremos la misma brocha y difuminaremos el contorno. Para la nariz trazaremos una línea de cada lado con una brocha tipo kabuki pequeña angular, las líneas tienen que estar juntas, pero dejando un pequeño espacio, que será el punto de luz.
Ahora colocaremos rubor he iluminaremos, estaré utilizando un rubor en tono coral y un iluminador rose gold. Para aplicar el rubor sonreiremos y lo aplicaremos en los cachetes con una brocha de cabezal ancho, en lo personal me gusta aplicar un poco en la nariz. Para el iluminador aplicaremos en los pómulos con una brocha abanico. En el tabique, en la punta de la nariz, en el arco de cupido y debajo de la ceja lo aplicaremos con una brocha plana.
Aplicare un labial rosado opaco mate para finalizar el maquillaje y si necesitamos que el maquillaje dure varias horas usaremos fijador de maquillaje en todo el rostro. Y el look final estaría listo.
¡ Hello everyone! I'm Angel and in today's post I will be doing a makeup in purple, reddish, orange and yellow tones, inspired by the beautiful and characteristic sunsets of the state of La Guaira. We will start by moisturizing the face and neck, I use this aloe vera gel from BACC and let the skin absorb the product.
Now I will do the eyebrows, first I will comb them upwards, then with an eyebrow shadow I will make a line from the beginning to the end of the eyebrow from the bottom and start filling in the empty spaces with more shadow, I will blend with the same brush I used to comb it.
Now correct the edges with a little liquid concealer and a flat cat tongue brush. Blend with a beauty blender. Now we will prepare the eyelid to be able to apply the shadows. I will place concealer on the eyelid, blend it with a beauty blender and seal with a light shadow.
Remember to remove excess shadow by lightly tapping on the handle of the brush, so that no patches remain (this tip applies to all brushes and shadows). It's time to start with the shadows, I will be using the carnival III palette from coco urban as the main colors.
The first shade I will use will be twilight, a wine color, I will apply it on the mobile eyelid by dabbing it a little and I will move it up a little towards the fixed eyelid. Then I will blend it in circles with a ball brush without product. Then I will add the cocoa tone (brick red) to finish blending the previous tone and raise the color a little more and on the cocoa tone I will place an orange (yell'o tone) to create that characteristic gradient of the sunsets, we will deposit it in circles with a wide ball brush. On top of the orange, below the eyebrow line we will apply yellow with a thin cat tongue brush, I took this shade from another palette, it is a "chick" yellow.
I will line the corner of the eye inward, close to the lashes with grape shadow (it is an opaque purple color) with a flat diagonal brush and blend it upwards. Intensify the eyeliner with a little black in the outer corner of the eye without smudging it too much. Now I will place concealer on the under eye area and blend it with a beauty blender, then I will apply very close to the lower lashes the same purple shade that I applied for the eyeliner above with a thin flat brush and blend it with the orange "yell'o" color.
To add a pop of shine to the makeup I will place this pink satin shadow on the eyelid in a semicircle shape with a flat brush, as shown in the image.I will curl my lashes and apply mascara.
Then I will follow the same steps to do the makeup of the other eye and now I will do the skin. With the face and neck previously moisturized I will apply primer, let it dry and apply the foundation, I place dots of foundation all over the face, I like to spread it with a brush and then blend with the sponge. I seal the foundation with loose powder.
Next, I will do the contours and highlights. The contour will be done with a powder 3 shades darker than my face with a large angled brush. For the contour of the cheeks we will guide from the ear to the corner of the mouth, and for the contour of the forehead and chin we will use the same brush and blend the contour. For the nose we will draw a line on each side with a small angled kabuki brush, the lines have to be together, but leaving a small space, which will be the point of light.
Now we will apply blush and illuminate, I will be using a coral blush and a rose gold illuminator. To apply the blush we will smile and apply it on the cheeks with a wide head brush, personally I like to apply a little on the nose. For the highlighter we will apply it on the cheekbones with a fan brush. On the septum, on the tip of the nose, on the cupid's bow and under the eyebrow we will apply it with a flat brush.
I will apply an opaque pink matte lipstick to finish the makeup and if we need the makeup to last several hours we will use makeup fixer all over the face. And the final look is ready.
Congratulations @medicenangel! You have completed the following achievement on the Hive blockchain and have been rewarded with new badge(s):
Your next target is to reach 50 replies.
You can view your badges on your board and compare yourself to others in the Ranking
If you no longer want to receive notifications, reply to this comment with the word
STOPSupport the HiveBuzz project. Vote for our proposal!
Thank you
You're welcome @medicenangel! Have a nice day 😊👍
thank you