Saludos y bienvenidos, amantes de la tecnología📲
Nombre de la herramienta: https://playground.com/
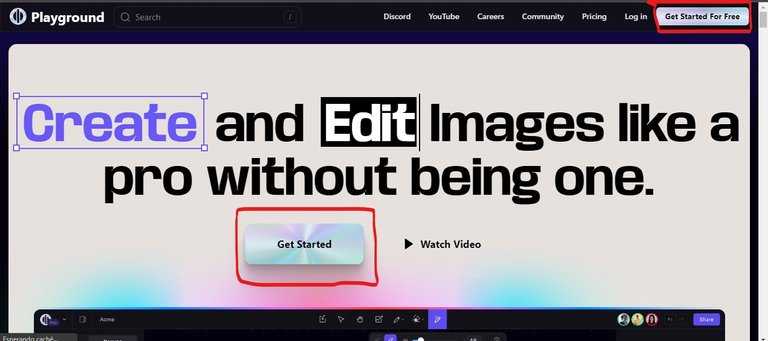
Esta herramienta se llama Playground AI, podrán acceder a ella haciendo click en el enlace que les deje arriba. Al momento de entrar, verán una pantalla inicial. Como se les muestra en la imagen de abajo, van a darle click donde dice “Get Started”.
Hello everybody! Dear GeekZone community. My name is Jesús Escalona, and today I want to introduce you to a tool for image generation that may be somewhat unknown to some, and that's why I wanted to share it here, because surely there are people who may not even know that there are ways to generate any image that our beautiful mind can imagine.
Name of the tool: https://playground.com/
This tool is called Playground AI, you can access it by clicking on the link I left above. When you enter, you will see an initial screen. As shown in the image below, click on “Get Started”.
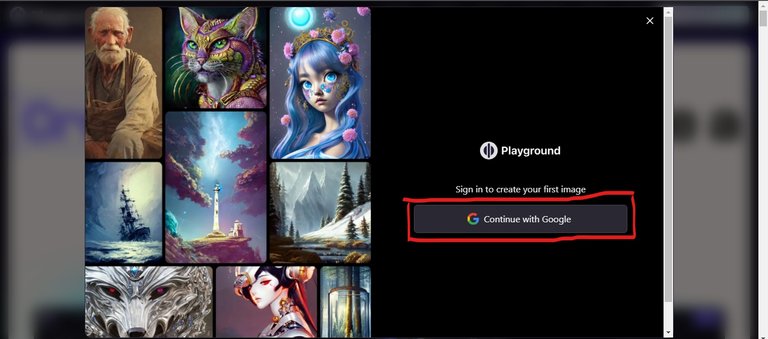
Posteriormente, podrán iniciar sesión con su cuenta de Google, de una manera muy fácil:
Afterwards, they will be able to log in with their Google account, in a very easy way:
Luego de que ingresen, van a ver esta pantalla que está aquí, en ella hay muchas opciones. No se preocupen, que repasaremos cada una de ellas.
After you log in, you will see this screen here, in it there are many options. Don't worry, we will go over each one of them.
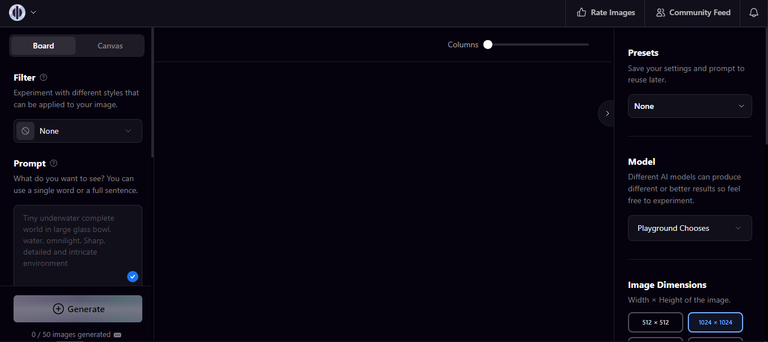
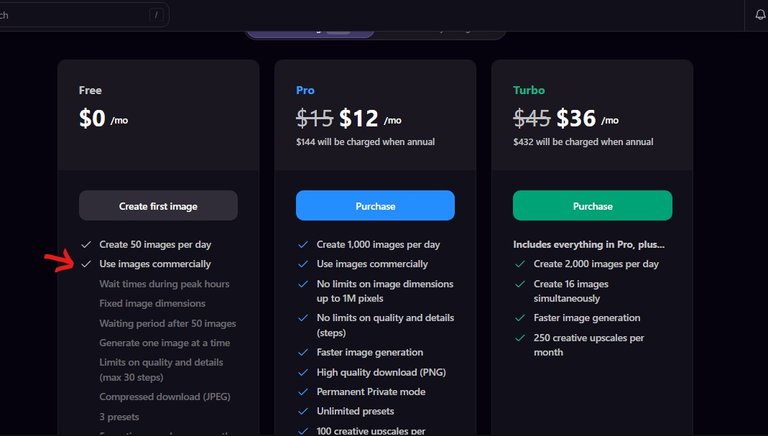
Antes de comenzar a crear, déjenme comentarles sobre los límites que tiene la versión gratuita de esta herramienta. Esta versión, que ya está seleccionada automáticamente al iniciar la sesión con Google, nos permite crear 50 imágenes por día, una cantidad bastante generosa a mi parecer. Luego, están las versiones de paga. Las versiones Pro y Turbo. La versión Pro cuesta 12$ mensual, y 144$ de manera anual. Esta versión permite generar 1000 imágenes por día, entre otros beneficios como la velocidad de generación, entre otros. La versión Turbo tiene un costo de 36$ mensual, y 432$ anuales. Esta versión nos permite generar 2000 imágenes por día, además de incluir todo lo de la versión Pro, más cosas extras. Les comparto la página específica por si quieren indagar a fondo en las diferencias de las versiones.
Link: https://playground.com/pricing
Yo siempre he usado la versión gratuita, creo que es bastante generosa y funciona muy bien, además de que da muy buenos resultados. Continuemos en la pantalla que les había puesto.
Before we start creating, let me tell you about the limits of the free version of this tool. This version, which is automatically selected when you log in with Google, allows us to create 50 images per day, a quite generous amount in my opinion. Then, there are the paid versions. The Pro and Turbo versions. The Pro version costs $12 per month, and $144 per year. This version allows you to generate 1000 images per day, among other benefits such as speed of generation, among others. The Turbo version costs $36 monthly, and $432 annually. This version allows us to generate 2000 images per day, in addition to including everything of the Pro version, plus extras. I share with you the specific page in case you want to know more about the differences between the versions.
Link: https://playground.com/pricing
I have always used the free version, I think it is quite generous and works very well, plus it gives very good results. Let's continue on the screen I had put for you.
Consideo importante mencionar algo que seguramente muchos se preguntan. Si, las imagenes generadas con esta herramienta pueden ser usadas de manera comercial. Esto lo veran a continuacion, estan invitados a leer los Terminos de Uso si lo desean:
I think it is important to mention something that I am sure many people are wondering. Yes, the images generated with this tool can be used commercially. You will see this below, you are invited to read the Terms of Use if you wish:
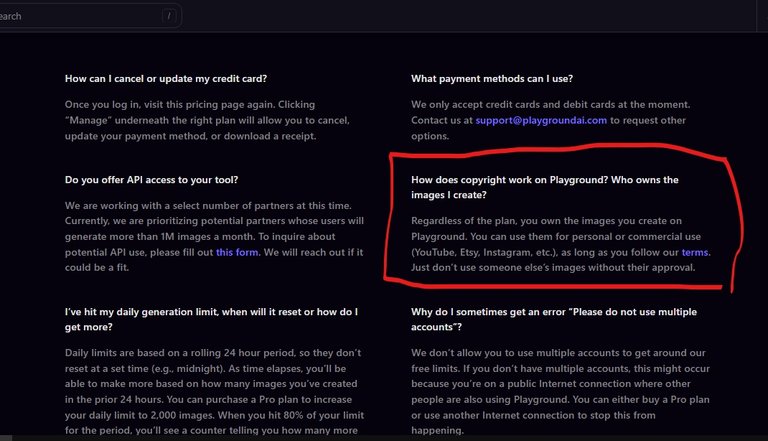
Traduccion al Español:
¿Cómo funcionan los derechos de autor en Playground? ¿A quién pertenecen las imágenes que creo?
Independientemente del plan, las imágenes que crees en Playground son tuyas. Puedes utilizarlas para uso personal o comercial (YouTube, Etsy, Instagram, etc.), siempre que cumplas nuestras condiciones. Eso sí, no utilices las imágenes de otra persona sin su aprobación.
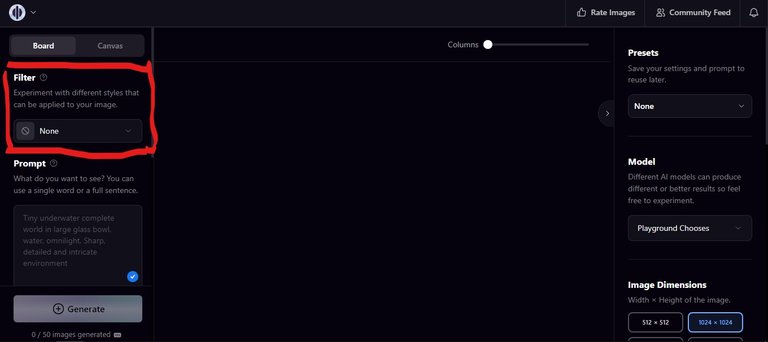
En esta pantalla, arriba, en el lado izquierdo, podemos ver donde dice “Filter” esto sirve para seleccionar el estilo que queremos usar para generar nuestra imagen, o nuestras imágenes. Por defecto, esta herramienta ya tiene definida por defecto ”None” es decir, ningún estilo específico seleccionado. Esto no significa que no vaya a funcionar, de igual manera se pueden generar las imágenes.
In this screen, at the top, on the left side, we can see where it says “Filter” this is used to select the style we want to use to generate our image, or images. By default, this tool already has “None” defined, that is, no specific style selected. This does not mean that it will not work, you can still generate the images.
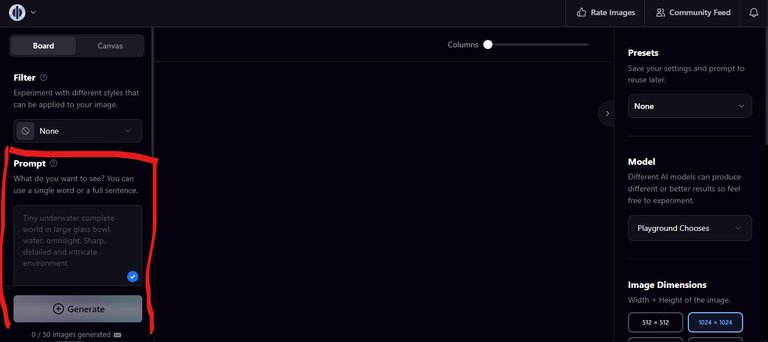
Luego, debajo de esto, viene la caja de texto donde escribiremos nuestro Prompt. Para las personas que no sepan, los Prompts son las indicaciones que nosotros le daremos a la herramienta, para que esta pueda generar la imagen, esto es muy importante. Con nuestras instrucciones bien definidas, se podrán generar las imágenes lo más cercana a lo que nosotros tenemos en mente.
Then, below this, comes the text box where we will write our Prompt. For those who do not know, the Prompts are the indications that we will give to the tool, so that it can generate the image, this is very important. With our instructions well-defined, we will be able to generate the images as close as possible to what we have in mind.
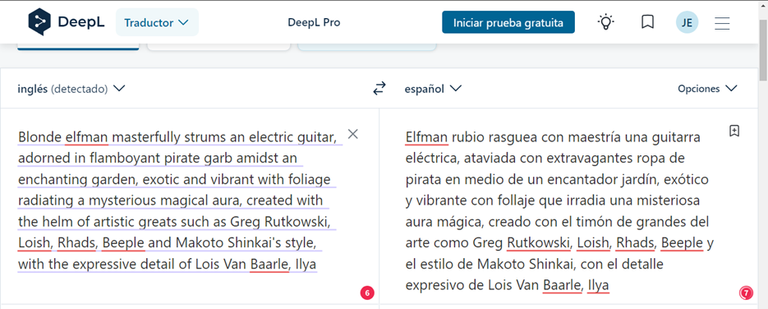
Esta herramienta trabaja con el idioma inglés, genera mejores resultados cuando le das las instrucciones en inglés. Así que lo recomendable, si no sabes inglés, es usar un traductor para que traduzca el prompt. Te recomiendo utilizar: DeepL
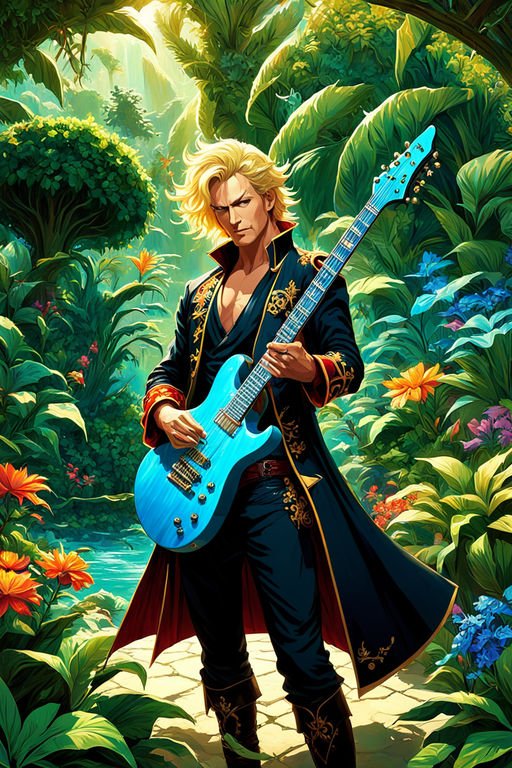
Para que vean lo sencillo que es, les daré un ejemplo, con una instrucción bastante sencilla.
This tool works with the English language, it generates better results when you give it the instructions in English. So if you do not know English, it is recommended to use a translator to translate the prompt. I recommend you to use: DeepL. To show you how simple it is, I will give you an example, with a very simple instruction.
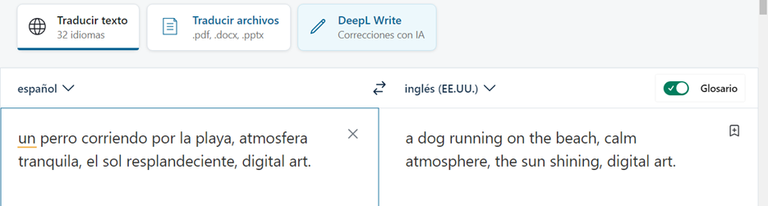
Un consejo, es muy bueno añadir ciertas “situaciones” o “atmosferas” al prompt, de esta manera la imagen será mucho más específica, y esto mejorará la composición, y el resultado. Si tú eres muy, muy específico, la imagen se adaptará lo más que se pueda a tus necesidades. Como esto: atmosfera tranquila, el sol resplandeciente, digital art. Ya que es lo que yo quiero ver en la imagen, pueden ver que puse “digital art” esto lo puse porque quiero que el resultado sea parecido a un dibujo hecho digitalmente, no realista, no en cartoon, no en lego, no en un estilo de pintura de óleo, yo lo quería como si fuera un dibujo digital. Por eso debemos ser específicos, ya que puedes pensar: “Se equivocó, no sirve, no me dio lo que quería”, pero ¿tú especificaste eso? Si querías que el perro fuera de una raza específica, pero no colocaste eso, obviamente la herramienta te dará un resultado suponiendo, ya que lo que no le digas, no lo hará.
A tip, it is very good to add certain “situations” or “atmospheres” to the prompt, this way the image will be much more specific, and this will improve the composition, and the result. If you are very, very specific, the image will be adapted as much as possible to your needs. Like this: calm atmosphere, the sun shining, digital art. Since this is what I want to see in the image, you can see that I put “digital art” because I want the result to be similar to a drawing made digitally, not realistic, not cartoon, not lego, not in an oil painting style, I wanted it as if it were a digital drawing. That's why we have to be specific, because you may think: “He made a mistake, it's no good, he didn't give me what I wanted”, but did you specify that? If you wanted the dog to be a specific breed, but you didn't put that in, obviously the tool will give you a result assuming, since what you don't tell it, it won't do.
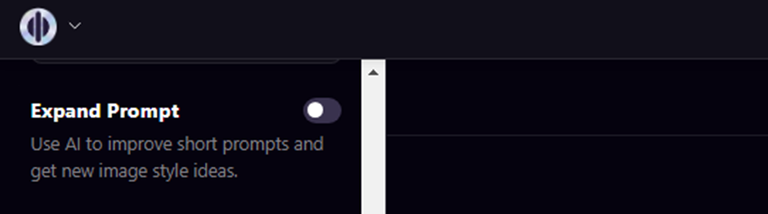
Abajo de la caja de texto, dónde pondrán el Prompt está la opción de "Exapand Prompt" esto ustedes deciden si activarlo o no, lo que hará es que la misma IA va a agregarle más cosas a su prompt con la intención de “mejorarlo” es una buena opción para prompts muy poco elaborados, o para aquellos casos en los que no se tiene una idea clara de lo que se quiere. Hay que tener en cuanta, que al expandirse el Prompt el resultado puede ser diferente al que nosotros teníamos en mente, por ejemplo, si en mi prompt está "digital art" pero yo lo expando, la IA puede agregarle "realistic textures", esto hará que el resultado no sea de tipo dibujo, sino que será más realista, tener esto en cuenta.
Below the text box, where you will put the Prompt is the option of “Exapand Prompt” this you decide whether to activate it or not, what it will do is that the same AI will add more things to your prompt with the intention of “improving it” it is a good option for very little elaborated prompts, or for those cases in which you do not have a clear idea of what you want. Keep in mind that when expanding the Prompt the result may be different from what we had in mind, for example, if my prompt is “digital art” but I expand it, the AI can add “realistic textures”, this will make the result is not drawing type, but it will be more realistic, keep this in mind.
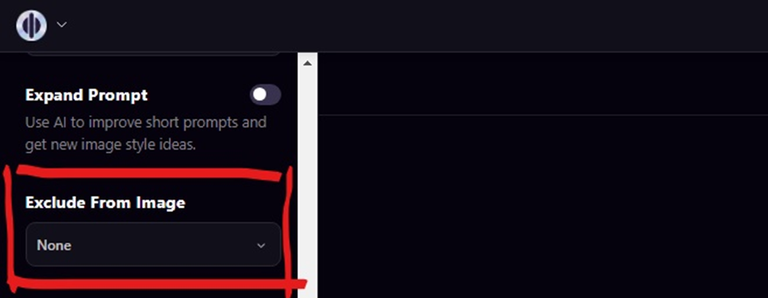
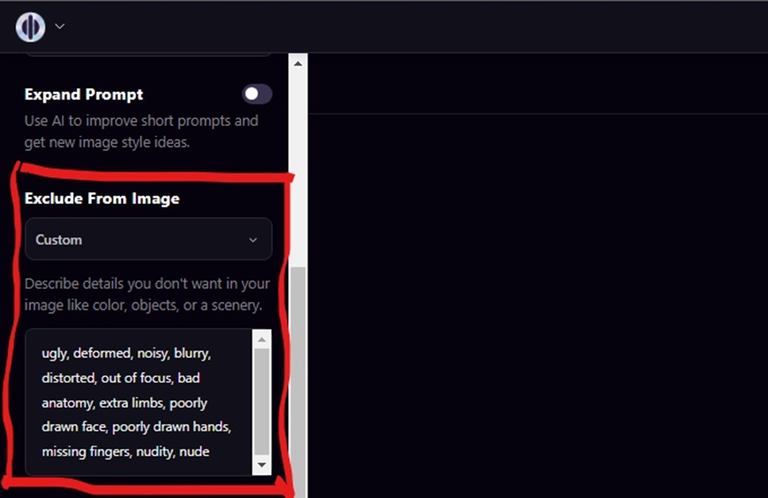
Abajo de "Expand Prompt" está la opción de "Exclude From Image" esto son los Negative Prompt de la imagen que generarás, estas son las cosas que no quieres que salgan en tu imagen, esto se usa para que la imagen sea lo más parecida a lo que quieres. Esto es importante, a veces esto está en "None" es importante darle click y seleccionar "Custom" esto nos permitirá añadir cosas que no queremos que salgan, por defecto ya tiene algunos Negative Prompts, estos hay que ponerlos en ingles, claramente.
Under “Expand Prompt” is the option to “Exclude From Image” this is the Negative Prompt of the image you will generate, these are the things that you do not want to appear in your image, this is used to make the image as close to what you want as possible. This is important, sometimes this is set to “None” it is important to click on it and select “Custom” this will allow us to add things that we don't want to appear, by default it already has some Negative Prompts, these must be set in English, clearly.
Seguimos con el apartado de Image to Image, pero se los explicaré más adelante con un ejemplo. Luego está la opción de Control Traits, pero yo no meto con esto, igual pueden usarlo si lo desean.
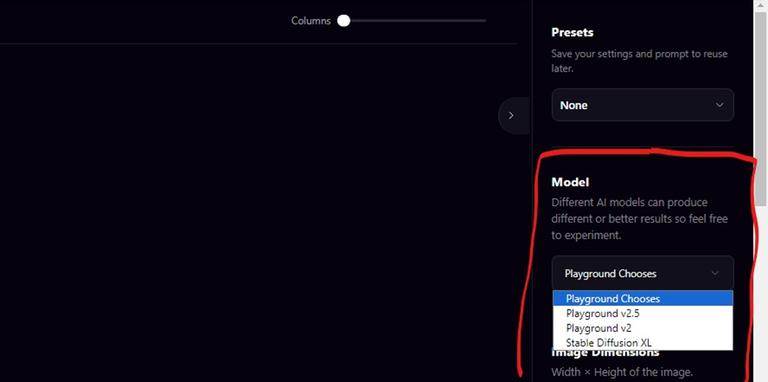
En la otra parte tenemos la parte de "Presets" esto normalmente yo lo dejo así como está, luego, más abajo encontrarán la parte de "Model" esto sirve para elegir el modelo de IA que queremos utilizar, puedes variarlos si quieres, eso si deseas comparar cuál modelo te genera mejores resultados, aunque normalmente yo uso los que estan por defecto, es decisión de cada persona.
We continue with the Image to Image section, but I will explain it later with an example. Then there is the Control Traits option, but I don't mess with this, you can still use it if you want.
In the other part we have the part of “Presets” this normally I leave it as it is, then, further down you will find the part of “Model” this serves to choose the AI model that we want to use, you can vary them if you want, that if you want to compare which model generates you better results, although normally I use those that are by default, it is decision of each person.

Luego tenemos la parte de las dimensiones de las imágenes, con esto podremos escoger de qué tamaño queremos la imagen, nos dan varias opciones para escoger.
Then we have the part of the dimensions of the images, with this we will be able to choose of what size we want the image, they give us several options to choose.

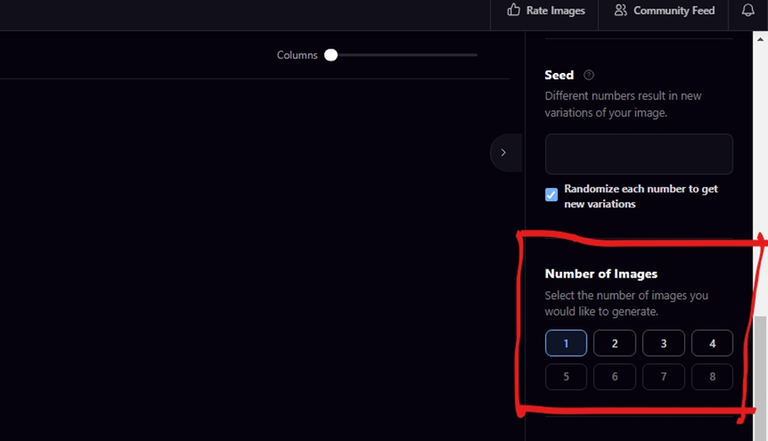
Abajo de esto, tenemos el apartado de Speed and Quality, esto lo dejan como está, luego veremos la parte donde elegiremos el número de imágenes que queremos que se generen al mismo tiempo, podremos elegir desde 1 a 4 imágenes simultáneamente. Hay que tener en cuenta que mientras más imágenes se generen al mismo tiempo, el tiempo de espera será mayor, yo normalmente siempre género una sola imagen, ya que es la opción más rápida. Y bueno, esto sería lo básico.
Below this, we have the Speed and Quality section, leave this as it is, then we will see the part where we will choose the number of images we want to be generated at the same time, we will be able to choose from 1 to 4 images simultaneously. You have to take into account that the more images are generated at the same time, the longer the waiting time will be, I usually always generate only one image, since it is the fastest option. And well, this would be the basics.
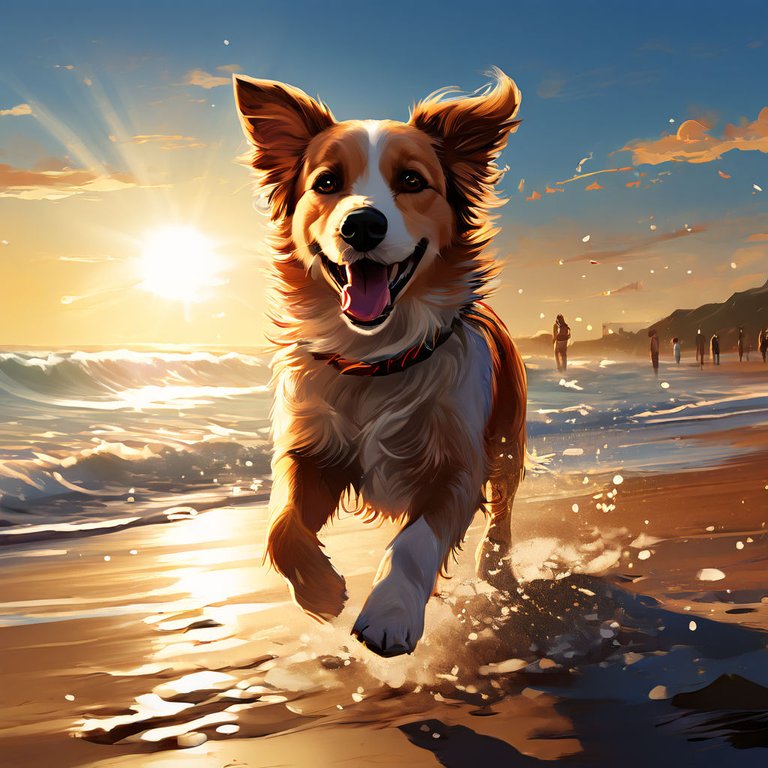
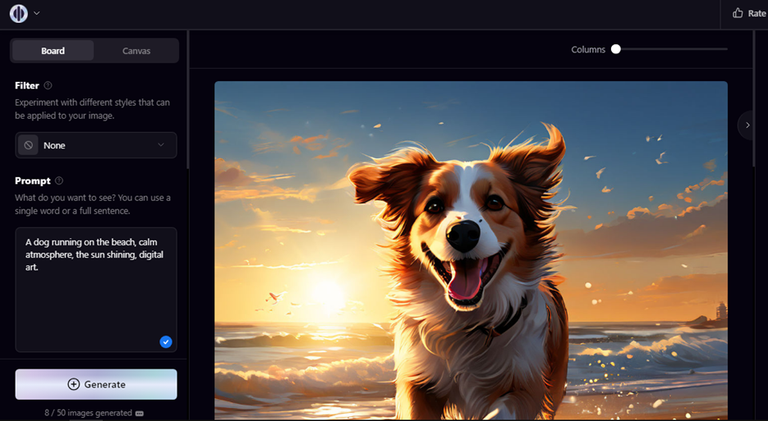
Una vez explicado lo anterior, les mostraré el resultado del Prompt que les mostré.
Having explained the above, I will show you the result of the Prompt I showed you.
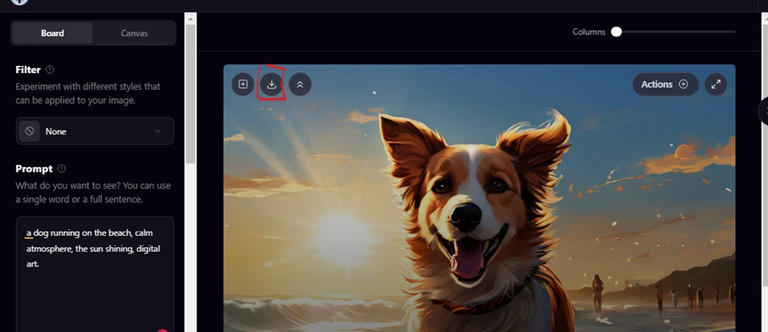
Podremos descargarlo dando click por aquí donde está el símbolo de descarga, y se guardará en nuestro dispositivo. Depende mucho de tu velocidad de internet cuánto se tarde en generar las imágenes, mi internet no es muy bueno, y nunca tarda más de 1 minuto en generar la imagen, aunque claro esto puede variar.
We will be able to download it by clicking here where the download symbol is, and it will be saved in our device. It depends a lot on your internet speed how long it takes to generate the images, my internet is not very good, and it never takes more than 1 minute to generate the image, although of course this can vary.
Una vez hayas creado tu imagen, si no te termino de gustar el resultado, puedes darle en la opción de Create Variations esto lo que hará será generar variaciones de esa misma imagen, respetando la composición anterior.
Once you have created your image, if you don't like the result, you can click on the option Create Variations this will generate variations of the same image, respecting the previous composition.
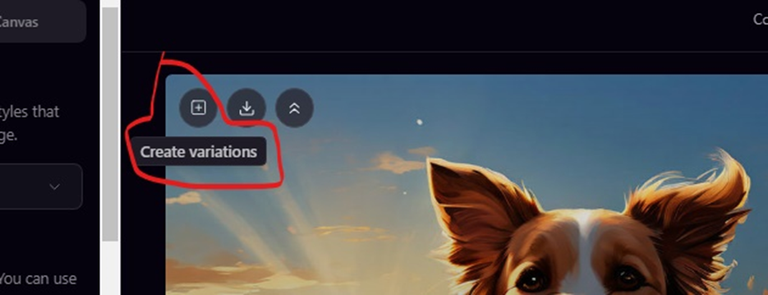
Cómo podrán observar esta nueva imagen de variación, es muy parecida, pero si la analizas bien, notarás que por ejemplo no hay gente, las olas son un poco distintas, el rostro del perro es un poco diferente, esto puedes hacerlo hasta que estés conforme con el resultado.
As you can see this new variation image is very similar, but if you analyze it well, you will notice that for example there are no people, the waves are a little different, the dog's face is a little different, you can do this until you are satisfied with the result.
A continuación les mostraré otros estilos, para que puedan ver cómo son los resultados con los diferentes estilos, y con otras instrucciones.
Next I will show you other styles, so you can see what the results are like with the different styles, and with other instructions.

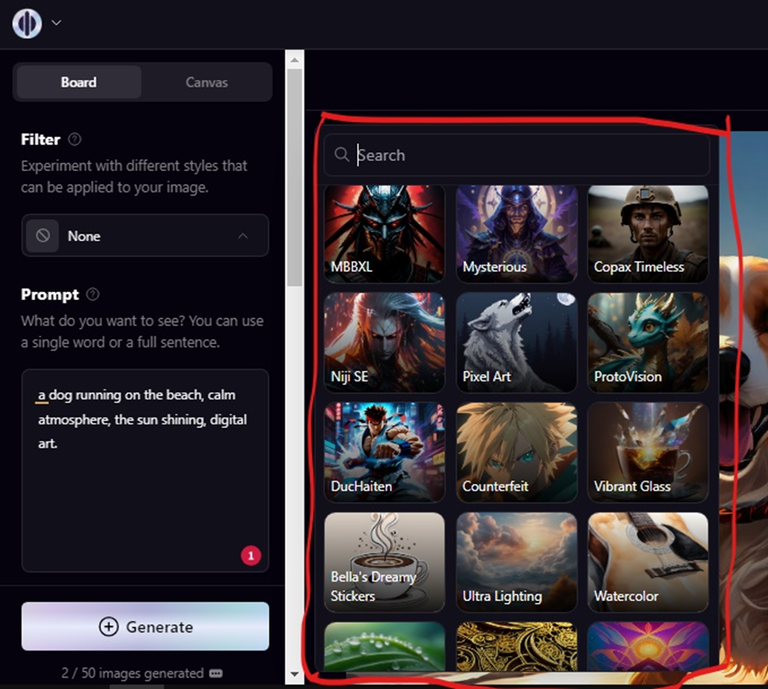
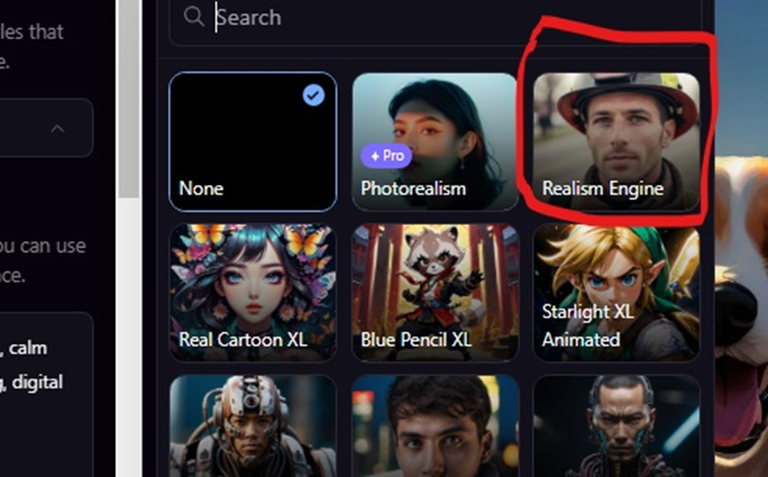
Cómo pueden ver está herramienta tiene muchos estilos, pueden probar el que más les guste, o al que crean que se ajusta mejor a lo que ustedes están buscando, pueden variar de estilos, y el resultado final será diferente.
As you can see this tool has many styles, you can try the one you like the most, or the one you think best fits what you are looking for, you can vary styles, and the final result will be different.
En este caso, usaré el de Realism Engine, este estilo como su nombre lo dice, sirve para generar imágenes realistas, entonces haremos un prompt. Un consejo, si ustedes desean hacer retratos, es decir, imágenes dónde salga una sola persona, les recomiendo usar la palabra "portrait" esto hará que la persona sala de frente. Este será el Prompt que usaré:
In this case, I will use the Realism Engine, this style, as its name says, is used to generate realistic images, so we will make a prompt. A tip, if you want to make portraits, that is to say, images where only one person appears, I recommend you to use the word “portrait” this will make that the person is in front of you. This will be the Prompt I will use:
Yo siempre le agrego al final el estilo que quiero, en este caso le puse híper realista, esto para especificar aún más el estilo que deseo. Mientras más específicos seamos, mejor quedará la imagen. También le cambiaré el tamaño, también si van a la parte de los Negative Prompt, verán que se han modificado para hacer que la imagen sea lo más apegada al estilo seleccionado, de igual manera podremos agregarles más cosas que no queremos que salgan si lo deseamos.
I always add at the end the style I want, in this case I put hyper realistic, this to specify even more the style I want. The more specific we are, the better the image will look. I will also change the size, also if you go to the Negative Prompt, you will see that they have been modified to make the image as close as possible to the selected style, we can also add more things that we don't want to appear if we want.
Este es el resultado:

Se ha respetado la instrucción dentro de lo que cabe, y si no estás conforme, puedes realizar las cosas que te dije anteriormente.
The instruction has been respected as far as possible, and if you are not satisfied, you can do the things I told you before.
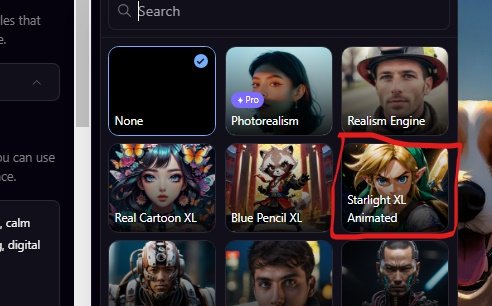
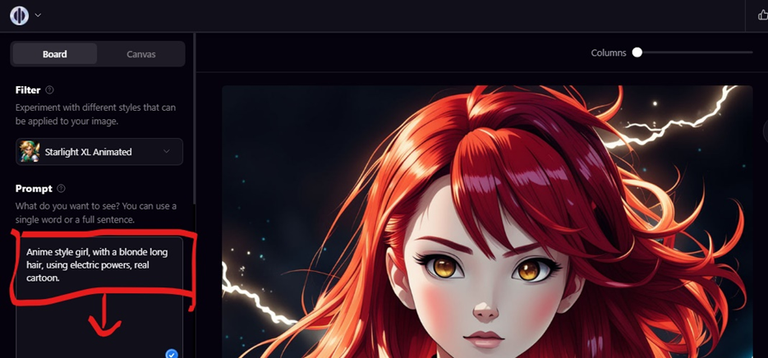
Les mostraré otro modelo interesante, se trata del estilo: Starlight XL Animated
Y en este caso le añadiré el siguiente Prompt: Anime style girl, with a red hair, using electric powers, real cartoon.
Este fue el Resultado:
I will show you another interesting style, it is the Starlight XL Animated model.
And in this case I will add the following Prompt: Anime style girl, with a red hair, using electric powers, real cartoon.
This was the result:
Resultado:
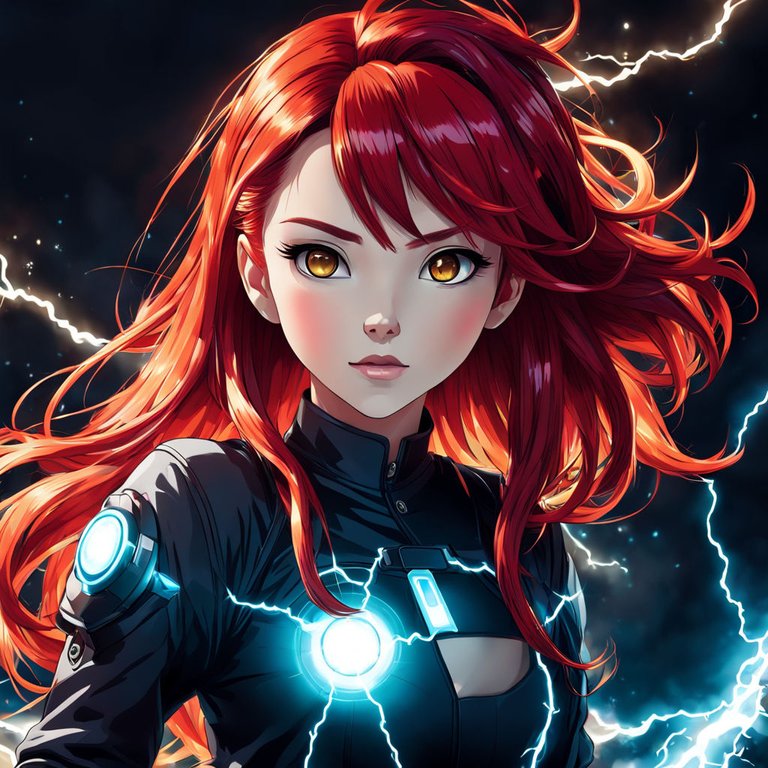
Se ha respetado bastante el Prompt, ahora les enseñaré algo. Si por aquí en la imagen le damos click donde dice "Actions" y " Use Image to Image". Esto lo que hará será ponerlo acá abajo, donde dice Image to Image, para tomar el estilo y la composición de esa foto.
The Prompt has been respected enough, now I will show you something. If we click here on the image where it says “Actions” and “Use Image to Image”. This will put it down here, where it says Image to Image, to take the style and composition of that photo.
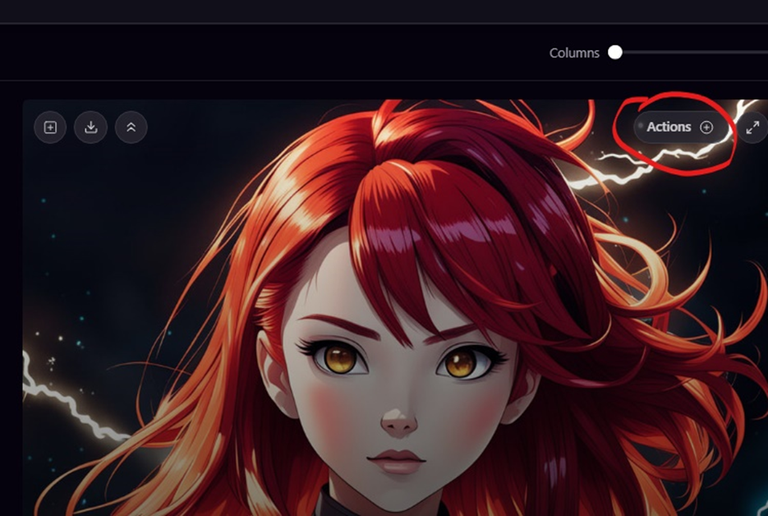
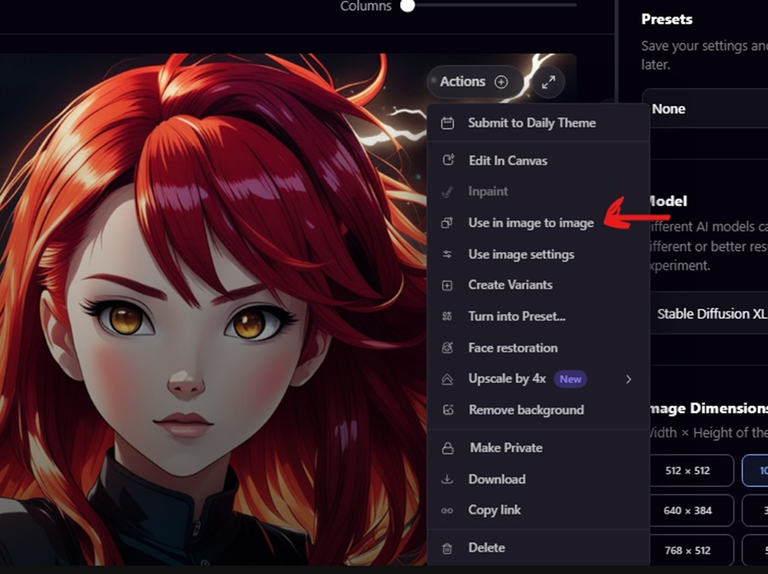
Esto puede servir mayormente si te gusto la imagen, pero no te termino de convencer, así que quieres cambiar ciertas cosas específicas pero quieres que la nueva imagen que generarás sigas pareciendose a la imagen que pondrás en Image to Image. También desde ahí pueden agregar imágenes que ya tengan en su dispositivo, para que se tome de referencia en las creaciones, estás imágenes pueden ser generadas por IA, o cualquier tipo de imágen. Aunque no siempre los resultados son buenos, ya que a veces se puede equivocar al momento de generar la imagen, o puede ser que el resultado quede extraño. Abajo, pueden medir la intensidad con la que quieren que la herramienta respete la imagen que le pusieron, yo siempre lo dejo por defecto como está, o a veces lo subo un poquito, pero depende de cada persona, esto también lo puedes ir variando.
This can be useful mostly if you liked the image, but you are not convinced, so you want to change some specific things, but you want the new image that you will generate to look like the image that you will put in Image to Image. Also from there you can add images that you already have on your device, to be taken as a reference in the creations, these images can be generated by AI, or any type of image. Although the results are not always good, as sometimes it can be wrong at the time of generating the image, or the result may be strange. Below, you can measure the intensity with which you want the tool to respect the image that you put, I always leave it by default as it is, or sometimes I raise it a little, but it depends on each person, you can also vary this.
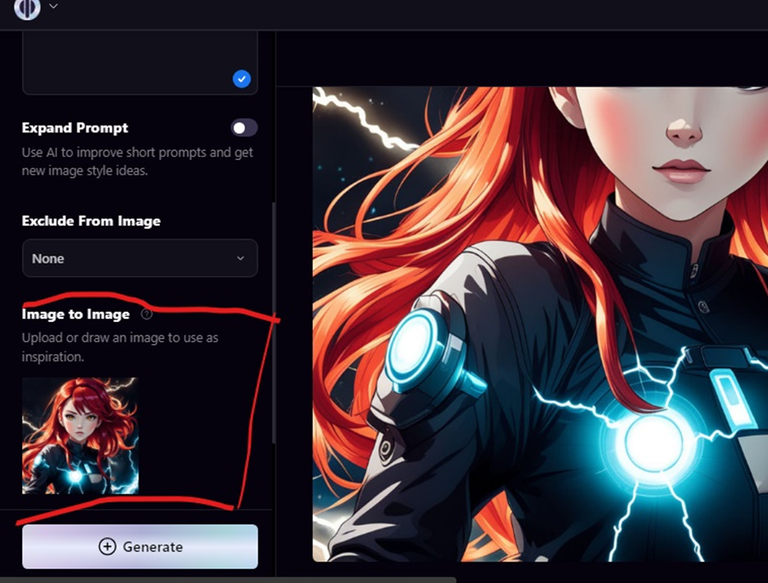
Cómo verán, yo modificaré el Prompt y le cambiaré algo, por ejemplo le pondré que ahora quiero a la chica diferente, está vez quiero que sea rubia. Así que le pondré: blonde long hair. Y luego vamos a generar!
As you will see, I will modify the Prompt and I will change something, for example I will put that now I want the girl to be different, this time I want her to be blonde. So I will put: blonde long hair. And Generate!
Resultado:
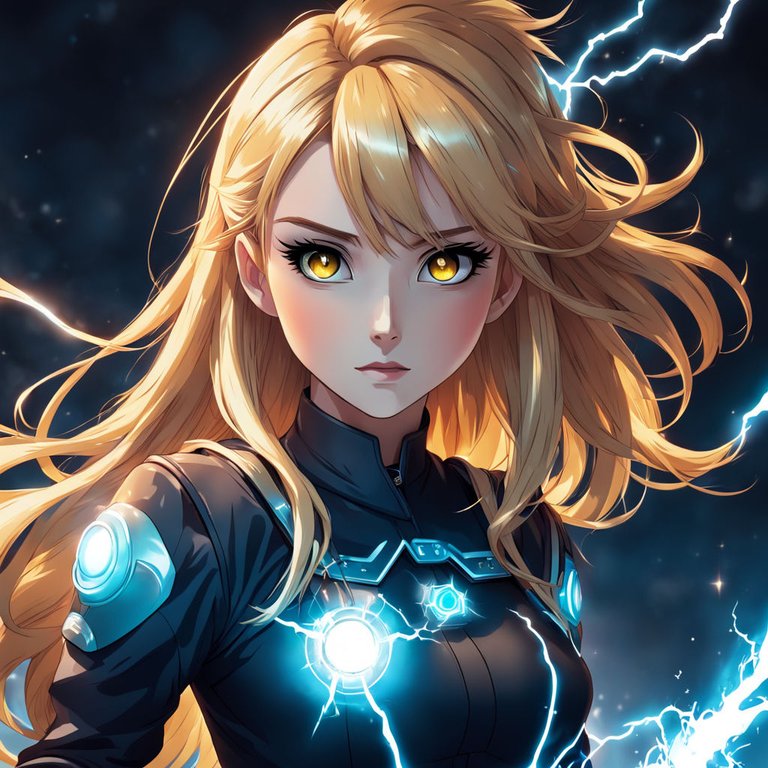
Cómo ven el estilo y composición sé respeto bastante, y efectivamente se cambió el color del cabello. Hay veces en que se puede equivocar o puede no darte lo que le pediste, así que lo que tendrás que hacer es probar distintas opciones, jugar con el Prompt hasta que quede como tú quieres, le puedes ir cambiando lo que más te convenga, el color de ojos, los poderes, etc.
As you can see the style and composition I respect a lot, and indeed the hair color was changed. There are times when he can be wrong or he may not give you what you asked for, so what you will have to do is try different options, play with the Prompt until it looks the way you want, you can change what suits you best, the eye color, the powers, etc.
Por último, les quiero mostrar uno de mis Prompts favoritos, que trata sobre la amalgama o la fusión de superhéroes. Muchas veces los resultados quedan muy geniales. Lo pueden modificar a su justo, obviamente, cambiando los superhéroes, el lugar, etc.
Prompt: Superman-Iron Man hybrid character in a dynamic action pose, mid-flight above a city that hovers through a combination of the two personas' technology, captured in the aesthetic of analog photography, natural lighting sculpting dynamic shadows and highlights on the textured skin, shallow depth of field bringing the levitating superhero into sharp focus against a blurred metropolis backdrop, dynamic composition, golden ratio, ultra-realistic.
Finally, I want to show you one of my favorite Prompts, which deals with the amalgamation or fusion of superheroes. Many times the results are very cool. You can modify it to your liking, obviously, changing the superheroes, the place, etc.
Prompt: Superman-Iron Man hybrid character in a dynamic action pose, in full flight over a city hovering through a combination of the two people's technology, captured with the aesthetics of analog photography, natural lighting that sculpts dynamic shadows and highlights on textured skin, shallow depth of field that sharply focuses on the superhero levitating against a blurred metropolis background, dynamic composition, golden ratio, ultra-realistic.
Resultado:
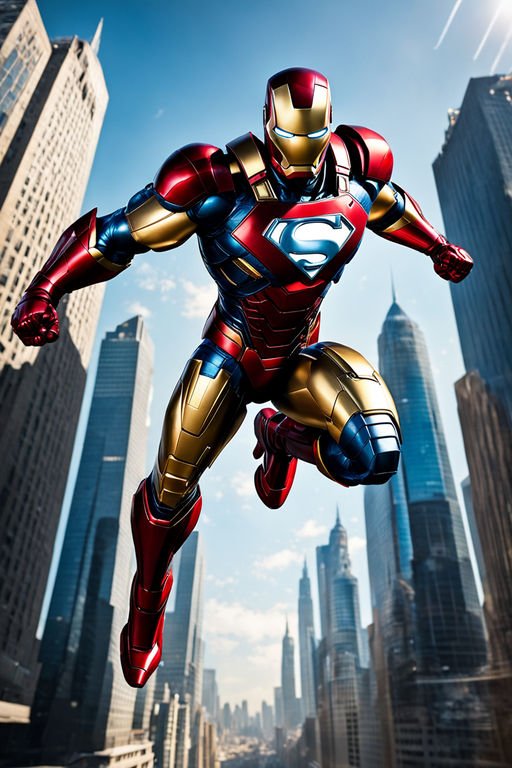
Cómo pueden ver es una instrucción bastante específica y larga. Este es el resultado, cómo ven es de muy buena calidad. En este momento me debes estar preguntando: "Jesús, pero ese Prompt se ve muy complejo, mi cabeza jamás me daría la idea de crear ese tipo de instrucciones o estilos específicos para que mis imágenes sean increíbles".
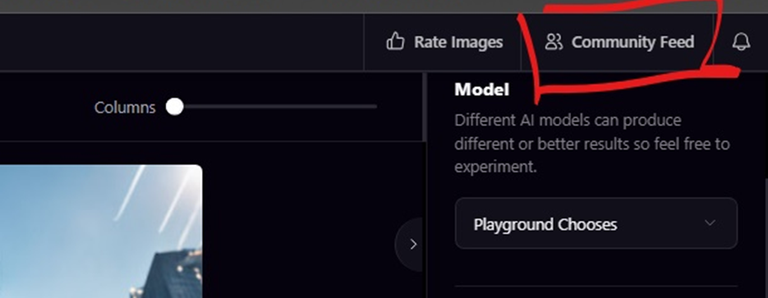
Bueno, quiero contarte algo, dándole en la parte de arriba donde dice "Community Feed" eso nos llevará al feed de esta herramienta, obviamente, dónde podremos ver todas las imágenes que se han creado últimamente. Puedes explorar por ahí tranquilamente, seguramente te encontrarás con imágenes muy bien elaboradas que te encantarán.
As you can see it is a very specific and long instruction. This is the result, as you can see it is of very good quality. At this moment you must be asking me: “Jesus, but that Prompt looks very complex, my head would never give me the idea of creating that kind of instructions or specific styles to make my images look amazing”.
Well, I want to tell you something, by clicking on the top where it says “Community Feed” it will take us to the feed of this tool, obviously, where we can see all the images that have been created lately. You can browse around, you will surely find very well elaborated images that you will love.
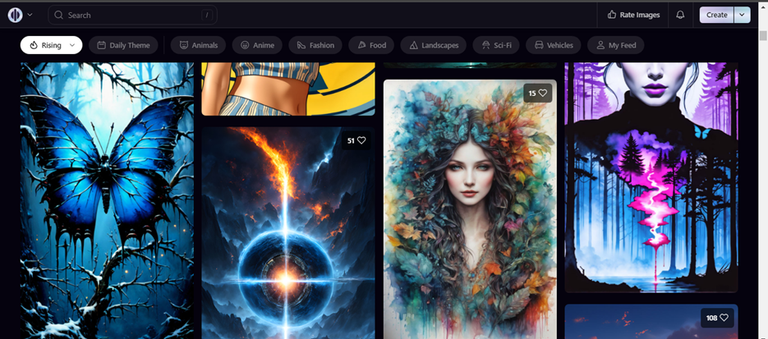
Y al darle click, a cualquiera de ellas, podremos ver el Prompt que se utilizo para crear esta imagen, y abajo hay una opción donde dice copiar, así que podemos copiar el Prompt y ajustarlo a nuestras necesidades. Esto nos ayudará mucho a aprender diferentes estilos, e instrucciones para crear imagenes de muy alta calidad. Es importante mencionar que esto no asegura que la imagen que crees sea igual a la que encontraste es posible que se parezca, pero nunca será igual, de igual maneras podras ajustarla lo mejor que puedas para obtener el resultado que realmente quieres, o uno con el que estes conforme. Explorando el feed, y las imágenes seguramente te llegarán muchas ideas interesantes, veamos un ejemplo:
And when we click on any of them, we can see the Prompt that was used to create this image, and below there is an option where it says copy, so we can copy the Prompt and adjust it to our needs. This will help us a lot to learn different styles, and instructions to create very high quality images. It is important to mention that this does not ensure that the image you create will be the same as the one you found it is possible that it looks similar, but it will never be the same, anyway you can adjust it as best you can to get the result you really want, or one that you are happy with. Exploring the feed, and the images will surely give you many interesting ideas, let's see an example:
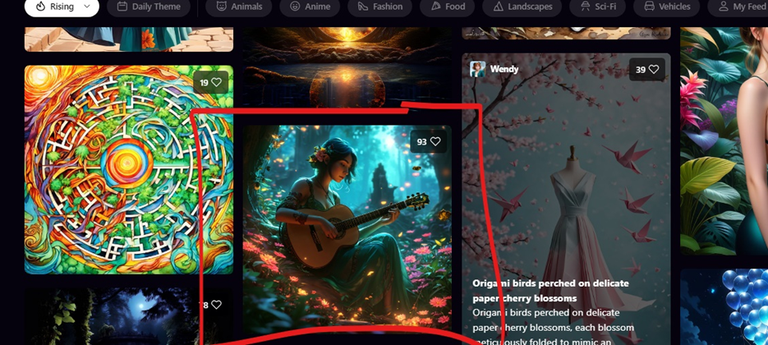
Y este sería el resultado, como pueden ver se conservaron un poco los estilos y atmósfera de la imagen anterior, pero está completamente adaptada de una nueva manera a nuestros requerimientos
And this would be the result, as you can see the styles and atmosphere of the previous image were kept a bit, but it is completely adapted in a new way to our requirements.
Y bueno esto sería todo.. cómo podrán notar estás imágenes no son 100% perfectas, hay errores de composición algunas veces, en los ojos, en la anatomía, el ambiente.. pero, afortunadamente hay otra herramienta, que se encarga de mejorar los errores de estas imágenes, y les aumenta aún más la calidad.
Pero, se las compartiré próximamente en otro tutorial, este me llevo bastante tiempo jaja, déjenme en los comentarios, si les gustaría conocer esta otra herramienta.
Espero que este tutorial les haya servido, y que les haya gustado. Nos vemos, cuidense!
And well this would be all... as you may notice these images are not 100% perfect, there are some composition errors sometimes, in the eyes, in the anatomy, the environment... but, fortunately there is another tool, which is responsible for improving the errors of these images, and further increases their quality.
But, I will share it soon in another tutorial, this one took me a long time haha, let me know in the comments, if you would like to know this other tool.
I hope this tutorial has helped you, and that you liked it. See you, take care!

📲 My social media:


See you next time! 👀🎞💗
he usado esta herramienta, pero no siempre he tenido resultados que no siempre son buenos. De hecho, la dejé de usar porque antes de emperezaran a cobrar los resultados eran mejores (a mi juicio). Supongo que ellos instan a que pagues la membresía, porque también todavía están entrenando esta IA asi que hay que tener paciencia
Es una tecnología increíble pero creo que hay que revisar muy bien la parte de derechos de autor en las condiciones de uso ya que por ejemplo DALE-E contiene una norma de que ellos son los únicos dueños de los derechos de todas las imágenes que se generen con su tecnología.
Hola amigo! En la parte de Pricing. En las preguntas frecuentes de abajo se aclara esto. Te dejo una captura:
Traducción: ¿Cómo funcionan los derechos de autor en Playground? ¿A quién pertenecen las imágenes que creo?
Independientemente del plan, las imágenes que crees en Playground son tuyas. Puedes utilizarlas para uso personal o comercial (YouTube, Etsy, Instagram, etc.), siempre que cumplas nuestras condiciones. Eso sí, no utilices las imágenes de otra persona sin su aprobación.
Genial, entonces son útiles para utilizar aquí en hive. ¡Excelente!
Hola @jessuses1381 👋🏽
Mejor explicado imposible, pero 🥴 es un trabajo bastante arduo para mí. Yo no tengo esa paciencia con la tecnología. Por eso admiro a los que usando este tipo de programas logran imágenes tan reales o irreales y bonitas. Saludos.
Wow!... Great work on this post @jessuses1381 friend!... Congratulations, 100% first class content...
!discovery 34
!PIZZA
Thank you very much!
This post was shared and voted inside the discord by the curators team of discovery-it
Join our Community and follow our Curation Trail
Discovery-it is also a Witness, vote for us here
Delegate to us for passive income. Check our 80% fee-back Program
$PIZZA slices delivered:
@jlinaresp(6/10) tipped @jessuses1381
Congratulations @jessuses1381! You have completed the following achievement on the Hive blockchain And have been rewarded with New badge(s)
Your next target is to reach 30 posts.
Your next target is to reach 4250 upvotes.
You can view your badges on your board and compare yourself to others in the Ranking
If you no longer want to receive notifications, reply to this comment with the word
STOPCheck out our last posts:
From Venezuela, our witness drives decentralization and the adoption of Web3 technology, creating opportunities for the local community and contributing to the global ecosystem. // Desde Venezuela, nuestro testigo impulsa la descentralización y la adopción de la tecnología Web3, generando oportunidades para la comunidad local y contribuyendo al ecosistema global.
Sigue, contacta y se parte del testigo en: // Follow, contact and be part of the witness in:
Congratulations, your post has been curated by @dsc-r2cornell. You can use the tag #R2cornell. Also, find us on Discord
Felicitaciones, su publicación ha sido votada por @ dsc-r2cornell. Puedes usar el tag #R2cornell. También, nos puedes encontrar en Discord