Buenas noches a toda la comunidad de Geek Zone y a quien esté leyendo este post, hoy quise mostrarles los progresos que llevo de un juego que estoy creando usando el programa Game Maker 8.1 y de paso dar algunas explicaciones para el que quiera hacer un juego propio con este programa.
Good evening to the entire community of Geek Zone and who is reading this post, today i whant to shows the progress that I have of a game that I am creating using the Game Maker 8.1 program and incidentally give some explanations for those who want to try to make their own game with this program.
Lo primero y más importante es sentar las bases del juego en cuestión, para lo cual me enfoqué en 3 factores claves; el tipo de juego, personaje principal y diseño del juego. Se que hay otros puntos importantes como la historia, enemigos, objetivos…etc, pero estos puntos pueden tratarse más adelante, aunque no esta mal tenerlos resueltos desde antes
The first and most important thing is to lay the foundations of the game in question, for which I focused on 3 key factors; The type of game, main character and game design. I know there are other important points such as history, enemies, objectives ... etc, but these points can be treated later, although it is not bad to have them resolved from before
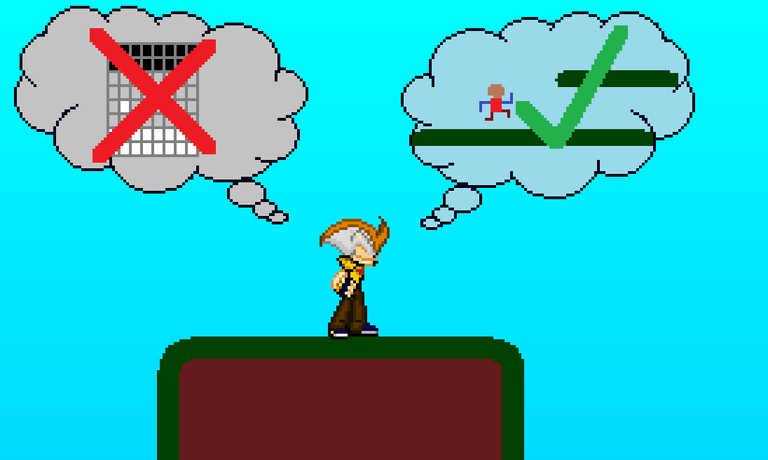
Viendo lo del tipo de juego…opté por hacer uno del tipo plataformas, lo vi como una buena base para iniciar además que facilitaría un poco futuras obras si intentaba voltear a RPG o simulador, realmente en lo que a mi respecta fue una decisión sencilla
Seeing the type of game…I chose to make one of the platform types, I saw it as a good base to start, as well as that it would make future works a little easier if I tried to turn to RPG or simulator, really, as far as I was concerned, it was a simple decision.
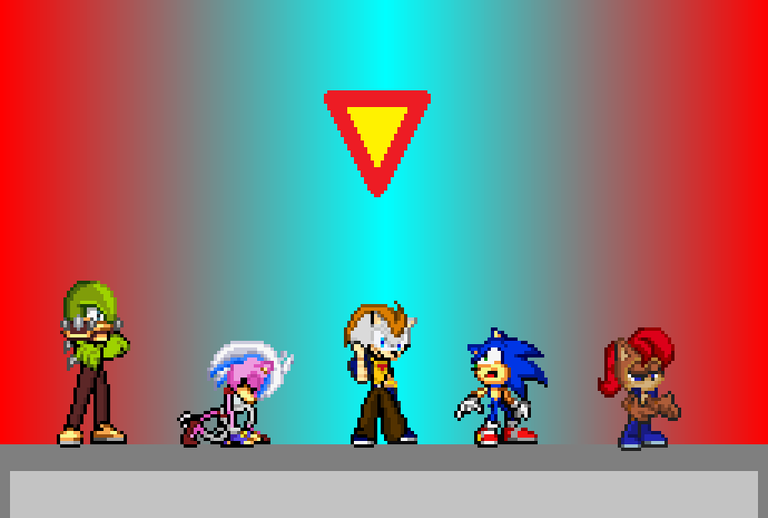
Del segundo punto podemos decir que fue más fácil todavía debido a que desde hace un buen tiempo tenía un personaje creado para la ocasión, ese personaje es Sonder, un erizo con dedos agiles para la arqueología y una actitud de dar el paso al frente ante los problemas. Sé que su nombre no es original siquiera, pero nunca pensé en cambiarlo…lo más cerca que estuvo del cambio terminó en simplemente añadirle un apellido quedándole el nombre de Sonder Rickstorm Este personaje lo creé hace varios años y la primera vez que lo llevé al público fue en otro fangame conocido como Super Smash Bros Crusade y fue a modo de modpack por lo que en aquel entonces una historia no era especialmente importante, aquí les dejo el enlace del Mod individual y Modpack donde aparece
From the second point we can say that it was even easier because for a long time I had a character created for the occasion, that character is Sonder, a hedgehog with agile fingers for archeology and an attitude of taking the step forward before the problems. I know his name isn't even original, but I never thought of changing it... the closest he got to change ended up simply adding a last name to him, leaving him with the name Sonder Rickstorm I created this character several years ago and the first time I brought him to the public It was in another fangame known as Super Smash Bros Crusade and it was as a modpack so back then a story was not particularly important, here is the link to the Individual Mod and Modpack where it appears
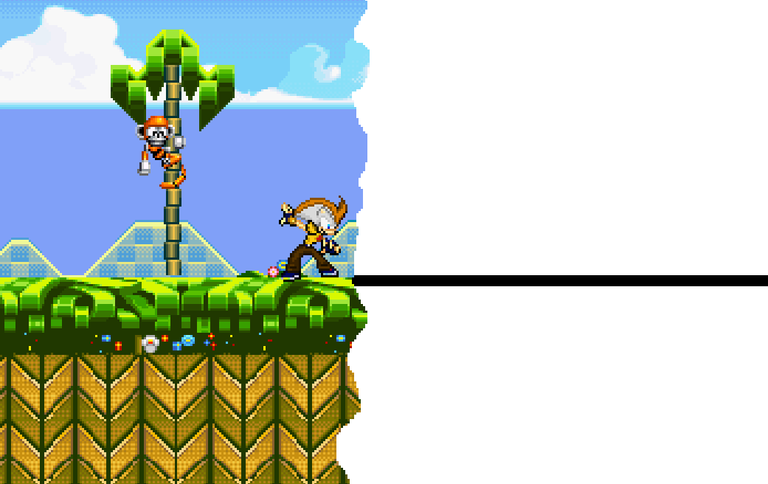
Ya para el tercer punto, o sea, el diseño…era fundamental elegir UN solo tipo de diseño para que el juego se viera lo mejor posible por lo cual solo debía seleccionar uno con el que me sintiera a gusto, al final opté por los diseños tipo GBA (Game Boy Advance), más específicamente los Sonic advance, estos me parecían los más indicados por 2 razones, me sentía a gusto con ellos y eran fáciles de usar
Now for the third point, that is, the design... it was essential to choose ONE type of design so that the game would look its best, so I only had to select one with which I felt comfortable, in the end I opted for the designs GBA type (Game Boy Advance), more specifically the Sonic advance, these seemed to me the most suitable for 2 reasons, I felt comfortable with them and they were easy to use
Teniendo esto a mano, ya se podía empezar a trabajar con el Game maker para iniciar la creación del juego por lo cual vamos a comenzar con algo que todo juego tiene, los sprites.
Having this at hand, we could start working with the Game maker to start the creation of the game, so we are going to start with something that every game has, the sprites.
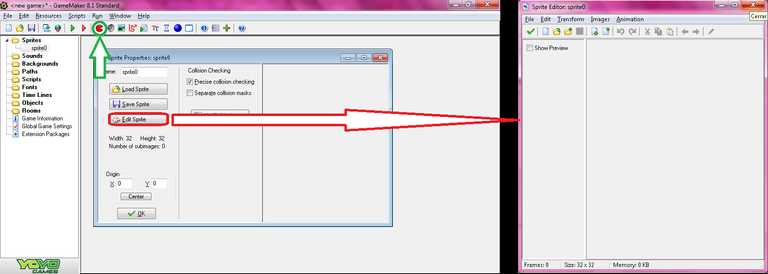
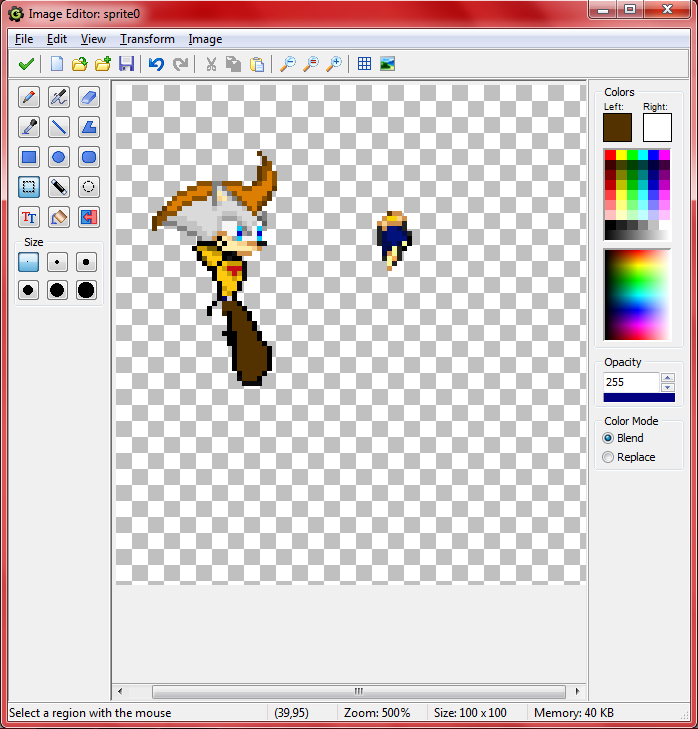
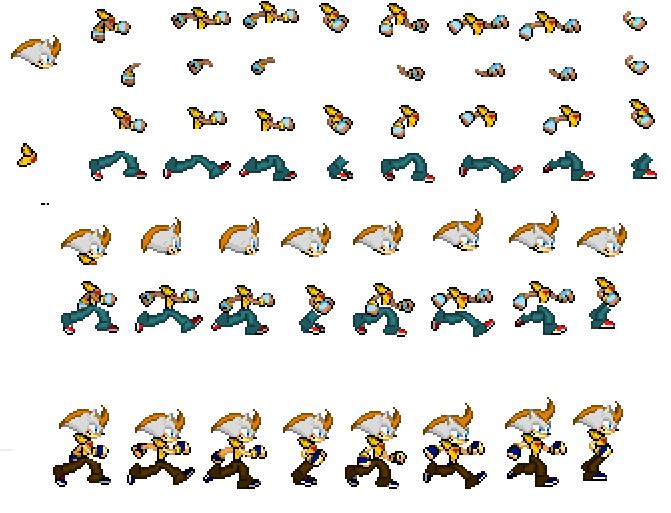
Hacer un Sprite depende del creador, y en lo que a mí respecta, existen varias opciones… se puede simplemente usar sprites ya creados (viendo que no tengan derechos de autor) o crearlos por tu propia cuenta, dicha opción fue la que preferí usar ya que en parte tengo algunos sprites de mi FC Sonder…aunque volverlos a hacer no fue mala idea
Making a Sprite depends on the creator, and as far as I'm concerned, there are several options... you can simply use sprites already created (seeing that they are not copyrighted) or create them on your own, that option was the one I preferred to use already that in part I have some sprites from my FC Sonder…although making them again was not a bad idea
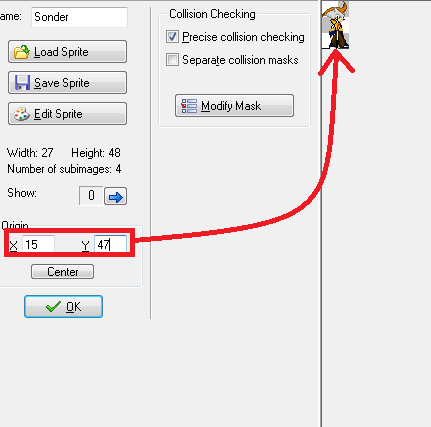
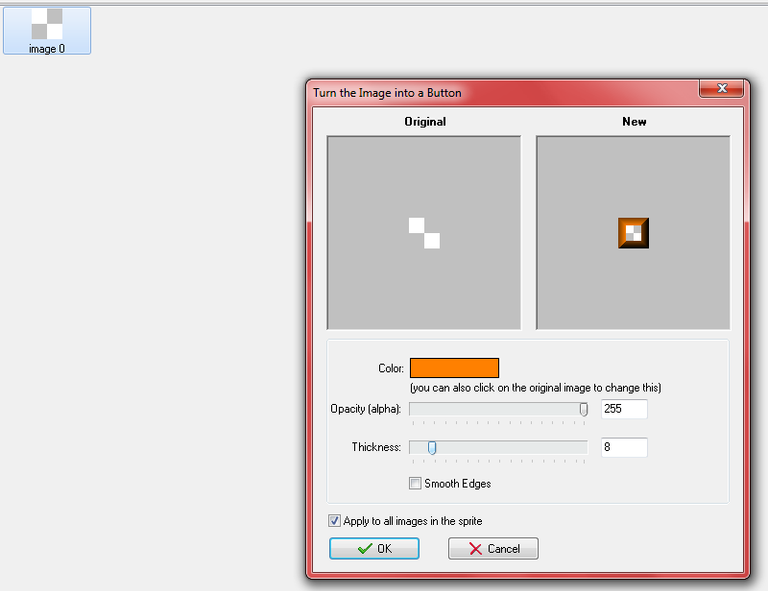
Ya con el Sprite del personaje creado, se puede proceder a lo que serían las paredes, suelo y el techo, para esto dejaré claro que su diseño no será muy importante a largo plazo por lo que algo simple ayudará a tenerlo visualizado
With the Sprite of the character created, you can proceed to what would be the walls, floor and ceiling, for this I will make it clear that its design will not be very important in the long term so something simple will help to visualize it
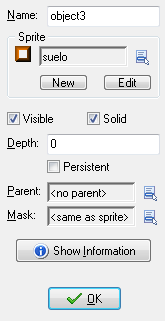
Con ambos sprites terminados se podría decir que tenemos lo necesario para crear un juego, pero no…aún falta convertirlos en objetos para poder usarlos a nuestra conveniencia, de momento con crearlos y asignarles el Sprite bastará, no sin antes marcar las paredes como sólidos (en un futuro nos será útil)

With both sprites finished, it could be said that we have what we need to create a game, but no... we still need to convert them into objects to be able to use them at our convenience, for now creating them and assigning them the sprite will suffice, but not without first marking the walls as solids (in the future it will be useful to us)
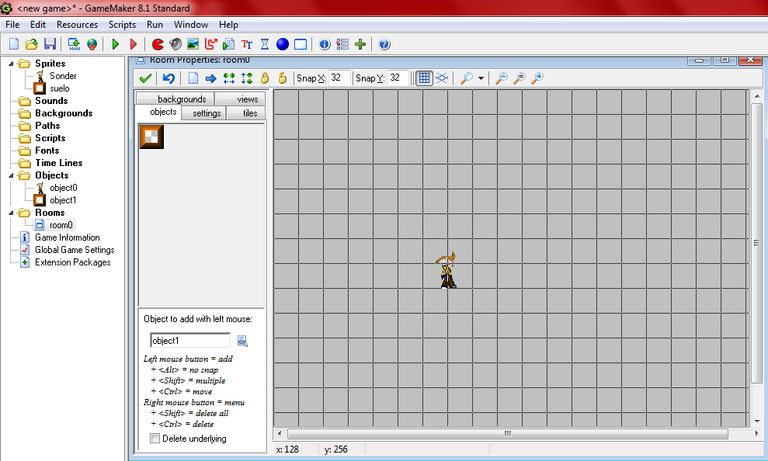
Con los objetos declarados, podemos proceder a crear una Room, para quien se pregunte qué es, las rooms son las distintas pantallas que usan los juegos, como por ejemplo en Super Mario Bros, el nivel 1-1 solamente ya cuenta con 2 rooms: la del nivel principal y la del subnivel de bonus, eso sin contar la room del Game-over o la del título. Volviendo al caso…para la primera room que será creada solo pondremos al personaje principal y algunas paredes, y sería todo
With the objects declared, we can proceed to create a Room, for those who wonder what it is, rooms are the different screens used by games, such as in Super Mario Bros, level 1-1 only already has 2 rooms: the one on the main level and the one on the bonus sublevel, that's not counting the Game-over room or the title room. Going back to the case… for the first room that will be created we will only put the main character and some walls, and that would be it
La verdad que la prueba fue un poco anticlimático probándolo con la opción “Run”
The truth is that was a bit anticlimactic testing with the "Run" option
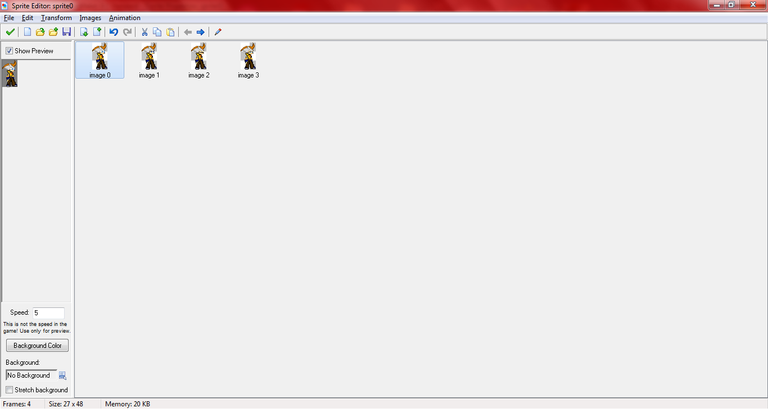
Ciertamente se ve muy rápido, el personaje no tiene gravedad…ni comandos que pueda realizar, para solucionar eso iremos de vuelta al object del personaje para instalarle nuestro primer comando (no sin antes crear un Sprite de él corriendo)
It certainly looks very fast, the character has no gravity…or commands that he can perform, to solve that we will go back to the character object to install our first command (not without first creating a Sprite of him running)
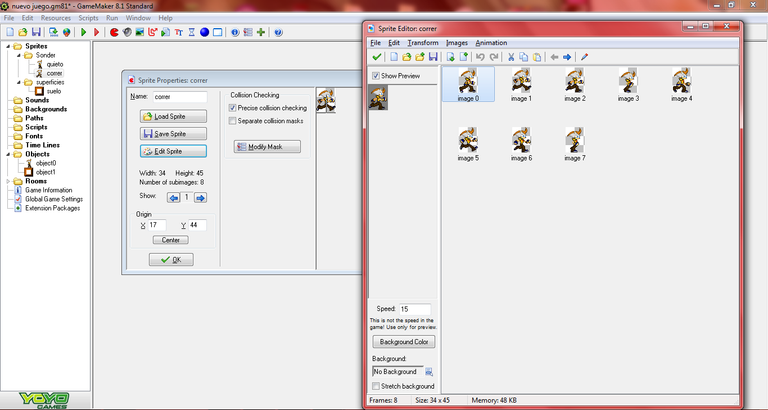
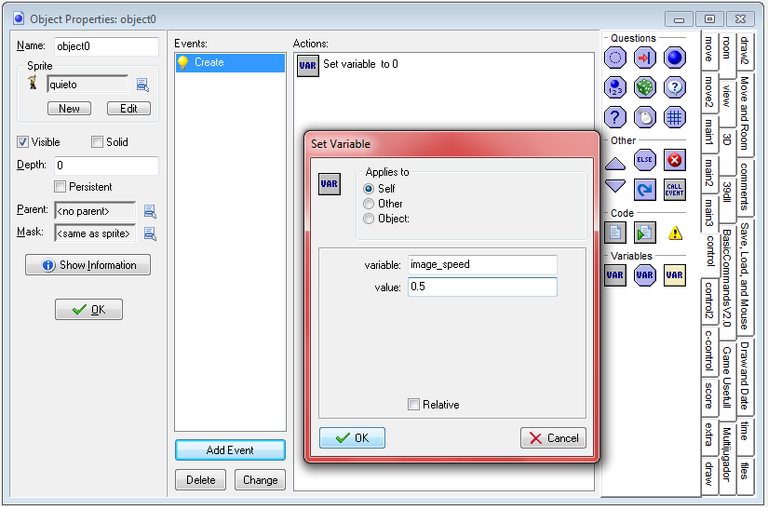
Instalar comandos en Game maker es fácil, primeramente, porque no da una buena gama de comandos prefabricados que podemos usar a nuestro antojo para darle vida a los objects, y por ende, el juego. Primero había que encargarse de la velocidad de animación, con lo cual se debe asignar una variable en create, debe ser ahí por ser de un uso y además debe funcionar nada más aparezca el personaje (o sea, al iniciar la room)
Installing commands in Game maker is easy, first of all, because it does not provide a good range of prefabricated commands that we can use at our whim to give life to the objects, and therefore, the game. First you had to take care of the animation speed, with which a variable must be assigned in create, it must be there because it is of use and it must also work as soon as the character appears (that is, when starting the room)
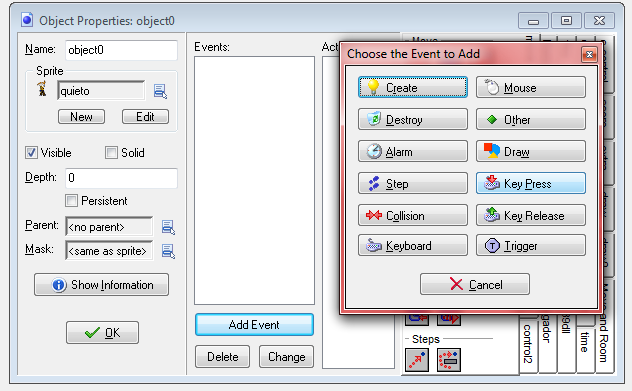
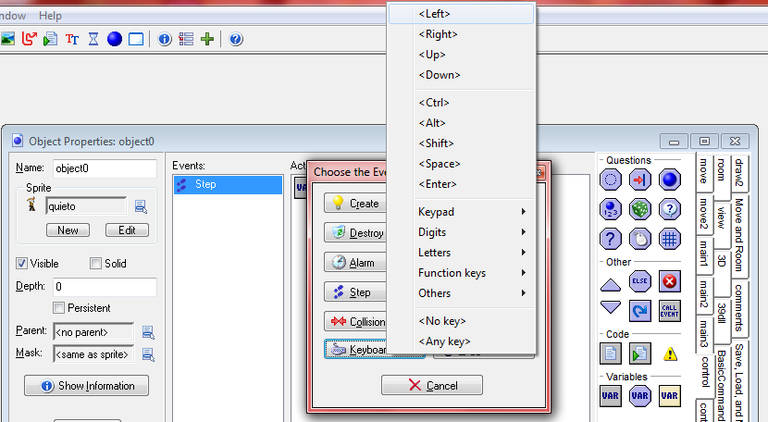
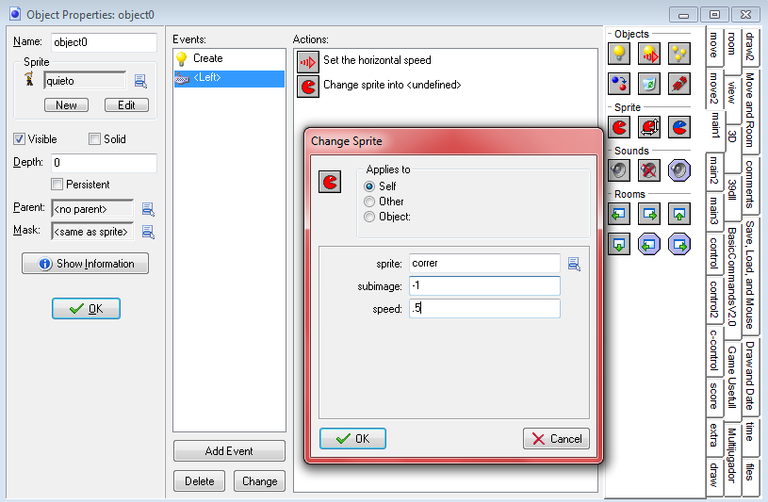
Para hacer correr a nuestro personaje debemos presionar las teclas direccionales ¿cierto?, pues Game Maker nos brinda opciones para las distintas situaciones con el teclado…para esta ocasión usaremos la de la esquina abajo-izquierda ya que se activa siempre que la tecla correspondiente esté presionada y usando los comandos predefinidos de declarar una velocidad horizontal y cambiar de Sprite podremos asignarle un movimiento a Sonder o cualquier personaje que planees usar
To make our character run we must press the directional keys, right? Because Game Maker gives us options for different situations with the keyboard... for this occasion we will use the one in the lower-left corner since it is activated whenever the corresponding key is pressed and using the predefined commands to declare a horizontal speed and change Sprite we can assign a movement to Sonder or any character you plan to use

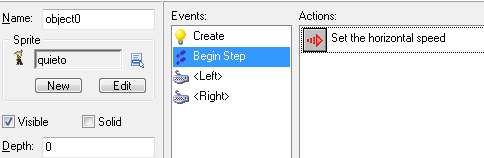
ante futuros problemas conviene instalar un comando para declarar que la velocidad horizontal vuelva a ser 0, pero esto no puede ir en créate o al presionar un botón…ahí es donde los eventos step nos ayudan ya que estos se activan en cada frame que el juego corra, y game maker cuenta con 3 tiempos para asignar comandos a step (antes del frame (begin step), durante el frame (step), después del frame (end step)). Seré honesto, lo probé en step y no funcionó así que lo pasé a begin step
In the face of future problems, it is convenient to install a command to declare that the horizontal speed is 0 again, but this cannot go in create or when pressing a button... that is where the step events help us since they are activated in each frame that the game run, and game maker has 3 times to assign commands to step (before frame (begin step), during frame (step), after frame (end step)). I'll be honest, I tried it in step and it didn't work so I passed it to begin step

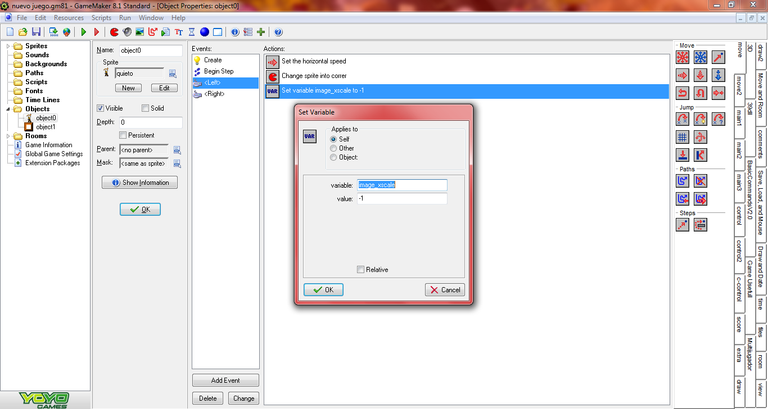
Ahora sí, volviendo a los eventos de teclado…debia asegurarme que el futuro héroe,cazafortunas, o cualquier rol que le diéramos en este juego, viera hacia donde se dirigiera, por lo que hizo falta asignar un image_xscale que en el lenguaje del Game maker, define el ancho de los sprites, permitiendo voltearlo si el valor es negativo. Una cosa que NO puede faltar es asignar el Sprite del personaje quieto una vez deje de moverse
Now yes, going back to the keyboard events… I had to make sure that the future hero, fortune hunter, or whatever role we gave him in this game, saw where he was going, so it was necessary to assign an image_xscale that in the language of the Game maker , defines the width of the sprite, allowing it to be flipped if the value is negative. One thing that can NOT be missing is to assign the Sprite of the still character once it stops moving
Si ahora volvemos a testear el juego, notaremos varias cosas:
1-la animación ahora irá más lenta
2-el personaje se mueve solo cuando presionamos la tecla correspondiente
3-¿atraviesa paredes?
4-sigue sin gravedad
Así es…empieza a tomar forma, pero aún falta mucho para tenerlo funcional
If we now test the game again, we will notice several things:
1-the animation will now go slower
2-the character moves only when we press the corresponding key
3-does it go through walls?
4-still without gravity
That's right... it's starting to take shape, but there's still a long way to go to make it functional
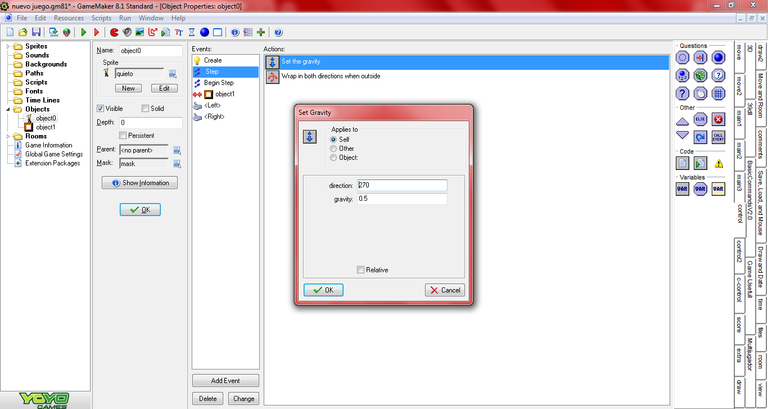
Volviendo al object del personaje, activamos un evento step (esta vez usado de manera correcta) y asignaremos gravedad y para evitar que se nos pierda de vista el personaje, asígnaremos un Wrap para que…si se sale del cuadro por un lado, vuelva por el otro
Going back to the character object, we activate a step event (this time used correctly) and we will assign gravity and to prevent the character from losing sight of us, we will assign a Wrap so that... if it leaves the frame on one side, it returns on the the other
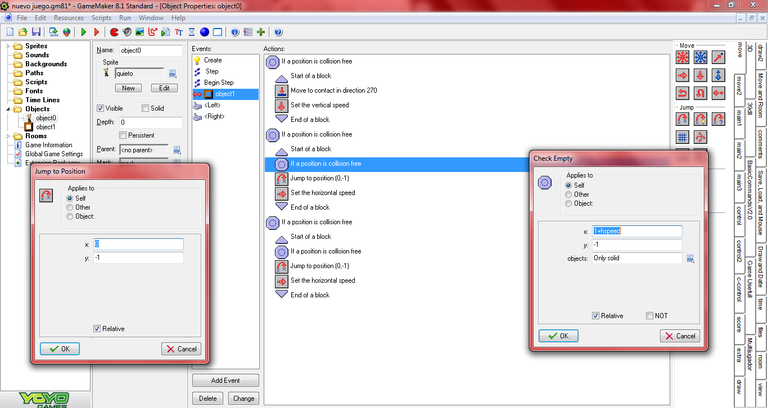
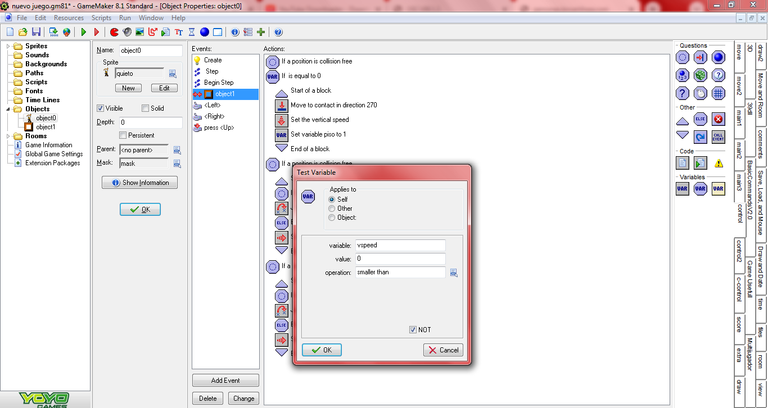
Con tal de solucionar el problema de las paredes, creamos un evento de colisión, y este, a diferencia de otros eventos…te permite seleccionar a cuál objeto será la colisión, una vez creado el evento, se procede a añadir comandos de colisión y debajo, comandos para volver a 0 la velocidad correspondiente(en este caso usé comandos de “si hay algo en X posición” pero cada quien puede obtener su propio método para lograr el resultado deseado, recomiendo que busquen hasta encontrar el más indicado a su estilo).
In order to solve the problem of the walls, we create a collision event, and this, unlike other events... allows you to select which object will be the collision, once the event is created, proceed to add collision commands and below , commands to return the corresponding speed to 0 (in this case I used commands of "if there is something in X position" but each one can obtain their own method to achieve the desired result, I recommend that you search until you find the most appropriate to your style) .
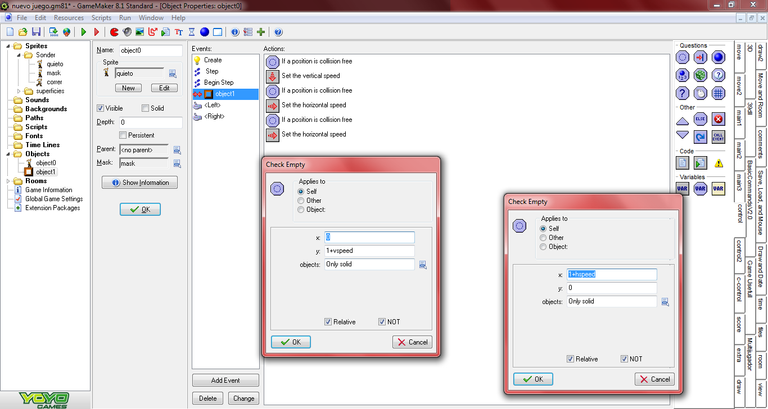
Las esquinas de las paredes suelen ser problemáticas debido que el jugador puede leerlas tanto como pared, como piso, por lo cual puede ser complejo lidiar con el, este comando podría solventar de manera temporal dicho problema además de darnos una futura función mientras hagamos el juego
The corners of the walls are usually problematic because the player can read them both as a wall and as a floor, so it can be complex to deal with, this command could temporarily solve this problem as well as give us a future function while we make the game
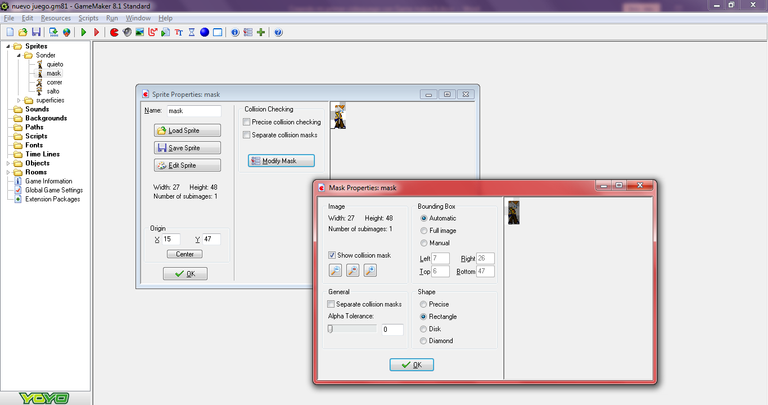
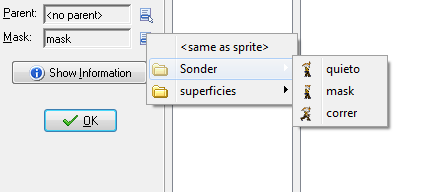
Teniendo las esquinas programadas, convenía crear una mask, eso servirá como una caja de colisiones para evitar comportamientos extraños a la hora de cambiar de Sprite por lo que crear otro Sprite y asegurar que su colisión NO sea precisa, ayudará a ese propósito, lo otro sería asignarlo al objeto
Having the corners programmed, it was convenient to create a mask, that will serve as a collision box to avoid strange behaviors when changing Sprites, so creating another Sprite and ensuring that its collision is NOT precise, will help that purpose, the other would be to assign it to the object
Volviendo a las pruebas se notará una mejoría ya que Sonder a estas alturas contará tanto con gravedad como con colisiones antes paredes (razón por la cual las marcamos como solid) aunque…la falta de saltos y de animación al caer hacen opacar mucho sus mejoras
Going back to the tests, an improvement will be noticed since Sonder at this point will have both gravity and collisions before walls (which is why we marked them as solid) although… the lack of jumps and animation when falling make their improvements very obscure
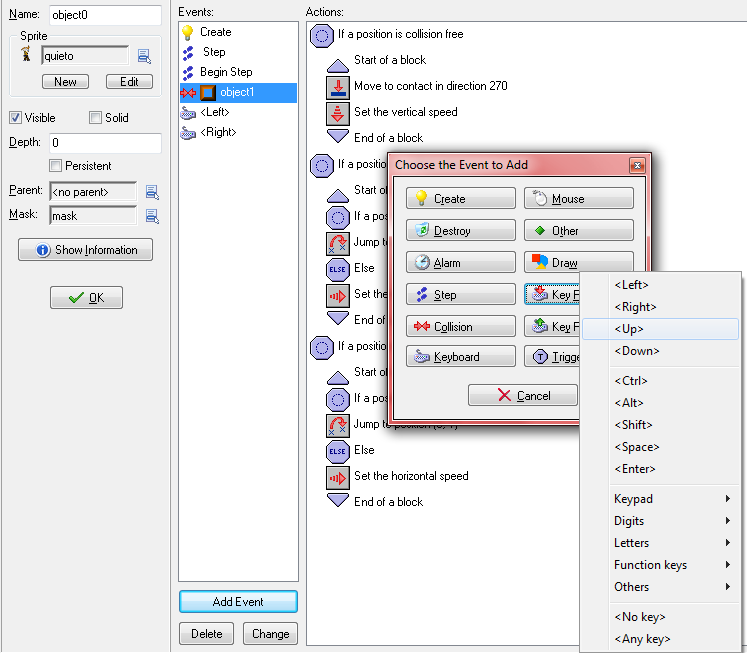
Esta vez le toca el turno a la tecla de salto (arriba en este caso) así que usaremos la Key Press, no Keyboard, y eso por una simple razón; Keyboard activa los comandos mientras se presiona mientras que Key Press solo lo activa una vez cuando presionas la tecla, si quieres que se vuelvan a activar los comandos de ese evento debes volver a presionar la tecla
This time it is the turn of the jump key (up in this case) so we will use the Key Press, not Keyboard, and that for a simple reason; Keyboard triggers the commands while pressed while Key Press only triggers it once when you press the key, if you want the commands of that event to be triggered again you must press the key again
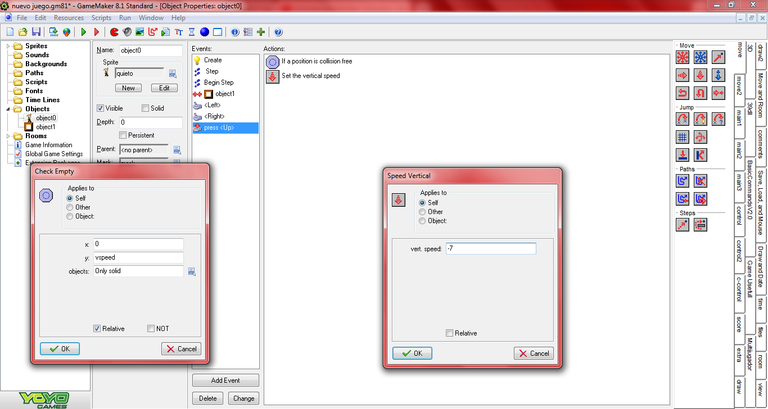
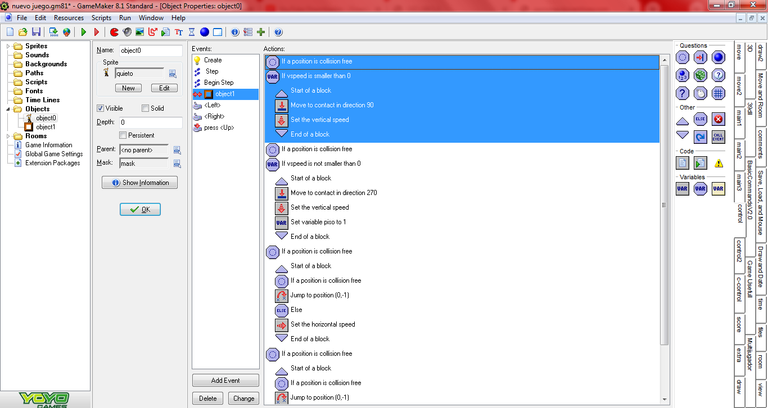
Para usar los saltos debemos tener una condicional para la cual el check empty nos servirá porque debemos asegurarnos que esté tocando el suelo y si esta condición se cumple, realizar el salto
To use the jumps we must have a conditional for which the empty check will help us because we must make sure that it is touching the ground and if this condition is met, perform the jump
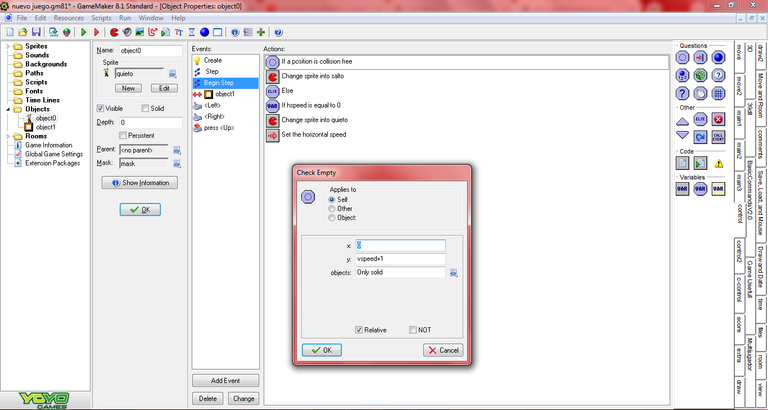
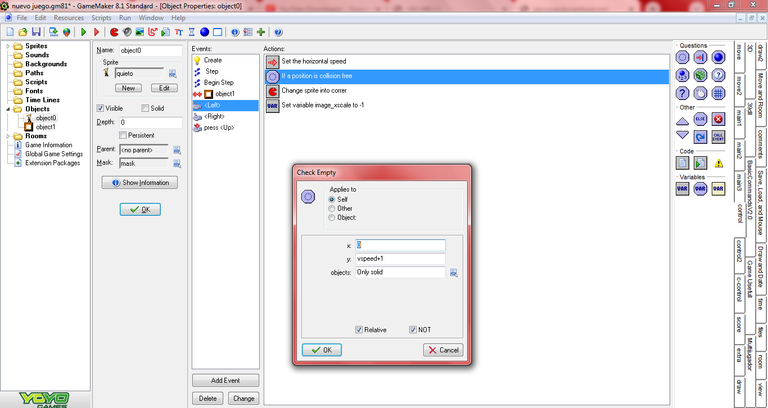
Con el salto completado, solo nos quedaría asignar los sprites para lo cual volvemos tanto al begin speed como los keyboard y asignamos la condicional que revisa si no hay piso debajo del personaje para que el sprite sea de salto…si en caso de no cumplirse…use los de moverse/quieto
With the jump completed, we would only have to assign the sprites for which we return to both the begin speed and the keyboard and assign the conditional that checks if there is no floor under the character so that the sprite is a jump sprite... if not fulfilled... use move/stay
Ya con los sprites correctamente asignados quedaría un detalle menor con la colisión del personaje con el piso con lo cual se puede usar el “move to contact” para que se adhiera bien una vez aterrice
With the sprites correctly assigned, there would be a minor detail with the character's collision with the floor, with which the "move to contact" can be used so that it adheres well once it lands
Para culminar la labor, solo queda asignar un comando para cuando el personaje colisione con el techo, para lo cual se puede clonar la lista de comando de colisión al suelo para reasignarle valores y acomodarla a chocar con un techo
To complete the task, it only remains to assign a command for when the character collides with the ceiling, for which the collision command list can be cloned to the ground to reassign values and accommodate it to collide with a ceiling
Finalmente…con todo lo preparado en el object podemos proseguir a añadir más plataformas a nuestra room y poder tener un jueguito sencillo. Poner paredes fuera de la room no será visto al momento de hacer pruebas…pero siguen haciendo su labor de colisión
Finally… with everything prepared in the object we can continue to add more platforms to our room and be able to have a simple little game. Putting walls outside the room will not be seen at the time of testing... but they continue to do their collision work
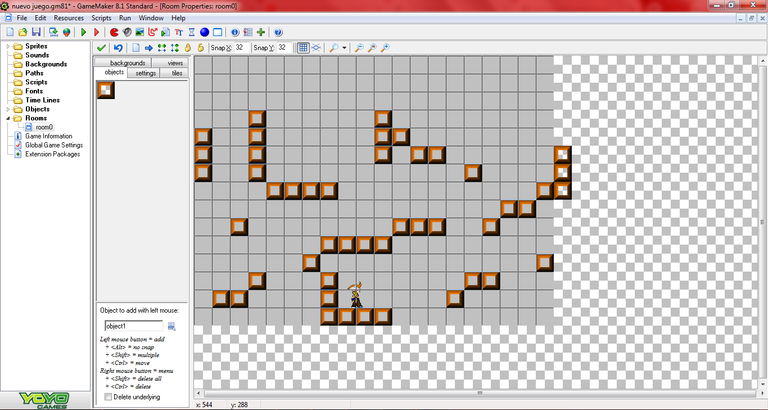
Utilizando una vez más el “Run”, podremos comprobar que efectivamente nuestro personaje puede moverse, saltar y caer de una manera un poco más fluida y funcional para un juego de plataformas, al menos en términos básicos
Using the “Run” once again, we will be able to verify that our character can indeed move, jump and fall in a slightly more fluid and functional way for a platform game, at least in basic terms.
Con todo esto, estarás listo para iniciar en el mundo de la fabricación de videojuegos, si tienen alguna duda con los pasos que mostré o quieres saber algo más, puedes escribirme en los comentarios para aclararles.
Espero que pasen una gran noche, Chao
With all this, you will be ready to start in the world of video game manufacturing, if you have any questions with the steps that I showed or you want to know something else, you can write me in the comments to clarify.
I hope you have a great night, Bye
![]()
Fué utilizado el Traductor de Google para los diálogos en inglés
The Google Translate was used for the dialogues in English
WOWWWWW amigo que geniallll este postttt!!! para una persona que sabe poco de este tipo de cosas me parece absolutamente increíble y complicado, pero tu lo haces ver muy sencillo en tu post ¡de verdad me parece impresionante! Juraba que para crear un videojuego se necesitaban de muchas más cosas.
Por supuesto sé que hay videojuegos mas complejos, pero aun a este nivel con estos gráficos pensé que era más dificil.
Me encantó tu post y Sonder me parece un nombre genial ¡no lo cambies! y su apellido le quedó aun mejor, además el hecho de que sea un erizo le da un plus con ese cabello jejeje se ve muy cool.
De verdad me encantó tu post @rickstormrules y espero que lo termines pronto porque Sonder merece ser conocido por muchos 👏👏👏👏.
Ciertamente la programación suele parecer desafiante(especialmente en videojuegos)...pero gracias a programas como Game Maker es que los que inician en este mundo podrán tener una base en la cual comenzar
Me alegro que te haya gustado Sonder, espero poder hacer más partes de este tutorial en un futuro próximo, y muchas gracias @liveofdalla por comentar
Qué buen posee chiste Qué buen contenido Qué buena presentación me duele mucho todo lo que hiciste obviamente para publicar y crear un juego que necesita mucha lógica y mucha creatividad pero como dices tú lo primero que significa es la base de una idea Clara de lo que quieres creo que es muy importante porque no puedes comenzar a crear un juego y mientras se va creando tú vas viendo que quieres hacer eso no es así gracias por traer
Es muy cierto que todo juego necesita una base y no se trata de meterle cosas a diestra y siniestra sin un plan, pero eso no significa que no puedan surgir ideas factibles sobre la marcha. Me alegro que le haya gustado este post y muchas gracias por su buen comentario