
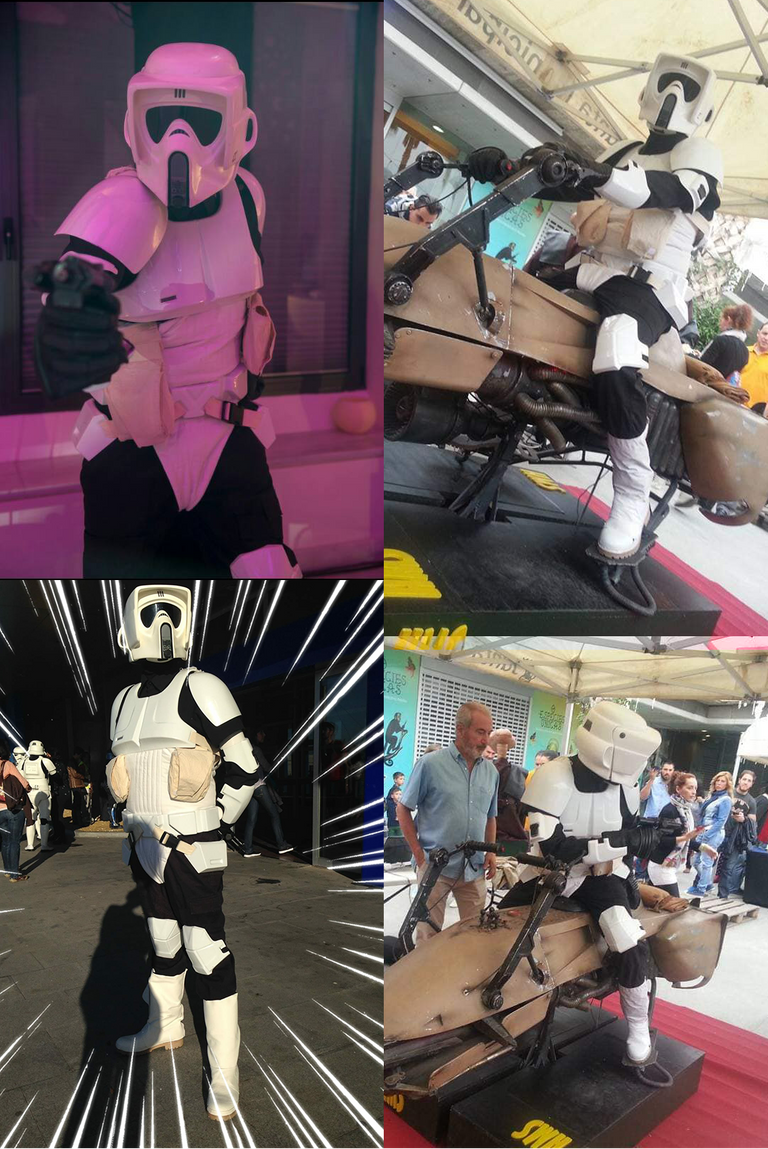
The image was taken with my phone at the science fiction festival in Fuenlabrada.

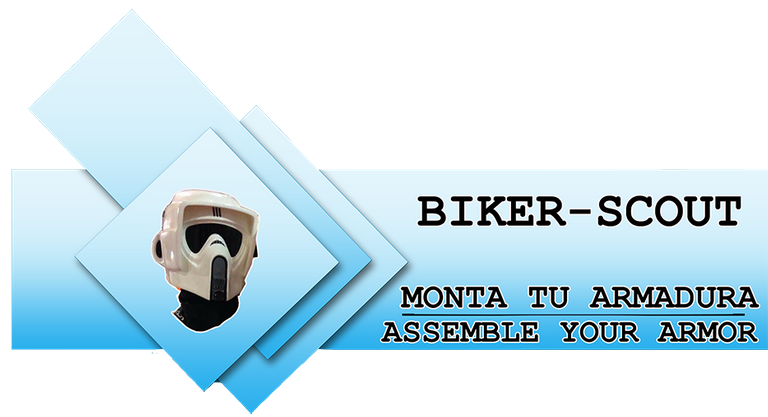
Hola amig@s de HIVE y en particular a toda la comunidad de #Aliento🤗. Hoy vamos a ver como poder montar al detalle un cosplay de una armadura de Biker Scout (soldado imperial motorizado de Star Wars). En este tutorial vamos a ver todas y cada una de las partes que componen este cosplay y he intentado explicarlo con el mayor detalle que me ha sido posible para que cualquier persona con todas estas guías visuales pueda hacerlo. Espero que os guste😉.
Soy un gran fan de Star Wars y el cosplay, tengo lo que yo llamo a "los tres blanquitos" de la trilogía clásica, stormtrooper, biker scout y snowtrooper. Este será el segundo tutorial del segundo personaje que tengo y mas adelante podre compartir el tutorial de uno de los personajes mas reconocidos de la saga, "el stormtrooper", pero hoy vamos con el biker que es un traje que me encanta y no es de los mas complicados de realizar.
Hello friends of HIVE and in particular to the whole community of #Aliento😃. Today we are going to see how to assemble in detail a cosplay of armor of a Biker Scout (imperial motorized soldier of Star Wars). In this tutorial we are going to see every one of the parts that make up this cosplay and I have tried to explain it in as much detail as possible so that anyone with all these visual guides can do it. Enjoy😉.
I'm a big fan of Star Wars and cosplay, I have what I call "the three whiteys" from the classic trilogy, stormtrooper, biker scout and snowtrooper. This will be the second tutorial of the second character I have and later I will be able to share the tutorial of one of the most recognized characters of the saga "the stormtrooper", but today we are going with the biker which is a costume that I love and is not the most complicated to make.
Materiales:
- Armadura y casco
- Camisa Cargo negra
- Guantes negros motorista
- Pantalones Cargo negros
- Tela blanca para el fajín
- Tela beige para los bolsos
- Chaleco negro
- Botas tipo camper
- Pistola réplica
- Balaklava negra
- Elástico negro de 3cm (2m)
- Elástico negro de 8cm (1m)
- 50X50 cm tela ante
- Correa negra de 5cm (2m)
- Correa negra de 10cm (3m)
- Vinilo blanco para las botas
- Sujeción casco-cabeza
- Visor verde para el casco
- Piezas decorativas
- Velcro blanco y negro
- Snaps, cierres clap, etc.
Materials:
- Armor and helmet
- black Cargo shirt
- Motorcycle black gloves
- black Cargo pants
- White fabric for the Cummerbund
- Beige fabric for the bags
- Black vest
- Campers type boots
- Gun replica
- Black balaklava
- 3cm black elastic (2m)
- 8cm black elastic (1m)
- 50X50 cm suede cloth
- Black 5cm strap (2m)
- Black 10cm strap (3m)
- White vinyl to cover boots
- Helmet-head support
- Green visor for the helmet
- Decorative parts
- Velcro black and white
- Snaps, clap fasteners, etc.

🛑⭕️⚫️🔴SOFTPARTS🔴⚫️⭕️🛑
🔸BOTAS / BOOTS🔸
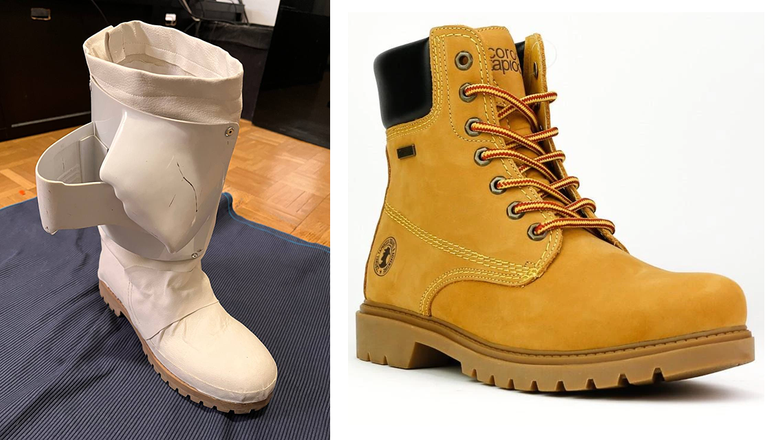
Para las botas usaremos una botas tipo camper que tendremos que cubrir de vinilo blanco, es una tarea complicada que se tiene que hacer muy despacio, pero con la ayuda que da un secador de pelo podemos hacerlo. El secador lo emplearemos para calentar el vinilo para poder ajustarlo a las curvas de la bota y para pegar usaremos un pegamento rápido.
Este proceso es muy lento porque se hace muy poco a poco, primero cortaremos el trozo necesario de vinilo blanco, tendremos que hacer un patrón pero muy por encima sin complicarnos. Después pondremos pegamento a ser posible con pincel o brocha por la zona de la bota a pegar e iremos pegando el vinilo haciéndolo por partes, cuando lleguemos a una curva utilizaremos el secador de pelo para dar algo de forma al vinilo, estiraremos el vinilo con cuidado y seguiremos pegando, así poco a poco y con mucha suerte es posible que lo hagas a la primera🤣. Yo lo conseguí a la segunda..
También puedes usar polipiel que no sea muy gruesa, el resultado será mejor, pero será mucho mas complicado de hacer, todo depende de uno mismo.
For the boots we will use camper type boots that we will have to cover with white vinyl, it is a complicated task that has to be done very slowly but with the help of a hair dryer we can do it. The hair dryer we will use to heat the vinyl to be able to adjust it to the curves of the boot and to glue it we will use a fast glue.
This process is very slow because it is done very little by little, first cut the necessary piece of white vinyl, and we will have to make a pattern but very over without complication. Then we will put glue if possible with a brush or brush in the area of the boot to paste and we will paste the vinyl doing it by parts, when we get to a curve we will use the hair dryer to give some shape to the vinyl, we will stretch the vinyl carefully and continue pasting, so little by little and with a lot of luck you may do it the first time🤣. I got it the second time...
You can also use leatherette that is not too thick, the result will be better but it will be much more complicated to do, it all depends on yourself.
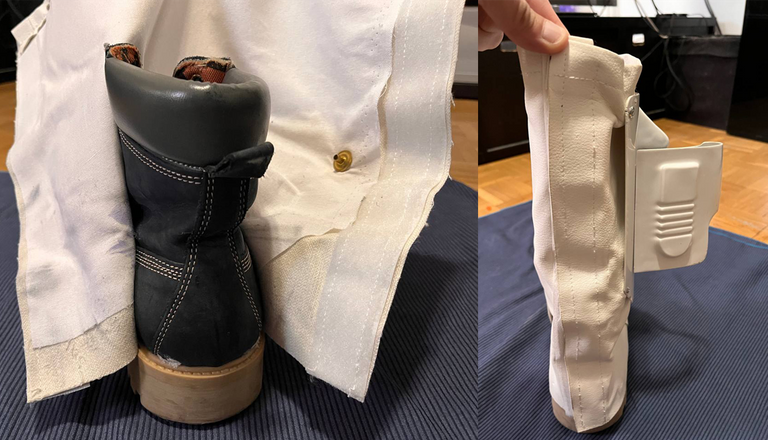

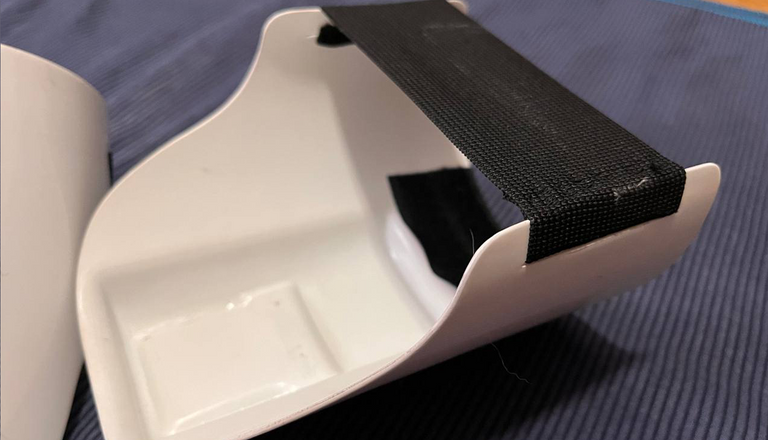
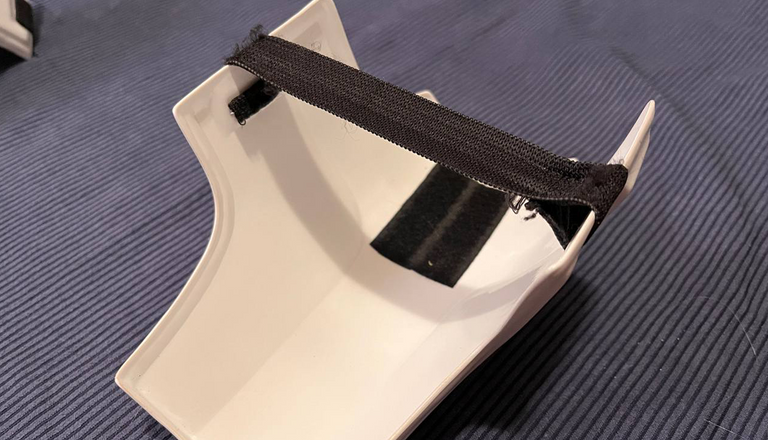
En esta última imagen se puede ver una pieza que cubre una zona que se llena de arrugas y así se consigue darle un mejor acabado, las costuras que se ven son decorativas. Por detrás, por ambas partes coseremos velcro blanco para cerrar las botas.
In this last image you can see a piece that covers an area that is filled with wrinkles and thus gives a better finish, the seams are decorative. White Velcro will be sewn on the back on both sides to close the boots.
🔸PANTALONES Y CAMISA / PANTS AND SHIRT🔸

Pantalones y camisa cargo negros (dickies, docker, etc.). ¿Por qué de este tipo? Porque es de una tela fuerte, para trabajar, casi militar, con un corte y una caída de la tela que nos aporta el toque que buscamos.
Black cargo pants and shirt (dickies, docker, etc.) Why this type? Because it is a strong fabric, for work, almost military, with a cut and a fall of the fabric that gives us the touch we are looking for.

El pantalón tiene estas piezas de tela de ante negro cosidas junto a unos elásticos negros de ocho centímetros de ancho y lleva por detrás esta otra pieza de ante negro para esconder los bolsillos traseros. A la altura de las rodillas hay que poner velcro negro para fijar las rodilleras.
The pants have these pieces of black suede fabric sewn together with black elastic eight centimeters wide and have this other piece of black suede behind to hide the back pockets. Black Velcro must be placed at the knees to fix the knee pads.
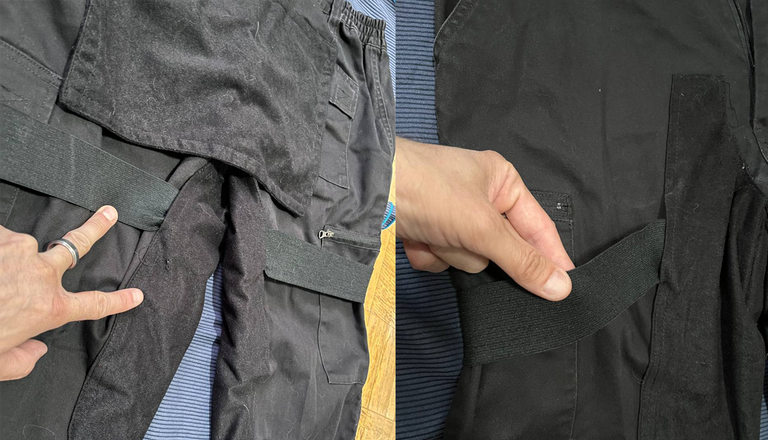
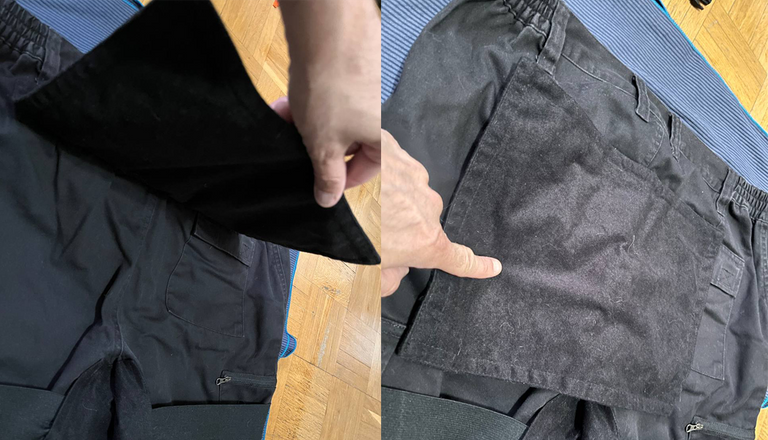
La camisa tiene que llevar velcro negro en la parte exterior de ambos brazos a la altura de los antebrazos y de los tríceps, en los brazos irán pegadas partes de la armadura.
The shirt must have black Velcro on the outside of both arms at the level of the forearms and triceps, in the arms will be glued parts of the armor.

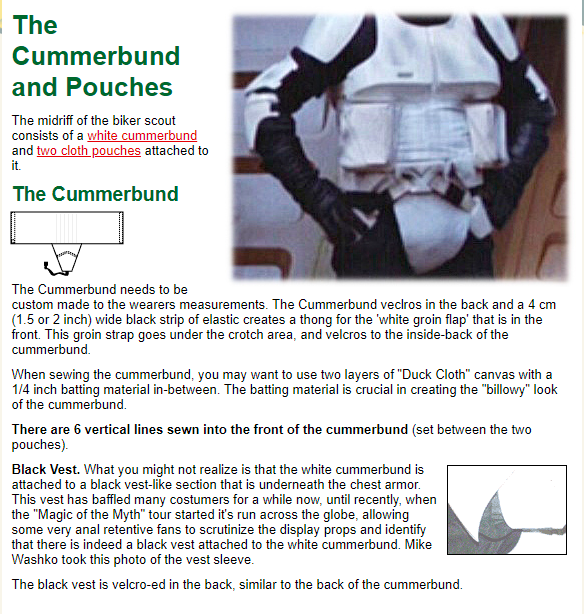
🔸FAJIN / CUMMERBUND🔸
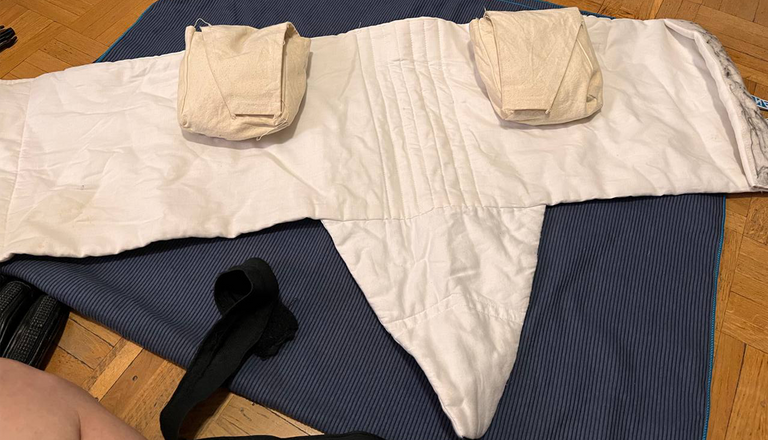
El fajín es una parte muy característica de este cosplay, pero como no se me da bien coser opte por comprarla a un fabricante que las hace de buena calidad y a buen precio. En Etsy tenéis a varios fabricantes para poder comparar y elegir la mejor opción.
Tela de algodón blanco, elástico negro, velcro blanco y negro es todo lo necesario para hacer lo que comúnmente llamamos dentro del mundillo del cosplay star wars "el pañal".
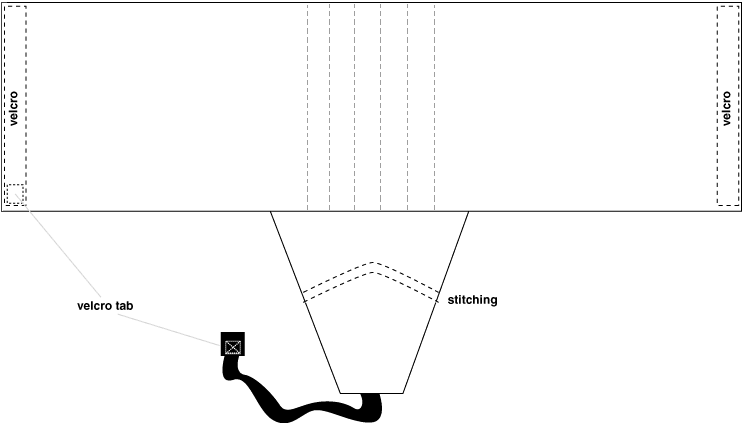
Si se te da bien la costura está la opción de hacerlo uno mismo, por eso a continuación comparto una explicación visual de como hacerlo por parte de la maravillosa gente de StudioCreations.
The cummerbund is a very characteristic part of this cosplay but as I am not good at sewing I chose to buy it from a manufacturer that makes them of good quality and at a good price. On Etsy, you have several manufacturers to compare and choose the best option.
White cotton fabric, black elastic, and black and white velcro are all you need to make what we commonly call in the world of cosplay star wars "the diaper".
If you are good at sewing there is the option of doing it yourself so below I share a visual explanation of how to do it by the wonderful people of StudioCreations.
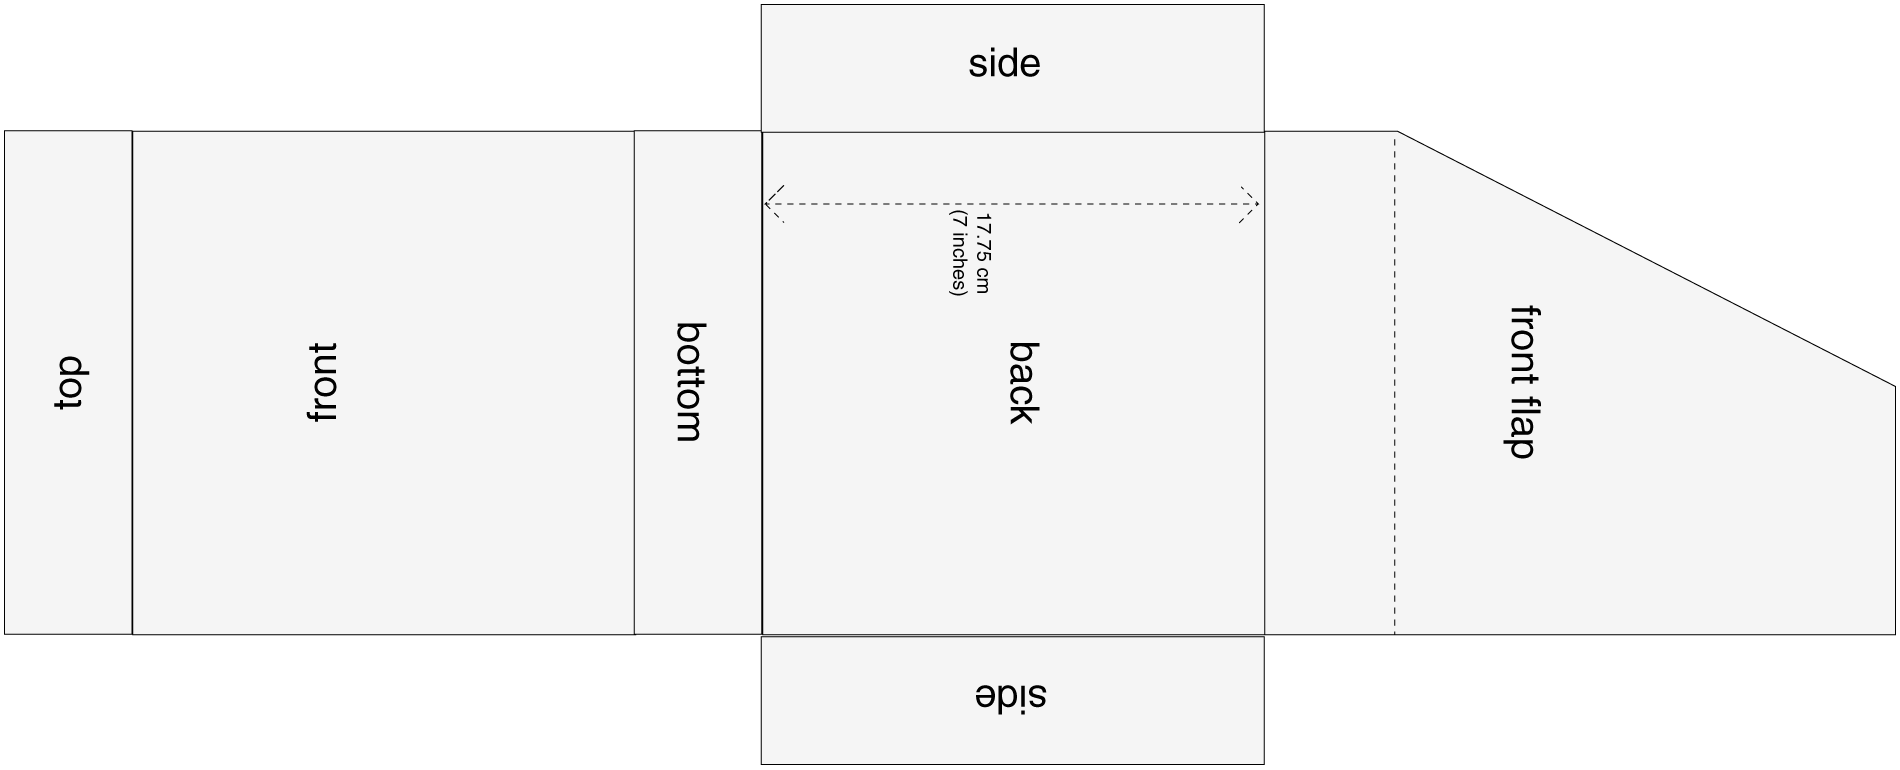
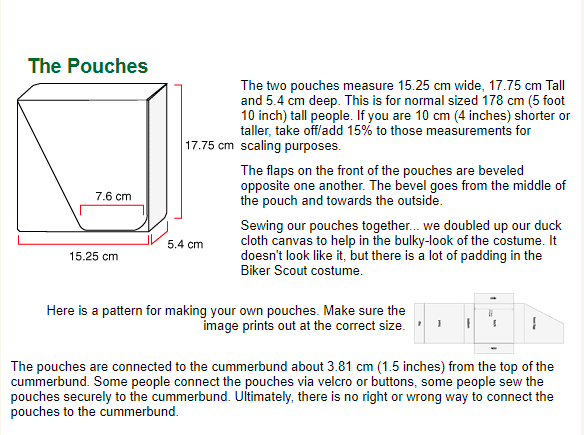
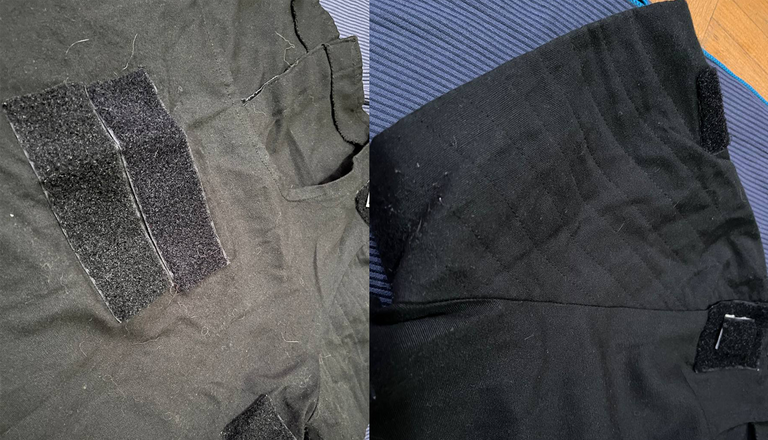
🔸BOLSOS / POCKETS🔸
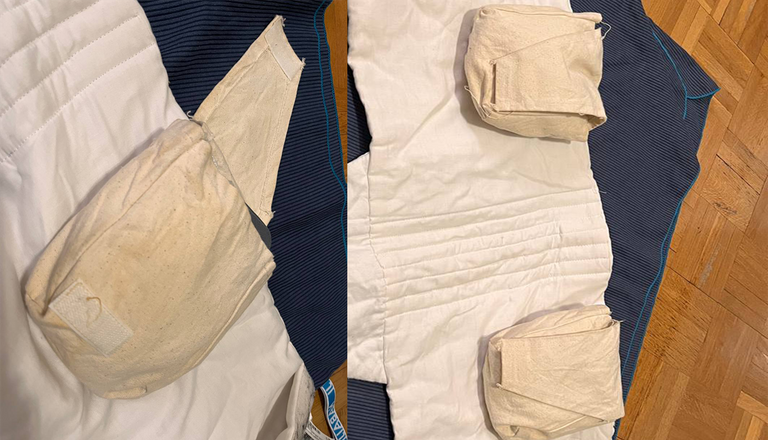
Los bolsos van juntos al fajín con velcro y son de tela blanca, aunque también puede servir perfectamente tela de color beige. Los míos vinieron junto al fajín que compre, así que no tuve que hacerlos, aunque como podéis ver no son muy complicados de hacer. A continuación podéis ver como hacerlos gracias a StudioCreations.
The bags are attached to the sash with velcro and are made of white fabric, although beige fabric can also be used. Mine came with the sash that I bought so I didn't have to make them but as you can see they are not very complicated to make. Below you can see how to make them thanks to StudioCreations.
🔸CHALECO / VEST🔸

El chaleco lo compre al mismo fabricante al que le compre en fajín y los bolsos. Siempre se pueden encontrar buenas ofertas comprando varias cosas al mismo fabricante.
El chaleco tiene que ser de tela negra y llevara velcro negro en hombros, tríceps, pecho y espalda, los velcros en hombros y tríceps sujetaran varias partes de armadura, los velcros de espalda y pecho nos servirán para sujetar el fajín. La parte de los hombros y brazo superior está acolchada, dándole así un bonito acabado.
I bought the vest from the same manufacturer I bought the cummerbund and bags from. You can always find good deals by buying several things from the same manufacturer.
The vest must be made of black fabric and will have black velcro on the shoulders, triceps, chest and back, the velcro on the shoulders and triceps will hold various parts of the armor, and a velcro on the back and chest will be used to hold the cummerbund. The shoulders and upper arm are padded to give it a nice finish.

🔸GUANTES / GLOVES🔸

Los guantes que usaremos son guantes negros de motorista y poco mas podemos añadir.
The gloves we will use are black biker gloves and a little more we can add.
🛑⭕️⚫️🔴HARDPARTS🔴⚫️⭕️🛑
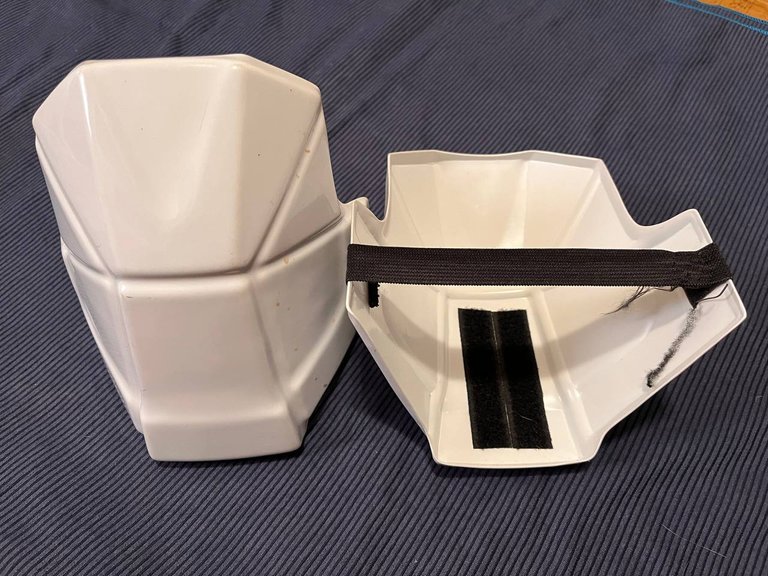
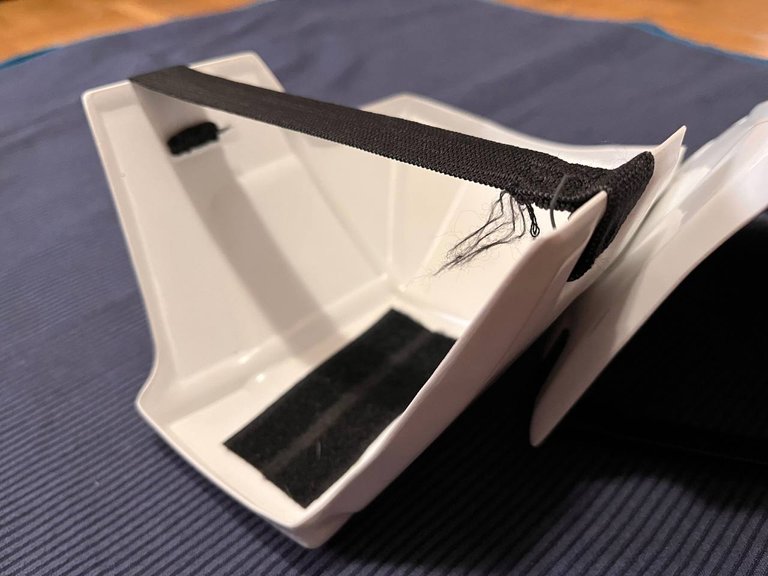
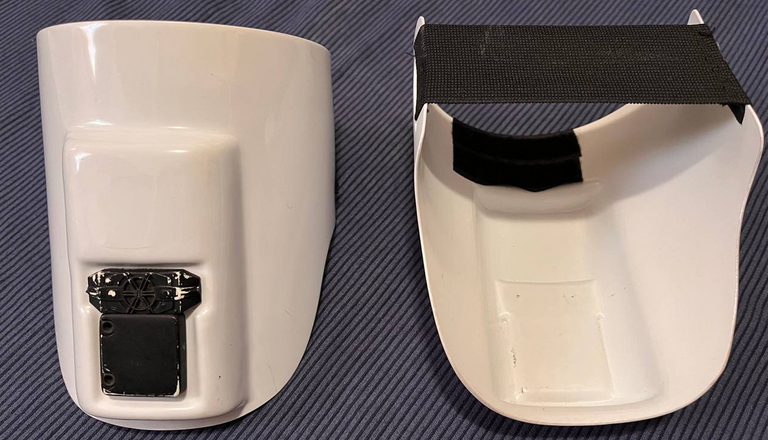
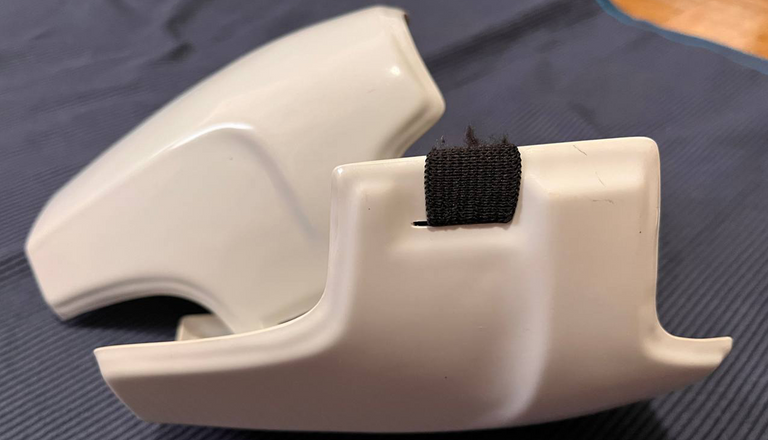
🔸CASCO / HELMET🔸
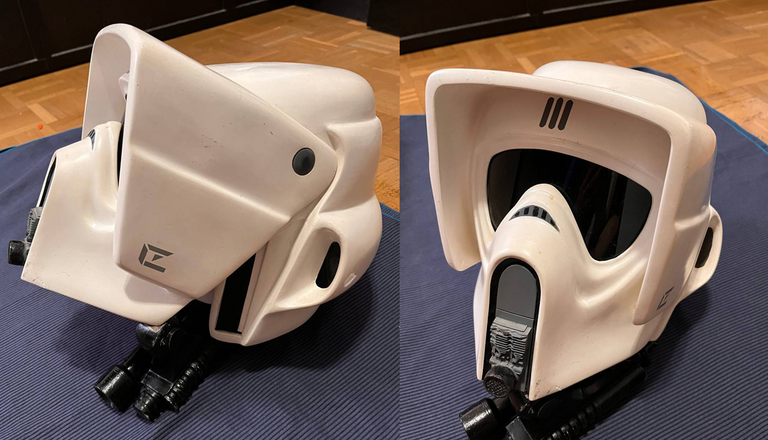
Para el casco hay varias opciones, plástico ABS, otros tipos de plásticos, impresión 3D y fibra de vidrio. Yo me decidí por comprar el casco a un antiguo amigo que los hacía de fibra de vidrio y me lo dejo a muy buen precio, pero un casco de estas características puede costar unos 300 USD.
Las opciones en plástico son mas baratas y si lo montas tu mismo te puede salir muy barato, pero no esperes una calidad parecida a la que te da la fibra de vidrio. La "cara" del casco es abatible y se levanta para así poder enseñar el rostro.
El casco lleva un visor verde cortado de una manera específica, con la ayuda de una dremmel puedes hacerlo fácilmente. Por dentro deberá llevar material acolchado y un soporte para llevarlo cómodamente, además de un elástico y un barbiquejo para sujetarlo a la barbilla.
La parte trasera y delantera del casco tiene unos detalles decorativos que o bien se pueden pintar o bien se pueden poner pegatinas.
For the helmet there are several options, ABS plastic, other types of plastics, 3D printing and fiberglass. I decided to buy the helmet from an old friend who made them in fiberglass and he gave it to me at a very good price but a helmet of these characteristics can cost about 300 USD.
The plastic options are cheaper and if you assemble it yourself you can get it very cheap but do not expect quality similar to that of fiberglass. The "face" of the helmet is hinged and lifts to show the face.
The helmet has a green visor cut in a specific way, with the help of a dremmel you can do it easily. The inside of the helmet should have padding material and support to wear it comfortably as well as an elastic and a chin strap to hold it to the chin. The back and front of the helmet have decorative details that can either be painted or stickers can be applied.

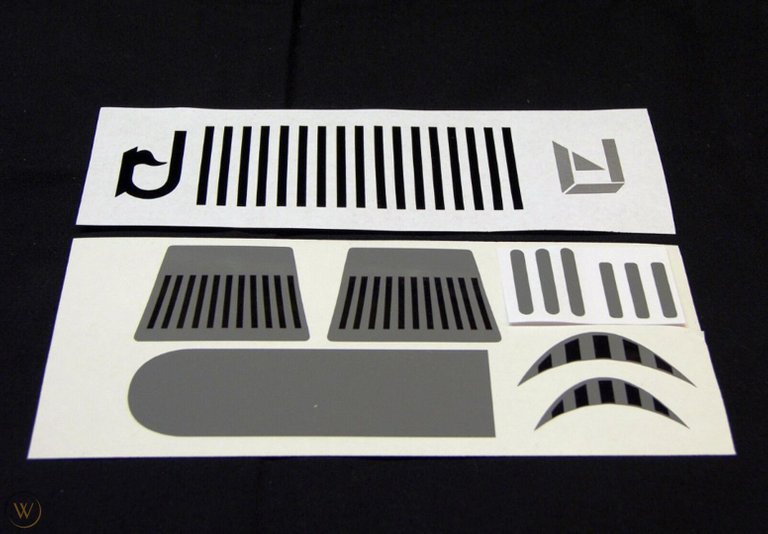 casco/helmet Decals/stickers source
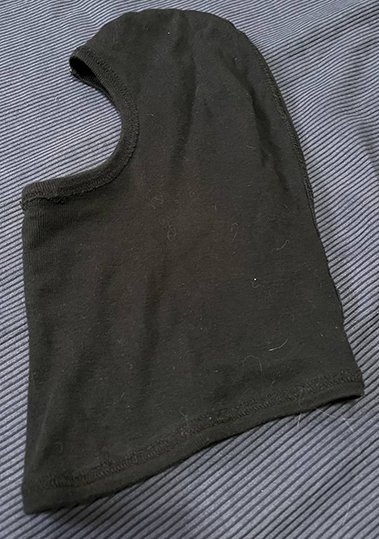 balaklava
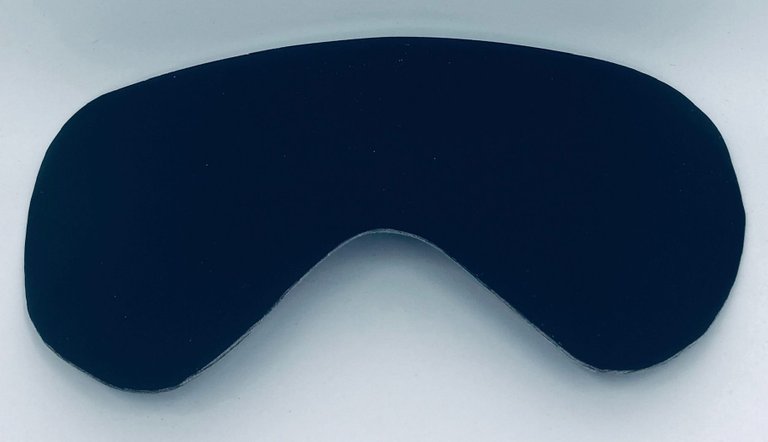 visor
visor 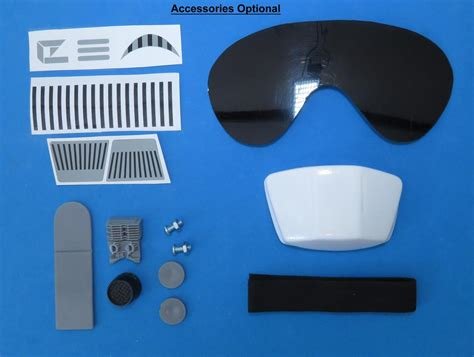 pieces
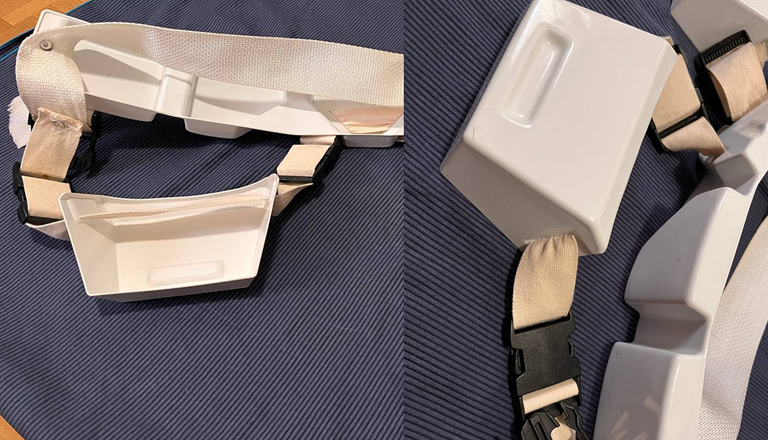
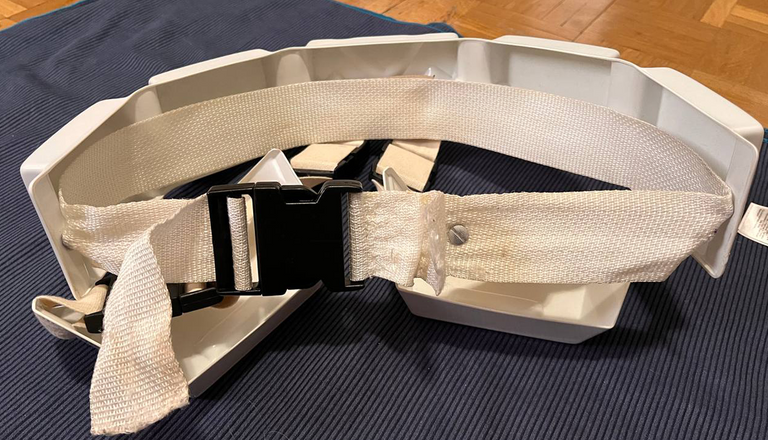
🔸CINTURON / BELT🔸
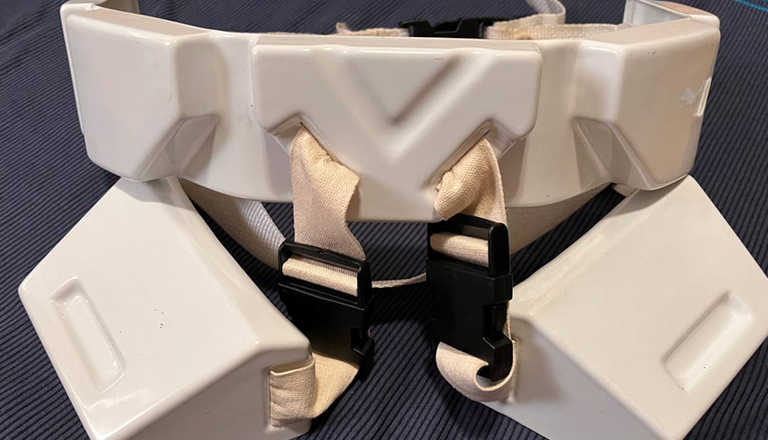
El cinturón está compuesto por dos piezas de armadura que simula donde iría la munición guardada, el propio cinturón rígido, cuatro cierres clap negros, correa blanca de diez cm de anchura y velcro blanco para fijar el cinturón por detrás. Para fijar la correa la remacharemos en ambos finales del cinto rígido.
Deberás coser el velcro por detrás en ambos finales de correa para poder ajustarte el cinturón. Su montaje no es complicado, coge hilo, aguja, ponte música y a coser.
The belt is composed of two pieces of armor that simulate where the ammunition would be stored, the rigid belt itself, four black clap fasteners, a white strap ten cm wide and white velcro to attach the belt behind. To fix the strap we will rivet it to both ends of the rigid belt.
You will have to sew the velcro on the back at both ends of the strap to be able to adjust the belt. Its assembly is not complicated, take thread, needle, put on music and sew.
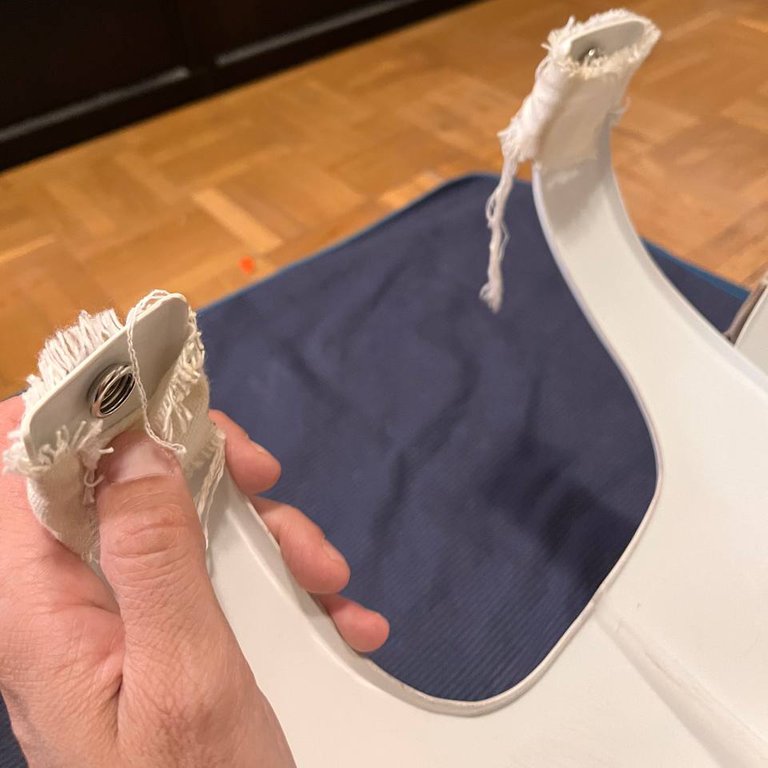
🔸RODILLERAS / KNEES🔸
Para esta parte se debe pasar elástico negro por las hendiduras que tienen las rodilleras, si no las tuviesen hechas se pueden hacer fácilmente con una dremmel, una vez se comprueba la medida del elástico, este se cose. Por dentro de las rodilleras pondremos velcro adhesivo para fijarlo al pantalón. Acuérdate de ponerte las rodilleras antes que las botas😅.
For this part you must pass black elastic through the slits that have the knee pads, if they do not have them can be done easily with a dremmel, once the size of the elastic is checked this is sewn. Inside the knee pads we will put adhesive Velcro to fix it to the pants. Remember to put on your knee pads before your boots😅.
🔸BRAZOS / ARMS🔸
 tríceps
 antebrazos/forearms
La armadura de los brazos está compuesta de dos partes, una va por la parte exterior del antebrazo y la otra por la parte exterior del tríceps.
Para esta parte se debe pasar elástico negro por las hendiduras que tienen las piezas, si no las tuviesen hechas se pueden hacer fácilmente con una dremmel, una vez se comprueba la medida del elástico, este se cose. Por dentro de las piezas pondremos velcro adhesivo para fijarlo a la camisa.
The arm armor is composed of two parts, one goes on the outside of the forearm and the other on the outside of the triceps.
For this part you must pass black elastic through the slits that have the pieces, if they have not been made they can be easily done with a Dremmel, once the elastic measure is checked this is sewn. Inside the pieces we will put adhesive velcro to fix it to the shirt.
 tríceps
 antebrazos/forearms
🔸HOMBRERAS / SHOULDERS🔸
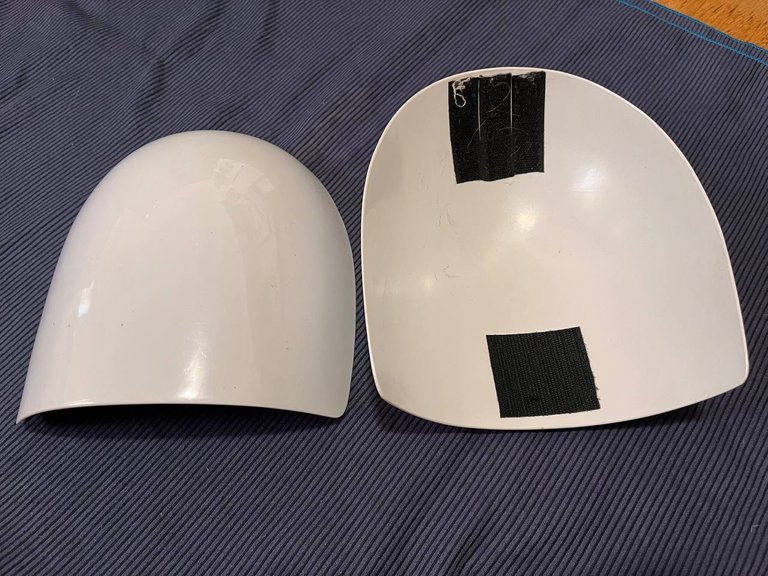
Las hombreras son sin duda la parte mas fácil de montar porque solo hay que pegar por dentro velcro adhesivo por la parte superior e inferior para poder fijarlo al chaleco.
The shoulder pads are undoubtedly the easiest part to assemble because you only have to stick adhesive Velcro on the inside at the top and bottom to be able to attach it to the vest.
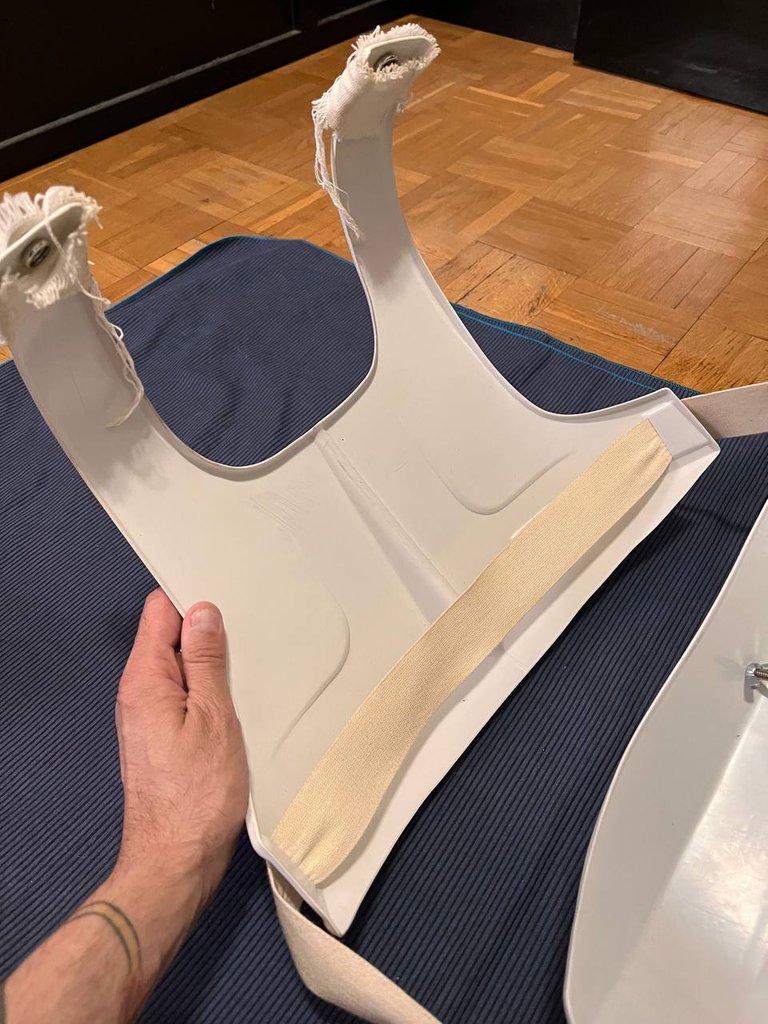
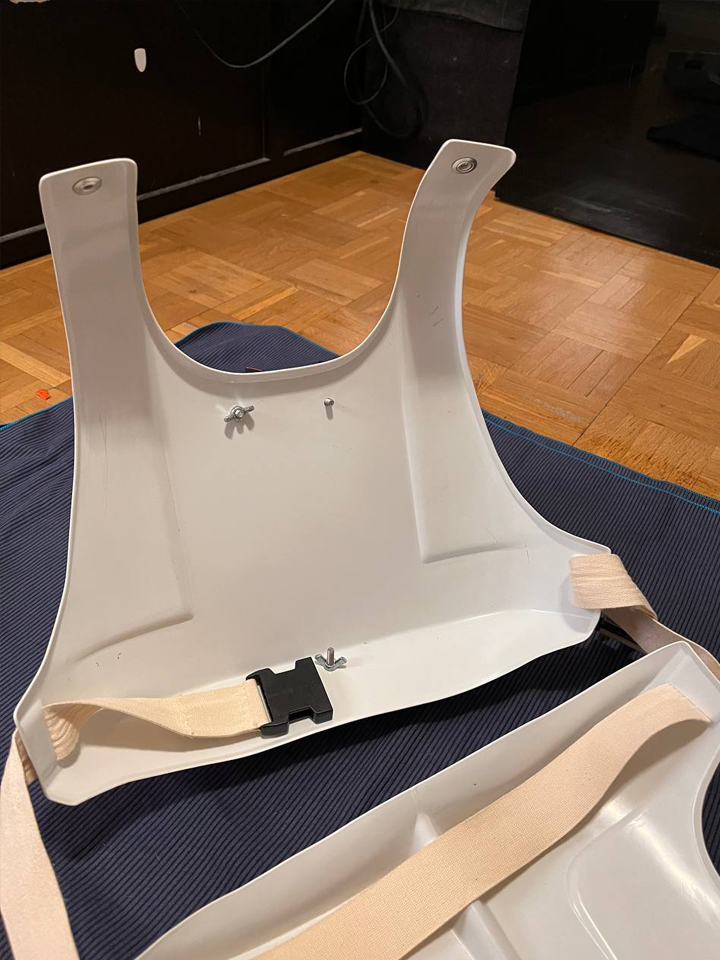
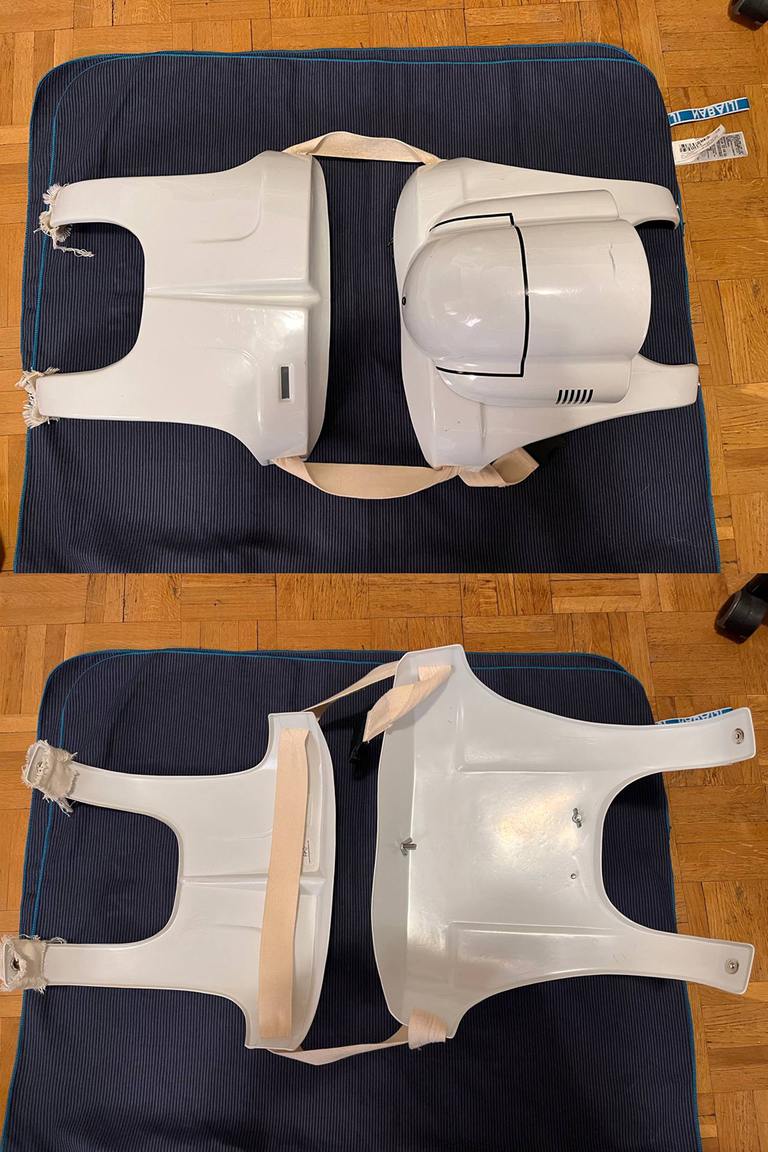
🔸CORAZA PECTORAL/ CHEST ARMOR🔸

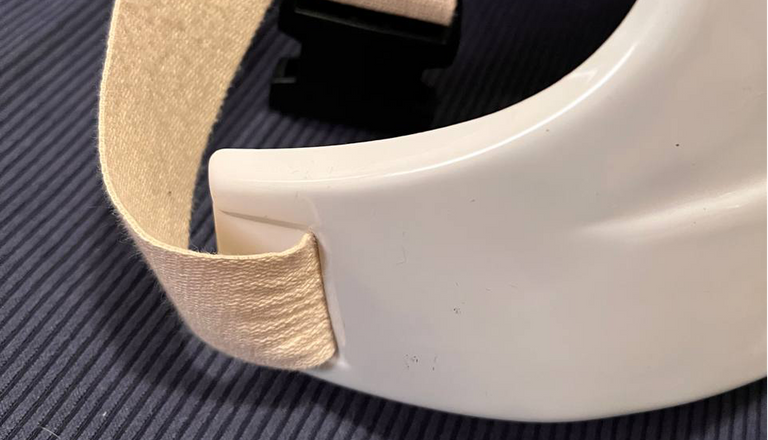
En las dos partes superiores deberemos poner snaps (o automáticos) de buena calidad que servirán de anclaje a la coraza trasera. Con correa blanca de diez cm de ancho fijaremos la coraza delantera a la trasera. La correa va por dentro de las hendiduras de la armadura como se puede ver en las imágenes y el fijado de la correa se hace con un cierre clap, este proceso no es nada complicado, pero hay que tener cuidado al poner los snaps porque solo tienes dos hombreras, practica antes en un trozo de plástico😃.
In the two upper parts we will have to put snaps (or automatics) of good quality that will serve as anchorage to the back armor. With a ten cm wide white strap we will fix the front armor to the rear armor. The strap goes inside the slits of the armor as you can see in the pictures and fixing the strap is done with a clap fastener, this process is not complicated but be careful when putting the snaps because you only have two shoulder pads, practice before on a piece of plastic😃.

Pondremos un poco de tela blanca que fijaremos con pegamento rápido para así poder tapar los snaps.
We will put some white fabric that we will fix with quick glue to cover the snaps.
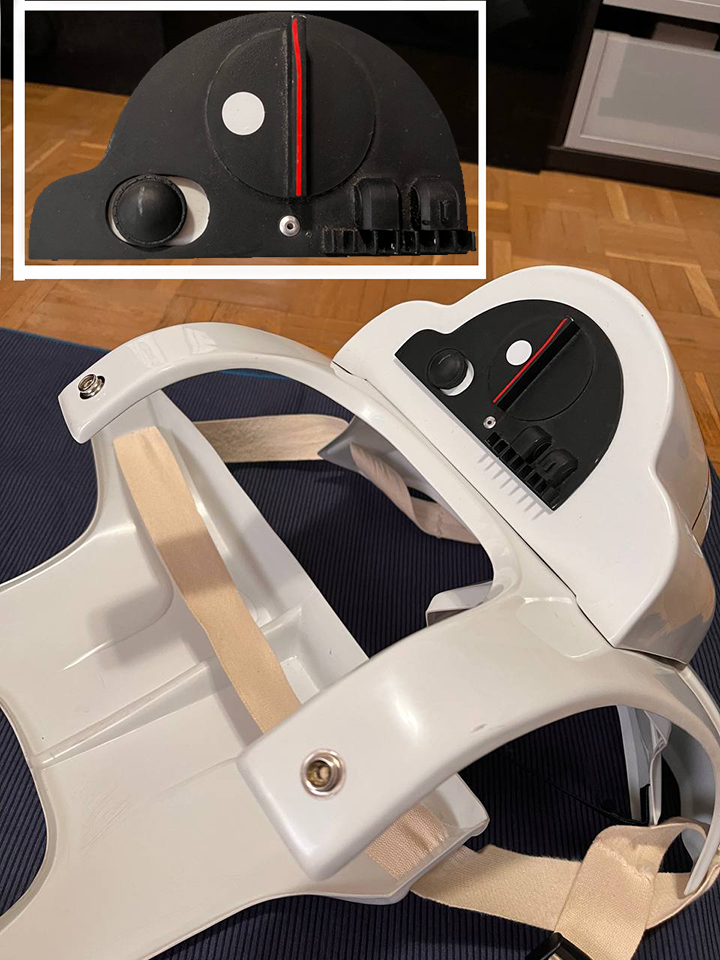
🔸CORAZA TRASERA / BACK ARMOR🔸

Esta pieza está compuesta por varias partes, la principal es la propia coraza y después están todas las piezas que componen la pequeña "mochila" que lleva. Su montaje no es nada complicado, siendo muy fácil de encajar y fijar todas las piezas con pegamento rápido y algo de tornillería. La mochila tiene varias pegatinas como se puede ver en las imágenes y estas vienen junto a las que trae el casco.
En las partes superiores pondremos dos snaps para poder fijarlo a la coraza delantera. Introduciremos las correas por las hendiduras de la armadura para fijarlo con la coraza pectoral como explicamos anteriormente.
This piece is composed of several parts, the main one is the shell itself and then all the pieces that make up the small "backpack" that carries. Its assembly is not complicated at all being very easy to fit and fix all the pieces with quick glue and some screws. The backpack has several stickers as you can see in the pictures and these come with the helmet.
In the upper parts we will put two snaps to be able to fix it to the front shell. We will introduce the straps through the slots in the armor to fix it with the chest armor as explained above.
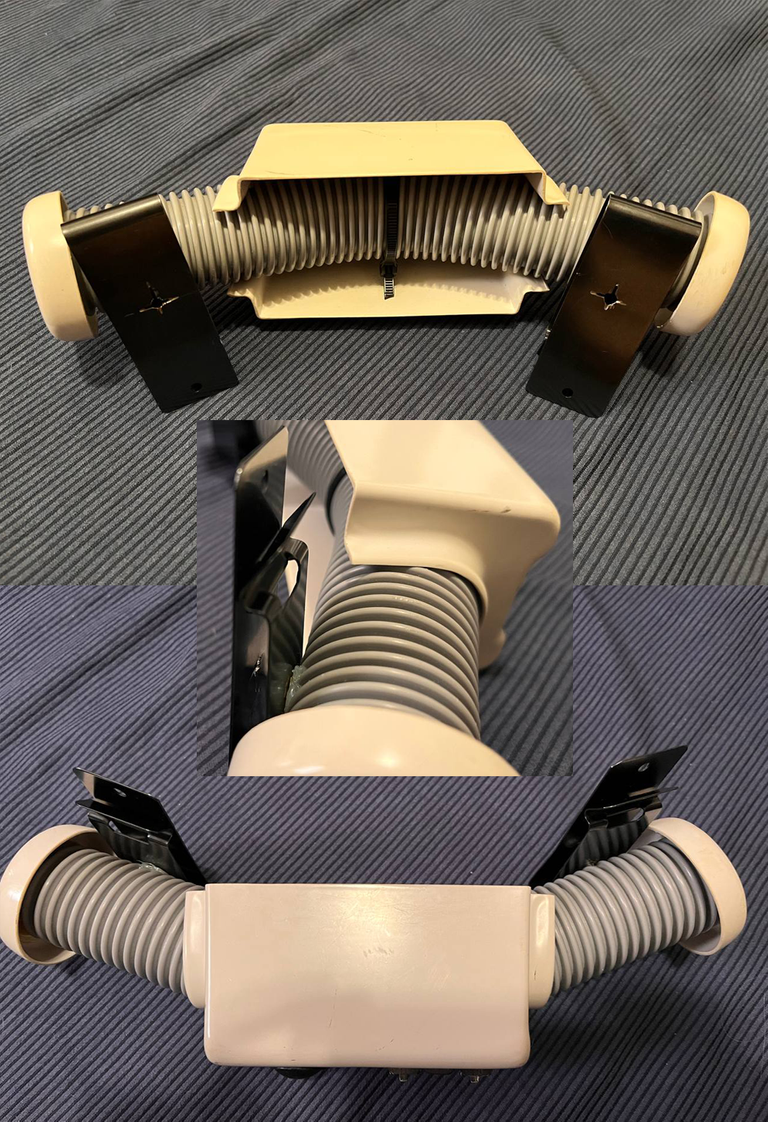
🔸DETONADOR TERMAL / THERMAL DETONATOR🔸
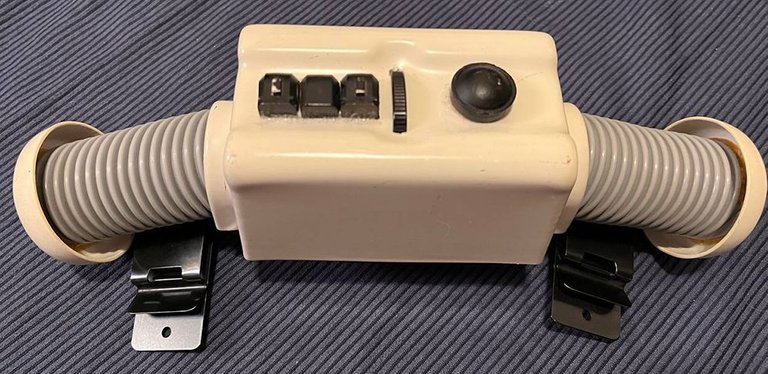
El detonador termal se compone de un tubo de corrugado, la caja y dos tapas blancas de plástico, las piezas decorativas negras, una brida negra y dos pinzas metálicas que servirán para sujetar el detonador al cinturón.
Las pinzas van ancladas con remaches al tubo de corrugado, el tubo va sujeto a la caja con una brida, las piezas negras decorativas y las tapas blancas van pegadas con pegamento rápido.
🔸CARTUCHERA Y PISTOLA / HOLSTER AND PISTOL🔸
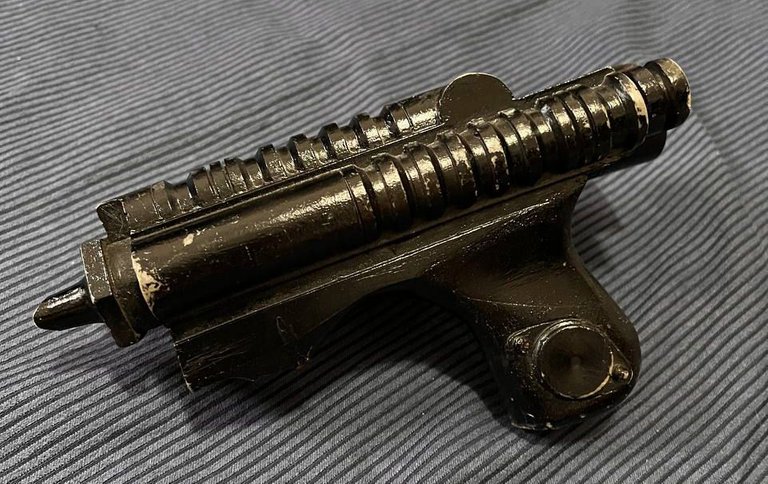
La cartuchera va fijada a la caña superior de la bota derecha con remaches por cuatro puntos. Para esta pieza es necesario usar una remachadora y es importante hacer alguna prueba antes para poder hacerlo bien a la primera.
La pistola es una réplica hecha en resina con un peso aproximado de 300 gramos. La pistola se puede hacer con impresión 3D, resina, madera, etc.
The cartridge holder is attached to the upper shaft of the right boot with rivets at four points. For this piece it is necessary to use a riveting machine and it is important to make some tests before to be able to do it well the first time.
The gun is a resin replica with an approximate weight of 300 grams. The gun can be made with 3D printing, resin, wood, etc.

NO CREO QUE ME OLVIDE NADA / I DON'T THINK I'M FORGETTING ANYTHING🤣😂😅
 Imágenes tomadas con mi teléfono/Images taken with my phone🙋♂

Un día con mi traje de biker tuve la increíble suerte de conocer a Morena Baccarin en persona en la Comic Con de Portugal, nos la cruzamos de casualidad mientras que la llevaban al backstage y le pedimos hacernos una foto, su gente de seguridad se negó, pero ella amablemente se paró con nosotros para hacerse unas fotos😱.
Que persona mas maravillosa y hermosa es Morena Baccarin😍, yo soy muy fan de ella desde que tuvimos la suerte de verla en la serie Firefly que por cierto es una de mis series favoritas.
Esta fotografía se la dedico a @themarkymark porque he podido ver en Hive que también es un fan de la serie😉.
One day with my biker outfit I had the incredible luck to meet Morena Baccarin in person at the Portugal Comic Con, we crossed her by chance while she was being taken backstage and we asked to take a picture, but her security people refused but she kindly stopped with us to take some pictures😱.
What a wonderful and beautiful person Morena Baccarin😍 is, I'm a big fan of her since we were lucky enough to see her in the series Firefly which by the way is one of my favorite series.
I dedicate this picture to @themarkymark because I could see on Hive that he is also a fan of the series😉.
🔸🔹AVISO / NOTICE🔹🔸
◽️El tiempo usado para hacer este tutorial a sido de 20 horas aprox. (incluido fotografiado)
◽️Todas las imágenes usadas en este post son de mi propiedad excepto las
que estén atribuidas a otras personas de la manera correspondiente.
◽️Banner superior usado propiedad de geralt en pixabay
◽️Edición de imágenes y fotografías con Photoshop
◽️Imagen adopt en firma por 3333873 en pixabay
◽️Traducido al inglés con DeepL Translate
◽️Corregido con languagetool español
◽️Corregido con Grammarly inglés
◽️Corrected with Grammarly english
◽️Corrected with languagetool spanish
◽️Photoshop PS image and photo editing
◽️Translated to English with DeepL Translate
◽️Top banner used property of geralt at pixabay
◽️Image adopt in signature by 3333873 at pixabay
◽️All images used in this post are my property except
those attributed to other people in a corresponding way.
◽️The time used to make this tutorial was about 20 hours (including photography).
Todas las partes de la armadura, ya sean rígidas o no, pueden ser compradas a diferentes fabricantes a través de la web de ETSY y a otros fabricantes como pueden ser StudioCreations. Si tu idea es llegar a la perfección y que todo este totalmente al detalle como en las películas, tendrás que recurrir a la web mas famosa del costuming Star wars "La Legión 501".
All armor parts whether rigid or not can be purchased from different manufacturers through the ETSY website and other manufacturers such as StudioCreations. If your idea is to reach perfection and that everything is detailed as in the movies you will have to resort to the most famous Star wars costuming website "The 501st Legion"
Si no lo has visto aquí puedes ver el montaje al detalle de mi cosplay de snowtrooper
If you haven't seen it here you can see the detailed assembly of my snowtrooper cosplay
Hiverizado del meme hecho por mi (Autor original del meme desconocido)
Hiverized meme made by me (Original author of the meme unknown)

This post was written listening City Pop music and New Retro Wave🎼
May we be governed by a DAO
Este post a sido redactado escuchando música City Pop y New Retro Wave🎼
Que nos gobierne una DAO
Este me gusta más que el Snowtrooper, rifadísimo el traje.
Muchas gracias! para mi son como mis hijos, les quiero a todos igual jajaja
The rewards earned on this comment will go directly to the people(@thorsito) sharing the post on Twitter as long as they are registered with @poshtoken. Sign up at https://hiveposh.com.
This is amazing! omg! love troopers :D haha especially since clone wars they have a different place in my heart !
One of the best characters