English (Español abajo)
On the subject of Photo Editing ... I am one of those who think that photos should be edited.
In principle, it must be understood that although cameras are super advanced devices, they do not know about feelings, timing, light, intentions, etc. They have the ability to capture light and convert it to ones and zeros and then create an image.
Among other advantages, the cameras capture a lot of information, especially if we configure them to take the photos in uncompressed formats such as .DNG, which keeps a greater dynamic range, obtaining more information on shadows and highlights and a wider range of colors and when editing it is much more flexible which allows us to correct things like white balance, work more comfortably each color separately, rescue what is in the darkest and lightest areas, etc.
That is why I think it is important to edit the photos since the camera will capture all that necessary information so that we can later show a photograph that shows what we saw at the time, what that scene made us feel, the vivid colors that left us admired, contrasts between light and shadow and much more.
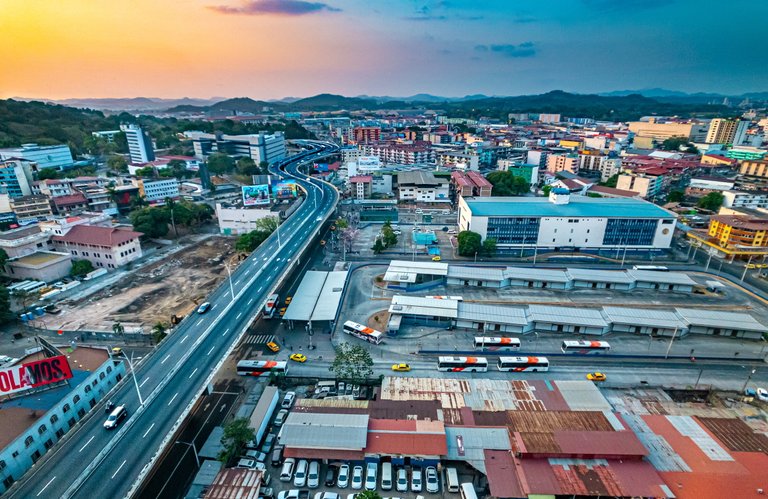
The photo that I bring you today I took one afternoon while I could see all the city chaos that surrounds the 5 De Mayo bus station in Panama City. I edited the photo so that you can see that the sky was divided: the left upper half was yellow from the sun but below that half everything was bluish and above the right half the sky was blue but at the bottom all the colors were more warm due to the rays of the Sun (I love it when this phenomenon occurs).
So, I quickly took out my phone, and took the photo in uncompressed .DNG format to later edit it (important to know that the way we take the photo goes hand in hand with the way we are going to edit it).
Of course, if you want to make it easier you can take the photo in HDR or other ways that different cameras and cell phone cameras offer, but taking into account that this option is limited and actually editing a photo in .DNG is not difficult, there are many tutorials that will teach you easily.
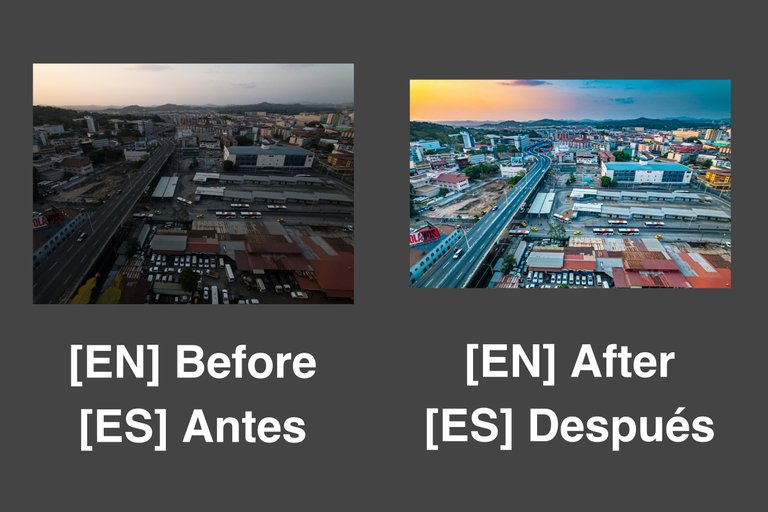
Here you have a before and after
Author: Kake Garcia (me)
Camera / Device: iPhone 8Plus
Camera Application: Moment Camera
Settings: ƒ / 1.8, 1/500, 3.99mm, ISO 20
Accessories and / or peripherals: Moment Case, Moment Wide Angle Lens
Editing Software: LR Mobile
This photo may also appear on my Instagram profile: KakeGarcia on my Instagram profile @Phootaround on my Shutterstock profile: KakeGarcia and on my website: kakegarcia.com
Español (English above)
Acerca del tema de la Edición Fotográfica... Soy de los que piensa que las fotos deben ser editadas.
En principio hay que entender que a pesar de que las cámaras son aparatos súper avanzados, ellas no saben de mociones, momentos, luz, tiempo, intenciones, etc. Ellas tienen la capacidad de capturar luz y convertirla en unos y ceros para luego crear una imagen.
Entre otras ventajas, las cámaras capturan muchísima información en especial si las configuramos para tomar las fotos en formatos descomprimidos como lo es el .DNG el cual guarda un mayor rango dinámico obteniendo más información de la sombra y las altas luces y una más amplia gama de colores y al editarla es mucho más flexible lo que nos permite corregir cosas como balance de blancos, trabajar más cómodamente cada color por separado, rescatar lo que está en las partes más oscuras y en las más claras, etc.
Por eso es que es importante editar las fotos ya que la cámara captará toda esa información necesaria para que podamos luego mostrar una fotografía que demuestre lo que vimos en aquel momento, lo que aquella escena nos hizo sentir, los colores vivos que nos dejaron admirados, contrastes entre luces y sombras y mucho más.
La foto que les traigo hoy la tomé una tarde mientras podía ver todo el caos citadino que rodea a la estación de autobuses de 5 De Mayo en la Ciudad de Panamá. Edité la foto para que puedan ver que el cielo estaba dividido: la mitad izquierda estaba amarilla por el sol pero debajo de esa mitad todo estaba azulado y arriba de la mitad derecha el cielo estaba azul pero en la parte de abajo todos los colores estaban más cálidos debido a los rayos del Sol (me encanta cuando se da este fenómeno).
Entonces, saqué rápidamente mi teléfono, y tomé la foto en formato descomprimido .DNG para luego editarla (importante saber que la manera en que tomamos la foto va de la mano con la manera en que la vamos a editar.
Claro que si quieres hacerlo más sencillo puedes tomar la foto en HDR u otras maneras que diferentes cámaras y cámaras de teléfonos celulares ofrecen pero tomado en cuenta de que está opción es limitada y realmente editar una foto en .DNG no es difícil, hay muchos tutoriales que te pueden enseñar de manera fácil.
Aquí les dejó un antes y después
Autor: Kake García (yo)
Cámara / Dispositivo: iPhone 8Plus
Aplicación de Cámara: Moment Camera
Settings: ƒ/1.8, 1/500, 3.99mm, ISO 20
Accesorios y/o periféricos: Moment Case, Moment Wide Angle Lens
Software de Edición: LR Mobile
Esta foto también puede aparecer publicada en mi perfil de Instagram: KakeGarcia en mi otro perfil de Instagram @Phootaround en mi perfil de Shutterstock: KakeGarcia y en mi sitio web: kakegarcia.com
@tipu curate
Upvoted 👌 (Mana: 36/54)