
As you may have been following, I've recently been blogging about my efforts working with the rpg-js framework, check out my profile if you've missed out on this content.
Today's tutorial covers several areas - a custom market GUI, tiled events, custom properties, and items!
Creating a shop!
Launch Tiled, and create a store like so:

I've assigned collision shapes to each table so that the user doesn't walk through them, and wrapped each table that has something to sell with a market_xx object shape with the following properties:
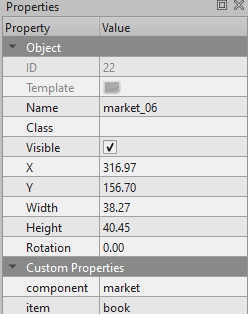
We give it the component string market to select the custom market GUI and the item string for specifying the item that's on the table. The items on the table are static, they're part of a the Tiled tile layer.
To implement the market interactivity, we detect when the user is within the market item shape and if they've pressed the action button to look at the item:
const player: RpgPlayerHooks = {
  async onInput(player: RpgPlayer, { input }) {
    if (input === Control.Action && player.getVariable("AT_MARKET")) {
      await promptPlayer(player, "AT_MARKET", "Want to evaluate this item?");
    }
  },
  async onInShape(player: RpgPlayer, shape: any) {
    if (shape.name.includes("market")) {
      player.setVariable("AT_MARKET", { name: shape.name, properties: shape.obj.properties });
      player.name = shape.obj.properties.header || shape.obj.properties.item;
    }
  },
  async onOutShape(player: RpgPlayer, shape: any) {
    if (shape.name.includes("market")) {
      player.name = " ";
      player.gui(shape.obj.properties.component).close();
      player.hideAttachedGui();
      player.setVariable("AT_MARKET", null);
    }
  },
};
.
Now we need to create a market GUI for the user to view:
<script>
import { RpgPlayer } from '@rpgjs/server'
import { defineComponent, computed, watchEffect, ref, onMounted, inject } from "vue";
import "@shoelace-style/shoelace/dist/components/button/button.js";
import "@shoelace-style/shoelace/dist/components/dialog/dialog.js";
import "@shoelace-style/shoelace/dist/components/alert/alert.js";

import items from "../assets/index.ts";

export default defineComponent({
  name: "market",
  props: {
    properties: {
      type: Object,
      required: true,
    },
    player: {
      type: RpgPlayer,
      default: null,
    }
  },
  setup(props) {
    const open = ref(true);
    const rpgGuiClose = inject("rpgGuiClose");

    const qty = ref(1);

    const item = computed(() => {
      return props.properties.item;
    });

    const itemProps = computed (() => {
      return items.find(item => item.id == props.properties.item);
    });

    const player = computed(() => {
      return props.player;
    });

    const totalPrice = computed(() => {
      return itemProps.value.price * qty.value;
    });

    watchEffect(async () => {
      if (open.value) {
        console.log(`Market GUI opened: ${itemProps.value.name}`);
      } else {
        console.log("Market GUI closed...");
        try {
          await rpgGuiClose("market");
        } catch (e) {
          console.error(e);
        }
      }
    });

    function buy() {
      if (player.value.gold >= itemProps.value.price) {
        player.value.gold -= itemProps.value.price;
        player.value.addItem(itemProps.value.id, qty.value);
        open.value = false;
      } else {
        console.log('You have insufficient gold for this purchase!');
      }
    }

    function leave() {
      open.value = false;
    }

    return {
      open,
      //
      gold: player.gold,
      //
      item,
      itemProps,
      //
      totalPrice,
      qty,
      buy,
      leave
    };
  },
});
</script>

<template>
  <div class="market">
    <sl-dialog :open="open" label="Would you like to buy this item?" class="dialog-overview">
      <div class="details">
        <div>
          // REMOVED FOR HIVE POST - SEE GITHUB!
        </div>
        <div>
          <h4 style="margin: 0px; padding: 0px;">
            Item: {{ itemProps.name }}
          </h4>
          <p>
            {{console.log({itemProps})}}
            Description: {{ itemProps.prototype.description }}<br/>
            Price: {{ itemProps.price }}<br/>
            {{ itemProps.prototype.hpValue ? 'HP value: ' + itemProps.prototype.hpValue : '' }}
          </p>
        </div>
      </div>
      <sl-alert v-if="gold < totalPrice" variant="danger" open>
        ⛔ <strong>You have insufficient gold for this purchase!</strong>
      </sl-alert>
      <p>How many would you like?</p>
      <p>{{ qty }} {{ itemProps.prototype.name }} for {{ totalPrice }} gold.</p>
      <div class="smallGrid" style="padding-bottom: 10px;">
        <sl-button size="small" @click="qty > 1 ? qty -= 1 : qty = 1">- 1</sl-button>
        <sl-button size="small" @click="qty += 1">+ 1</sl-button>
      </div>
      <div class="smallGrid">
        <sl-button slot="footer" variant="primary" @click="buy">Buy</sl-button>
        <sl-button slot="footer" variant="warning" @click="leave">Leave</sl-button>
      </div>
    </sl-dialog>
  </div>
</template>

<style>
.smallGrid {
  display: grid;
  grid-template-columns: repeat(2, 1fr);
  grid-gap: 5px;
  margin-top: 5px;
}
.details {
  display: grid;
  grid-template-columns: 1fr 3fr;
  grid-gap: 5px;
  margin-top: 30px;
}
</style>
This market GUI required some additional resources, namely new graphics for each of the market items, I simply copy/pasted them out of the tileset into their own 32x32 image for use in the GUI and stored them within the /main/assets/ folder.
To get the properties for each item I created the following file to handle exporting the items we've created:
import Ham from '../database/ham';
import Ale from '../database/ale';
import Cheese from '../database/cheese';
import Pearl from '../database/pearl';
import Potion from '../database/potion';
import Book from '../database/book';

const items = [Ham, Ale, Cheese, Pearl, Potion, Book];

export default items;
.
This export enables us to fetch the price, name and id of items without polluting the tiled shape's custom properties with duplicate item information which has already been defined in each item's database definition file.
OK, time for a demonstration!

Cool, so we're now able to easily add multiple new items to the shop without writing any further code, other than creating new item configs if needed.
We already had the option to use the built-in shop GUI to purchase these items directly from the NPC in the store, but now this custom GUI offers you the ability to buy items via a custom GUI without an NPC nor the default GUI.
What's next for the custom market GUI component?
Perhaps some additional UX improvements for the user to buy a specific quantity of items, or adding greater quantities than 1 per button press.
Showing a 3D model of the item being sold in the shop - contrasting the top down 2D graphics the rest of the game is set in.
Have any questions? Comment below!
Which items would you want to see added to the store?
How much gold (bitshares) do you think large collectables or unlocks should cost? Bearing in mind no real BTS would transfer hands.
These developments were brought to you by the NFTEA Gallery.
Consider collecting an NFTEA NFT to or donate to the following BTS or EOS blockchain accounts directly, to fund continued developments.
Don't have a Bitshares account? Make one today!
The rewards earned on this comment will go directly to the people sharing the post on Reddit as long as they are registered with @poshtoken. Sign up at https://hiveposh.com. Otherwise, rewards go to the author of the blog post.