Saludos cordiales, comunidad de Foodies Bee Hive. En esta ocasión una nueva receta de pasta fresca, tortellini de berenjena, con una salsa de mantequilla y tomates fritos.
Warm greetings, community of Foodies Bee Hive. This time a new fresh pasta recipe, eggplant tortellini, with a butter sauce and fried tomatoes.


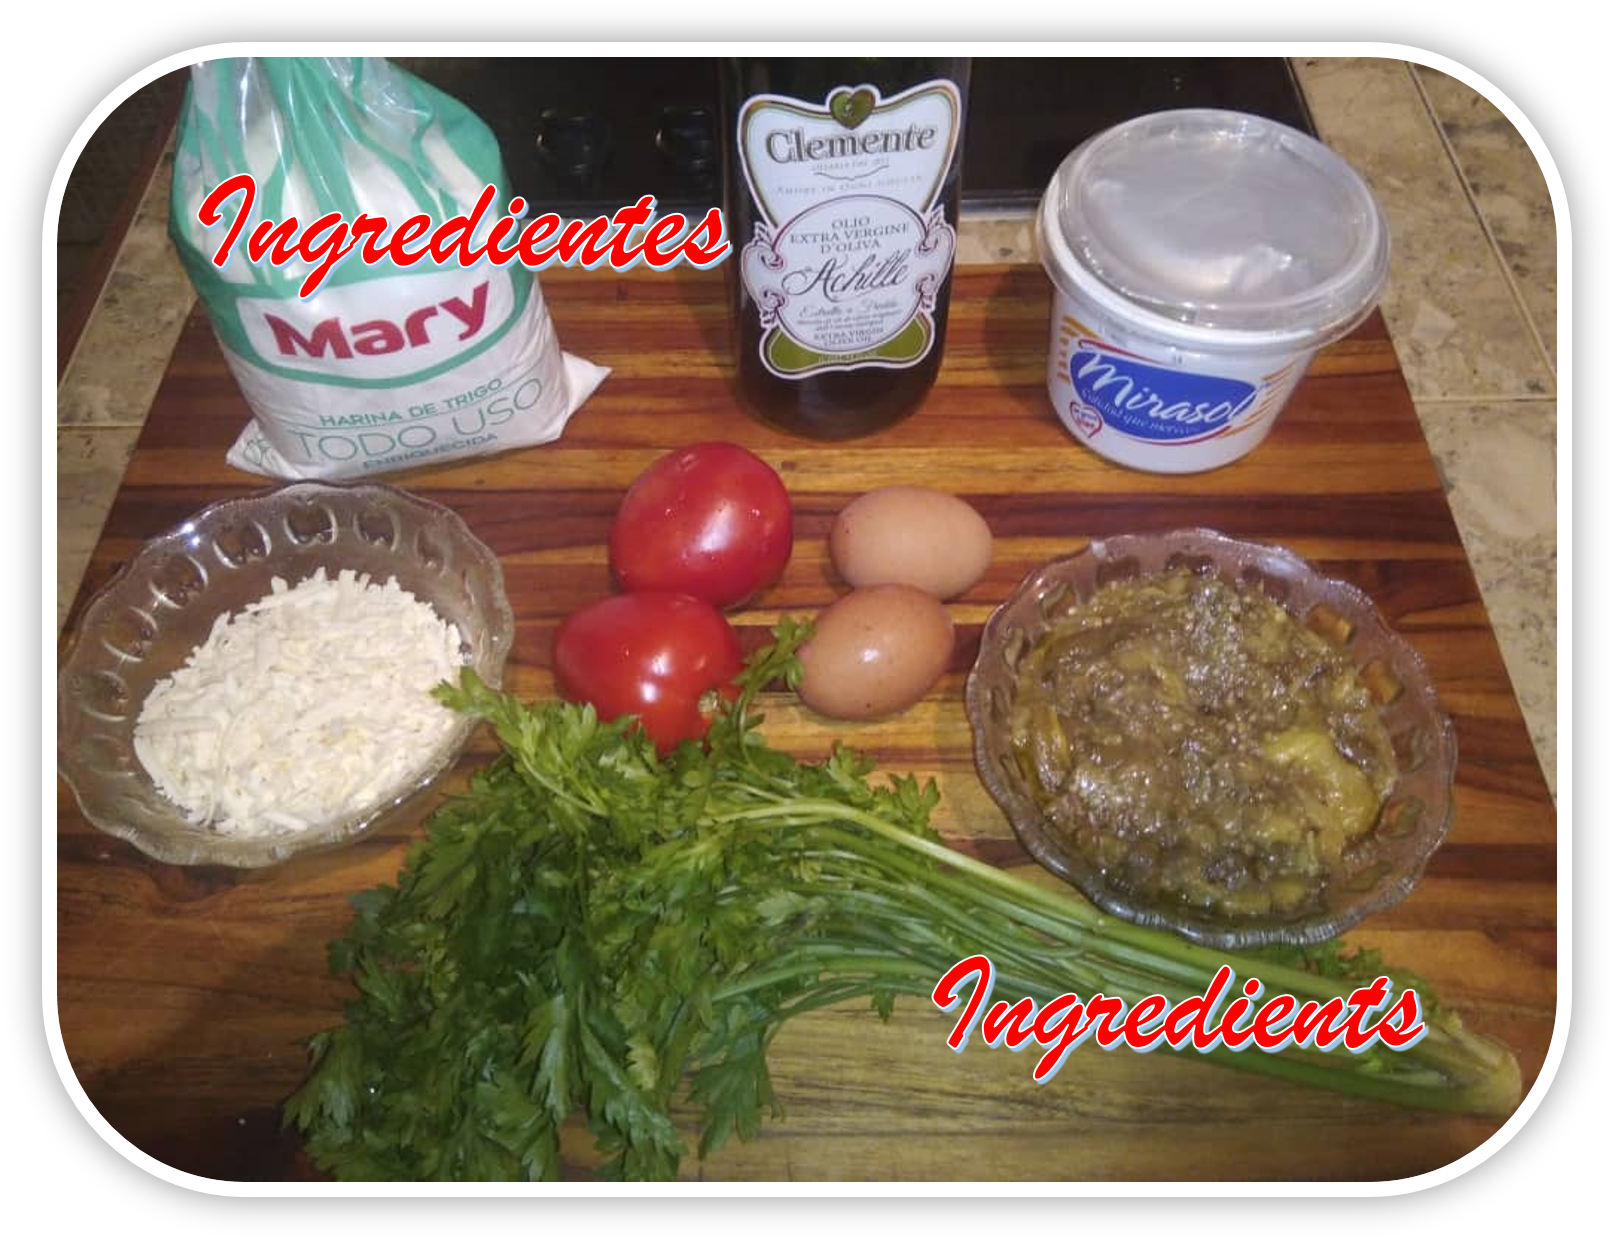
Ingredientes
Para la pasta:
- 300 gr de harina de trigo para todo uso.
- 2 huevos.
- 70 ml de agua.
- 1 cucharada de aceite de oliva.
Para el relleno de la pasta:
- La pulpa de 4 berenjenas asadas.
- 1 y 1/2 taza de queso rallado, yo use un queso blanco fresco.
- Sal, pimienta y sazonador al gusto.
Para la salsa:
- 2 tomates.
- 1 ramillete de perejil.
- 100 gr de mantequilla o margarina.
- tres o cuatro cucharadas de aceite de oliva.
- Sal, pimienta y sazonador al gusto.
Ingredients
For the dough:
- 300 gr all-purpose wheat flour.
- 2 eggs.
- 70 ml of water.
- 1 tablespoon of olive oil.
For the pasta filling:
- The pulp of 4 roasted eggplants.
- 1 and 1/2 cup of grated cheese, I used a fresh white cheese.
- Salt, pepper and seasoning to taste.
For the sauce:
- 2 tomatoes.
- 1 bunch of parsley.
- 100 gr of butter or margarine.
- three or four tablespoons of olive oil.
- Salt, pepper and seasoning to taste.

Procedimiento
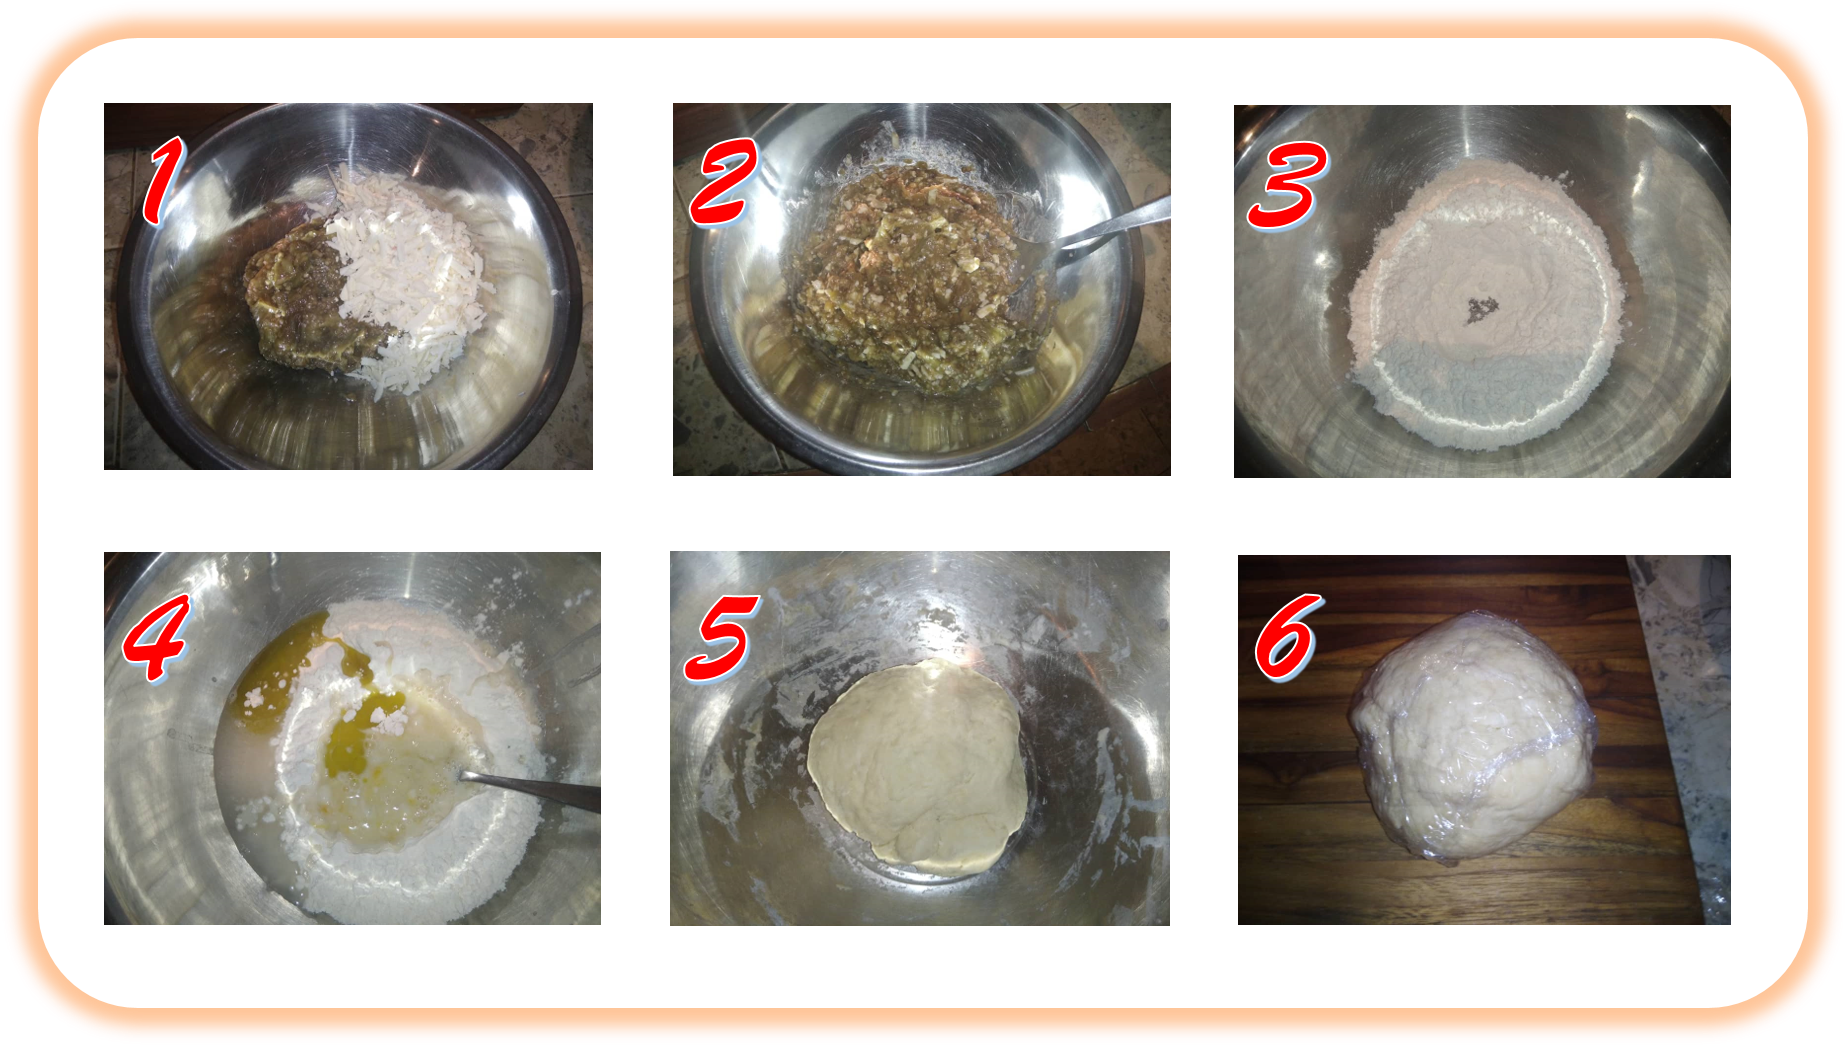
Para empezar, prepararemos el relleno de los tortellini, para ello colocaremos la pulpa de la berenjena y el queso rallado en un bol y lo sazonaremos con sal, pimienta y sazonador al gusto (1), lo mezclaremos bien (2) y lo reservaremos en el refrigerador mientras preparamos la base para los tortellini.
Para preparar la pasta colocaremos la harina en un bol y formaremos un hueco en medio de la pila (3), agregaremos los huevos, el agua, el huevo y el aceite en el hueco y mezclaremos todo sirviéndonos de un tenedor (4), en la medida que mezclamos iremos dejando caer harina en la mezcla e ira engrosando, hasta que ya no podamos mezclar con el tenedor, entonces lo empezaremos a mezclar con la mano, hasta lograr integrar toda la harina en la mezcla, la haremos una bola lo más homogénea posible (5), no es necesario amasar demasiado, que envolveremos en film transparente o una bolsa plástica y dejaremos descansar por media hora (6).
Procedure
To begin, we will prepare the filling for the tortellini, for this we will place the eggplant pulp and the grated cheese in a bowl and season it with salt, pepper and seasoning to taste (1), we will mix it well (2) and reserve it in the refrigerator while we prepare the base for the tortellini.
To prepare the pasta we will place the flour in a bowl and we will form a hole in the middle of the pile (3), we will add the eggs, the water, the egg and the oil in the hole and we will mix everything using a fork (4), as we mix we will drop flour in the mixture and it will thicken, until we can no longer mix with the fork, then we will begin to mix it with the hand, until we integrate all the flour in the mixture, we will make a ball as homogeneous as possible (5), it is not necessary to knead too much, we will wrap it in cling film or a plastic bag and we will let it rest for half an hour (6).
Pasada la media hora, dividiremos la masa en tres partes, más o menos iguales (7) y a continuación procederemos a trabajar cada parte por separado. Tomaremos una parte y la aplanaremos un poco con la mano, lo suficiente para continuar aplanándola con un rodillo o con una máquina laminadora (8), la aplanaremos en la posición más abierta de la máquina que en mi caso es la 1 (9) o con un rodillo hasta un grosor de medio centímetro, si la masa se siente un poco húmeda y/o pegajosa, espolvorearemos harina por cada lado y luego la plegaremos en tres partes (10), luego la pasaremos nuevamente por la máquina con la misma apertura (11), o la aplanaremos con el rodillo, este procedimiento lo haremos unas diez veces, antes de empezar a disminuir la apertura de la máquina para estirarla, lo mismo haremos si usamos un rodillo, debemos estirarla hasta que tenga un grosor de poco menos de un milímetro (12), en mi caso es la posición 6 o 7 de la máquina, más fino que esto podría romperse al manipularlo.
After half an hour, divide the dough into three more or less equal parts (7) and then proceed to work each part separately. We will take a part and flatten it a little with the hand, enough to continue flattening it with a rolling pin or with a laminating machine (8), we will flatten it in the most open position of the machine that in my case is the 1 (9) or with a rolling pin until a thickness of half a centimeter, if the dough feels a little wet and/or sticky, we will sprinkle flour on each side and then we will fold it in three parts (10), then we will pass it again through the machine with the same opening (11), or we will flatten it with the rolling pin, we will do this procedure about ten times, before starting to decrease the opening of the machine to stretch it, we will do the same if we use a rolling pin, we must stretch it until it has a thickness of just under a millimeter (12), in my case it is position 6 or 7 of the machine, thinner than this could break when handling it.

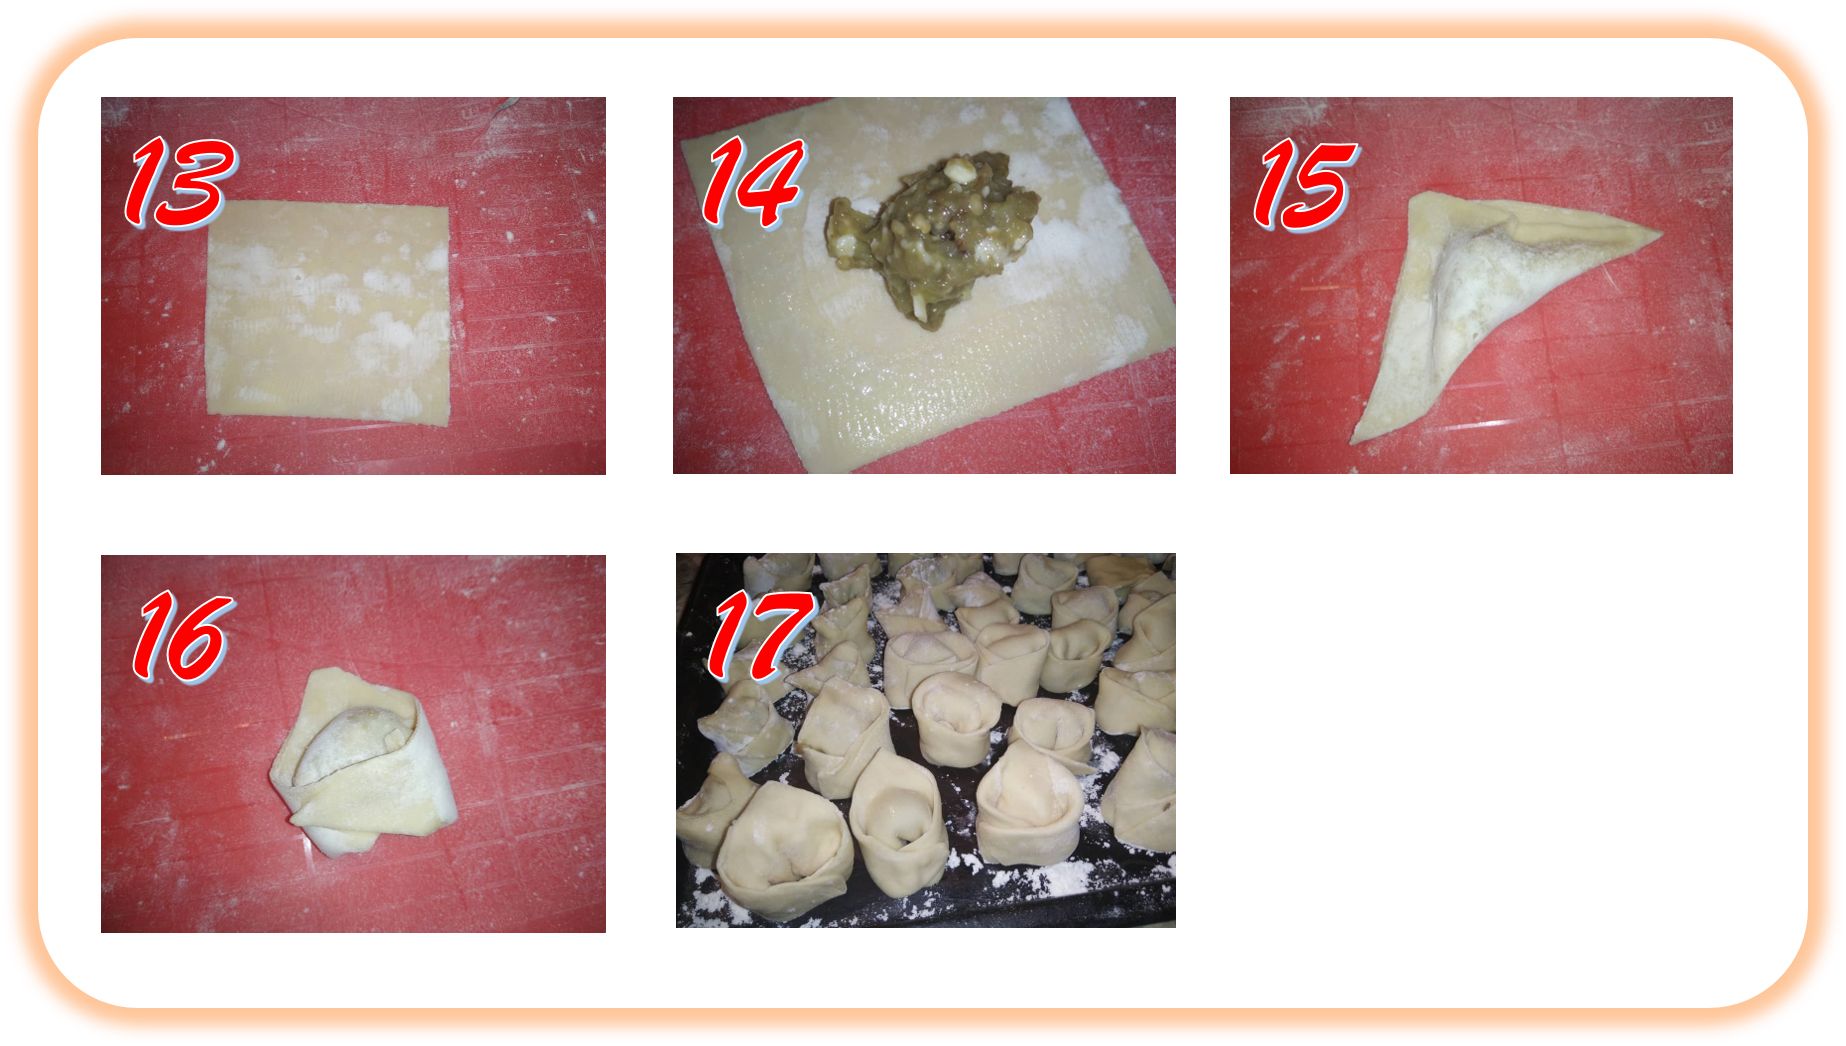
Para dar forma a los tortellini, algo en lo que debo confesar que no tengo mucha experiencia y no me quedaron muy bonitos, cortaremos la masa ya estirada en cuadros de unos 7 cm por lado (13) y colocaremos un poco de relleno en medio (14), luego humedeceremos un poco con agua el borde de la masa usando el dedo y la plegaremos para formar un triángulo (15), humedeceremos una de las puntas de la base del triángulo y la uniremos con la otra punta de la base, para formar un pequeño bultito (16), lo colocaremos en una bandeja espolvoreada con harina y lo reservaremos, repetiremos este mismo procedimientos hasta haber usado toda la pasta preparada y/o la mezcla de relleno (17).
To shape the tortellini, something in which I must confess that I do not have much experience and they were not very nice, cut the dough already stretched in squares of about 7 cm per side (13) and place a little filling in the middle (14), then moisten a little water with the edge of the dough using your finger and fold it to form a triangle (15), moisten one of the ends of the base of the triangle and join it with the other end of the base to form a small lump (16), place it on a tray sprinkled with flour and set it aside, repeat this procedure until you have used all the dough prepared and/or the filling mixture (17).
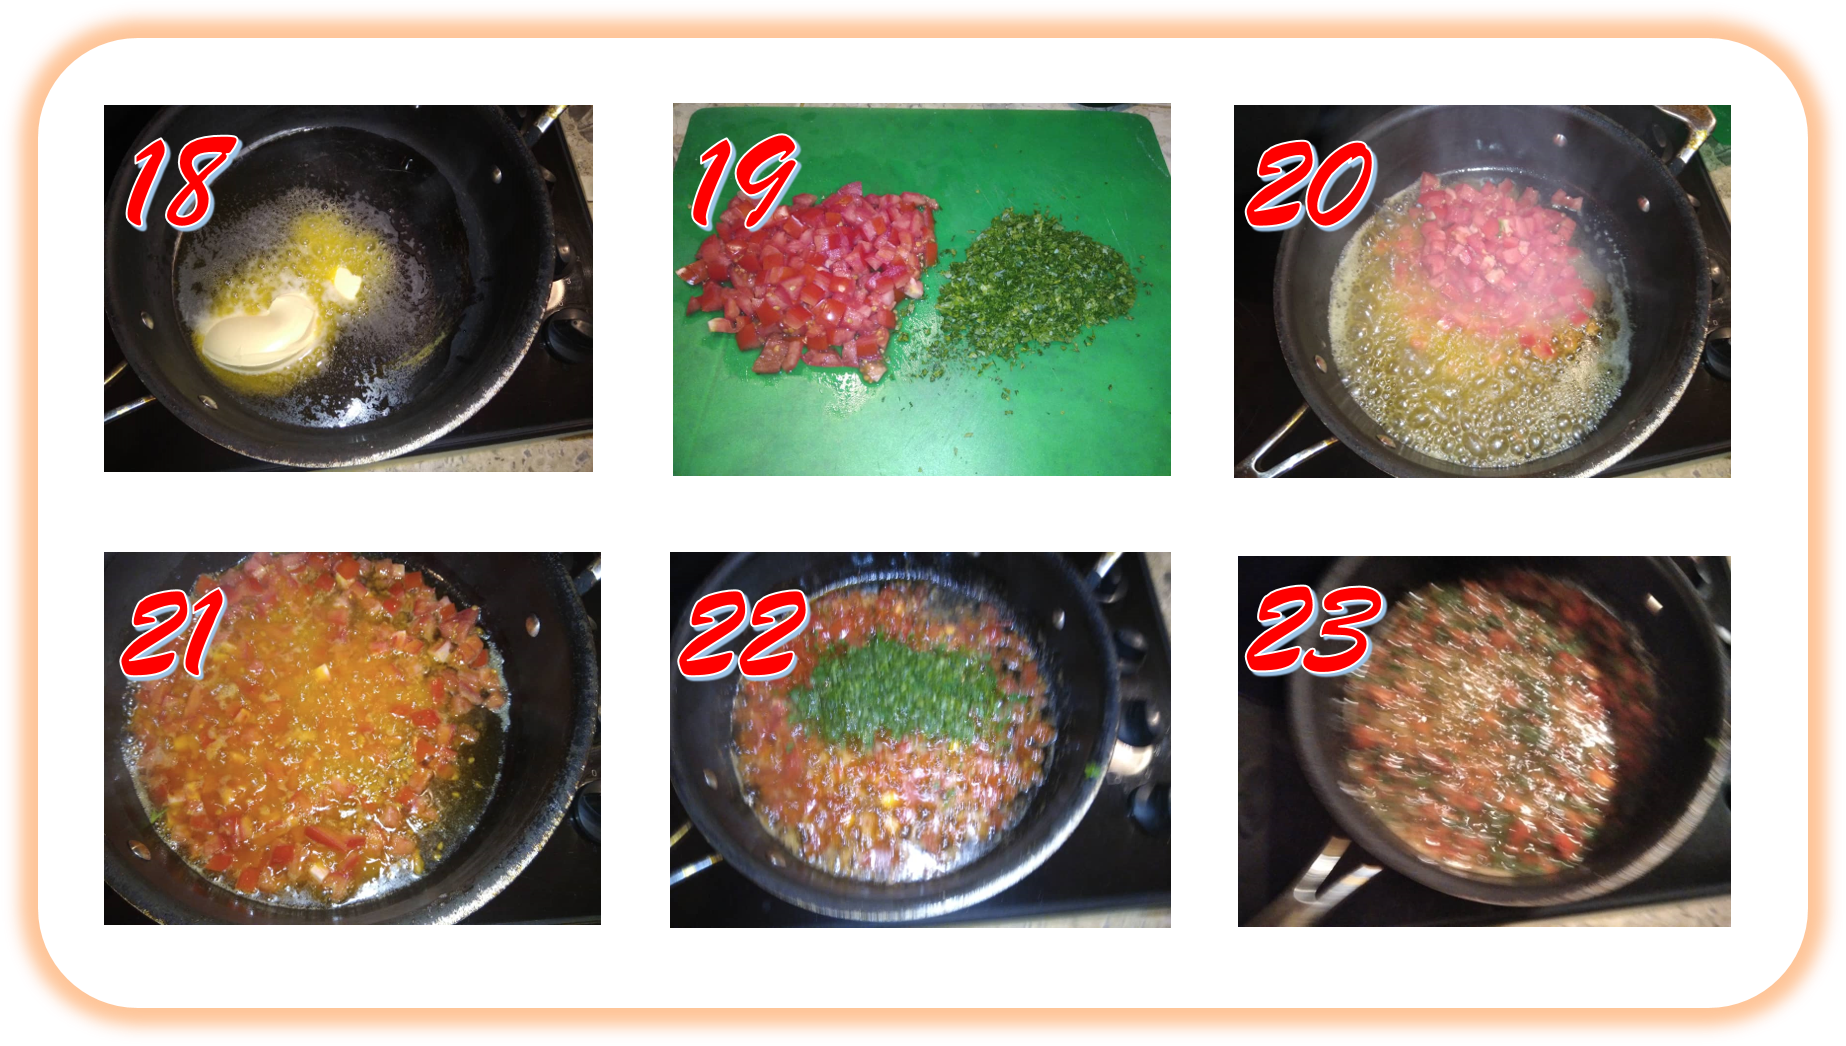
Para preparar la salsa, colocaremos en una sartén amplia, la margarina y el aceite de oliva y llevaremos al fuego medio alto (18), cortaremos los tomates en cubos pequeños y el perejil pequeñito (19). cuando se haya derretido la mantequilla y este caliente, sin dejarla humear, agregaremos los tomates (20), saltearemos (21) y antes de que se empiecen a deshacer agregaremos el perejil (22) continuaremos salteando por un minuto más y estará listo para agregarle la pasta, que ya debería estar cocida, lista para incorporarla (23).
To prepare the sauce, place the margarine and the olive oil in a large frying pan and heat over medium high heat (18), cut the tomatoes in small cubes and the parsley (19). When the butter has melted and is hot, without letting it smoke, add the tomatoes (20), sauté (21) and before they start to melt, add the parsley (22), continue sautéing for one more minute and it will be ready to add the pasta, which should already be cooked, ready to be incorporated (23).
Para cocinar la pasta, la agregaremos en agua hirviendo, ligeramente salada (24), al hacer esto por la temperatura del agua probablemente descenderá un poco y dejará de hervir, no importa; esto deberemos hacerlo casi al mismo tiempo de empezar a preparar la salsa, para que ambos, pasta y salsa, estén listos para unirse al mismo tiempo, cuando el agua rompa nuevamente en hervor y la pasta flote, ya estará lista (25), esto ocurrirá pasados unos 5 minutos, más o menos, la retiraremos del agua con una espumadera y la incorporaremos en la salsa, a la cual agregaremos también, medio cucharon de agua de cocción de la pasta (26), mezclaremos a delicadamente, para no romper los tortellini, buscando que todos se impregnen en la salsa, dejaremos que se reduzca un poco el líquido adicional que añadimos y ya tendremos listos para servir nuestros Tortellini de Berenjena (27).
To cook the pasta, we will add it in boiling water, lightly salted (24), when doing this because of the temperature of the water it will probably drop a little and stop boiling, it doesn't matter; this we will have to do it almost at the same time of beginning to prepare the sauce, so that both, pasta and sauce, are ready to join at the same time, when the water breaks again in boiling and the pasta floats, already it will be ready (25), this will happen after about 5 minutes, more or less, we will retire it of the water with a skimmer and we will incorporate it in the sauce, to which we will add also, half a spoonful of water of cooking of the pasta (26), we will mix delicately, not to break the tortellini, looking for that all are impregnated in the sauce, we will leave that the additional liquid that we add is reduced a little and already we will have ready to serve our Tortellini of Eggplant (27).

Los tortellini de berenjena son un plato delicado y delicioso que se puede disfrutar con una copa de vino blanco, pueden agregarle un poco de queso parmesano o pecorino. Espero que sean de su agrado.
Eggplant tortellini is a delicate and delicious dish that can be enjoyed with a glass of white wine, you can add a little parmesan or pecorino cheese. I hope you like them.

Todas las fotografías fueron tomadas con un movil Redmi 8A
Guao!! Nunca he comido pasta fresca pero su sabor debe ser completamente otra cosa a lo que estamos acostumbrados.
Por otro lado la berenjena la amo, así que esta receta seria ideal para mi aparte del delicioso sabor del tomate seco.
Gracias por dejar un paso a paso tan detallado, no hay margen de error su se siguen al pie de la letra.
Has sido votado por
PROYECTO ENLACE
'Conectando Ideas y Comunidades'
PROYECTO ENLACE es un proyecto de curación de habla hispana enfocado en recompensar contenido de calidad y apoyar autores en su proceso de crecimiento en HIVE.
Creemos y apostamos por el futuro de esta gran plataforma, y estamos muy emocionados de poder hacerla crecer junto a esta comunidad. Así que te invitamos a usar nuestra etiqueta ENLACE y estar atento a todas las actividades que tenemos preparadas y que estaremos publicando en breve.
¿QUIERES AUTOMATIZAR TUS GANANCIAS DE CURACIÓN? SE PARTE DEL PROYECTO ENLACE APOYANDO A NUESTRO TRAIL EN HIVE.VOTE INGRESA AQUÍ PARA CONOCER LOS DETALLES.
¿QUIERES INVERTIR ENLACE? DESCUBRE COMO HACERLO Y GENERAR INGRESOS DE FORMA SEMANAL MEDIANTE TU DELEGACIÓN DE HP AQUÍ TE EXPLICAMOS COMO.
Te invitamos a participar en nuestro servidor de Discord: https://discord.gg/3S9y7BbWfS
Atentamente
EQUIPO ENLACE 2022
Join the foodie fun! We've given you a FOODIE boost. Come check it out at @foodiesunite for the latest community updates. Spread your gastronomic delights on and claim your tokens.
Hello friends, I think your food is very delicious and you should make a lot to share with our friends, your friends also eat.
Se ve muy delicioso! gracias por compartir esta receta, la tendré en cuenta para una futura preparacion, saludos😁
Thank you for sharing this post on HIVE!
Your content got selected by our fellow curator semarekha & you just received a little thank you upvote from us for your great work! Your post will be featured in one of our recurring compilations which are aiming to offer you a stage to widen your audience within the DIY scene of Hive. Next time make sure to post / cross-post your creation within the DIYHub community on HIVE and you will receive a higher upvote ;) Stay creative & HIVE ON!
@tipu curate
Upvoted 👌 (Mana: 25/55) Liquid rewards.