Bueno les dejare en lista todos lo que necesitamos para dicha elaboración.
Ingredientes
1 tz de yogurt natural preferiblemente sin azúcar
2 L. de leche pura de vaca.
Utensilios
Hoya grande (suficiente para los 2L de leche)
1 envase de ½ L.
2 Tz medidora
Envase o bol plástico de 2L
Envase de 500gr
Cucharillas
Pedazo de tela o un colador grande de tela
Colador de acero inoxidable
Bol extra con tamaño suficiente para posicionar el colador de acero inoxidable
Paño grueso de ½ M. aproximadamente
Well I will list everything we need for this preparation.
Ingredients
1 cup of natural yogurt preferably without sugar
2 L. of pure cow's milk.
Utensils
Large bowl (enough for the 2L of milk)
1 ½ L. container
2 measuring cups
2 L plastic container or bowl
500gr container
Spoons
Piece of cloth or large cloth strainer
Stainless steel strainer
Extra bowl with sufficient size to position the stainless steel strainer
Thick cloth of approximately ½ M.

Yogurt griego envasado en un recipiente plástico de 500gr, cantidad aproximada que queda de la receta dada. // Greek yogurt packed in a 500g plastic container, approximate amount remaining from the given recipe.

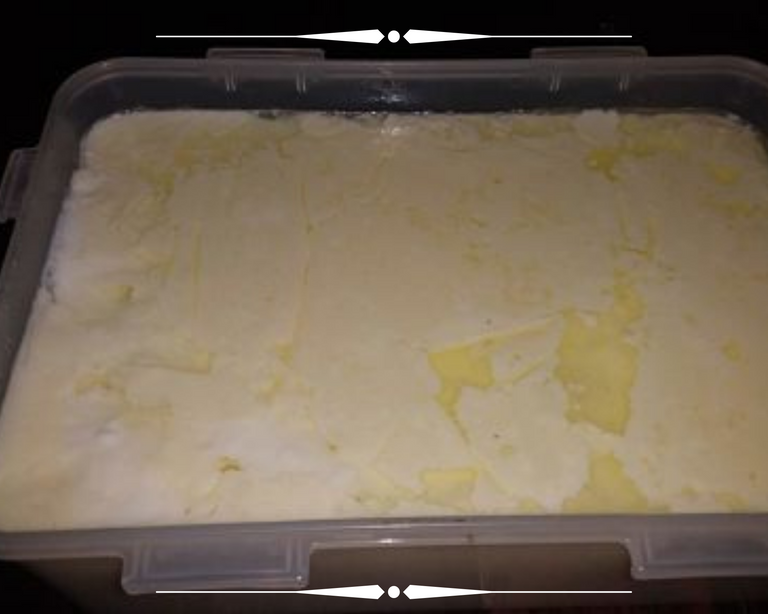
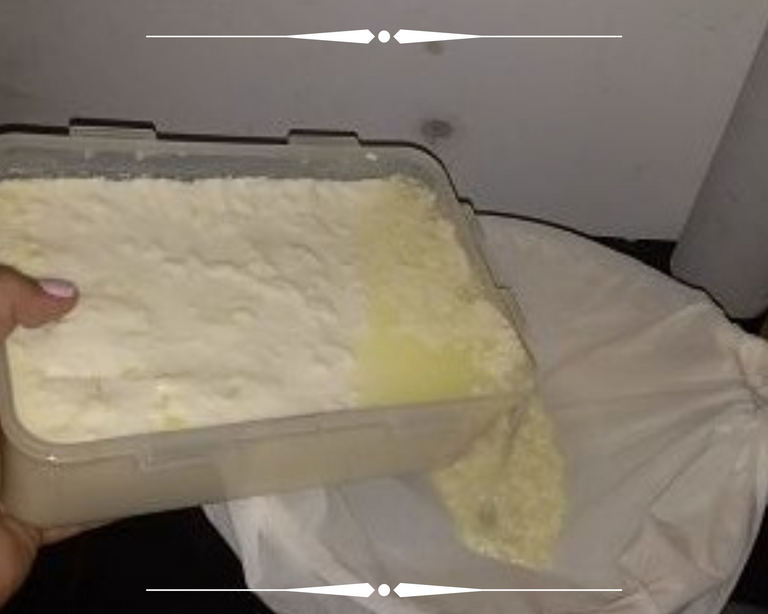
Lo primero que se debe hacer es hervir la leche, dejarla reposar a temperatura ambiente, allí al cabo de media hora se creara una capa de grasa natural de la leche yo se la quitó es opcional pero es como si estuviéramos descremando la leche, a mí me gusta descremarla luego si conserva la temperatura alta donde podamos sentir la leche tibia, (yo usa la técnica de introducir un dedo y soportar la temperatura pero sentirla tibia si no es así, la podemos calentar un poco en la cocina nuevamente), ya verificado este proceso se saca una taza de leche y en un envase de ½ L, unimos la taza de leche con la taza del yogurt que tenemos, esto para llevar el yogurt a una temperatura más cerca de lo que esta la leche en ese momento, luego de esta mezcla agregamos ahora si al bol de plástico la leche restante que quedo en la hoya junto con la mezcla que acabamos de hacer de leche con yogurt, una vez todo unido en el envase plástico movemos con una cuchara hasta tratar de integrar todo y que sea una mezcla homogénea, luego procedemos a cubrir el envase con un paño grueso que lo cubra bien, toda la parte de arriba, no se le puede colocar tapa al envase en este momento, el paño ira adsorbiendo la humedad mientras que la preparación llega a temperatura ambiente se dejara así en reposo por mínimo 8 hora, yo prefiero dejarla toda la noche en un lugar donde no corran mucho aire yo uso el horno eléctrico y allí dejo reposar toda la noche la preparación del yogurt, pasado este tiempo, se procede asacar la preparación retirarle el paño y verificar la consistencia, ya en este punto se verifica que se haya compactado y ya se va viendo que se está separado por parte el suero del yogurt, se le coloca una tapa preferible la del mismo envase y se lleva a la nevera por dos hora, pasado este tiempo se procede a quitarle lo más que se pueda el suero y así lograr un yogurt firme y espeso por eso se le llama yogurt griego, se coloca el colador de acero más una tela que solo se va usar para esta preparación siempre, o también pueden usar un colador de tela, como mejor lo prefieran, y se coloca el yogurt allí, por aproximadamente 3 horas, una vez visto la firmeza y consistencia que queremos lo envasamos en un recipiente donde luego lo usaremos para lo que nos guste.
Preparation
The first thing to do is to boil the milk, let it stand at room temperature, there after half an hour a layer of natural milk fat will be created I removed it is optional but it is as if we were skimming the milk, I like to skim it later if it keeps the high temperature where we can feel the warm milk, (I use the technique of introducing a finger and support the temperature but feel it warm if not, we can heat it a little in the kitchen again), once this process is verified we take out a cup of milk and in a ½ L. container, we join the cup of milk with the milk in a bowl, we join the cup of milk with the cup of yogurt we have, this to bring the yogurt to a temperature closer to what the milk is at that moment, after this mixture we add now to the plastic bowl the remaining milk that was left in the hole along with the mixture we just made of milk with yogurt, once all together in the plastic container move with a spoon to try to integrate everything and make it a homogeneous mixture, then proceed to cover the container with a thick cloth that covers it well, the entire top, you can not put a lid on the container at this time, the cloth will adsorb moisture while the preparation comes to room temperature and let it stand for at least 8 hours, I prefer to leave it overnight in a place where they do not run a lot of air I use the electric oven and there I let stand overnight the preparation of yogurt, after this time, we proceed asacar preparation remove the cloth and check the consistency, and at this point it is verified that it has been compacted and is already seeing that it is separated by part of the whey yogurt, After this time we proceed to remove as much of the whey as possible and thus achieve a firm and thick yogurt that is why it is called Greek yogurt, we place the steel strainer plus a cloth that will only be used for this preparation always, or you can also use a cloth strainer, as you prefer, and place the yogurt there for about 3 hours, once we have seen the firmness and consistency that we want, we pack it in a container where we will use it for whatever we like.
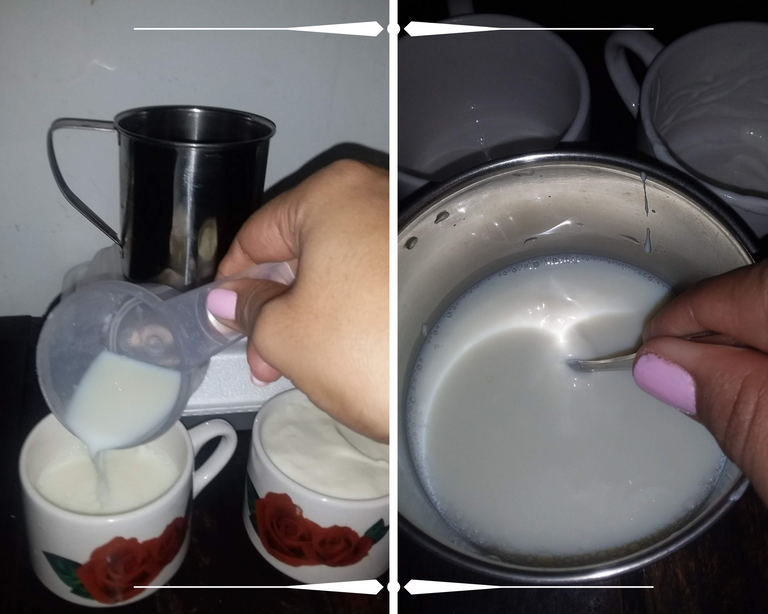
Se mezcla el yogurt base con una porción de leche para equilibrar las temperaturas // The yogurt base is mixed with a portion of milk to balance the temperatures.

Con una cucharilla se bate la preparación para integrar la mezcla anterior con el total de la leche // With a spoon, beat the preparation to integrate the previous mixture with the total milk.
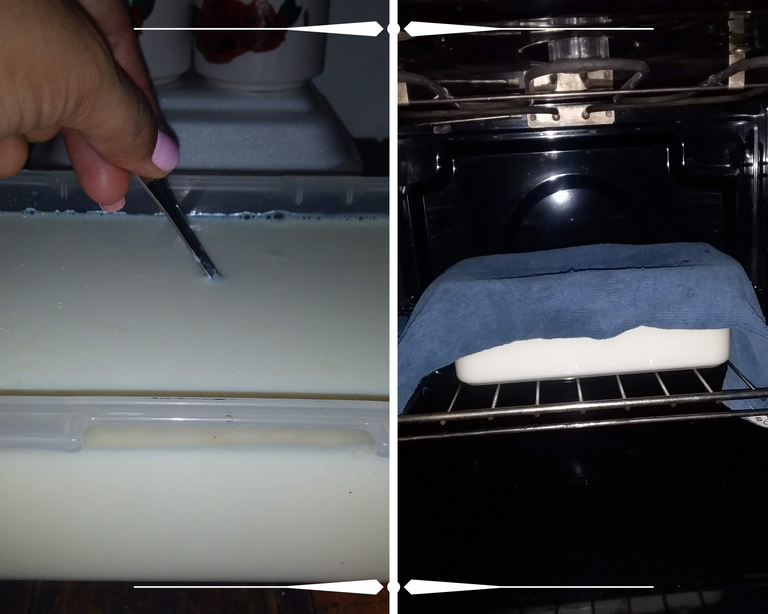
Luego se vuelve a mezclar para lograr integrar todo, se cubre con un paño y se guarda en un lugar con poca ventilación //Then it is mixed again to integrate everything, covered with a cloth and stored in a place with little ventilation.
Así se ve la preparación luego de dejarlo en reposo, ya está listo para meterlo a la nevera // This is how the preparation looks like after letting it rest, it is ready to be put in the refrigerator
Luego de sacarlo de la nevera, se coloca la preparación del yogurt a escurrir es decir que bote el suero // After removing it from the refrigerator, place the yogurt preparation to drain, that is to say, to drain the whey.
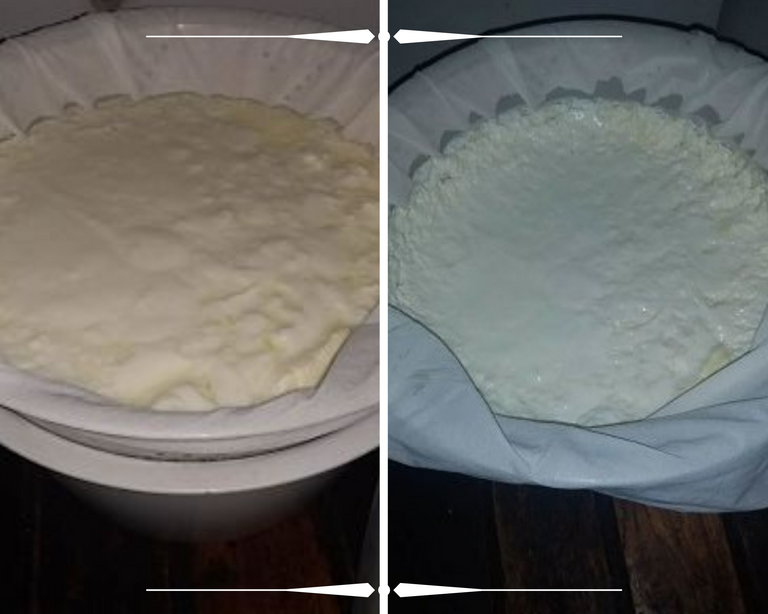
Al pasar el tiempo se va ir viendo cómo va escurriendo el suero y va quedando la preparación más espesa // As time goes by, the whey will drain and the preparation will become thicker.
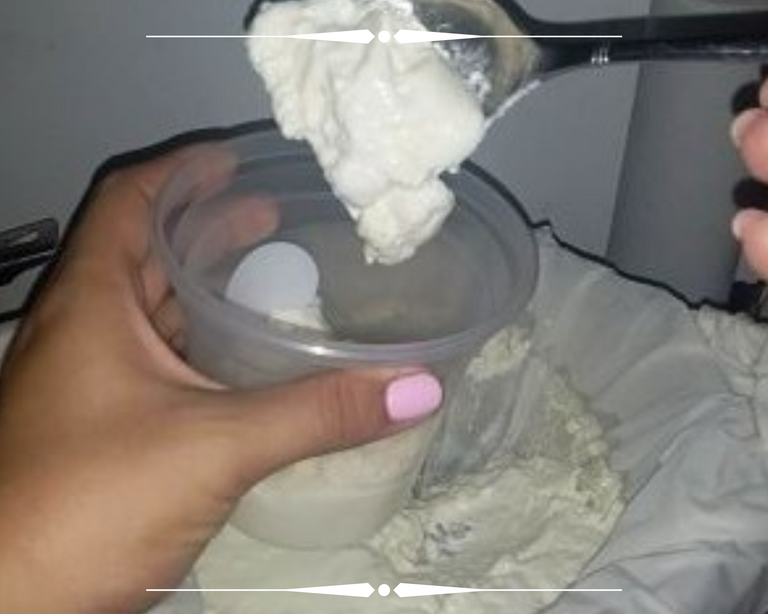
Y así tenemos el más rico yogurt griego hecho en casa, aquí se envasa y esta listo para degustarlo como prefieran // And so we have the most delicious homemade Greek yogurt, here it is packaged and ready to taste it as you prefer.
Y listo colmenas, así de fácil es hacer yogurt griego en casa, aunque también pueden omitir el paso de quitarle el suero y lo usan así, solo que quedaría la preparación liquida pero es como ustedes los prefieran, a mí me gusta sin suero, sin azúcar, sin tanta grasa de la leche es decir más ligero y saludable, me encanta comerlo de distintas formas, luego en un próximo post les muestro como acompaño mi yogurt griego, y es que les confieso que todos los días me encanta degustarlo.
And ready hives, that's how easy it is to make Greek yogurt at home, although you can also skip the step of removing the whey and use it like that, only that would be the liquid preparation but it is as you prefer, I like it without whey, without sugar, without so much milk fat is lighter and healthier, I love to eat it in different ways, then in a next post I show you how I accompany my Greek yogurt, and is that I confess that every day I love to taste it.
Amigos gracias por llegar hasta aquí, espero y les haya gustado mi receta, les invito a seguirme tengo muchas recetas de cocina tanto dulces como saladas que enseñarle, a mí me encanta cocinar, y aquí estoy para compartir con ustedes todos estos aprendizaje. Hasta un próximo post.
Friends thank you for coming this far, I hope you liked my recipe, I invite you to follow me, I have many recipes both sweet and savory to teach you, I love cooking, and here I am to share with you all these learning. See you in my next post.
Fotos tomadas por mi / Photos taken by me
Galería de fotos realizadas por mí en / Gallery of photos taken by me in https://www.canva.com/

Gracias por compartir! que buena receta!
que bueno que te gusto la receta,es muy facil de hacer.
There is no such thing as Greek yogurt. It will be Turkish yogurt. Baklava is also a Turkish dessert. The Greeks are trying to protect these and similar ones (cacık). Many examples can be given in this regard. Please research and write more carefully.
Very interesting, my grandmother used to make regular yogurt only from milk.But this is an easy recipe that I can make even myself.Thank you ❤💋
te invito a que practiques la receta estoy segura que te gustara, en realidad siguiendo los pasos, es muy facil de hacer.