PAN RELLENO DE POLLO.
Es una receta ideal para un desayuno, el pan suave y el pollo guisado le da una jugosidad que termina siendo la combinación perfecta, y además la forma del pan está de lujo.

Hello mis amigos...! 🤍
Espero se encuentren bien ustedes y su familia, en esta ocasión te mostrare como hice los panes rellenos con pollo y tambien como fue que hice el diseño del pan, realmente tan fácil que te sorprenderá.
¡Sal de la rutina de desayunos repetidos e intenta hacer estos panes, te encantarán!!
Ahora bien…. ¡Manos a la olla…!!!
INGREDIENTES PARA LOS PANES RELLENOS
PREPARACIÓN DE POLLO GUISADO 🫕
🌾 400 gr de pollo
🌾 Sal
🌾 Ajo (4 dientes)
🌾 1Cebolla picada
🌾 2 Tomate
🌾 1 Ají
🌾 Orégano
🌾 Salsa inglesa
🌾 Onoto o páprica
🌾 Aceite de oliva
🌾 Mostaza
Pasos para preparar el relleno.
Paso 1. Los 400 gramos de pollo los cortamos en porciones pequeñas, use pechuga de pollo normalmente esta parte del pollo es seca pero un truco que uso siempre es, al terminar de cortar el pollo limpio, coloco en una bolsa limpia y golpeo hasta que la fibra del pollo se rompa y esto es lo que permite que sea jugosa.
Paso 2. Sazone el pollo con sal, coloque un diente de ajo lo lleve a la sarten previamente calentadito y coloque un chorrito de aceite de oliva y agregue el pollo y al ir cocinando coloque orégano y salsa inglesa.
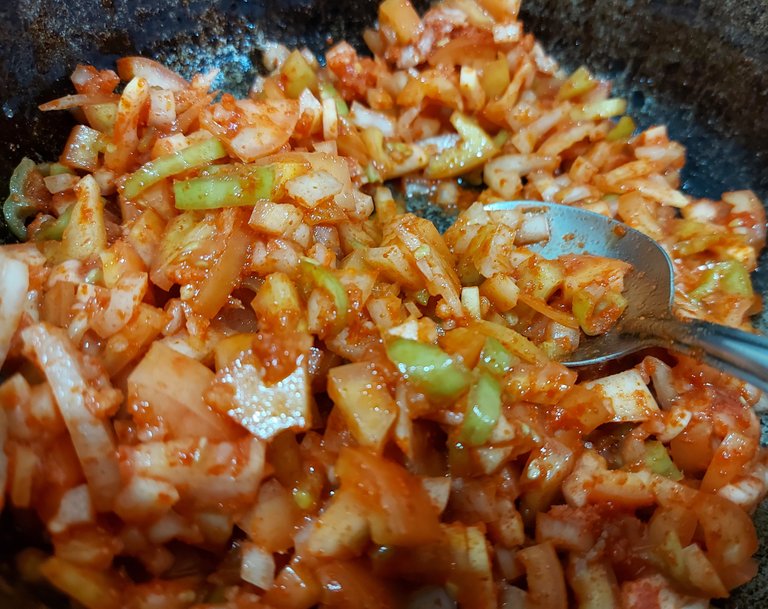
Paso 3. En otro recipiente un chorrito de aceite de oliva y coloque la cebolla, los 2 tomates picados en cuadritos pequeños, un ají sin semillas, ajo picado, agregue onoto, mostaza y el tiempo de cocción fue breve hasta que los ingredientes tomaron una consistencia suave.
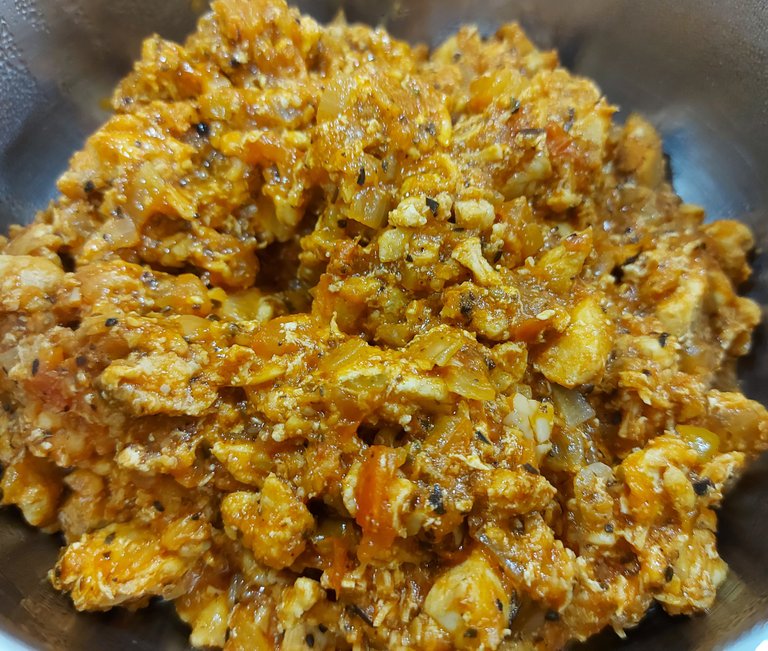
Paso 4. Finalmente agregue el pollo al guiso y mezcle bien y lo cocine por unos minutos más, agregue un poco de agua para que terminar su cocción, aguardé aproximadamente por 15 minutos y ya esta listo.
PREPARACIÓN DE LA MASA
🌾 500 gr de harina
🌾 Sal
🌾 Aceite de oliva
🌾 Levadura seca 10 gr
🌾 Mantequilla para barnizar.
🌾 Agua 150 ml
🌾 Azúcar 2 cucharadas.
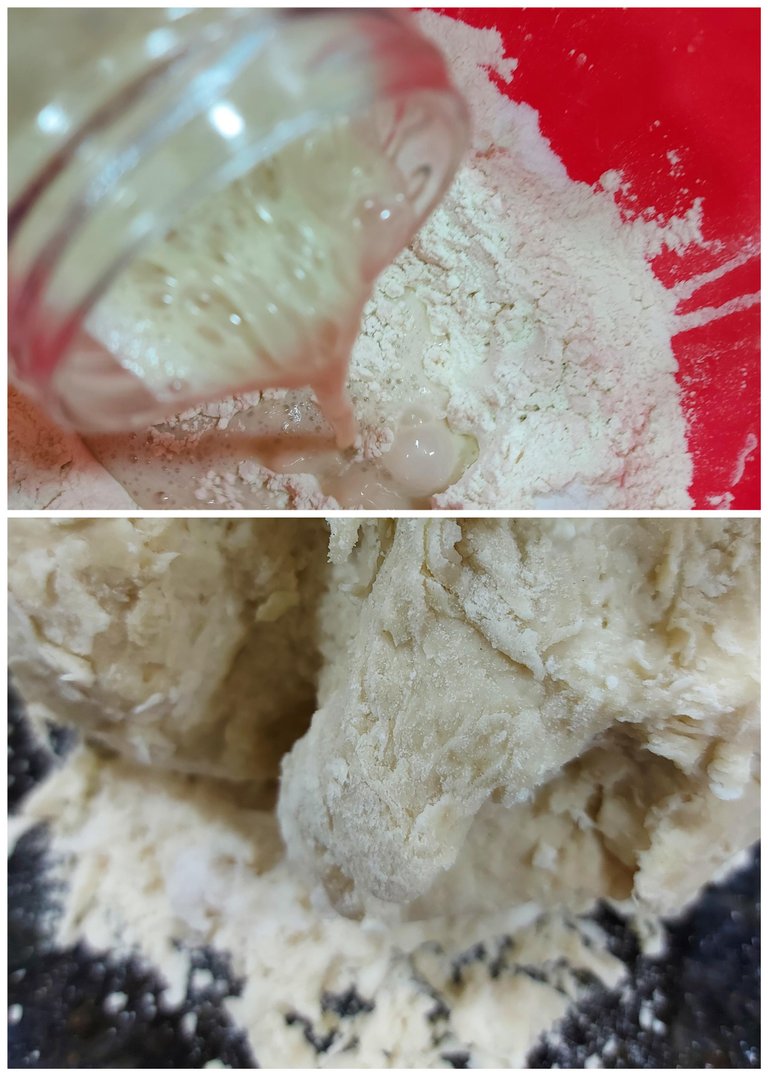
Paso 1. Previamente cernimos toda la harina de trigo
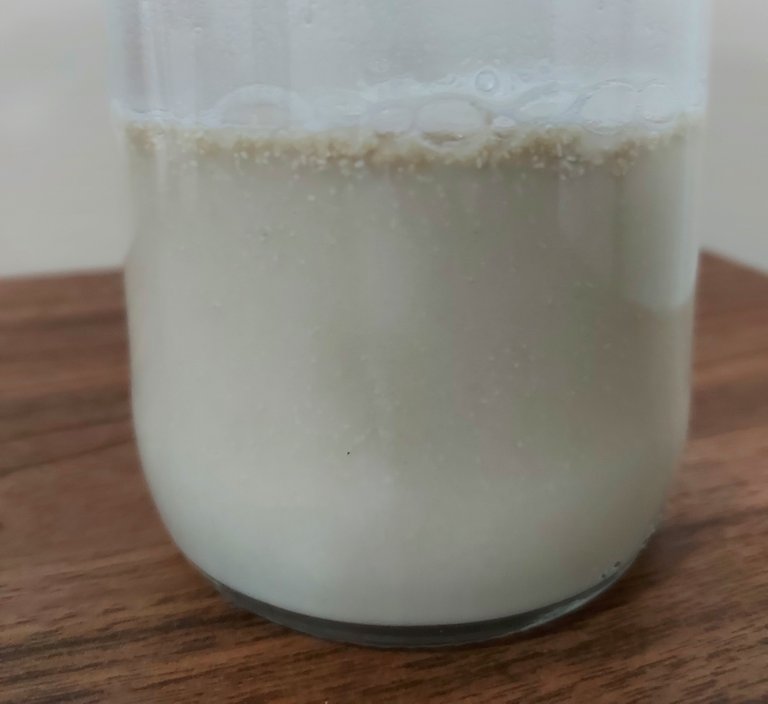
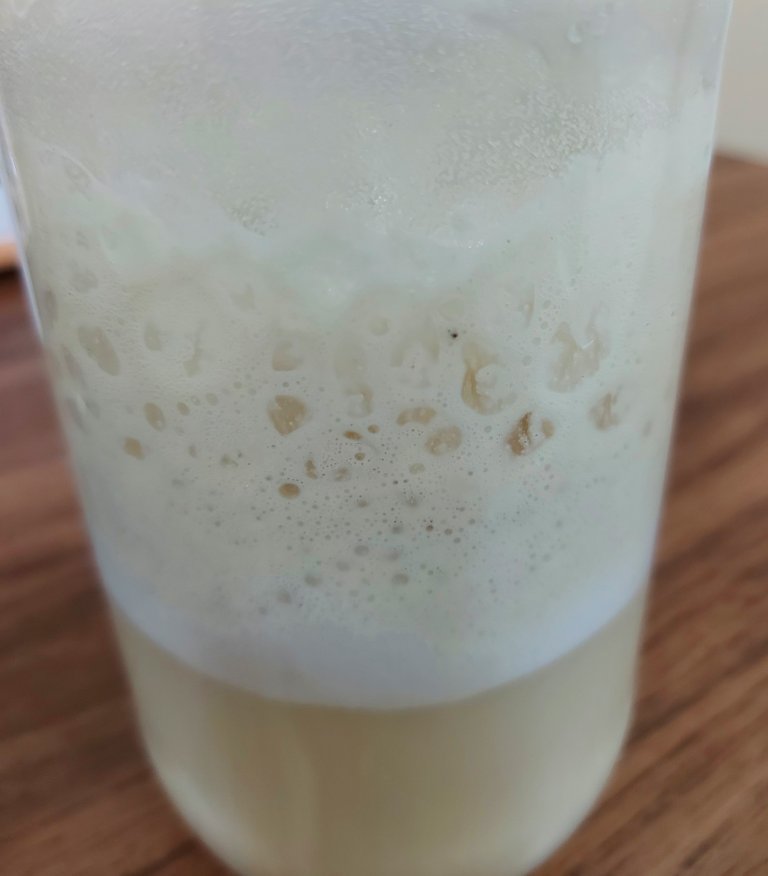
Paso 2. En un recipiente colocamos los 150ml de agua tibia, tomamos 2 cucharadas de harina para preparar la levadura y agregamos las 2 cucharadas de azúcar, dejamos reposar por 10 minutos.
Paso 3. En un recipiente agregamos la harina y hacemos el volcán, agregamos 10 gr de sal o el equivalente a 2 cucharaditas, colocamos aproximadamente 2 cucharadas de aceite de oliva.
Paso 4. Al estar lista la levadura agregamos a la harina, intentamos mezclar todo muy y luego pasamos al mesón a seguir amasando, hasta tener una consistencia suave.
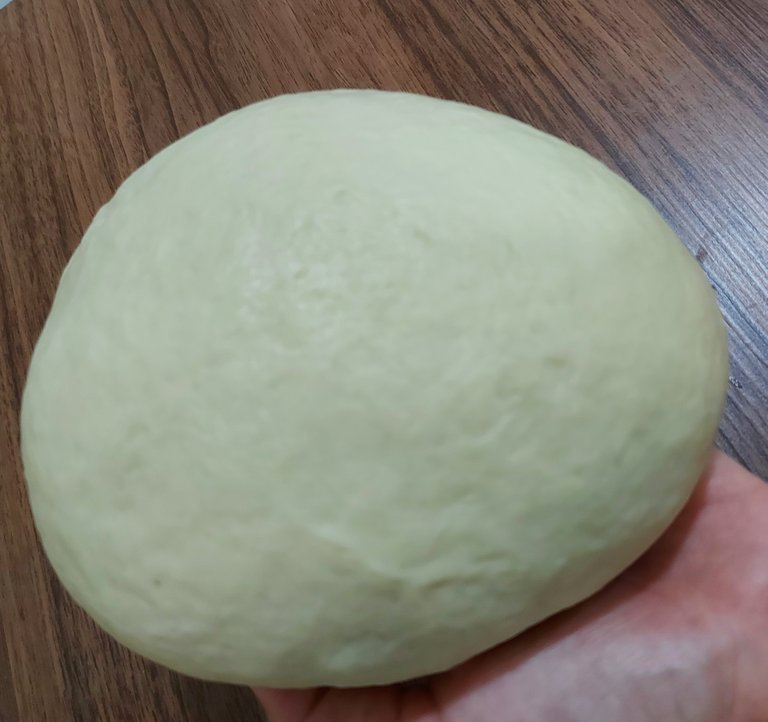
Paso 5. Al terminar de amasar hacemos una bola y colocamos en un recipiente con tapa por aproximadamente 1 hora
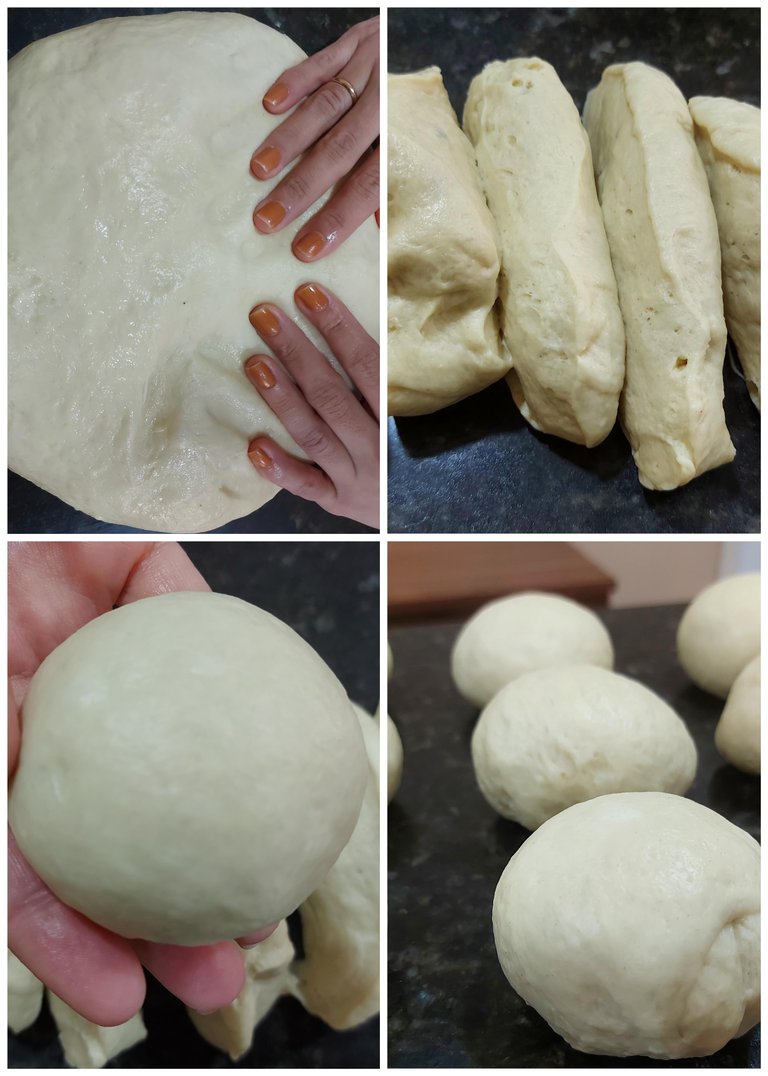
Paso 6. Al fermentar o doblar el tamaño sacamos nuestra masa desinflamos y amasamos por unos 5 minutos, dividimos en porciones y dejamos descansar unos 10 minutos.
DISEÑO DEL PAN
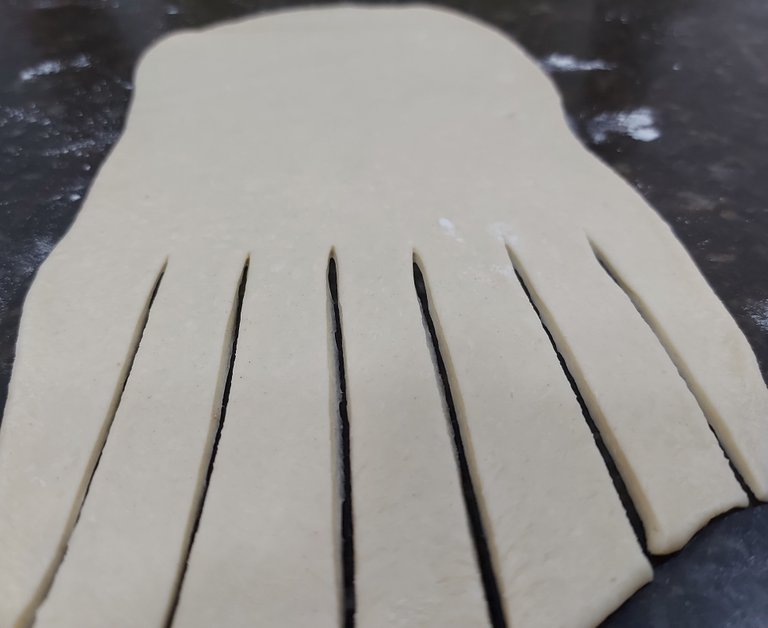
Paso 1. Estiramos la masa con la ayuda de un rodillo, no olvides colocar un poquito de harina al rodillo y al mesón antes de estirar nuestra porción de masa así no se pegará y te quedaran más bonitos estira lo suficiente para que te quede una capa delgada.
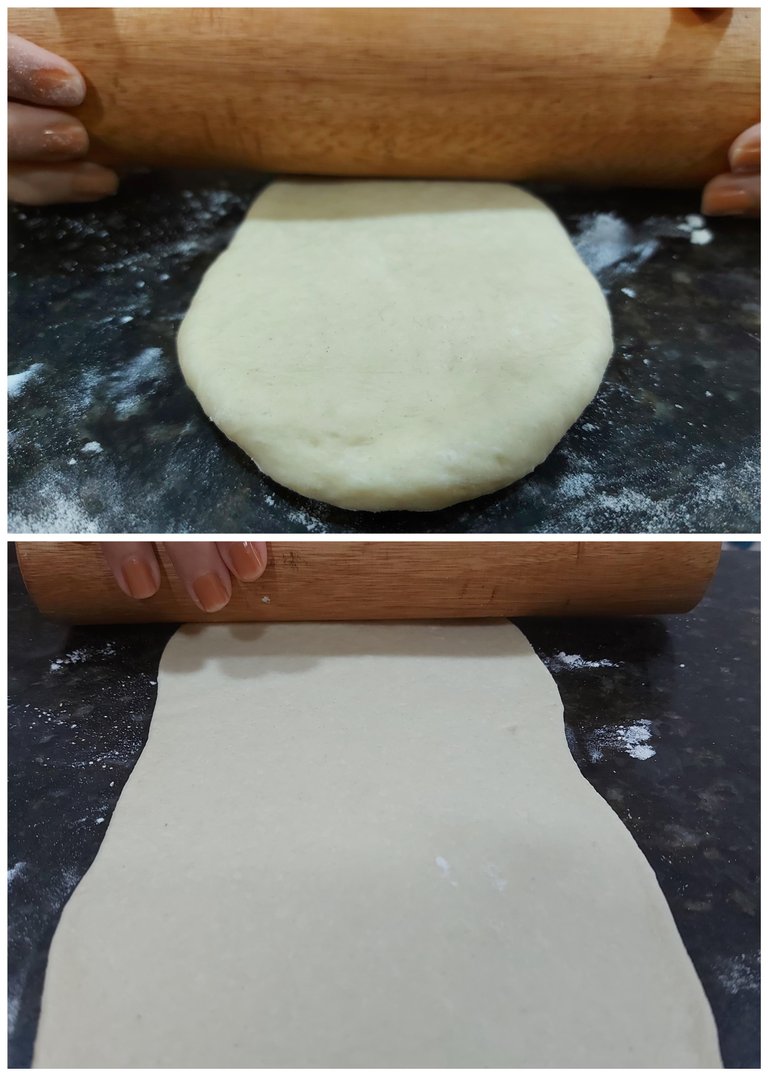
Paso 2. Al tener estirada corta en franjas la mitad o un poco menos la masa, debemos dejar un buen espacio para el relleno
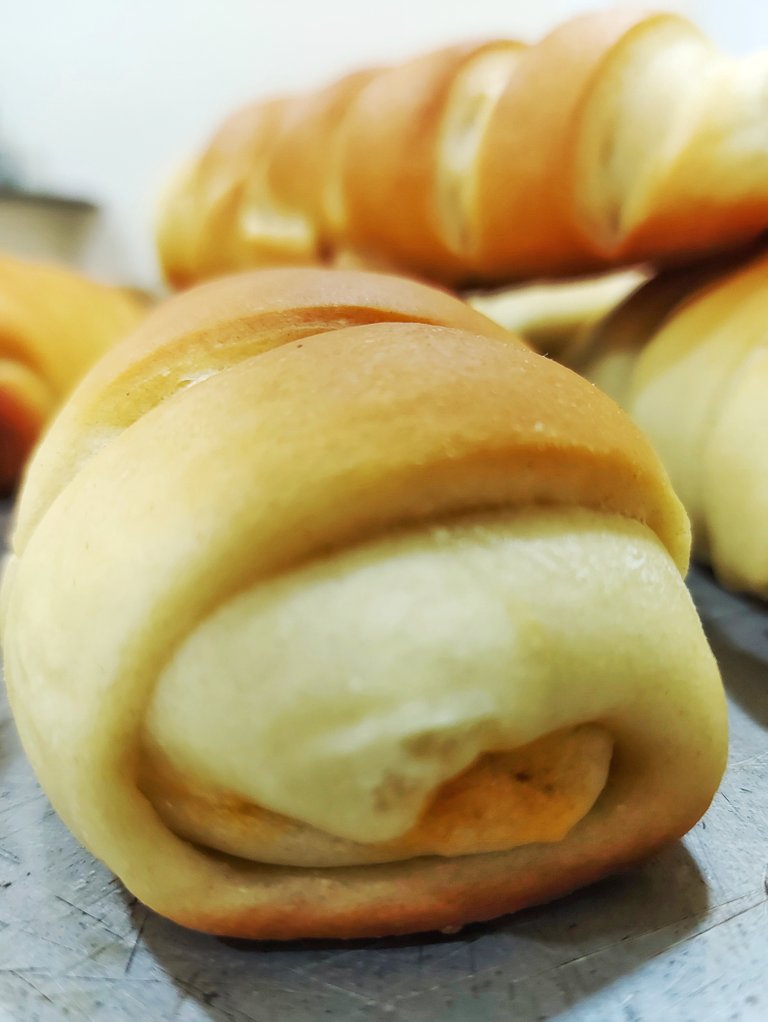
Paso 3. Colocamos el relleno, se generoso, pero no te vuelvas loco al colocar demasiado relleno, porque después se desborda y te queda horri …horrible, jejejej.
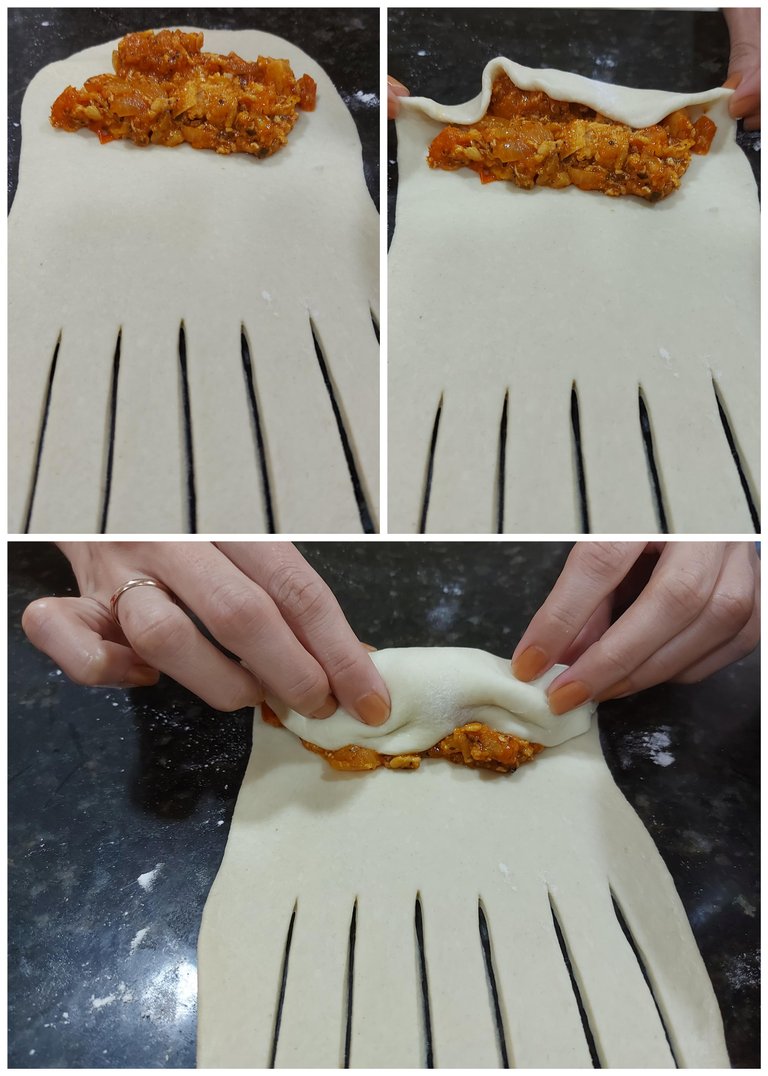
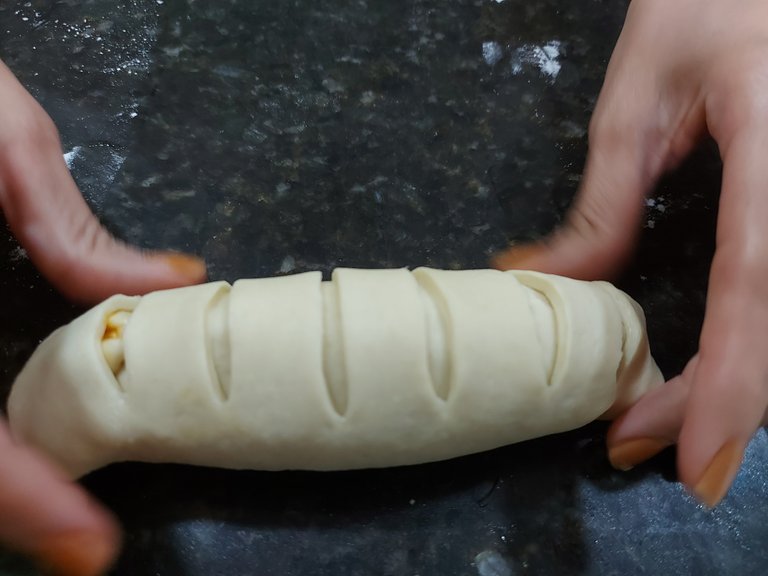
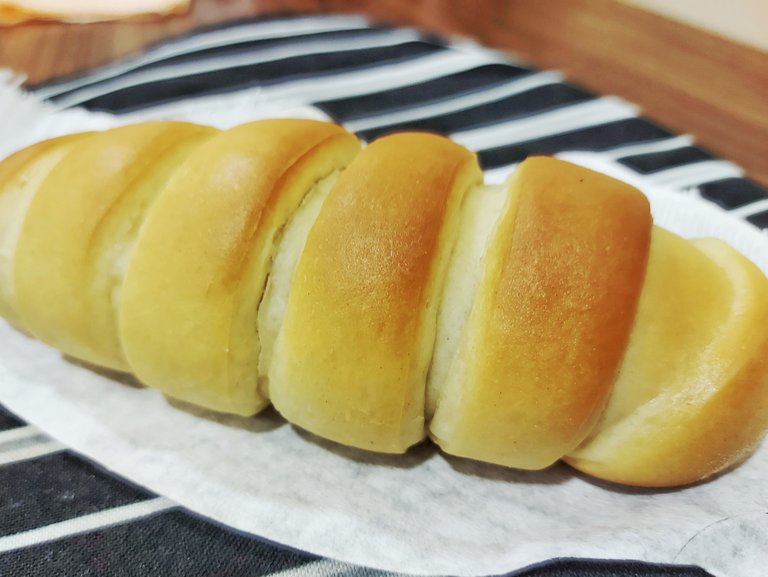
Paso 4. Vas ir enrollando con mucho cuidado y colocando los bordes hacia dentro solo en la parte del relleno, lo demás lo enrollas normal y ves cómo te va quedando…lindo y maravilloso.
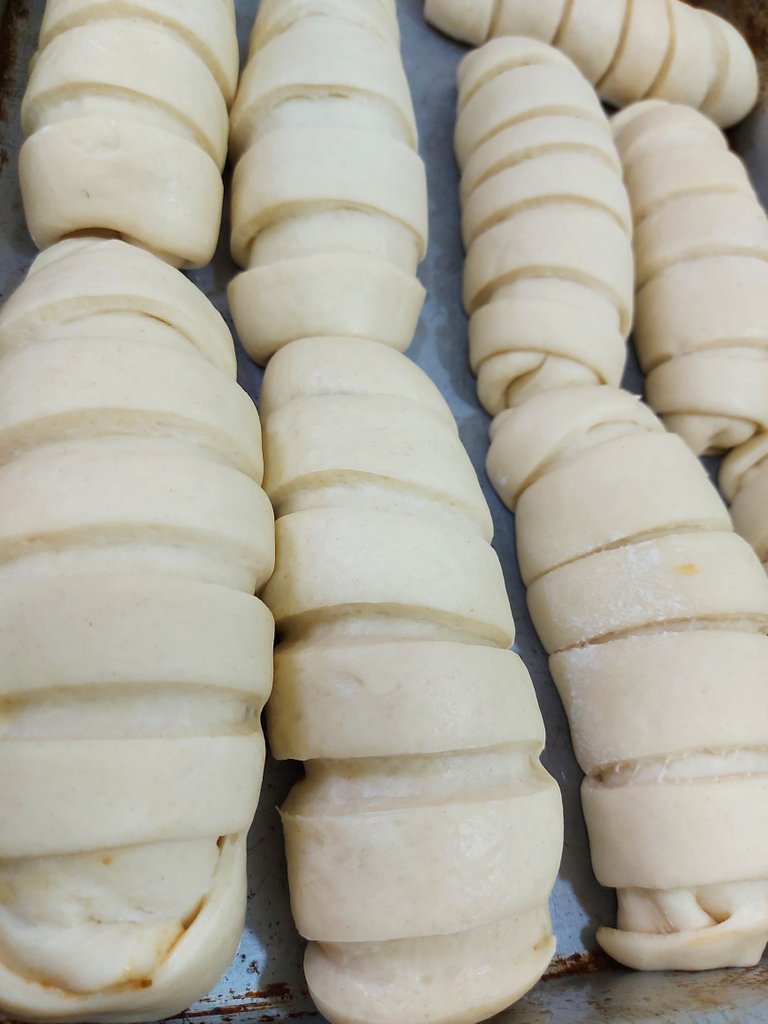
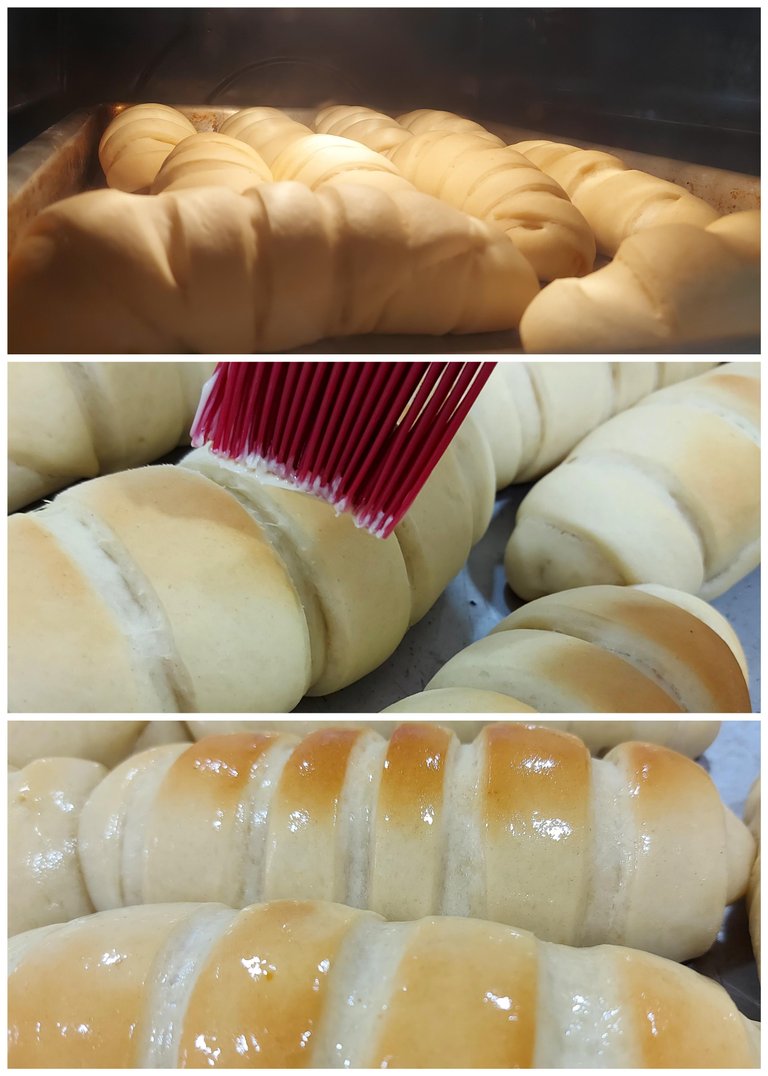
Paso 5. Deja reposar por 40 minutos tu creación, precalienta el horno a 230 grados por 10 minutos y coloca tus panes por 20 minutos o hasta que doren.
Paso 6. Saca del horno y barniza con mantequilla para darle un brillo inolvidable, pero sin ser exagerado… jajaja

¡A DEGUSTAR …!!! 😋😋😋
Amigos les recomiendo esta receta, si sigues el paso a paso te va quedar deli…delicioso, una receta que no tiene misterio los truquitos te los di… 😊
😃Sorprende a tu gente querida y lúcete como un panadero Pro🥳, jajaja yo no lo soy, pero me la estoy creyendo con estos panes, aquí en casa volaron.😋👌
Me despido con cariño 🤗🫂@ladiadema hasta la próxima🤍 ¡Que seas feliz…!! ❤️
CRÉDITOS.
Imágenes propias
Samsung A71
App ligtroom, Canva, Picsart

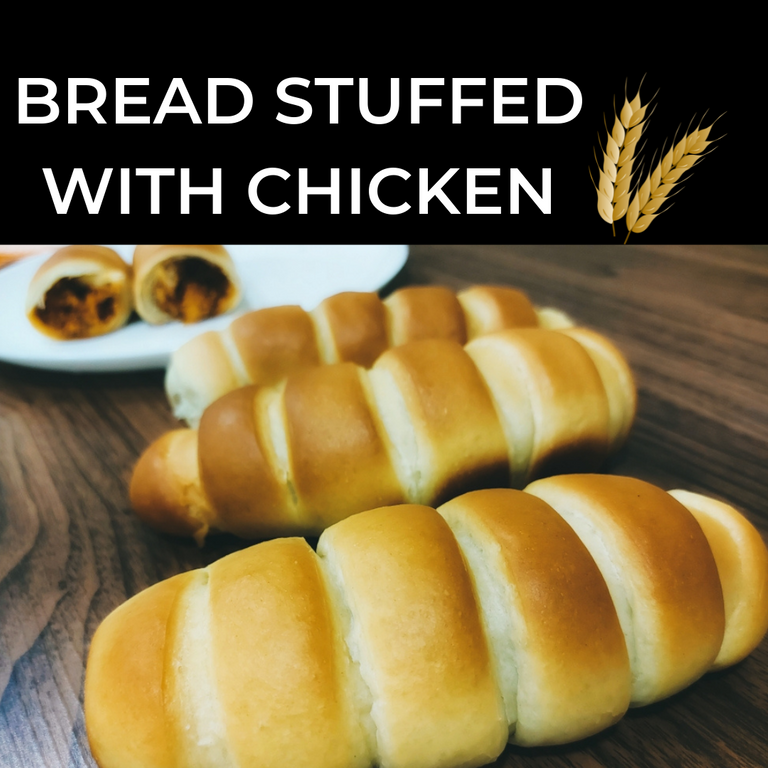
BREAD STUFFED WITH CHICKEN.
It is an ideal recipe for a breakfast, the soft bread and the stewed chicken gives it a juiciness that ends up being the perfect combination, and also the shape of the bread is luxurious.
Hello my friends...!
I hope you and your family are well, this time I will show you how I made the bread stuffed with chicken and I will also show you how I made the design of the bread, really so easy that it will surprise you.
Get out of the routine of repeated breakfasts and try making these breads, you will love them!!!
Now then.... Hands to the pot...!!!!!
INGREDIENTS FOR THE STUFFED BREADS
PREPARATION OF CHICKEN STEW
🌾 400 gr chicken
🌾 Salt
🌾 Garlic (4 cloves)
🌾 1 chopped onion
🌾 2 tomatoes
🌾 1 chili bell pepper
🌾 Oregano
🌾 Worcestershire sauce
🌾 Onoto or paprika
🌾 Olive oil
🌾 Mustard
Steps to prepare the stuffing.🫕
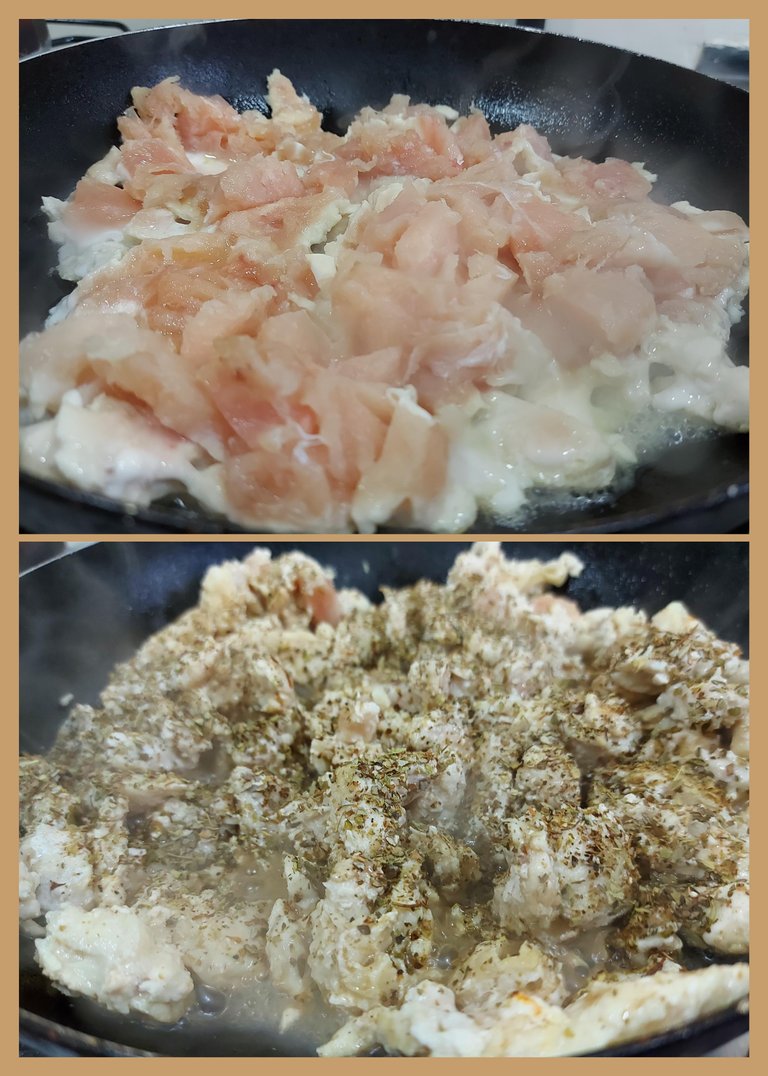
Step 1. The 400 grams of chicken we cut into small portions, use chicken breast normally this part of the chicken is dry but a trick I always use is, when finished cutting the chicken clean, I place in a clean bag and beat until the fiber of the chicken is broken and this is what allows it to be juicy.
Step 2. Season the chicken with salt, place a clove of garlic and take it to the pan previously heated and put a drizzle of olive oil and add the chicken and as it cooks add oregano and Worcestershire sauce.
Step 3. In another bowl a drizzle of olive oil and place the onion, 2 tomatoes chopped into small squares, a seedless chili, chopped garlic, add onoto, mustard and cooking time was short until the ingredients took a smooth consistency.
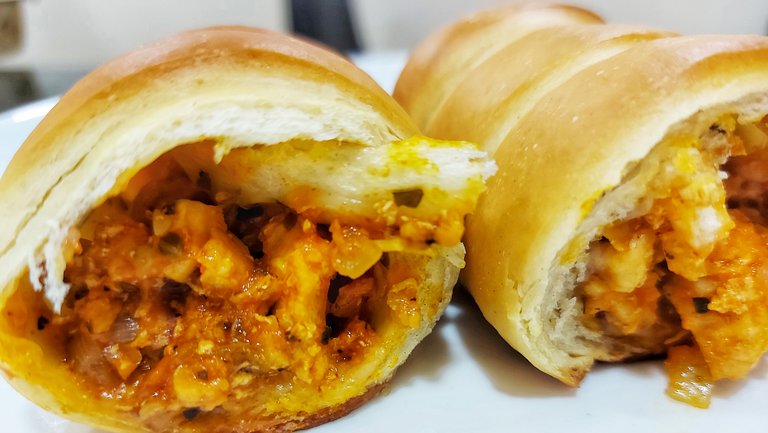
Step 4. Finally add the chicken to the stew and mix well and cook for a few more minutes, add a little water to finish cooking, wait about 15 minutes and it is ready.
PREPARATION OF THE DOUGH🫕
🥖 500 gr of flour
🥖 Salt
🥖 Olive oil
🥖 Dry yeast 10 gr
🥖 Butter for glazing.
🥖 Water 150 ml
🥖 Sugar 2 tablespoons.
Step 1. Previously we sift all the wheat flour.
Step 2. In a bowl place the 150ml of warm water, take 2 tablespoons of flour to prepare the yeast and add the 2 tablespoons of sugar, let stand for 10 minutes.
Step 3. In a bowl add the flour and make the volcano, add 10 grams of salt or the equivalent of 2 teaspoons, put about 2 tablespoons of olive oil.
Step 4. When the yeast is ready we add to the flour, we try to mix everything very well and then we move to the counter to continue kneading, until we have a smooth consistency.
Step 5. At the end of kneading we make a ball and place in a covered container for about 1 hour.
Step 6. When fermenting or doubling the size we take our dough deflate and knead for about 5 minutes, divide into portions and let rest about 10 minutes.
BREAD DESIGN
Step 1. Stretch the dough with the help of a rolling pin, do not forget to put a little flour to the roller and the counter before stretching our portion of dough so it will not stick and you will be more beautiful stretched enough so that you have a thin layer.
Step 2. Having stretched the dough cut into strips half or a little less dough, we must leave a good space for the filling.
Step 3. Place the filling, be generous, but do not go crazy to put too much filling, because then it overflows and you get horrible ... horrible, hehehehehe.
Step 4. You are going to go rolling very carefully and placing the edges inward only in the part of the filling, the rest you roll it normal and see how you are going to be ... nice and wonderful.
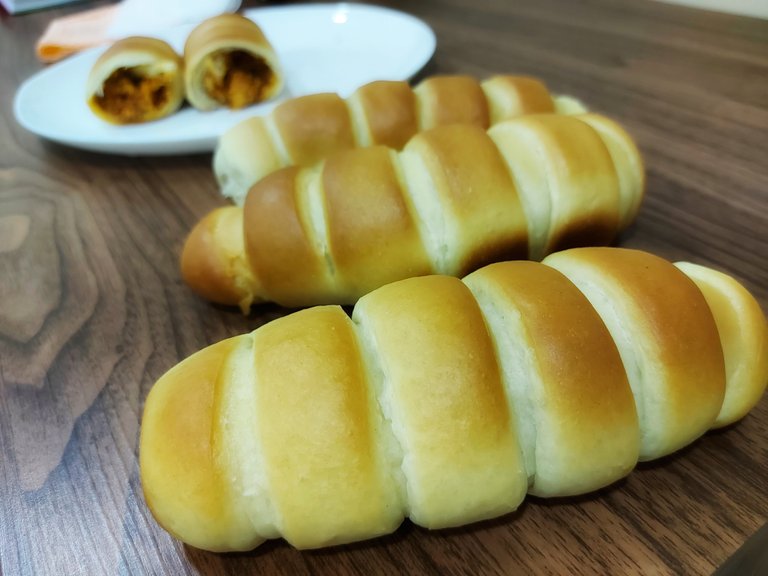
Step 5. Let your creation rest for 40 minutes, preheat the oven to 230 degrees for 10 minutes and place your breads for 20 minutes or until golden brown.
Step 6. Remove from the oven and glaze with butter to give it an unforgettable shine, but without being exaggerated ... hahaha.
TASTE ...!!!!!
Friends I recommend this recipe, if you follow the step by step you will be deli ... delicious, a recipe that has no mystery the tricks I gave you ...
Surprise your loved ones and look like a baker Pro, hahaha I'm not, but I'm believing it with these breads, here at home flew.
I bid you a fond farewell @ladiadema until next time, be happy...!!!! 🥰🙌🤍
CREDITS.
Own images
Samsung A71
App ligtroom, Canva, Picsart ,Snapseed
Translated with www.DeepL.com/Translator (free version)
Oh my! This looks like a fantastic dish and I'm going to have to try and make this! Although yours looks wonderful. Thank you for sharing it with us.
Glad you like it, come crash it🙌, thanks so much for commenting, thanks for the support 🥖🥳.
Que deliciosos esos panes.... Tan solo verlos se me hizo agua la boca 😅. Gracias por compartir esta maravillosa receta. Voy a poner interés en copiarla. Saludos.
Holaaaaa @afonzovalle21 🙌 gracias por tu comentario y tú apoyo... Son fáciles y sabrosos 😆😋...un abrazo a Wendy 🥰
Aunque no te consideras unas panadera profesional, vas por ese camino con paso firme y sin vacilar, tus posts los demuestran. Sigue así 😉
Tu comentario me alegra el ❤️ Muchas gracias por comerte todo 😅😆😂🤣.
Congratulations @ladiadema! You have completed the following achievement on the Hive blockchain and have been rewarded with new badge(s):
Your next target is to reach 40 posts.
You can view your badges on your board and compare yourself to others in the Ranking
If you no longer want to receive notifications, reply to this comment with the word
STOPTo support your work, I also upvoted your post!
Check out the last post from @hivebuzz:
Support the HiveBuzz project. Vote for our proposal!
¡Felicidades! Esta publicación obtuvo upvote y fue compartido por @la-colmena, un proyecto de Curación Manual para la comunidad hispana de Hive que cuenta con el respaldo de @curie.
Si te gusta el trabajo que hacemos, te invitamos a darle tu voto a este comentario y a votar como testigo por Curie.
Si quieres saber más sobre nuestro proyecto, acompáñanos en Discord: La Colmena.
Your content has been voted as a part of Encouragement program. Keep up the good work!
Use Ecency daily to boost your growth on platform!
Support Ecency
Vote for new Proposal
Delegate HP and earn more
Yum! You have been curated @sirenahippie on behalf of FoodiesUnite.net on #Hive. Thanks for using the #foodie tag. We are a tribe for the Foodie community with a unique approach to content and community and we are here on #Hive.
Join the foodie fun! We've given you a FOODIE boost. Come check it out at @foodiesunite for the latest community updates. Spread your gastronomic delights on and claim your tokens.
Join and Post through the Community and you can earn a FOODIE reward.