Muy buen inicio de semana Hivers, hace mucho no publicaba un lunes de
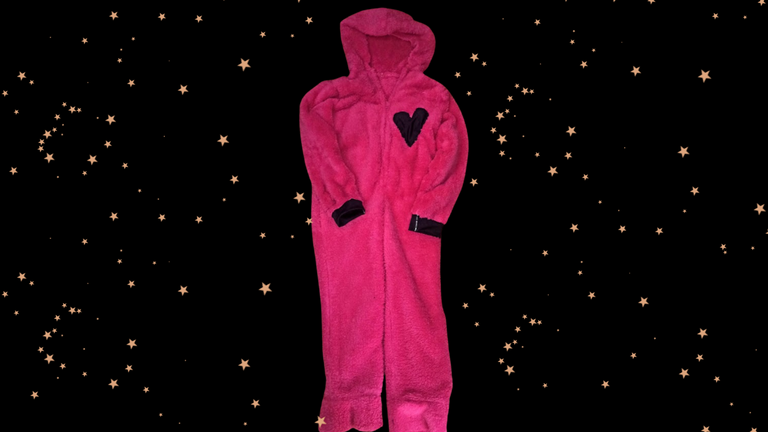
@needleworkmonday como corresponde, aprovechando la dicha, acá les traigo un tutorial más avanzado: patronaje y confección de un mameluco, en este caso es una pijama completa con cierre en el medio y capucha. Entonces vamos por los materiales: papel para el patronaje, cinta métrica, tela necesaria, hilos, agujas, tijeras, lápiz, cierre 60 cms, paciencia y confianza.
Happy start of the week Hivers, it's been a long time since I published a Monday of @needleworkmonday as it should, enjoying the joy, here I bring you a more advanced DIY: pattern making and sewing of a jumpsuit pajama, in this case it is a complete pajama with zipper in the middle and hood. So let's get the materials: pattern paper, measuring tape, fabric, threads, needles, scissors, pencil, 60 cm zipper, patience and confidence.

Te voy a dar 2 opciones de patronaje, la primera, para mi las más sencilla y frecuente es tomar como referencia piezas de ropa que ya sabemos nos quedan bien, en este caso sería un sweater con capucha y un pantalón ancho, los posamos a la mitad sacando las mangas y capucha aparte, dejando los cms correspondientes del tiro del pantalón y largo.
I am going to give you 2 patterning options, the first, for me the simplest and most frequent is to take as reference pieces of clothing that we already know fit us well, in this case it would be a sweater with hood and wide pants, we pose them in half taking out the sleeves and hood apart, leaving the corresponding cms of the pants and length.
La otra opción para tu patronaje de mameluco es con las medidas: ½ de espalda, largo de espalda, alto cadera, largo de pierna, largo de brazo, mitad contorno de cabeza y alto cabeza desde el inicio del cuello hasta la frente. Es lo que necesitas para hacer la parte delantera como trasera, las modificaciones serían el ancho deseado, los 2 cms en el delantero para el cierre, en el trasero serían los 5 cms del largo de tiro, este el corte que va en la entrepierna.
The other option for your jumpsuit pattern is with the measurements: ½ back, back length, hip length, leg length, arm length, half head circumference and head height from the beginning of the neck to the forehead. This is what you need to make the front and back, the modifications would be the desired width, the 2 cms in the front for the zipper, in the back would be the 5 cms of the draft length, this is the cut that goes in the crotch.
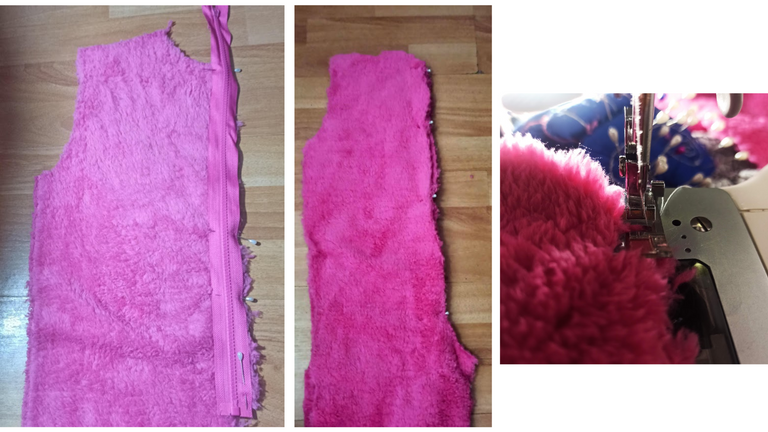
Ahora vamos manos a la tela, como indica la imagen tendríamos 6 piezas en total para armar nuestro mameluco: 1 delantera, 1 trasera, 2 mangas, 2 para armar una capucha. Vamos a empezar por unir con el cierre nuestra parte delantera, enfrentamos el derecho de la tela, con la parte frontal cierre y sujetamos con alfileres, respetando el margen de costura, el cierre irá desde el cuello hasta el alto de cadera, justo antes de la entrepierna.
Now let's get to the fabric, as indicated in the image we would have 6 pieces in total to assemble our jumpsuit: 1 front, 1 back, 2 sleeves, 2 to assemble a hood. Let's start by joining with the zipper on our front part, we face the right side of the fabric, with the front part zipper and fasten with pins, respecting the seam allowance, the zipper will go from the neck to the hip height, just before the crotch.
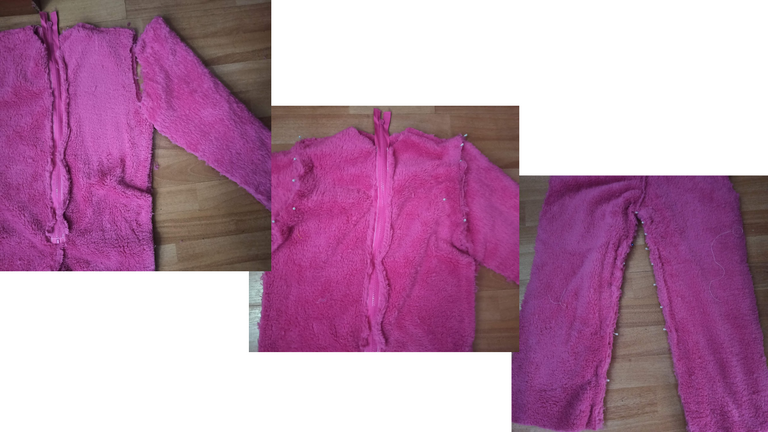
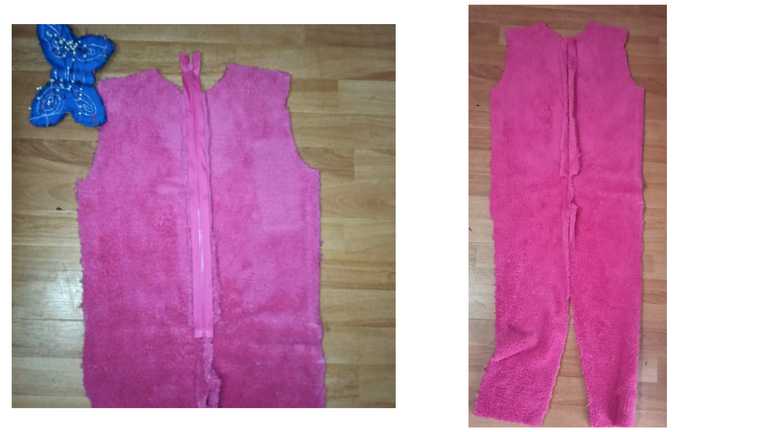
El segundo paso es unir nuestra parte delantera con la trasera pero desde la entrepierna y los hombros, eso nos ayuda con la simetría del mameluco. Luego procedemos a coser las mangas, desde el centro hacia la sisa, después cerramos el mameluco por los laterales, asegurándonos de ajustar el puño de la manga, las costuras de la sisa y ruedos de las piernas, siempre recordemos que la costura se hace enfrentando los derechos, así al voltear nos quedan por dentro las costuras. En este caso use una tela distinta para los puños de la manga y un corazón como decoración.
The second step is to join our front with the back but from the crotch and shoulders, this helps us with the symmetry of the romper. Then we proceed to sew the sleeves, from the center towards the armhole, then we close the jumpsuit on the sides, making sure to adjust the sleeve cuffs, the armhole seams and the leg hems, always remember that the seam is made facing the right sides, so when we turn the sleeves over the seams are inside. In this case I used a different fabric for the sleeve cuffs and a heart as decoration.
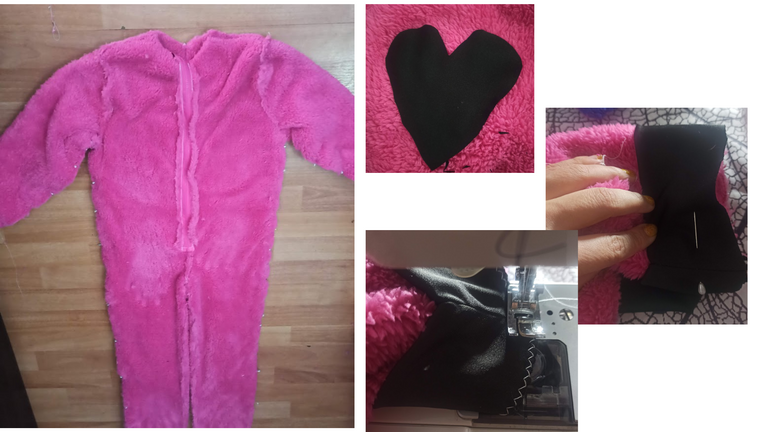
Para la capucha, unimos las dos mitades y desde el centro la posamos en la mitad de la espalda de nuestro mameluco, enfrentando los derechos, cubriendo todo el cuello, al llegar al cierre hacemos como un sandwich quedando él en el medio de ambas telas, pasamos costura y luego reforzamos por el derecho con otra costura simple, puedes variar el color del hilo para este así le da un toque decorativo y vistoso. Para finalizar eliminamos los excesos de hilo y costura. Listo el mameluco, con esta explicación puedes hacerlo en diferentes tallas y tantos diseños como quieras.
For the hood, we join the two halves and from the center we place it in the middle of the back of our jumpsuit, facing the rights, covering the entire neck, when we get to the closure we make a sandwich, leaving it in the middle of both fabrics, we sew and then we reinforce the right side with another simple seam, you can vary the color of the thread for this so it gives a decorative and colorful touch. Finally, we remove the excess thread and seam allowances. With this explanation you can make it in different sizes and as many designs as you want.
Espero que les guste y puedan hacerlo. Si se animan me etiquetan para verlo, para más inspiración paseen por el timeline de
@needleworkmonday, comunidad increíble donde nos apoyamos y motivamos. Las fotos son registro personal hechas con un Redmi note 9, editadas con Canva. Hasta la próxima muestra hivers. Si tienes dudas o sugerencias son bienvenidas en los comentarios, gracias hivers por el apoyo y compañía.
I hope you like it and can do it. If you are up for it, tag me to see it, for more inspiration take a look at the timeline of @needleworkmonday, an amazing community where we support and motivate each other. The photos are personal record made with a Redmi note 9, edited with Canva. Until the next show hivers. If you have questions or suggestions are welcome in the comments, thanks hivers for the support and join me.
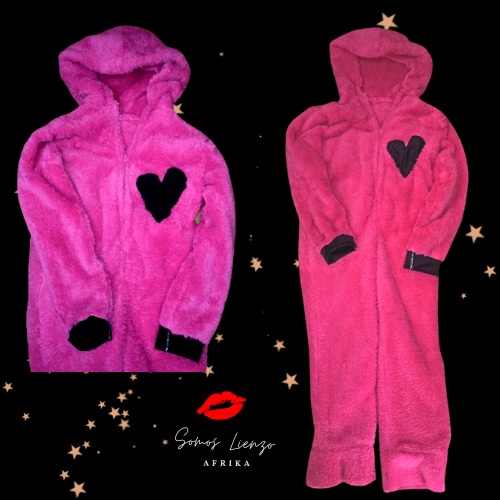
Que hermoso trabajo mi estimada amiga. Muy buen tipo de tela, te felicito 👏
Hola, muchas gracias por tu apreciación. Si la tela es algodón con chiporro o afelpada como para peluches, ideal para pijamas de invierno.
👍🏻😊
Beautiful! Thanks for sharing @afrikablr
Thank you for comming
Que linda prenda, me pareció genial la primera idea de patronaje, voy a intentarlo🤩
Supeeeer, si, me etiwutas para ver el resultado y tu paso a paso. Gracias.
Your content has been voted as a part of Encouragement program. Keep up the good work!
Use Ecency daily to boost your growth on platform!
Support Ecency
Vote for new Proposal
Delegate HP and earn more
!discovery 30
This post was shared and voted inside the discord by the curators team of discovery-it
Join our community! hive-193212
Discovery-it is also a Witness, vote for us here
Delegate to us for passive income. Check our 80% fee-back Program
Me encanta tu proyecto! gracias por compartirlo.
Gracias a ti por apreciarlo.
Muy lindos tu creación 🥰
Muchísimas gracias
qué buen trabajo!!! Me encantaría tener uno de esos, (quiero aprender a coser también) la tela se ve super calentita 😍
Siii, la tela es súper calientita. Solo empieza a coser lo más simple para ti, mi caso fue con alfileteros y flores. Anímate 🥰
Thank you for sharing this amazing post on HIVE!
Your content got selected by our fellow curator @stevenson7 & you just received a little thank you via an upvote from our non-profit curation initiative!
You will be featured in one of our recurring curation compilations and on our pinterest boards! Both are aiming to offer you a stage to widen your audience within and outside of the DIY scene of hive.
Join the official DIYHub community on HIVE and show us more of your amazing work and feel free to connect with us and other DIYers via our discord server: https://discord.gg/mY5uCfQ !
If you want to support our goal to motivate other DIY/art/music/homesteading/... creators just delegate to us and earn 100% of your curation rewards!
Stay creative & hive on!
Siempre agradecida por su apoyo🥰
Te quedo excelente, lo explicaste de una manera muy facil, saludos
En serioooo???? Yo tenía mis dudas 🥰❤️ gracias
The rewards earned on this comment will go directly to the people sharing the post on Twitter as long as they are registered with @poshtoken. Sign up at https://hiveposh.com.